Crochet scrunchies are one of those small projects that feel quick, useful, and genuinely fun to make. They are stylish without being complicated, beginner-friendly without feeling plain, and customizable enough to suit almost any taste. With just a little yarn, elastic, and a crochet hook, you can turn a simple hair tie into something soft, colorful, and beautifully handmade.
What makes crochet scrunchies especially appealing is how practical they are. They are gentle on hair, easy to wear, and perfect for everyday use. At the same time, they can be made to look elegant, playful, oversized, romantic, or trendy depending on the stitch pattern and yarn you choose. A velvet scrunchie feels rich and soft, a flower-shaped scrunchie feels cheerful and feminine, and a giant star-shaped scrunchie makes a bold fashion statement.
In this guide, you will find five cute crochet scrunchie patterns that you can make at home. Each one is written in a clear, step-by-step format with helpful notes on skill level, materials, stitches, finishing, and presentation. Whether you are making them for yourself, for gifts, or for your handmade shop, these patterns will give you plenty of inspiration.
Quick Notes
- Use a soft, stretchy elastic hair tie as the base.
- Choose yarn that matches the look you want: velvet for luxury, cotton for structure, acrylic for color variety.
- Keep your stitches even so the ruffle looks full and balanced.
- Do not over-tighten the crochet around the elastic, or the scrunchie may lose its stretch.
- Make sure the final rounds are distributed evenly around the hair tie.
- Weave in ends securely so the scrunchie stays neat with regular use.
Common Materials
- Elastic hair ties or plain ponytail elastics
- Crochet hook, usually 3 mm to 5 mm depending on yarn
- Yarn of your choice
- Tapestry needle
- Scissors
- Stitch marker, optional
- Decorative extras such as beads, rose motifs, or color changes, optional
1. Crochet Velvet Scrunchie Pattern
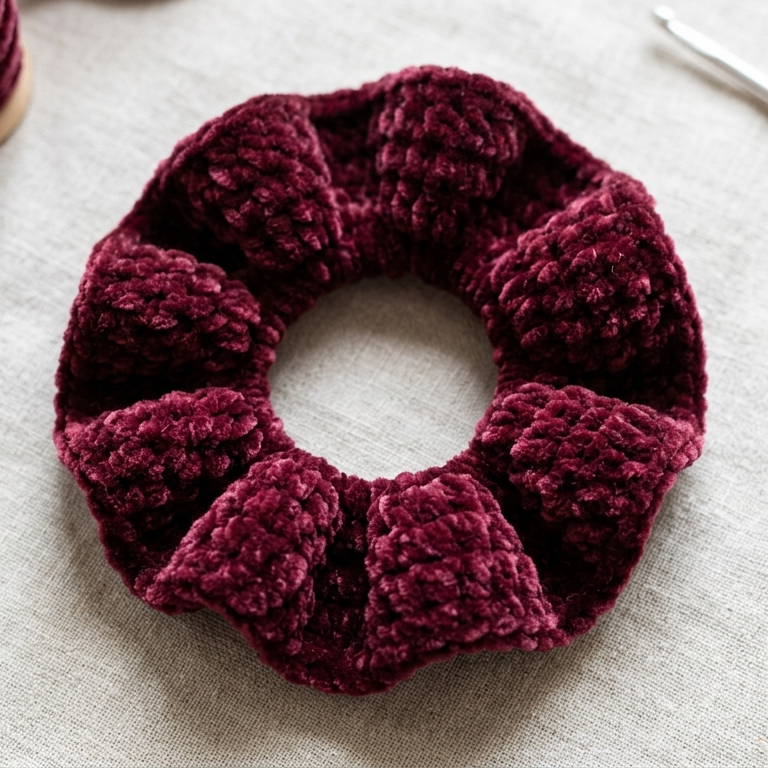
A crochet velvet scrunchie is soft, plush, and elegant. The texture of velvet yarn gives the finished piece a rich, luxurious look that feels much more polished than a standard hair tie. It is a lovely choice if you want a scrunchie that looks stylish but still feels easy to make.
Skill Level
Beginner
Materials
- Velvet yarn
- Crochet hook suitable for velvet yarn, usually 4 mm to 6 mm
- Elastic hair tie
- Tapestry needle
- Scissors
Stitches Used
- Chain (ch)
- Single crochet (sc)
- Slip stitch (sl st)
- Double crochet (dc), optional for extra fullness
Step-by-Step Guide
Step 1: Attach the yarn to the elastic
Start by tying your yarn securely to the elastic hair tie. Leave a small tail so you can weave it in later. Make sure the yarn is fastened well because the base will be pulled and stretched during use.
This first step is important because the whole scrunchie depends on a strong foundation.
Step 2: Cover the elastic with stitches
Work single crochet stitches around the elastic hair tie. Insert your hook through the elastic, yarn over, and pull through to create a tight, even base.
Keep the stitches close together so the elastic is fully covered and no gaps are visible.
Step 3: Continue around the entire band
Repeat the same stitch all the way around the elastic. Depending on the size of the hair tie and the thickness of your yarn, you may need quite a few stitches to fully wrap it.
Do not worry if the stitches feel dense. A full, even cover is exactly what gives velvet scrunchies their plush look.
Step 4: Add fullness with a second round
Once the elastic is covered, work another round of stitches around the outer edge. This is what creates the signature scrunchie ruffle.
You can use single crochet for a tighter texture or double crochet for a fuller, fluffier finish.
Step 5: Shape the ruffle
After completing the outer round, gently spread the stitches so they fan out naturally around the elastic. The velvet yarn will already give the scrunchie a soft, thick appearance, so a little shaping goes a long way.
Step 6: Finish and secure
Join the round neatly with a slip stitch, cut the yarn, and weave in the ends securely. Check that the scrunchie is evenly ruffled and that the elastic still stretches comfortably.
Finishing
- Weave in all loose ends
- Adjust the ruffle evenly around the elastic
- Check that no elastic is showing
- Trim any extra yarn neatly
Pro Tips
- Velvet yarn can split easily, so work slowly and carefully.
- Use a slightly larger hook if the yarn feels too tight.
- Dark velvet colors look elegant, while jewel tones make the scrunchie feel dramatic and luxurious.
- This pattern makes a beautiful handmade gift.
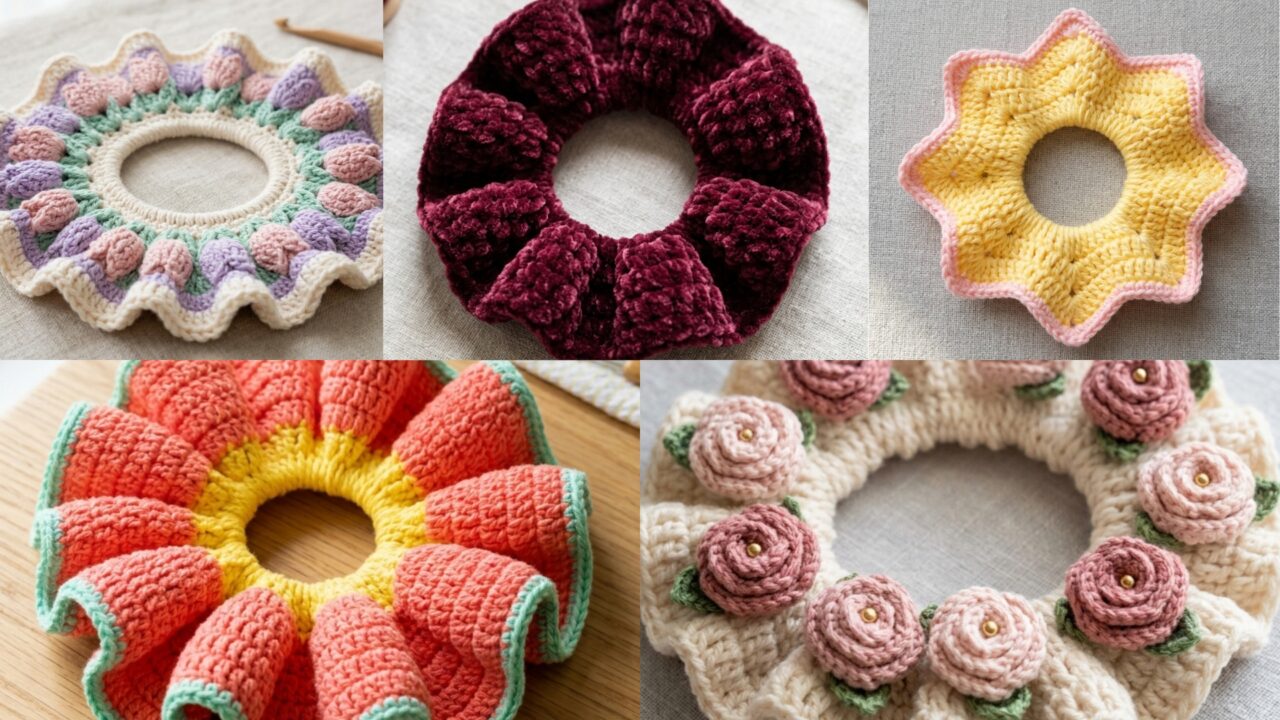
2. Crochet Summer Flower Shaped Giant Scrunchie Pattern
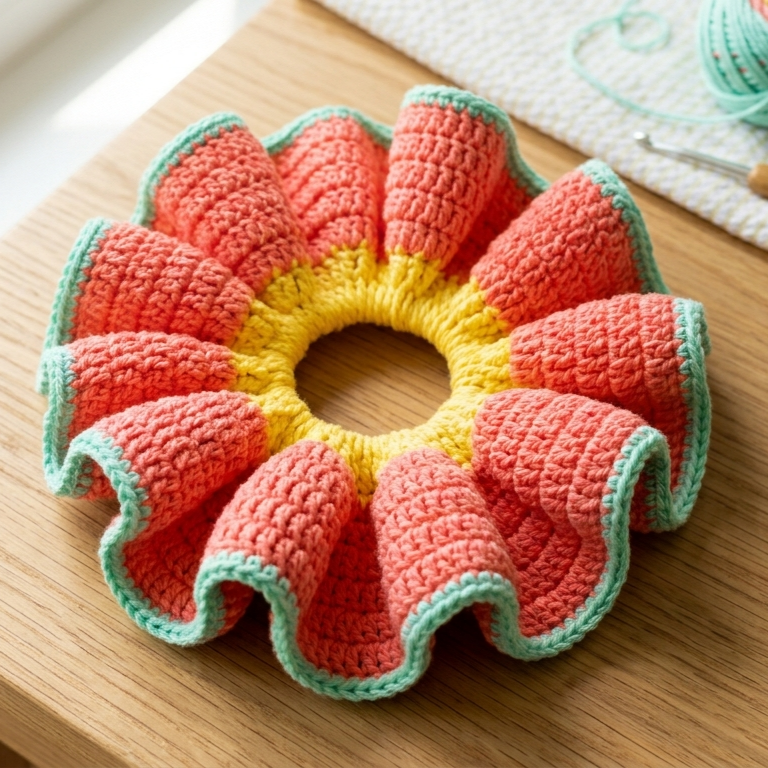
The summer flower shaped giant scrunchie is bright, playful, and full of personality. Its oversized design makes it stand out, while the flower shape gives it a cheerful, feminine look. This is the kind of scrunchie that feels perfect for summer outfits, beach days, or fun handmade accessories.
Skill Level
Beginner to Intermediate
Materials
- Cotton yarn or acrylic yarn in bright or pastel colors
- Crochet hook suitable for yarn size
- Elastic hair tie
- Tapestry needle
- Scissors
- Optional: contrasting yarn for petals or center
Stitches Used
- Chain (ch)
- Single crochet (sc)
- Half double crochet (hdc)
- Double crochet (dc)
- Slip stitch (sl st)
Step-by-Step Guide
Step 1: Wrap the base
Attach your yarn to the hair elastic and begin covering it with single crochet stitches. Continue until the elastic is fully hidden.
This gives the flower scrunchie a strong base and keeps it comfortable to wear.
Step 2: Build the first ruffle layer
Work a second round of stitches around the elastic, using taller stitches such as half double crochet or double crochet. This creates volume and begins the oversized look.
The extra fullness is what helps the scrunchie feel more like a flower.
Step 3: Shape the petals
To create the flower shape, use a repeating petal pattern. A petal can be made with several stitches worked into one space, followed by a smaller stitch or chain gap to separate it from the next petal.
Repeat this evenly around the scrunchie to form rounded petal sections.
Step 4: Use a color change if desired
A second color can be used for the petal edges or center accents. This makes the flower shape more visible and gives the scrunchie a brighter summer feel.
Color contrast works especially well on giant scrunchies because it helps the pattern stand out.
Step 5: Expand the outer edges
If you want a truly oversized flower scrunchie, add an extra round of petal shaping. This can be done by increasing stitches in each petal section so the edges flare out more dramatically.
The result should look full, soft, and decorative.
Step 6: Finish the shape
Once the petals are complete, gently arrange them with your fingers so they lie evenly around the elastic. The scrunchie should look balanced from every angle.
Finishing
- Weave in all yarn ends
- Adjust each petal so the shape looks even
- Make sure the flower sits comfortably on the elastic
- Check that the stitches are secure
Pro Tips
- Use bright colors like coral, yellow, lavender, or mint for a true summer look.
- Cotton yarn helps the petals hold their shape well.
- A giant scrunchie looks best when the petals are full but not stiff.
- This is a great pattern for statement hairstyles.
3. Crochet Tulip Stitch Ruffle Scrunchie Pattern
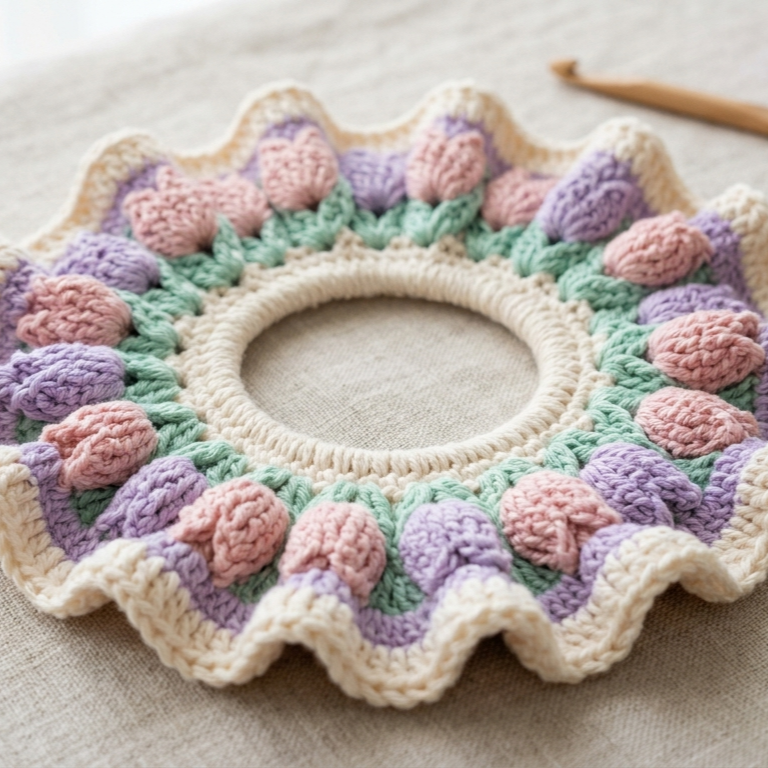
The tulip stitch ruffle scrunchie is soft, delicate, and beautifully textured. The tulip stitch adds a charming floral-like pattern, while the ruffle gives the scrunchie volume and movement. This design feels elegant and feminine, making it a lovely choice for everyday wear or special occasions.
Skill Level
Intermediate
Materials
- Cotton yarn or soft acrylic yarn
- Crochet hook matched to yarn weight
- Elastic hair tie
- Tapestry needle
- Scissors
Stitches Used
- Chain (ch)
- Single crochet (sc)
- Double crochet (dc)
- Puff or tulip-style stitch variation, depending on your version
- Slip stitch (sl st)
Step-by-Step Guide
Step 1: Cover the elastic
Begin by attaching your yarn to the elastic and crocheting a base round of single crochet stitches around it. Keep the stitches close and even so the elastic is completely covered.
This gives you a neat foundation for the tulip texture.
Step 2: Create the tulip stitch repeat
The tulip stitch is usually made by combining a few taller stitches in one space with a connecting stitch that creates a petal-like look. Work the pattern repeat around the elastic in a consistent rhythm.
This is what gives the scrunchie its floral texture.
Step 3: Add the ruffle effect
To make the scrunchie fuller, continue with a second round that increases the volume. You can use double crochet stitches or slightly larger stitch groups to encourage the edge to ruffle outward.
The tulip stitch and the ruffle work together to create a soft, decorative finish.
Step 4: Keep the spacing balanced
Because tulip stitch patterns can look uneven if rushed, take care to keep the repeat consistent. Each petal section should be similar in size so the scrunchie looks balanced.
Even spacing is especially important for floral-style patterns.
Step 5: Shape the petals gently
Once the full round is finished, lightly spread the stitch groups with your fingers so the tulip motifs sit naturally around the elastic. Do not flatten them too much, or the floral texture may be lost.
Step 6: Finish the scrunchie
Join the end neatly and weave in the yarn tails. Give the scrunchie a final shape check and make sure the ruffle sits evenly.
Finishing
- Secure all ends carefully
- Shape the tulip motifs evenly
- Make sure the elastic remains flexible
- Fluff the ruffle before wearing
Pro Tips
- Soft pastel colors highlight the flower-like shape beautifully.
- A solid color makes the stitch pattern easier to see.
- Keep tension moderate so the ruffle stays soft and wearable.
- This scrunchie looks especially pretty in spring-themed color palettes.
4. Crochet Scrunchie Made with Roses Pattern
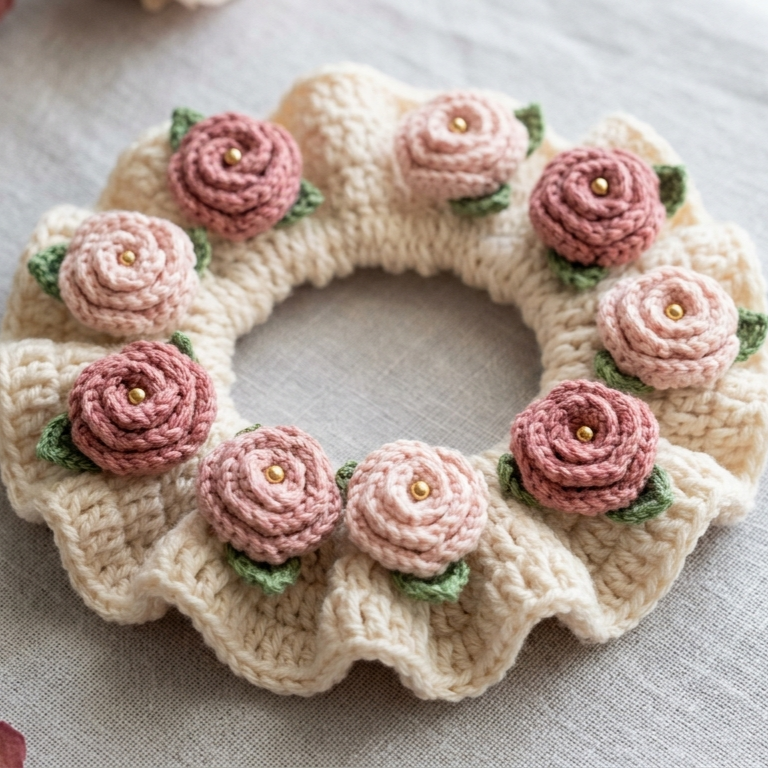
A crochet scrunchie made with roses feels romantic, elegant, and handmade in the best way. The rose details can be added as small motifs around the scrunchie or as a decorative topper on a ruffled base. This pattern is ideal for anyone who wants a scrunchie that looks a little more special and refined.
Skill Level
Intermediate
Materials
- Fine yarn or light worsted yarn
- Crochet hook appropriate for yarn size
- Elastic hair tie
- Tapestry needle
- Scissors
- Optional: small beads for rose centers
Stitches Used
- Chain (ch)
- Single crochet (sc)
- Double crochet (dc)
- Half double crochet (hdc)
- Slip stitch (sl st)
Step-by-Step Guide
Step 1: Make the scrunchie base
Start by covering the elastic with a simple round of single crochet stitches. This gives the scrunchie a stable foundation and allows the rose decoration to sit properly.
The base should be neat but not too tight.
Step 2: Crochet the rose motifs
To make the roses, work a strip or small spiral pattern using a combination of chain stitches and taller stitches. The strip is then rolled into a rose shape.
You can make several small roses or one larger rose, depending on the look you want.
Step 3: Secure the roses
Once each rose is rolled into shape, sew the base firmly so it stays together. Make sure the rose does not unravel when handled.
This step is very important because the flowers need to stay stable on the scrunchie.
Step 4: Attach the roses to the scrunchie
Sew the rose motifs onto the scrunchie base in a balanced arrangement. You can place them all around the elastic for a full floral look or cluster them on one side for a more modern design.
Try to space them evenly so the scrunchie looks intentional and elegant.
Step 5: Add leaves or accents if desired
Small green leaves can make the roses look more realistic. Beads or tiny pearl centers can also add extra detail without overwhelming the design.
A little decoration goes a long way with rose scrunchies.
Step 6: Finish the piece
Check that each rose is stitched securely and that the scrunchie still stretches comfortably. Adjust any petals that seem too flat or uneven.
Finishing
- Weave in ends carefully
- Secure all roses firmly
- Check that the elastic remains usable
- Arrange the flowers for a balanced finish
Pro Tips
- Rose scrunchies look beautiful in red, blush, cream, or dusty pink.
- Keep the roses small if you want the scrunchie to stay practical.
- A cluster of roses creates a romantic boutique-style look.
- This pattern makes a lovely gift for birthdays or special occasions.
5. Crochet Star Shaped Giant Scrunchie Pattern
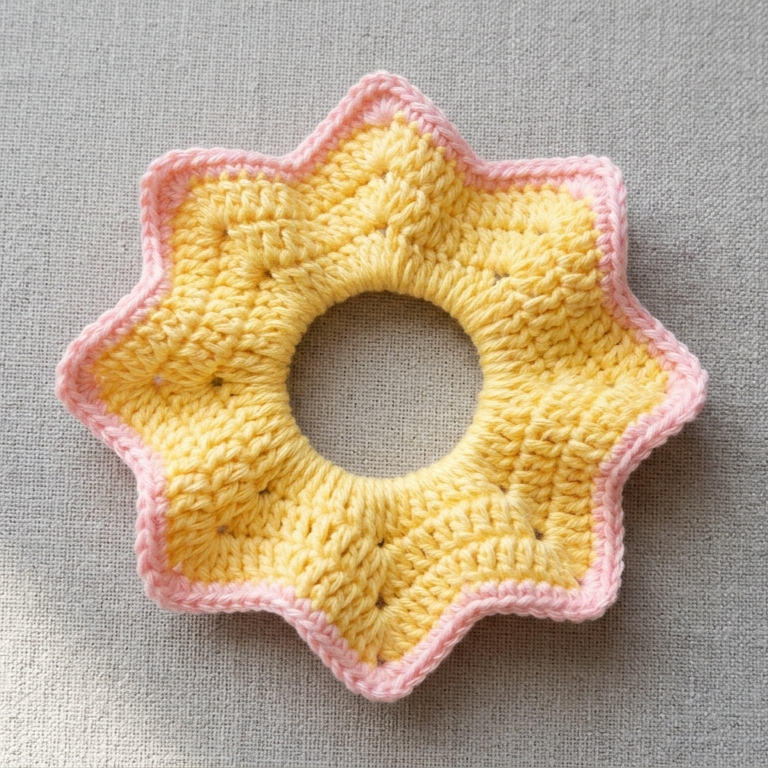
The star shaped giant scrunchie is bold, playful, and eye-catching. It is the kind of accessory that feels trendy and fun, making it perfect for anyone who wants their hair accessory to stand out. The oversized shape gives it a dramatic look, while the star motif adds a creative handmade touch.
Skill Level
Intermediate
Materials
- Cotton yarn, acrylic yarn, or a soft blend
- Crochet hook matched to yarn weight
- Elastic hair tie
- Tapestry needle
- Scissors
- Optional: contrasting yarn for outlining the star
Stitches Used
- Chain (ch)
- Single crochet (sc)
- Double crochet (dc)
- Treble crochet (tr), optional
- Slip stitch (sl st)
Step-by-Step Guide
Step 1: Start with the elastic base
Attach the yarn to the elastic and work single crochet stitches around it until the base is fully covered. This creates the foundation for the oversized star shape.
Make sure the base is secure before adding the outer layers.
Step 2: Build the first ruffle layer
Work a second round with taller stitches to create volume. This begins the giant scrunchie effect and gives the star shape something to sit on.
The fabric should feel full and soft, not flat.
Step 3: Form the star points
To shape the star, divide the outer edge into sections and work pointed increases in each section. Each point should be formed by increasing stitches and then narrowing back down to create a clear peak.
This is the most important part of the design because it defines the star silhouette.
Step 4: Repeat around the scrunchie
Continue forming points evenly around the elastic. Depending on the design, the star may have several points with slightly different heights, or it may be a symmetrical five-point style.
Keep the spacing even so the shape remains balanced.
Step 5: Fluff and shape the giant scrunchie
Once the points are complete, gently fluff the stitches with your fingers. The giant size should look dramatic but still wearable.
Do not flatten the points too much, or the star shape may lose its character.
Step 6: Secure the final join
Join the end neatly and weave in the yarn tails. Check the points from all angles and adjust them so the star looks even and full.
Finishing
- Weave in all loose ends
- Shape the star points carefully
- Make sure the elastic is fully covered
- Check that the scrunchie stretches comfortably
Pro Tips
- Use bold colors for a trendy, statement look.
- Try glitter yarn or a shiny blend for extra effect.
- A giant star scrunchie looks great in playful fashion photos and handmade collections.
- Keep the points firm enough to show shape, but soft enough to wear comfortably.
Conclusion
Crochet scrunchies are such a rewarding project because they combine style, usefulness, and handmade charm in one small accessory. They are quick enough to finish in a short time, yet creative enough to feel special. Whether you prefer soft and elegant textures or bold oversized shapes, there is a scrunchie style for every mood and occasion.
The velvet scrunchie brings a rich, plush finish, the summer flower scrunchie feels bright and cheerful, the tulip stitch ruffle scrunchie adds delicate texture, the rose scrunchie offers romantic detail, and the giant star scrunchie makes a playful statement. Each design has its own personality, which makes them fun to make and lovely to wear.
The key to a beautiful crochet scrunchie is simple: use the right yarn, keep your stitches even, and finish carefully. When the details are neat, even a small accessory can look polished and professional. That is what makes handmade crochet so satisfying: a little yarn and patience can become something practical, beautiful, and uniquely yours.