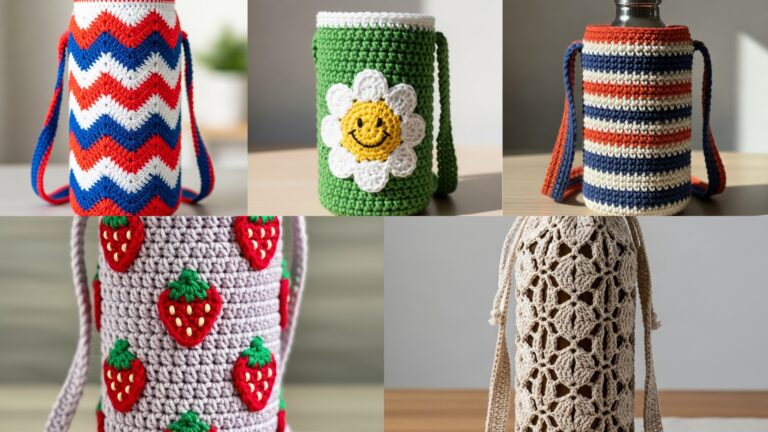
Crochet bottle holders are one of those projects that feel small, useful, and instantly giftable. They are practical enough to carry every day, pretty enough to sell at craft fairs, and quick enough to make without committing to a huge project. A handmade bottle holder can turn a simple water bottle into something stylish, playful, and personal, which is exactly why so many crocheters love making them.
What makes crochet bottle holders especially fun is how much character you can add through stitch choice, shape, and decoration. A pineapple stitch holder can feel fresh and textured. A heart stitch design adds a sweet handmade touch. A Minnie Mouse motif holder brings cheerful personality. A whimsical cat inspired version feels cute and quirky. Ribbon bow details create a soft, pretty finish. Each one has its own mood, but all of them are useful, reusable, and lovely for gifting.
In this post, you will find five cute crochet bottle holder patterns with clear step-by-step guidance, practical notes, and helpful finishing tips. Each section is written to be easy to follow while still detailed enough to help you create a bottle holder that looks neat, functions well, and feels special. Whether you are making them for markets, gifts, or everyday use, these ideas are a great place to begin.
Quick Notes
Project type: Crochet bottle holders
Best for: Gifts, craft fairs, reusable bottle carriers, everyday use, and stash-busting
Skill level: Beginner to intermediate, depending on shaping and stitch detail
Hook size: Usually 3.0 mm to 5.0 mm, depending on yarn weight and firmness needed
Yarn weight: Cotton, cotton blends, DK, or worsted weight yarn
Best yarn choice: Cotton yarn for durability, structure, and easy washing
Finished size: Usually sized for standard water bottles, adjustable by measurements
Time to complete: A few hours to one day depending on detail and size
Helpful stitches: Chain, slip stitch, single crochet, half double crochet, double crochet, increase, decrease, shell stitch, textured stitch repeats, appliqué, color changes, strap making
Common Materials
Most crochet bottle holders use the same basic supplies.
- Cotton yarn in your chosen colors
- Crochet hook suited to the yarn
- Yarn needle
- Scissors
- Measuring tape
- Optional stitch markers
- Optional drawstring cord or button closure
- Optional strap hardware or metal rings
- Optional lining or stiffener if needed
For bottle holders, cotton yarn is often the best choice because it holds shape well and is easy to clean. Since the bag will carry weight, a firmer stitch and a secure strap are important. If you want a slouchier look, you can use a cotton blend, but for everyday use, structure is usually the priority.
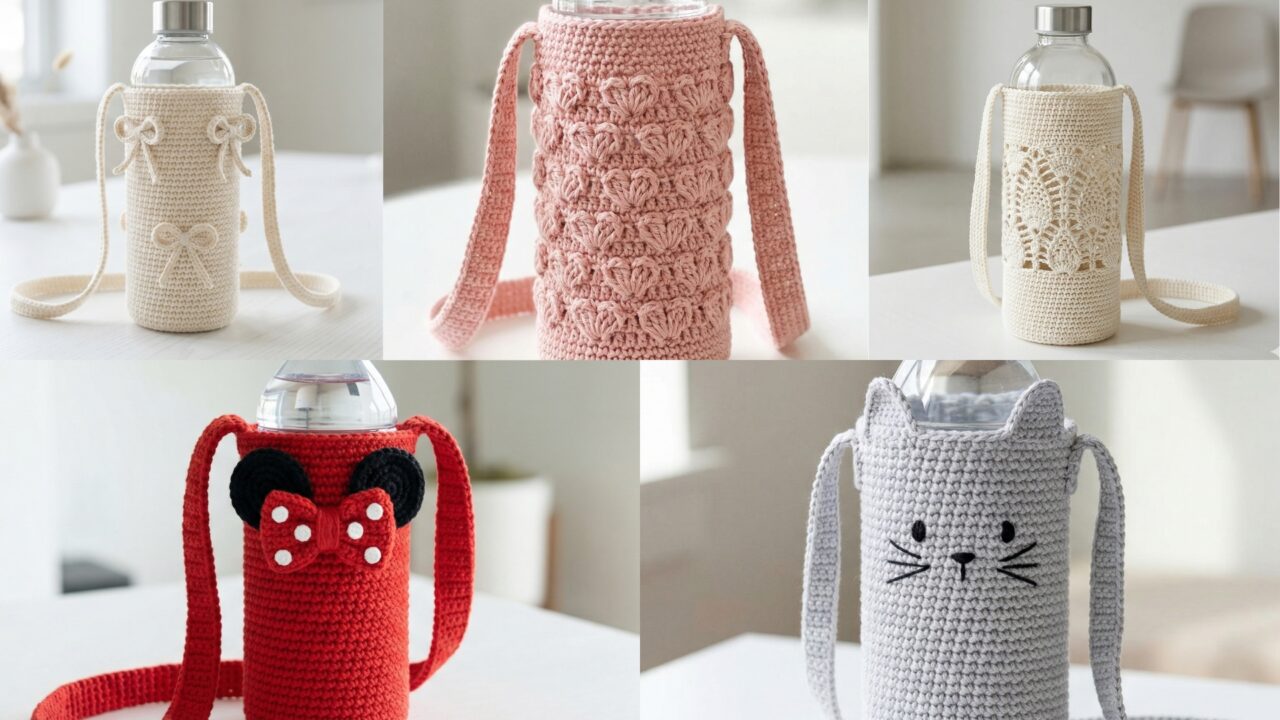
1. Crochet Pineapple Stitch Bottle Holder Pattern
A pineapple stitch bottle holder is bright, textured, and full of handmade charm. The pineapple stitch creates a beautiful openwork design that looks elegant while still being practical. This style is ideal if you want a bottle holder that feels cheerful and decorative enough for gifts or craft fairs.
Quick Notes
Skill level: Beginner to intermediate
Finished size: Fits standard water bottles, adjustable by height
Style: Textured, tropical, decorative, handmade
Best colors: Yellow, cream, green, teal, coral, white
Materials
- Cotton yarn
- Crochet hook suited to yarn
- Yarn needle
- Scissors
- Measuring tape
- Optional strap rings or drawstring cord
Step-by-Step Guide
Step 1: Measure the bottle
Before starting, measure the height and circumference of the bottle you want the holder to fit. Bottle holders work best when they fit snugly around the base and rise high enough to support the bottle without letting it slip. Taking measurements first saves a lot of guessing later.
A good fit is the foundation of a useful bottle holder.
Step 2: Crochet the base
Start with a flat circular base. Work increases evenly until the circle is the same width as the bottom of the bottle. The base should be flat and sturdy so the bottle sits securely inside without tipping.
A firm base helps the holder stand up properly.
Step 3: Build the sides
Once the base is complete, work upward without increasing to create the sides of the holder. This begins to form the pocket that will hold the bottle. Keep the stitches even so the fabric stays smooth and balanced.
This section gives the holder its shape.
Step 4: Add the pineapple stitch pattern
Begin the pineapple stitch repeat around the body of the holder. Pineapple stitch often uses open chains and clustered stitches to create a textured, tropical look. Keep your pattern consistent so the design looks neat and balanced all the way around.
The pineapple texture is the main decorative feature.
Step 5: Continue to the desired height
Work the pineapple stitch rows until the holder is tall enough for the bottle. The top should rise high enough to support the bottle securely, but not so high that it becomes awkward to use. Check the height against your bottle as you go.
Step 6: Finish the top edge
Add a clean border around the top opening. A row of single crochet or a subtle decorative edge can help the holder feel polished. A neat edge also keeps the top from stretching too much over time.
Step 7: Add the strap or closure
Create a strap, drawstring, or shoulder cord depending on the style you want. A longer strap works well for hands-free carry, while a short handle is great for bottle-to-go use. Make sure it is attached securely.
Helpful Tips
This design looks especially good in bright, tropical colors or soft natural tones. If you want it to feel more elegant, keep the palette simple and let the pineapple texture shine. If you want a fun market piece, try cheerful yellow or coral.
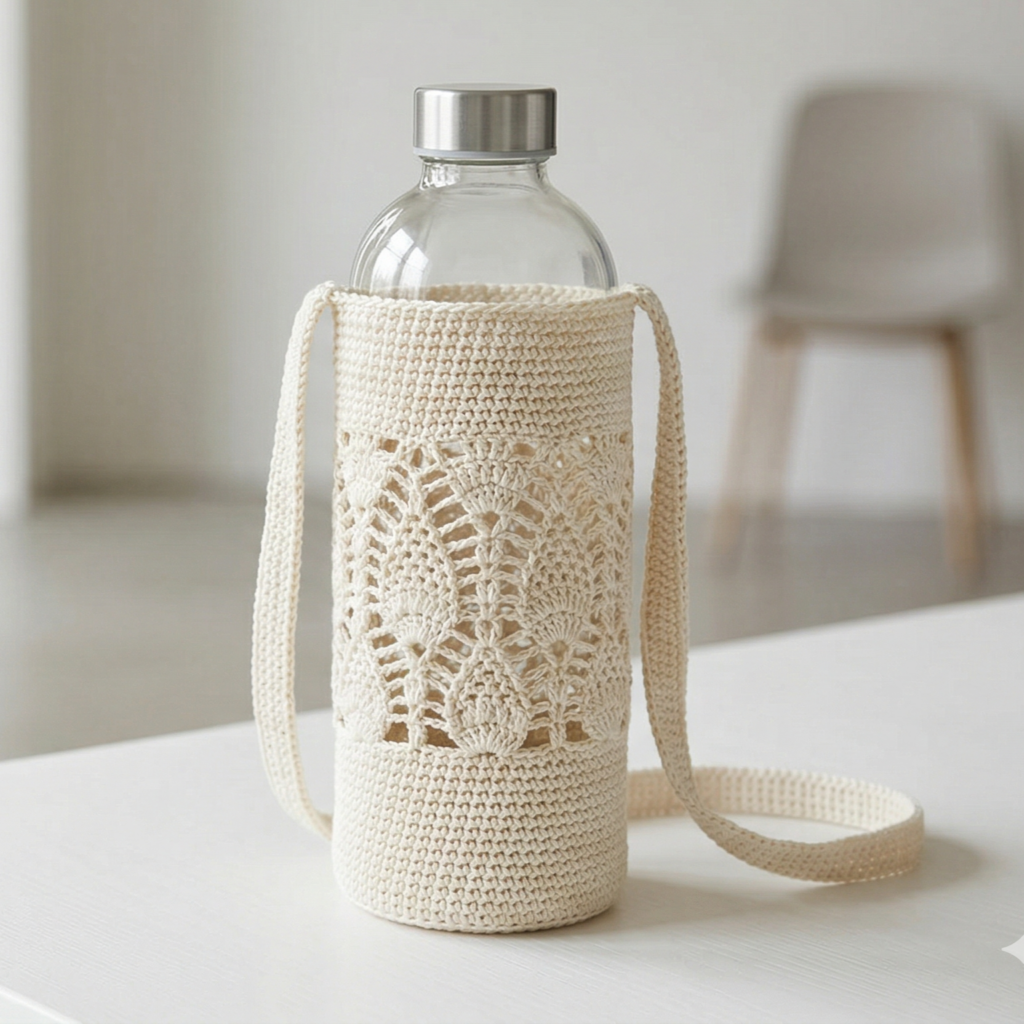
2. Crochet Heart Stitch Bottle Holder Pattern
A heart stitch bottle holder feels sweet, thoughtful, and perfect for gifting. It is a great way to make something useful feel extra special. The heart-like texture adds a soft romantic charm while still keeping the bottle holder practical for everyday use.
Quick Notes
Skill level: Beginner to intermediate
Finished size: Standard bottle size with soft stretch
Style: Cute, romantic, giftable, charming
Best colors: Pink, red, cream, blush, lavender, soft blue
Materials
- Cotton yarn in your chosen colors
- Crochet hook suited to yarn
- Yarn needle
- Scissors
- Measuring tape
- Optional strap or drawstring
Step-by-Step Guide
Step 1: Plan the heart texture placement
Decide whether you want the heart stitch pattern to cover the entire bottle holder or just the center band. A full-heart texture makes the design bold, while a centered accent feels softer and more subtle. Choose the placement that matches the look you want.
The pattern layout affects the whole mood.
Step 2: Crochet the base circle
Start with a flat circular bottom that matches the bottle’s base. Work evenly until the circle is the right size. A stable base is important because it keeps the bottle holder from becoming uneven when filled.
The base should stay flat and sturdy.
Step 3: Build the body
Crochet upward around the base to form the main body. Keep the stitches even and snug enough to support the bottle. This is the section where the heart stitch texture will show off best, so keep the fabric neat.
A balanced body helps the heart motif stand out.
Step 4: Work the heart stitch pattern
Add the heart stitch repeat across the body. This stitch often creates tiny heart-like shapes through thoughtful stitch placement and texture. Keep the repeats consistent so the hearts read clearly and evenly.
The heart texture is what gives the holder its charm.
Step 5: Continue to bottle height
Keep crocheting until the holder reaches the right height for the bottle. Try the bottle inside as you go to make sure the fit is secure. The top should not be too loose or the bottle may slip.
Step 6: Finish the top edge
Add a simple border to clean up the top opening. A small ribbed edge or single crochet round can help the holder feel more finished. It also helps keep the opening from stretching out.
Step 7: Add the strap or handle
Attach a strap that feels comfortable to hold or wear. You can crochet the strap in the same color or make it a contrast shade for a playful effect. Make sure it is strong enough to handle the weight of the bottle.
Helpful Tips
Heart stitch bottle holders make beautiful gifts because they feel thoughtful and handmade. Soft colors are lovely for everyday use, but red and white can create a more classic Valentine-inspired look. This pattern works especially well for craft fair tables because it feels sweet and universally appealing.
3. Crochet Minnie Mouse Motif Bottle Holder Pattern

A Minnie Mouse motif bottle holder is playful, cheerful, and full of personality. It is a great option for kids, themed gifts, or anyone who loves cute character-inspired accessories. The design can be made in a simple and recognizable style while still being practical and easy to use.
Quick Notes
Skill level: Beginner to intermediate
Finished size: Fits standard bottle sizes
Style: Playful, character-inspired, cute, colorful
Best colors: Red, black, white, pink, and polka-dot accents
Materials
- Cotton yarn in Minnie-inspired colors
- Crochet hook suited to your yarn
- Yarn needle
- Scissors
- Measuring tape
- Optional appliqué pieces for ears or bow
Step-by-Step Guide
Step 1: Choose the motif layout
Decide whether you want the Minnie-inspired design on the whole holder or just as a front motif. A front motif with a simple body can be easier and keeps the design wearable. The ears and bow are usually the most recognizable details.
A clear motif layout makes the design stronger.
Step 2: Crochet the bottle holder base
Start with a flat circle base and work upward around the bottle shape. Keep the body simple so the motif remains the focus. A plain black, white, or red body often works best because it lets the decoration stand out clearly.
The base should remain functional and simple.
Step 3: Add the motif details
Crochet or attach the Minnie-inspired ears and bow. You can make the ears as small circles and the bow as a separate appliqué. Keep the pieces compact so they do not get in the way when the bottle is carried.
The motif details are what make the holder feel playful.
Step 4: Place the decorations carefully
Sew the ears and bow onto the front of the bottle holder. Make sure the ears are even and the bow is centered or placed slightly above the middle. This balance helps the character look polished rather than cluttered.
Good placement makes the design instantly recognizable.
Step 5: Continue the body to height
Finish crocheting the body until the holder fits the bottle fully. Check that the bottle slides in smoothly and that the top edge is high enough to keep it secure.
Step 6: Finish the top edge
Add a clean border around the top opening to keep the shape neat. This also helps the character details stay the focus while the holder remains functional.
Step 7: Attach the strap
Add a short handle or a longer strap depending on how you want it worn. A contrast strap can add a nice finishing touch, especially in red or white.
Helpful Tips
This pattern is especially great for kids or themed gift sets. If you want a softer look, use pink accents instead of bright red. If you want the bottle holder to feel more polished, keep the character details small and neat rather than oversized.
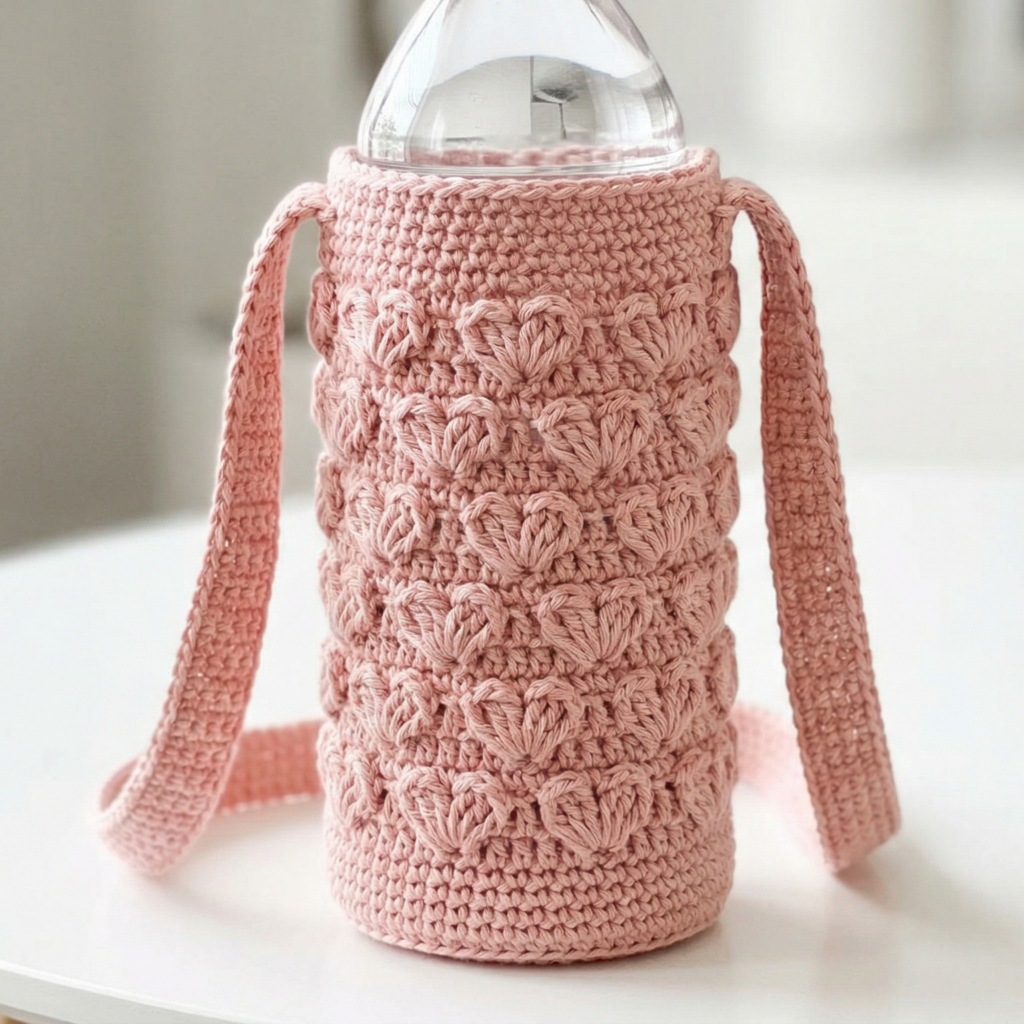
4. Crochet Whimsical Cat Inspired Bottle Holder Pattern
A whimsical cat inspired bottle holder is fun, charming, and perfect for cat lovers. It lets you create a practical accessory with a playful personality. Small ears, a tiny face, or cute whisker details can make the design feel alive without making the holder too busy or bulky.
Quick Notes
Skill level: Beginner to intermediate
Finished size: Standard bottle size
Style: Cute, whimsical, animal-inspired, charming
Best colors: Gray, white, black, cream, tan, pastel pink, soft blue
Materials
- Cotton yarn
- Crochet hook suited to yarn
- Yarn needle
- Scissors
- Measuring tape
- Optional safety eyes, embroidery thread, or appliqués
Step-by-Step Guide
Step 1: Decide on the cat style
Before you start, decide whether you want the cat features to be subtle or more obvious. You can create just tiny ears and whiskers, or you can make a full cat face on the front. A subtle version often works best for everyday use, while a bolder version feels more whimsical.
The style choice determines the personality of the holder.
Step 2: Crochet the base circle
Start with a flat circular base that fits the bottle bottom. Work in the round until the circle is the right size. A flat and even base gives the holder a stable foundation and helps the bottle sit upright.
The base keeps the shape functional.
Step 3: Build the sides
Once the base is complete, crochet upward in the round to form the body. Keep the stitches firm so the holder supports the bottle properly. This is the section where the face or ear details will be attached, so it should stay smooth and even.
A clean body lets the cat details stand out.
Step 4: Add the cat ears
Crochet two small triangular or rounded ears and sew them to the top edge. Make sure they are symmetrical and securely attached. Small ears are enough to give the bottle holder a cat-inspired look without adding too much bulk.
The ears are the most recognizable feature.
Step 5: Add face details
You can embroider tiny eyes, a nose, and whiskers on the front. If you want a very simple style, two small eyes and a nose are enough. If you want a more playful look, add a smile or blush marks as well.
Keep the face minimal so it remains cute rather than crowded.
Step 6: Continue to the desired height
Keep crocheting until the bottle holder fits the bottle fully. Make sure the top edge is comfortable to open and close. The bottle should fit snugly without being difficult to remove.
Step 7: Finish and add a strap
Add a neat border around the top and attach a handle or strap. A simple strap works well for daily use, while a longer cord can make it easier to carry.
Helpful Tips
Cat-inspired bottle holders are especially fun in soft gray or cream with pink ears. If you want a more playful look, black and white can make the face details pop. This design is great for gifts because it feels adorable and practical at the same time.
5. Crochet Ribbon Bows Bottle Holder Pattern
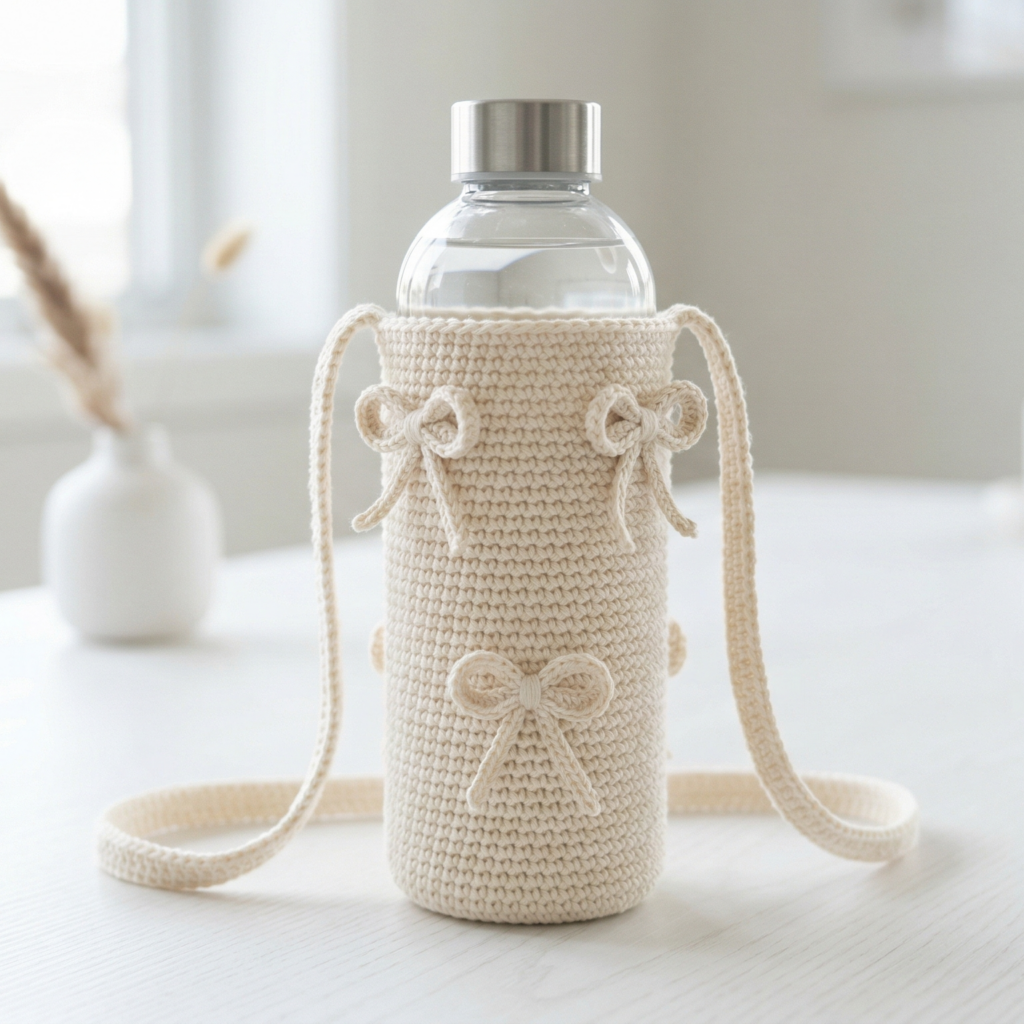
A ribbon bows bottle holder is soft, pretty, and beautifully giftable. The bow detail adds elegance and charm, making it a lovely choice for craft fairs or handmade presents. This design is perfect if you want a bottle holder that feels feminine and polished while still being practical for everyday use.
Quick Notes
Skill level: Beginner to intermediate
Finished size: Standard bottle size with decorative bow accents
Style: Pretty, feminine, decorative, elegant
Best colors: Pink, cream, white, lavender, baby blue, soft peach
Materials
- Cotton yarn in your chosen color
- Crochet hook suited to yarn
- Yarn needle
- Scissors
- Measuring tape
- Ribbon or crochet cord, optional
- Optional button or drawstring closure
Step-by-Step Guide
Step 1: Crochet the base circle
Start with a flat circle for the bottom of the bottle holder. Make sure it fits the bottle base before continuing upward. A good base gives the holder its shape and keeps it from collapsing.
A stable base is always the first step.
Step 2: Build the body
Crochet upward around the base to create the main body of the holder. Keep the stitches even and smooth. Since the ribbon bows will be the decorative feature, the body can stay simple and clean.
A simple body gives the bows room to stand out.
Step 3: Add the ribbon bow motifs
Crochet small bow shapes or use actual ribbon details if you prefer. You can place one larger bow on the front or several smaller bows spaced around the holder. Make sure the bows are sewn securely and lie flat enough to be practical.
The bows are the centerpiece of the design.
Step 4: Balance the decoration
Do not overload the bottle holder with too many bows. A few well-placed bows usually look much more elegant than a crowded arrangement. Keep the design balanced so it feels charming rather than busy.
A little decoration goes a long way.
Step 5: Continue to full height
Finish crocheting the body until the bottle holder fully covers the bottle. Check the fit as you go so the top sits comfortably. The bows should not interfere with the opening or make the holder too stiff.
Step 6: Finish the top opening
Add a neat border around the top to keep the shape tidy. You can also add a drawstring or small closure if you want extra security. A clean finish helps the bows feel more intentional.
Step 7: Attach the strap or handle
Add a matching strap, ribbon handle, or crocheted cord. If you want a more feminine style, a narrow ribbon strap can work beautifully. Make sure it is attached securely enough for daily use.
Helpful Tips
Ribbon bow bottle holders look especially lovely in soft pastel shades. If you want a more classic gift feel, cream and blush work beautifully. If you want the bows to stand out more, choose a strong contrast between the holder and the decoration.
Conclusion
Crochet bottle holders are such a rewarding project because they are useful, giftable, and fun to personalize. They are small enough to make without a huge time commitment, yet practical enough to use every day or sell at a craft fair. That balance of beauty and function is what makes them so appealing.
These five bottle holder patterns each offer a different mood. The pineapple stitch holder feels textured and tropical. The heart stitch holder is sweet and thoughtful. The Minnie Mouse motif holder is playful and cheerful. The cat inspired holder is whimsical and cute. The ribbon bows holder feels soft and elegant. Together, they show just how much variety you can create with a simple bottle carrier.
A handmade bottle holder is more than just a cover for a water bottle. It is a small accessory that can reflect personality, add charm to an everyday item, and make a lovely handmade gift. With the right yarn, careful shaping, and neat finishing, these bottle holders can become favorites at home, at markets, or in gift sets.