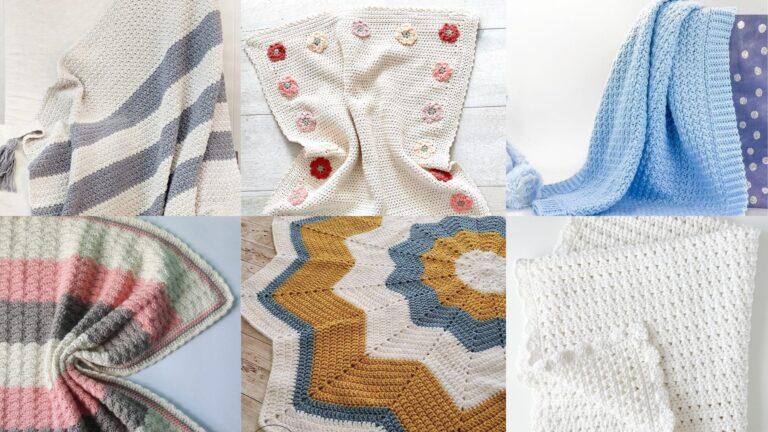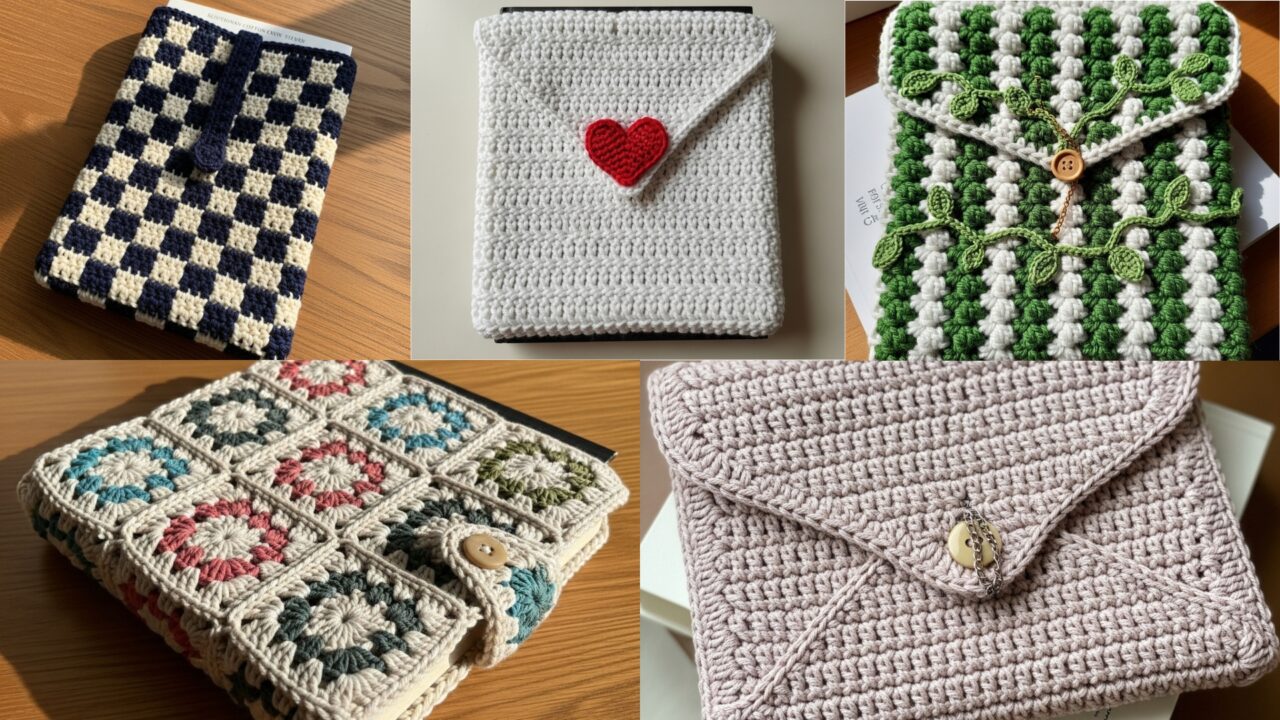
A handmade book sleeve is the perfect little project for book lovers — protective, quick to crochet, and endlessly customizable. Below are five complete book-sleeve patterns you can use in a blog post: Granny Square Book Sleeve, Checkered Book Sleeve, Envelope Book Sleeve, Cobbles & Vines Book Sleeve, and Love Letter Book Sleeve. Each section includes:
- Skill level
- Materials and yardage (with substitutions)
- A clear method for sizing to any book (so your readers can customize) with a worked example
- Gauge guidance and stitch multiple where needed
- Detailed, step-by-step instructions (body, closure/flap, lining option)
- Variations, finishing tips, and care instructions
All patterns use US crochet terms. Read the sizing section first — it will let you adapt each pattern to the exact book you have.
How to size a book sleeve (simple method you can reuse)
- Measure the book (closed):
- W = width of front cover (in inches)
- H = height of the book (in inches)
- T = thickness of the closed book (spine thickness, in inches)
- Calculate the sleeve circumference (the horizontal distance around the book when it’s inside a flat sleeve):
- Circumference ≈ W (front) + W (back) + T (spine) + seam allowance
- Usually that is: Circumference = (2 × W) + T + 0.5″ (0.5″ seam allowance is a good starting point — adjust if you like looser/tighter fit).
- Decide sleeve height:
- Height = H + 0.5″ to 1.0″ (to give a little headroom for the book to slide in and not stick out; 0.5″ if snug, 1.0″ for a looser fit).
- Take a gauge swatch in the stitch you’ll use:
- Example baseline gauge used in these patterns (worsted yarn + 5.0 mm hook): 16 sc = 4″ → that is 4 sc per inch.
- To calculate foundation stitches:
- Stitches needed = Circumference (inches) × stitches per inch
- Round that number to the nearest multiple required by the stitch repeat for the pattern (I list multiples per pattern).
Example (worked through)
- Suppose you have a trade paperback that measures: W = 6″, H = 9″, T = 0.75″.
- Circumference = (2 × 6) + 0.75 + 0.5 (seam allowance) = 12 + 0.75 + 0.5 = 13.25″.
(Digit by digit: 2 × 6 = 12. Add 0.75 → 12.75. Add 0.5 → 13.25.) - With gauge 4 sc/in, stitches = 13.25 × 4 = 53 stitches.
(Digit by digit: 13 × 4 = 52; 0.25 × 4 = 1; 52 + 1 = 53.) - If a pattern needs a multiple of, say, 6 stitches, round to nearest multiple: 53 → nearest multiple of 6 is 54 (6 × 9 = 54). So use 54 foundation stitches.
General tools & finishing notes (applies to all designs)
- Tapestry needle, stitch markers, measuring tape, scissors.
- Optional: light cotton or felt lining (recommended if you’ll carry loose jewelry or want extra structure). Sew lining by hand inside the sleeve and tack it through the top edge to keep it tidy.
- Seams: mattress stitch or whipstitch using matching yarn looks neat.
- Closures: elastic loop + button, magnetic snap, or a flap with button. For giftable sleeves I like a hidden magnetic snap (sewn to the lining) for a clean look.
- Care: For cotton/ acrylic yarns machine wash gentle, reshape and air dry. For wool, hand wash and dry flat.
1. Crochet Granny Square Book Sleeve Pattern
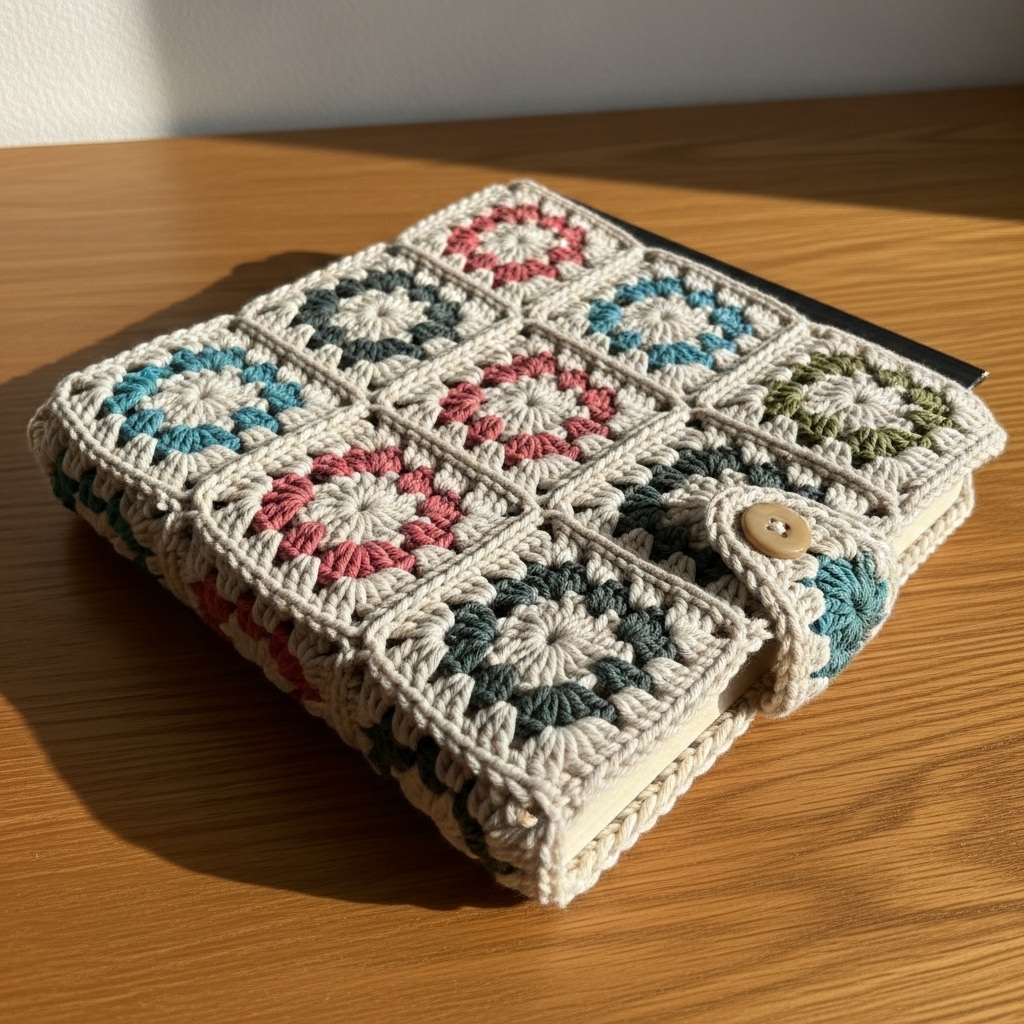
Skill level: Confident beginner — simple motifs and joins.
Materials (sample for one sleeve sized to the worked example above)
- Worsted-weight cotton or acrylic — ~120–150 yds total (depends on color changes).
- Hook: 5.0 mm (H).
- Tapestry needle, small piece of cotton lining (optional), one 18–20 mm button if making flap closure.
Design concept
Make granny-square panels and join into a rectangular sleeve. This is a great stash-buster and lets you mix colors. You can make either a single-panel tube (joined seam) or a two-panel sleeve seamed on one side.
Stitch multiple
One granny square motif is built to finish at ~3.5–4″ per motif (depending on yarn & hook). For our example (need 54 sts around), use a layout of 3 × 3 squares across the width if squares are ~4″ each (3 × 4 = 12″; add edge seam and depth by adding a small strip). But the simplest approach is to make a long rectangle by joining squares until the rectangle measures the required circumference and height.
Step-by-step
- Make motifs
- Classic 4-round granny square (adjust rounds to hit ~4″ finished):
- MR, ch3 (counts as dc), 2 dc, ch2, 3 dc into ring — repeat 3 more times for four corners. Join.
- Round 2: In each corner ch-2 space work (3 dc, ch2, 3 dc); between corners work ch1, 3 dc to create side clusters. Continue rounds until the motif is ~4″ across. Make enough motifs to produce a panel that will be seam-joined into the sleeve rectangle: for a 13.25″ circumference you could make 4 motifs across inside seam (4 × 3.5″ ≈ 14″) or 3 motifs of 4.25″ ≈ 12.75″ and then add a slim panel. Pick the combination matching your motif size.
- Classic 4-round granny square (adjust rounds to hit ~4″ finished):
- Lay out & join
- Arrange motifs into a rectangle approximately the sleeve circumference × desired height (for height 10″ and motifs 4″ tall you’ll need 3 motif rows: 3 × 4 =12″ tall; you can trim by fewer rounds on top motifs). Join motifs using join-as-you-go or whipstitch through back loops for a flat seam.
- Alternative: rectangle by row
- If you prefer a simpler route, make a solid rectangle in sc or hdc sized to stitches/calculation (e.g., foundation chain = 54 + 1 to make a ring, then work rows to reach height). Then add a round of granny clusters as decorative panels on the front.
- Sleeve seams & finishing
- If you created a rectangle, seam the short edges with mattress stitch to form a tube. If you have a rectangular panel assembled from motifs, seam one long side to make an open-ended sleeve (book slides in at top), or seam both long sides and leave one short side open if you like a sleeve with closed ends (not usual).
- Flap or closure (optional)
- For a flap, with work RS facing, fold top edge down 2–3″ and stitch down sides to create a flap that overlaps. Sew a button onto the front center and make a small chain loop on the flap to close. Alternatively, sew a small magnetic snap to the flap and to the corresponding spot on the body (stitch the snap to the lining for a secure hold).
- Lining
- Cut a rectangle of cotton fabric 1/4″ smaller than the interior measured width and height. Hem top edge if desired. Slip the lining inside and hand-stitch around the top edge from the wrong side, catching the crochet top rounds with small whipstitches every 1/4″ so the lining is secure.
Variations & tips
- Use all solids for a minimal aesthetic or multicolor grannies for playful contrast.
- Make a padded liner by using a thin interfacing or by inserting a piece of quilt batting between outer shell and lining for hardcover protection.
2. Crochet Checkered Book Sleeve Pattern
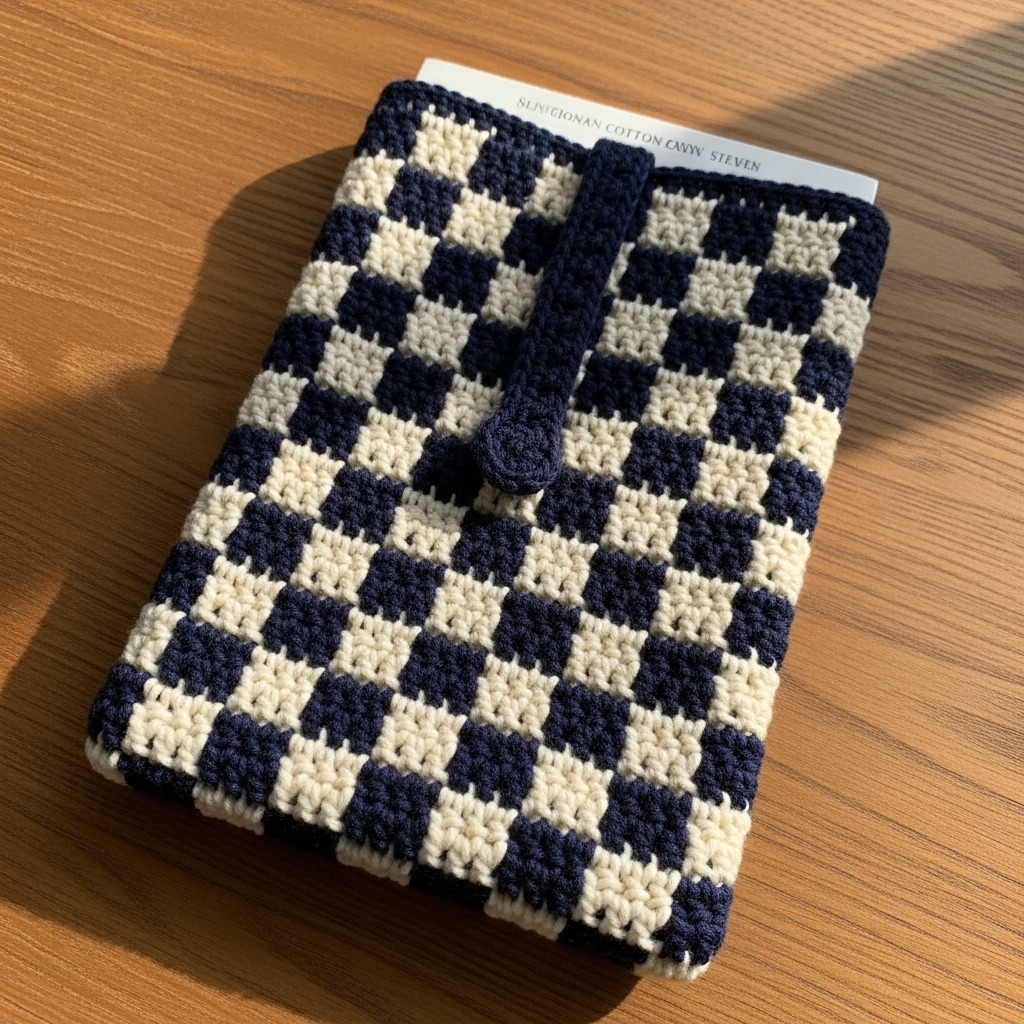
Skill level: Confident beginner — color changes (stripes/checkerboard), simple repeats.
Materials
- Two contrasting worsted-weight yarns (Color A and Color B) — ~150 yds total.
- Hook: 5.0 mm.
- Lining fabric optional.
Stitch multiple
Pattern works in multiples of 4 for the checkerboard block I use.
Sizing approach
Use the sizing method earlier: for 13.25″ circumference and gauge 4 sc/in → 53 stitches → choose nearest multiple of 4: 52 or 56. Use 52 for a slightly snug fit or 56 for looser. I recommend 56 for a comfortable fit with check pattern.
Design concept
Work a tube in single crochet with color changes to create a checkerboard: small square blocks of (2 sc × 2 rows) per block alternate in two colors. The check effect is produced by working 2-row blocks per color and switching color at the right times.
Step-by-step
- Foundation
- ch 56, join with sl st to make ring (do not twist). Mark beginning.
- Checker grid
- Row structure (worked in rounds): Each round is a single crochet round. To make 1 checker block height = 2 rounds. Each checker block width = 2 stitches.
- Round 1 & 2 (Color A block row): 2 sc with Color A, 2 sc with Color B, rep across — but because we want checks we will shift colors every two rounds to alternate.
- Practical method (clean color changes; simplest):
- Work in rounds of sc. For rounds 1 and 2: work (2 sc Color A, 2 sc Color B) across. For rounds 3 and 4: work (2 sc Color B, 2 sc Color A) across (this shifts the blocks so they sit under the other color blocks). Repeat rounds 1–4 sequence until required height (H + allowance). This yields a tidy checkerboard.
- Top finishing
- When you reach desired height (e.g., 10″ total), work 1 round of sc in both loops in a neutral color for tidy rim, then work 1 round sc in BLO if you want a neat folded top where the lining can be sewn.
- Closure option
- Add a flap by folding 2–3″ down and sewing edges, or add a tiny elastic strap and button to hold the book in place.
- Lining
- For checkered sleeves, lining hides carried floats; if you carried Color B across the inside it’s fine but lining gives the cleanest professional finish.
Variations & tips
- Use three colors for a more complex tiled look.
- Try mosaic colorwork instead of 2×2 checks for a pixelated art book sleeve look.
3. Crochet Envelope Book Sleeve Pattern
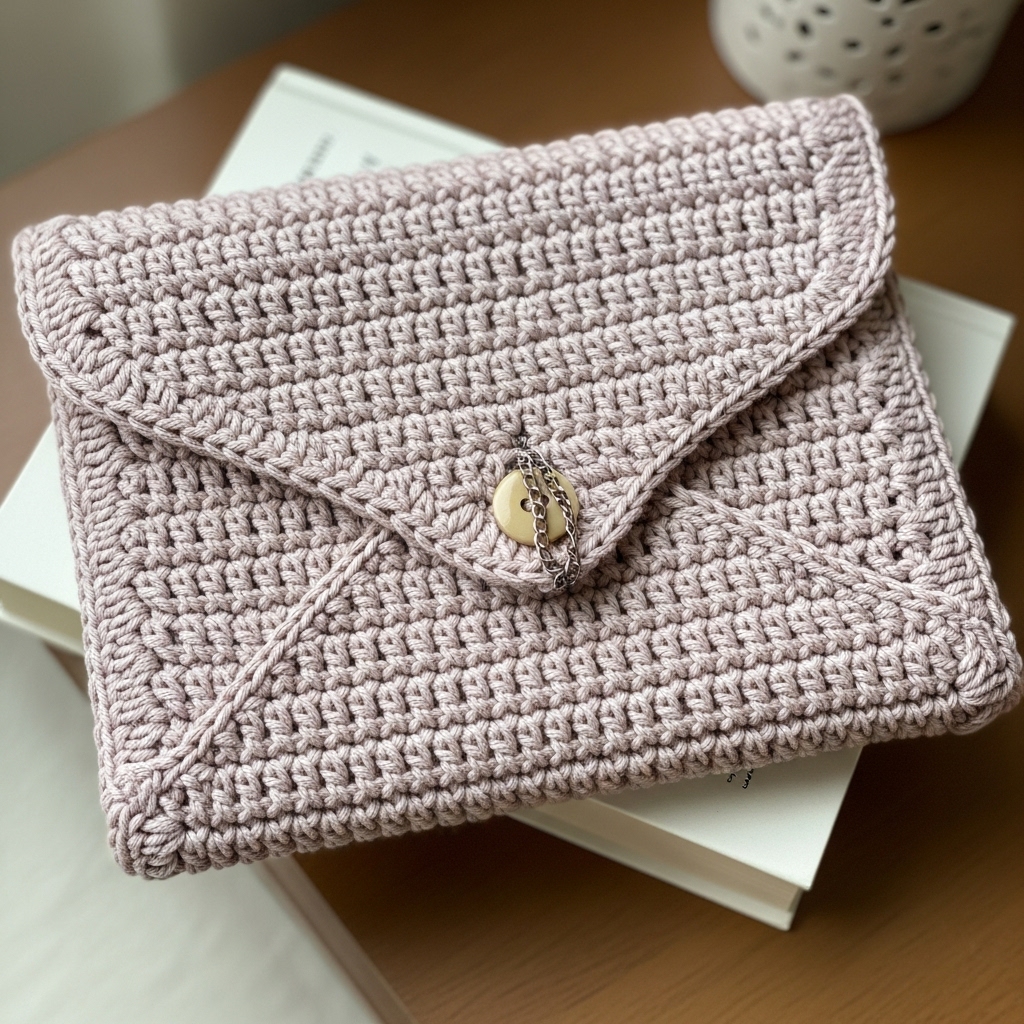
Skill level: Confident beginner — worked flat, seam, and flap finishing.
Materials
- Worsted-weight yarn — ~140–170 yds.
- Hook: 5.0 mm.
- A button or snap (or a velcro strip), tapestry needle, lining fabric.
Design concept
Worked flat as a rectangle (height equals total height including flap), folded like an envelope and seamed at sides with one side left open for book insertion. Flap folds down and fastens with a button or snap.
Sizing & example
- For the same sample book: Circumference = 13.25″. Instead of working a tube, we create a flat rectangle whose width = Circumference / 2 + flap overlap because an envelope is a rectangle folded. A simple way: make a rectangle with width = Circumference + flap length and height = desired height (H + allowance). For example, rectangle width = 13.25 + 3 = 16.25″ → stitches = 16.25 × 4 sc/in = 65 sc. Choose nearest whole number or stitch multiple required by the stitch (usually sc has no repeat constraints).
Step-by-step (worked flat)
- Calculate
- Rectangle width = Circumference (13.25″) + Flap length (3″) = 16.25″. At 4 sc/in → 16.25 × 4 = 65 sc.
- Foundation
- ch 66 (one extra turning ch) and work sc across for first row.
- Body
- Row 1–Rows until you reach book height (H + 0.5″): work sc across rows. Example H 9″, add 0.5″ → 9.5″ × rows/in (if rpi = 4 rows/in) → 9.5 × 4 = 38 rows. Work 38 rows to reach the height.
- Fold & seam
- Fold bottom edge up so the two side edges form the sides of the sleeve and the top portion becomes the flap. If your rectangle width was Circumference + flap, fold so the flap overlaps about 1.5–2″ over the front. Seam each side bottom-to-top stopping at the start of flap so the flap remains free. Use mattress stitch or whipstitch.
- Flap finishing
- The flap can be rounded by shaping the last few rows into a curve (do short rows before finishing) or left straight. Add decorative edging (shells or picots) around flap edges. Sew a button to the front body and make a chain-loop on the flap to fasten, or sew a small Snap through the lining for a clean look.
- Lining
- Cut lining to the same rectangle size, fold and hand sew into place. Attach the snap/button through the lining for reinforcement.
Variations & tips
- Make a padded envelope by placing interfacing or batting between the outer shell and lining (great for fragile paperbacks or a gift sleeve).
- Add an exterior pocket (small rectangle sewn onto front) for a bookmark or library card.
4. Crochet Cobbles & Vines Book Sleeve Pattern
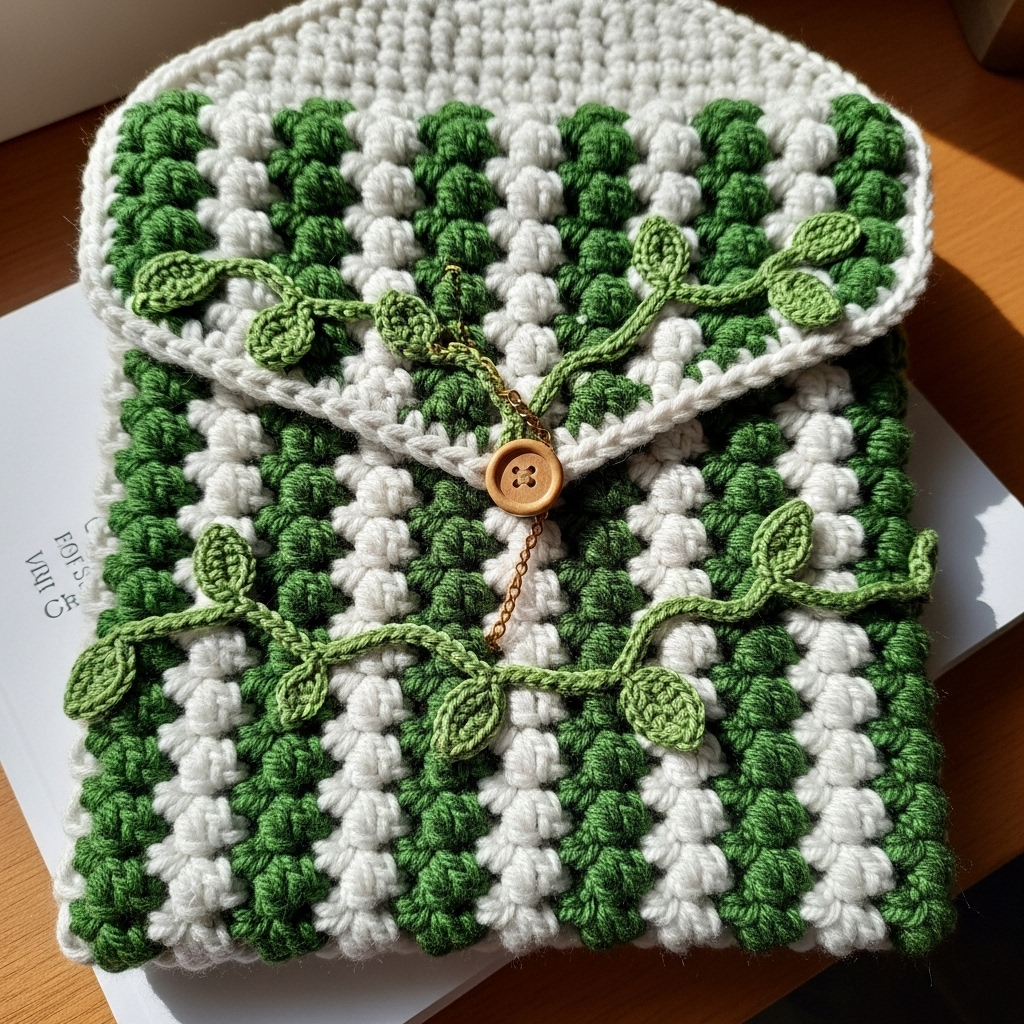
Skill level: Intermediate — textured stitches (bobble, popcorn) and simple vine/chain overlay.
Materials
- Worsted weight yarn — ~160–200 yds.
- Hook: 5.0 mm.
- Notions: tapestry needle, optional small wooden button.
Design concept
Textured cobble stitches (puff/bobble clusters) arranged in vertical columns, with a crocheted vine (chain & leaves) applied across the front as embellishment (or embroidered with yarn).
Stitch multiple
Design uses a repeat multiple of 8 stitches for the cobble column pattern.
Step-by-step
- Foundation
- Use the earlier sizing method. For our example circumference 13.25″ → stitches ≈ 53 → round to nearest multiple of 8: 56 stitches. ch 56, join for a tube, or work rectangle if you prefer envelope style.
- Cobble pattern (worked in rounds)
- Round 1: ch56, sc around (56 sc). Join.
- Round 2: sc in next 2, make a puff stitch in next st (puff = yo, insert, pull loop 4 times, yo pull through all loops), sc in next 3 rep across. Join and work a plain sc round after each puff round to lock texture.
- Continue alternating until height nearly reaches book height (H + allowance). For a 9″ book allow 9.5″ final height.
- Vine applique
- Make a long crocheted chain (chain length approx front panel width × 1.2 to allow curves) in a contrasting color, or use chain stitch embroidery with yarn through the front to create a vine meandering across the cobble texture. Add small leaf motifs (two-ch loops with sc base) every 6–8 stitches. Sew/embroider the vine onto the sleeve’s front with small stitches, catching only the front loops so the inside is smooth.
- Edge & closure
- Work a round of sc around top and a decorative scallop. Add flap with a small button and chain loop, or use an elastic loop & button.
- Lining
- A lining is useful here because the puff stitches can be bumpy on delicate paper; sew a cotton lining inside.
Variations & tips
- Use tonal shades for the cobble and bright green vine for contrast.
- Instead of sewn-on vine, embroider with surface slip-stitch for a low-profile decoration.
5. Crochet Love Letter Book Sleeve Pattern
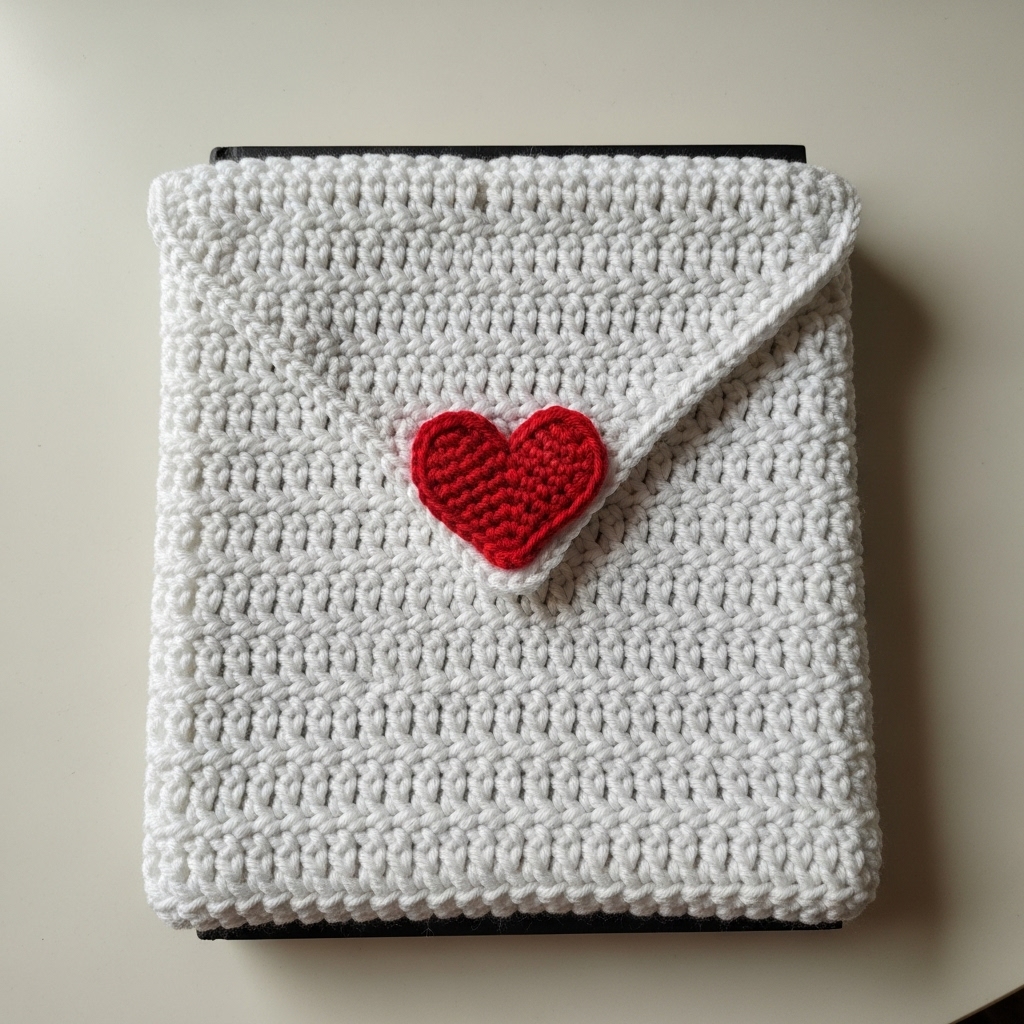
Skill level: Intermediate — colorwork, surface crochet, or simple intarsia-style panel.
Materials
- Worsted-weight yarn in 2–3 colors — ~180–220 yds depending on motif complexity.
- Hook: 5.0 mm.
- Tapestry needle, small snap or button.
Design concept
A front panel with a stitched heart or postal motif (an envelope outline or tiny stitched heart) using tapestry crochet, surface slip stitch, or sewn-on applique. The body is a neat sc tube or rectangle, with a flap styled like an envelope.
Sizing & example
Use the same sizing approach: circumference 13.25″ → choose 52 or 56 stitches. For colorwork, I recommend using slightly larger foundation (56) to have tidy repeats.
Step-by-step
- Foundation & body
- ch56 (or foundation sc 56), join to tube, work sc rounds for the body until 2–3″ below desired height (reserve space for flap).
- Front motif area
- If you want a centered Love Letter motif, either:
- Option A (surface crochet): after the sleeve is complete, use a contrasting color and a yarn needle to surface crochet the envelope/heart motif using simple running stitch or chain stitch on the surface.
- Option B (intarsia/tapestry): work the front panel flat with color changes to form the motif, then seam into a tube. This requires planning a small chart (e.g., heart 14 × 14 stitches) and centering it.
- If you want a centered Love Letter motif, either:
- Flap shaped like envelope
- Work 1–2 extra inches of the body and then create a triangular flap by decreasing centrally:
- Fold the top down and, with RS facing, start a triangular decrease: sc across but at the center make sc2tog at mid-point on every other row so the flap tapers to a point in 6–8 rows. Alternatively, shape flap by working a separate small triangular piece and seaming it onto the back of the sleeve.
- Work 1–2 extra inches of the body and then create a triangular flap by decreasing centrally:
- Closure
- Add a small button (wood or vintage brass) and either a small chain loop or an embroidered buttonhole on the flap. For a cleaner finish, attach a small magnetic snap through the lining.
- Lining & finish
- Line with cotton, sewing the snap/button through the lining for reinforcement. Add a small interior pocket for a library card or bookmark if desired (a rectangle of fabric or crocheted panel sewn to the inside).
Variations & tips
- Use felt appliqué for the envelope motif (stitch onto front with small stitches).
- Add a small stamped fabric “postage” square sewn onto the flap for charm.
Final finishing tips (applies to all five sleeves)
- Trim & weave: Weave in tails at least 2–3″ into the fabric; trim close. Use a crochet hook or tapestry needle to bury ends neatly.
- Lining attachment: Sew the lining only to the top edge and slip-stitch it in place. This allows the lining to remain removable if you ever need to wash. For glued snaps, attach on the lining to protect the crochet from metal stress.
- Blocking: Block flat if using cotton to even stitches before lining — this makes sewing lining easier.
- Thickness/padding: If your reader wants extra protection for delicate hardcover corners, suggest a thin batting layer or felt padding between outer shell and lining.
Conclusion
These five book-sleeve patterns—Granny Square, Checkered, Envelope, Cobbles & Vines, and Love Letter—give you a full range of styles for book lovers: colorful motif play, neat graphic checks, neat envelope closures, sculptural texture with botanical flair, and romantic letter-themed sleeves. Each pattern is intentionally adaptable: follow the sizing guide at the top to fit any book, adjust yarn weight and hook for thickness or drape, and add a lining or padding for extra protection.