Crochet baby dresses are some of the sweetest projects you can make by hand. They are soft, charming, and full of personality, which makes them perfect for newborn photos, baby showers, special occasions, or simply dressing a little one in something handmade and memorable. Unlike larger garments, baby dresses work up relatively quickly, but they still give you plenty of room to play with color, texture, lace, ruffles, and shaping.
What makes crochet baby dresses especially lovely is how versatile they can be. A boho pink and white dress can feel soft and romantic. A granny triangle pinafore gives a cute vintage-inspired look. A bobble lacy dress feels textured and playful. A sea breeze dress brings in fresh, airy summer style. A sugarplum dress feels sweet, delicate, and magical. Each design has its own mood, but all of them are adorable, practical, and fun to make for newborns and toddlers.
In this post, you will find five cute crochet baby dress patterns with detailed step-by-step guidance, helpful notes, and practical finishing tips. Each design is written to be easy to follow while still giving you enough detail to create a dress that looks polished and feels comfortable. If you love making baby items that feel special and handmade, these dress ideas are a wonderful place to start.
Quick Notes
Project type: Crochet baby dresses
Best for: Newborn photos, baby showers, special occasions, gifts, everyday wear, and keepsakes
Skill level: Beginner to intermediate, depending on shaping and stitch detail
Hook size: Usually 2.5 mm to 4.0 mm, depending on yarn weight and size
Yarn weight: Lightweight baby yarn, sport weight, DK, or soft cotton blends
Best yarn choice: Soft cotton, baby acrylic, or cotton blend for comfort and washability
Finished size: Newborn to toddler sizes, adjustable by chest and dress length
Time to complete: Several hours to a few days depending on detail
Helpful stitches: Chain, slip stitch, single crochet, half double crochet, double crochet, increase, decrease, shell stitch, bobble stitch, lace stitch, joining, edging, ties, buttons
Common Materials
Most baby dresses can be made with the same basic supplies.
- Soft baby yarn
- Crochet hook matched to yarn weight
- Yarn needle
- Scissors
- Stitch markers
- Measuring tape
- Buttons, ribbon ties, or closures
- Optional lining for added comfort
- Optional decorative trims
For baby garments, softness and comfort matter a lot. Choose yarn that feels gentle against sensitive skin and make sure any embellishments are securely attached. A machine-washable yarn is often a great choice for everyday baby wear.
1. Crochet Cute Boho Pink and White Baby Dress Pattern
A boho pink and white baby dress is soft, dreamy, and full of charm. The pink-and-white color combination gives it a sweet feminine feel, while the boho style adds a relaxed, pretty touch. This dress is wonderful for spring, summer, or special photo sessions, and it looks especially lovely on newborns and toddlers alike.
Quick Notes
Skill level: Beginner to intermediate
Finished size: Newborn to toddler, depending on measurements
Style: Soft, feminine, boho, romantic
Best colors: Pink and white, blush and cream, rose and ivory
Materials
- Soft pink and white baby yarn
- Crochet hook suited to yarn weight
- Yarn needle
- Scissors
- Stitch markers
- Buttons or ribbon tie, optional
Step-by-Step Guide
Step 1: Decide on the dress shape
Before you start, choose whether you want a fitted bodice with a flared skirt or a looser boho shape. A boho dress usually looks best with gentle shaping and a soft drape. Decide how long you want the skirt to be, especially if you are making it for a toddler.
A clear shape plan helps the dress fit beautifully.
Step 2: Create the bodice
Begin with the bodice using a simple top-down construction or panel method. The bodice should be snug enough to stay in place but not too tight for comfort. Use pink as the main color or alternate pink and white for a softer boho effect.
The bodice sets the tone for the dress.
Step 3: Add the yoke or top shaping
If you are making a top-down style, increase evenly at the yoke so the dress opens into the proper width for the shoulders and chest. Keep the increases neat and balanced. If you are making panels, join them carefully so the seams stay smooth.
Good shaping keeps the dress comfortable and wearable.
Step 4: Work the skirt section
Once the bodice is complete, begin the skirt. A boho style often looks beautiful with gentle flare or lace-like texture. You can alternate pink and white rows or add a soft textured stitch for a romantic handmade feel.
The skirt is where the boho charm really shines.
Step 5: Add decorative details
A simple lace border, small scallops, or a subtle shell edge can make the dress look extra sweet. Keep the details delicate so the dress still feels soft and baby-friendly. You want the dress to feel pretty, not heavy.
Step 6: Finish the armholes and neckline
Add a clean border around the neckline and armholes. This helps the dress feel polished and comfortable. A soft edging also helps the fabric sit neatly against the body.
Step 7: Add closure and finish
Use buttons, ribbon ties, or a simple back opening depending on your preferred style. Make sure the closure is secure and easy to use. Weave in all ends carefully and check that the dress is soft inside and out.
Helpful Tips
This dress looks especially beautiful in blush and cream shades. If you want a more romantic feel, use lace-like details sparingly. If you want a more casual boho look, keep the silhouette soft and the finishing simple.
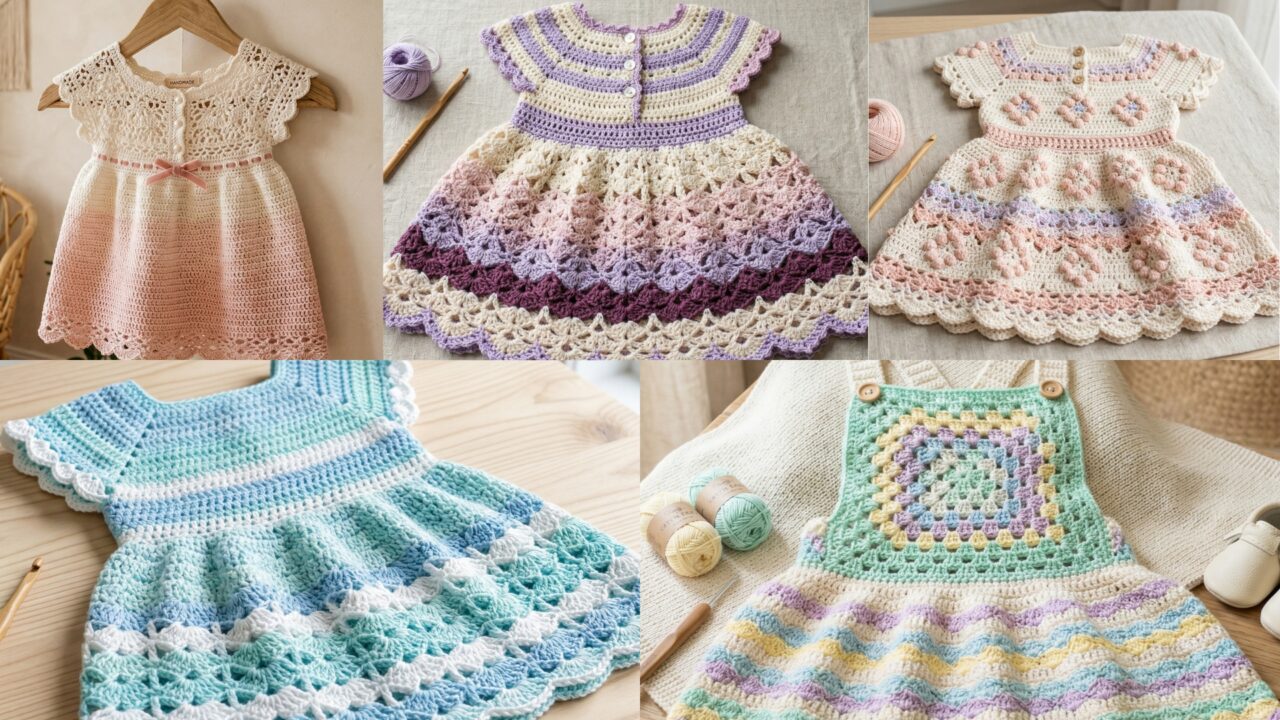
2. Crochet Granny Triangle Pinafore Baby Dress Pattern
A granny triangle pinafore baby dress has a cute vintage feel that is full of charm. The triangle-front design gives it a playful handmade look, while the pinafore shape makes it practical for layering over a shirt or onesie. This style is especially adorable for toddlers, but it can also be made in smaller newborn sizes.
Quick Notes
Skill level: Beginner to intermediate
Finished size: Newborn to toddler, depending on sizing
Style: Vintage-inspired, playful, layered, handmade
Best colors: Pastels, primary colors, soft neutrals, rainbow tones
Materials
- Soft baby yarn in one or more colors
- Crochet hook suited to yarn weight
- Yarn needle
- Scissors
- Stitch markers
- Buttons or ties for the straps
Step-by-Step Guide
Step 1: Start with the triangle front
The triangle front is the signature part of this dress. Begin at the top point and increase evenly as you work downward. The triangle should be wide enough to cover the front bodice but not so large that it becomes bulky.
A neat triangle gives the pinafore its shape.
Step 2: Work the bodice straps
Once the triangle reaches the right size, add straps at the top corners. These can be crocheted chains or simple strap sections that attach over the shoulders. Keep them comfortable and secure so they stay in place during wear.
The straps help the pinafore feel sweet and practical.
Step 3: Add the waist or skirt attachment
Attach the triangle front to the skirt section or create a join line where the skirt will begin. A soft seam helps the dress feel balanced. If you want the pinafore to be layered over another outfit, keep the fit relaxed enough for easy movement.
The waist connection gives the dress structure.
Step 4: Crochet the skirt
Work the skirt in rows or rounds from the waist downward. You can use granny stitch, simple rows, or a light flare to give the dress a classic pinafore look. A slightly flared skirt works especially well for movement and comfort.
The skirt makes the dress wearable and fun.
Step 5: Add the back closure
A pinafore often needs a back opening or button closure so it is easy to put on. Use buttons, ribbon ties, or a crochet loop-and-button closure. Make sure the opening is secure but not too tight.
A good closure is important for dressing a baby easily.
Step 6: Finish the edges
Add a border around the triangle front, straps, and skirt hem. A clean edge helps the pinafore look neat and polished. This is especially useful if you want the piece to have a finished vintage appearance.
Step 7: Check the fit
Try to keep the dress flexible enough for a onesie or shirt underneath. If making for a toddler, allow enough room through the chest and waist so the dress does not pull.
Helpful Tips
This dress is beautiful in soft pastel stripes or cheerful rainbow shades. If you want a true vintage vibe, choose cream, muted pink, or pale blue. It is a great style for layering and makes a lovely handmade outfit piece.
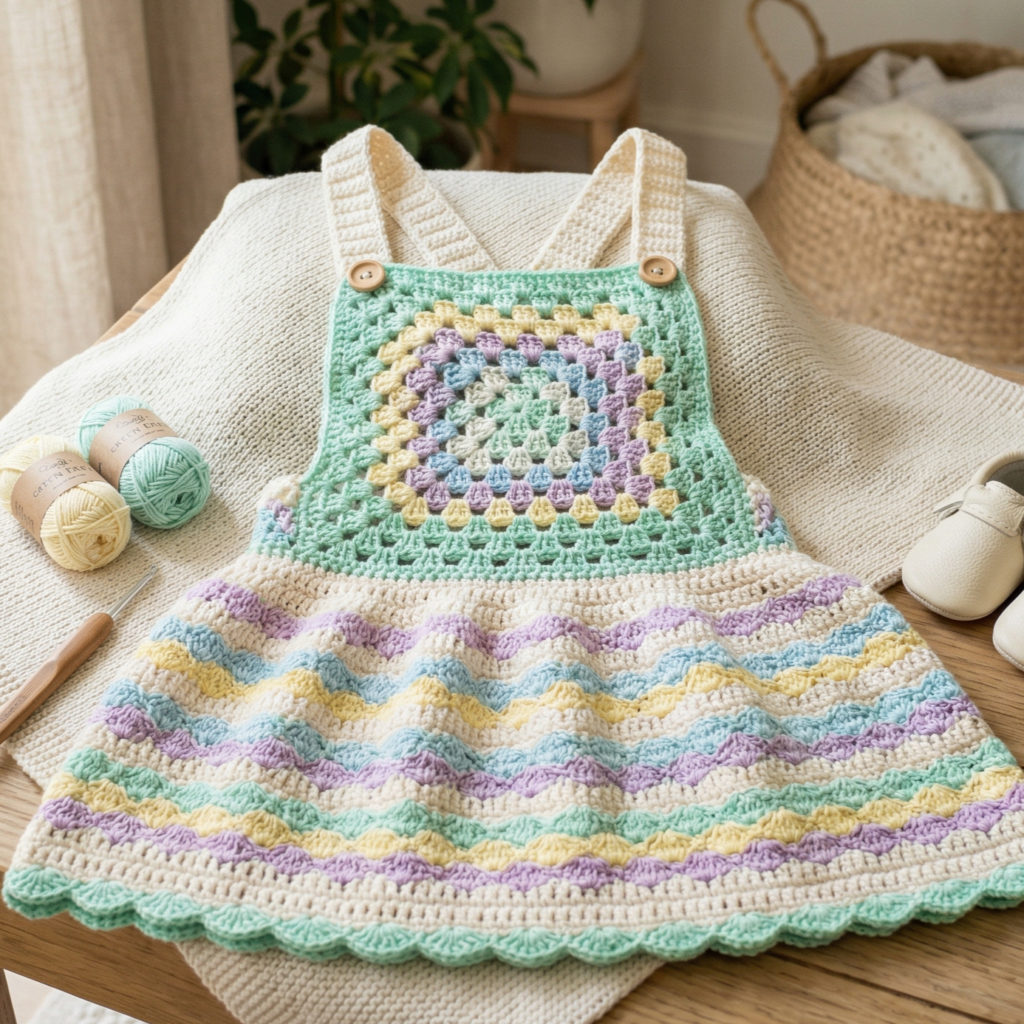
3. Crochet Bobble Lacy Baby Dress Pattern
A bobble lacy baby dress combines texture and delicacy in a very sweet way. The bobbles add a playful, dimensional effect, while the lace keeps the dress light and feminine. This pattern works beautifully for special occasions or for anyone who wants a baby dress with a little extra detail.
Quick Notes
Skill level: Intermediate
Finished size: Newborn to toddler sizes
Style: Textured, delicate, playful, dressy
Best colors: White, cream, blush, lavender, baby blue, soft peach
Materials
- Soft baby yarn
- Crochet hook suited to yarn weight
- Yarn needle
- Scissors
- Stitch markers
- Buttons or ties, optional
Step-by-Step Guide
Step 1: Choose the base silhouette
Decide whether the dress will be fitted at the bodice with a flared skirt or slightly looser all over. A structured bodice works very well with bobbles and lace because it keeps the design balanced. The dress should feel decorative but still soft enough for baby wear.
A simple silhouette helps the texture stand out.
Step 2: Make the bodice
Begin with the upper body or yoke of the dress. Keep the stitches even and comfortable, making sure the bodice fits the child’s chest without being tight. A smooth bodice gives the textured sections a clean base.
The bodice should support the decorative pattern.
Step 3: Add the bobble stitch section
Work a bobble stitch row or section across the dress. Bobbles add a sweet raised texture that makes the dress feel playful and rich. Keep the bobbles evenly spaced so the surface looks neat rather than crowded.
The bobble texture is the main decorative element.
Step 4: Add lace rows
Between the bobble rows, add lace or openwork rows to lighten the fabric. This helps the dress feel airy and soft rather than too dense. The contrast between bobbles and lace gives the pattern a very charming look.
The lace keeps the dress graceful.
Step 5: Shape the skirt
Continue the skirt with gentle increases so it flares slightly. A baby dress often looks nicest when the skirt has movement and a soft flow. Check the length as you go to make sure it suits the size you are making.
Step 6: Finish the neckline and sleeves
If the dress has sleeves or cap sleeves, finish them neatly with a simple border. The neckline should also have a clean edge so it lies comfortably against the skin. Keep the edging subtle so it does not compete with the texture.
Step 7: Add closure and finish
Use back buttons, ties, or a simple opening as needed. Weave in all ends carefully and make sure the bobbles and lace feel soft on the inside too.
Helpful Tips
This dress is especially lovely in white or blush because the bobble texture shows up beautifully. If you want a more dressy look, add a satin ribbon or small decorative buttons. Keep all details secure and baby-safe.
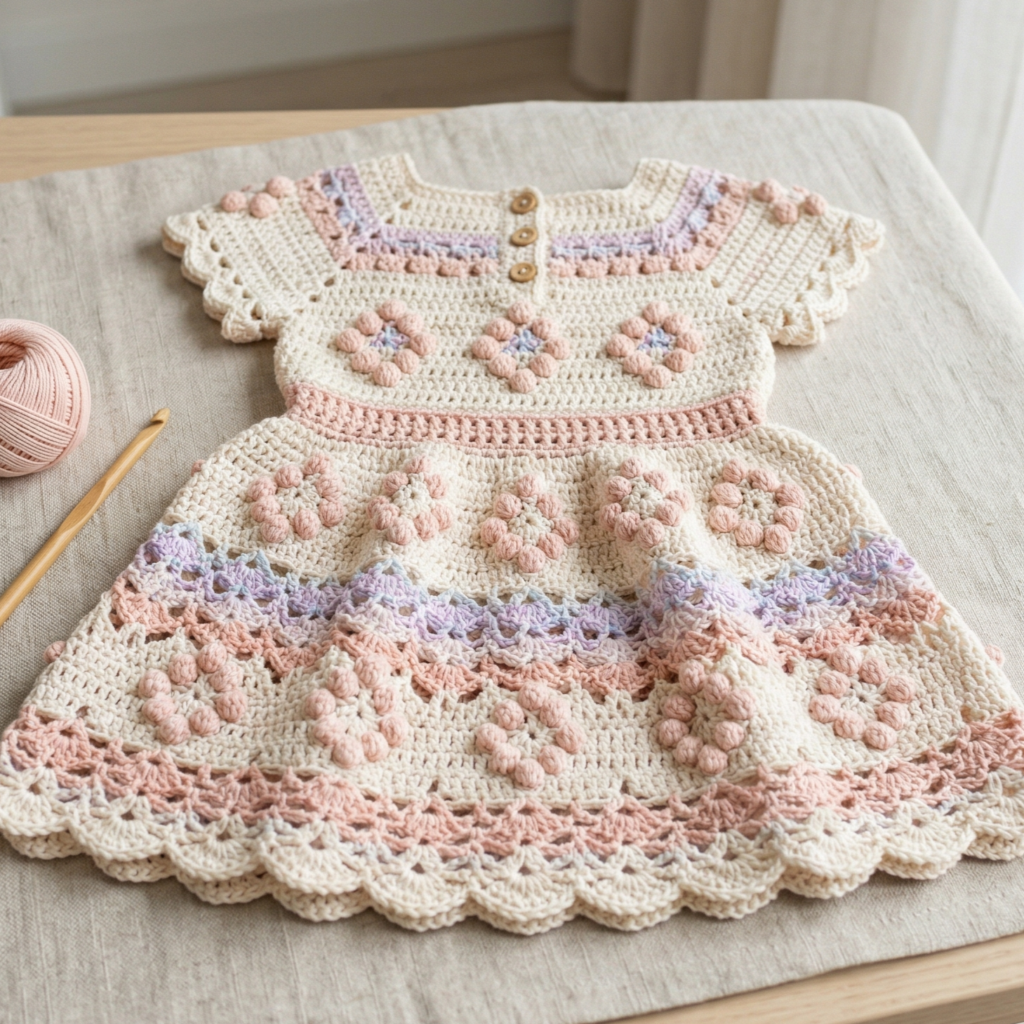
4. Crochet Sea Breeze Baby Dress Pattern
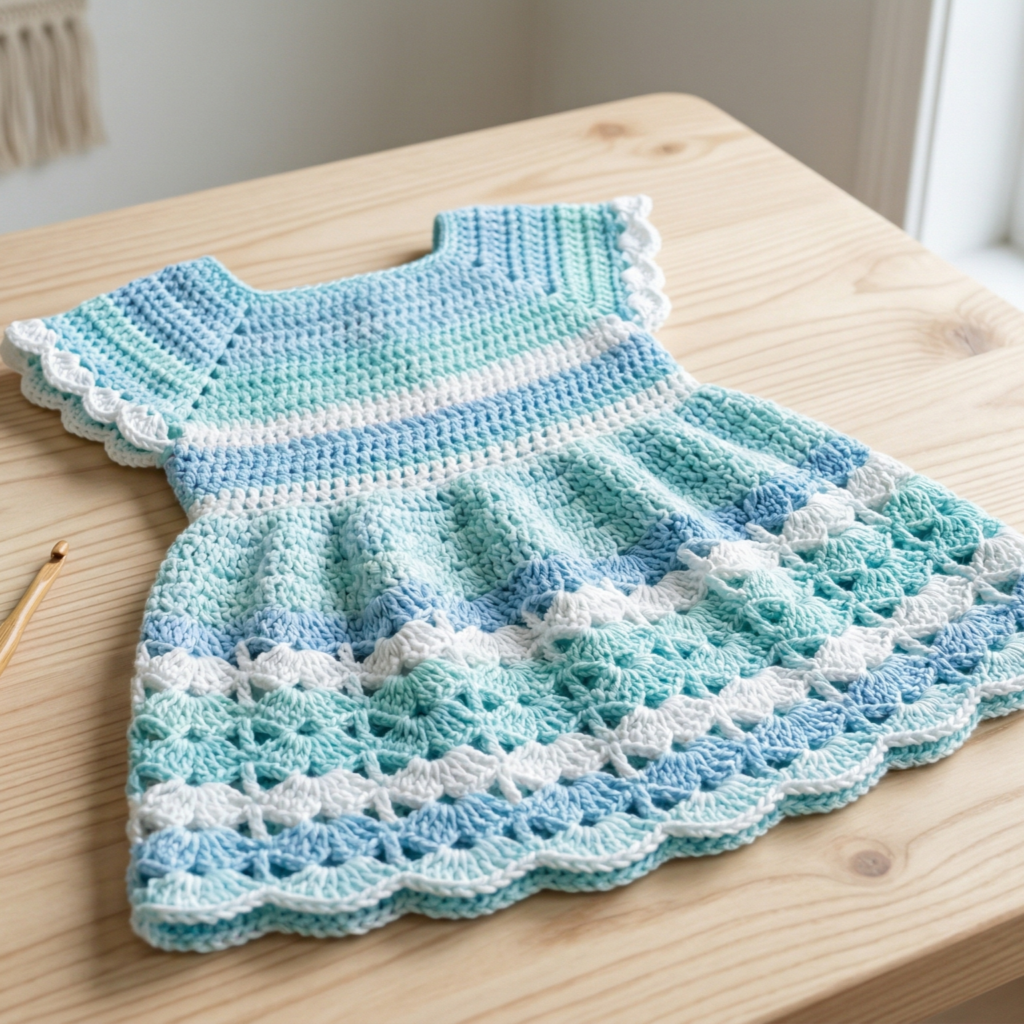
A sea breeze baby dress feels light, airy, and fresh, making it perfect for warm weather or seaside-inspired outfits. This design often uses open stitches, soft blues, and breezy shaping to create a relaxed, summery feel. It is lovely for everyday wear, beach photos, or a sweet handmade gift.
Quick Notes
Skill level: Beginner to intermediate
Finished size: Newborn to toddler sizes
Style: Airy, fresh, beachy, soft
Best colors: Sky blue, aqua, seafoam, white, sand, pale turquoise
Materials
- Lightweight baby yarn or cotton blend
- Crochet hook suited to yarn weight
- Yarn needle
- Scissors
- Stitch markers
- Buttons or ties, optional
Step-by-Step Guide
Step 1: Choose a soft, breezy structure
A sea breeze dress should feel comfortable and easy to wear. Decide whether you want a simple sleeveless style or a dress with short flutter sleeves. The shape should be open and breathable so it suits warm weather well.
A light structure gives the dress its breezy feel.
Step 2: Crochet the top
Start with the bodice or yoke. Use a simple stitch repeat that feels neat and airy. Soft blue or seafoam shades work especially well for the top section because they create that fresh ocean-inspired look.
The top section sets the mood of the dress.
Step 3: Add openwork or lace detail
Incorporate lace rows, small shell stitches, or gentle chain spaces to create a light, breathable texture. These open sections make the dress feel like it belongs in warm weather. Keep the pattern even so the fabric stays balanced.
The lace detail gives the dress its sea breeze quality.
Step 4: Shape the skirt
Work the skirt downward with gradual increases to create a soft flare. You can keep the skirt simple and flowing or add alternating rows of lace and solid stitches for a slightly more detailed effect.
The skirt should move gently and naturally.
Step 5: Add flutter or cap sleeves, optional
If you want a little extra charm, add small flutter sleeves or soft cap sleeves. These make the dress feel even lighter and more delicate. Keep them airy so they do not weigh down the look.
Step 6: Finish the hem and neckline
Add a clean edge along the hem, neckline, and sleeves. A subtle shell or picot border can add a gentle finishing touch. Keep the edges soft and neat.
Step 7: Add closure and finish
Use a small back opening, buttons, or ties. Make sure the dress is easy to put on and comfortable for the baby to wear. Weave in all ends securely and check that the inside feels smooth.
Helpful Tips
This dress looks especially beautiful in sky blue or seafoam with white accents. If you want a soft coastal feel, keep the stitches open and the color palette light. It is a lovely choice for summer photos and beach-inspired outfits.
5. Crochet Sugarplum Baby Dress Pattern

A sugarplum baby dress is sweet, whimsical, and full of soft charm. It feels magical without being overly complicated, making it perfect for special occasions, photo sessions, or handmade gifts. The name suggests a delicate, dreamy look, which can be created through soft colors, gentle shaping, and pretty stitch details.
Quick Notes
Skill level: Beginner to intermediate
Finished size: Newborn to toddler sizes
Style: Sweet, dreamy, soft, whimsical
Best colors: Lavender, plum, blush, cream, pale pink, soft purple
Materials
- Soft baby yarn
- Crochet hook suited to yarn weight
- Yarn needle
- Scissors
- Stitch markers
- Buttons or ribbon tie, optional
Step-by-Step Guide
Step 1: Pick the sugarplum color palette
Choose soft, dreamy colors that feel magical. Lavender and blush are especially pretty, but you can also use plum with cream or a mix of pale purple shades. The colors should feel soft and sweet rather than too bold.
The palette gives the dress its personality.
Step 2: Start the bodice
Begin with the upper bodice or yoke, using a comfortable stitch pattern that fits well against the chest. Keep the shaping neat so the dress looks tidy and feels easy to wear. The bodice should be sweet and simple so the skirt can shine.
A neat bodice supports the dreamy style.
Step 3: Add decorative stitch detail
You can use shell stitches, subtle lace, or small textured rows to add a sugarplum feel. The details should be delicate and soft. Avoid too many heavy layers, as the dress should feel light and comfortable for a baby.
The texture should feel charming and gentle.
Step 4: Shape the skirt
Work the skirt with gradual increases so it flares softly. A dreamy baby dress often looks best when the skirt has a little movement and flow. Make sure the skirt length matches the size you are making.
The skirt gives the dress its sweet shape.
Step 5: Add sleeves or strap details
Choose short sleeves, cap sleeves, or simple shoulder straps depending on the style you want. A sugarplum dress often looks lovely with a soft sleeve or a decorative shoulder detail. Keep it simple and elegant.
Step 6: Finish the edges
Add a clean border around the hem, neckline, and sleeves. A picot or scalloped edge works beautifully here because it enhances the whimsical feel without becoming too heavy. Keep the finishing soft and neat.
Step 7: Add closure and final details
Close the back with buttons, ribbon ties, or a small opening. Make sure the dress is comfortable and easy to put on. Weave in all ends carefully and check that the garment feels smooth inside and out.
Helpful Tips
Sugarplum dresses look especially lovely in lavender, blush, and cream. If you want a more delicate keepsake dress, keep the details subtle and the yarn soft. This is a beautiful option for special photos, gifts, or occasion wear.
Conclusion
Crochet baby dresses are some of the most rewarding handmade garments you can make. They are delicate, sweet, and full of personality, yet they are still practical enough to be worn, gifted, and treasured. Because baby dresses are smaller than adult garments, they are often more approachable to make, but they still allow room for creativity through color, texture, shaping, and finishing details.
These five dress patterns each offer a different style. The boho pink and white dress feels soft and romantic. The granny triangle pinafore dress has a cute vintage charm. The bobble lacy dress brings playful texture. The sea breeze dress feels airy and fresh. The sugarplum dress is dreamy and whimsical. Together, they show how beautifully crochet can be adapted for babies and toddlers.
Whether you are making a dress for a newborn photo, a special occasion, or a heartfelt gift, these patterns are a lovely place to begin. With soft yarn, careful shaping, and neat finishing, you can create baby dresses that are comfortable, beautiful, and memorable.