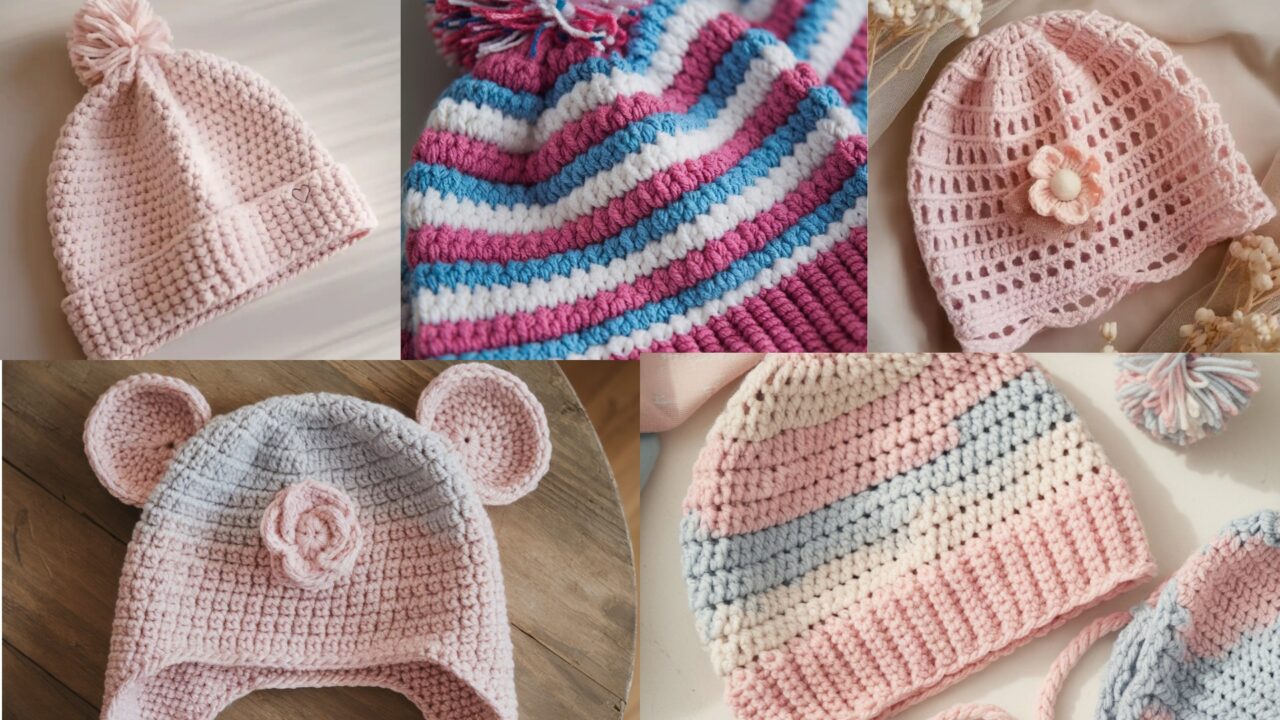
Make five adorable baby beanies — all with pom-poms options — that are quick, beginner-friendly, and easy to customize. Each pattern below includes: materials, suggested sizing + stitch counts (based on a sample gauge), a step-by-step construction method (magic-ring crown increases → body → brim/earflaps), pom-pom finishing, safety notes, and simple styling variations. I write everything in US crochet terms.
Quick sizing note (read first) — these patterns use a common reference gauge to give concrete stitch counts. Before you start, make a small swatch and adjust the counts to your own tension (instructions tell you how).
Swatch, gauge & sizing (how to make these fit)
Suggested yarn & hook (baseline)
- Yarn: worsted weight #4 (a soft acrylic or acrylic/wool blend for easy care) or DK if you prefer lighter hats.
- Hook: 4.0 mm (G-6) is a good starting point for worsted; drop one size for a firmer fabric if you want less stretch.
- Approx yarn: Newborn ~50 yds, 3–6 months ~60–80 yds, 6–12 months ~80–100 yds (very approximate).
Make a gauge swatch
- Work sc in rounds for a small square, at least 2″×2″. Measure stitches per inch (spi) and rows per inch (rpi). Many crocheters using worsted on a 4.0 mm hook will find about 4–4.5 stitches per inch, but your tension may differ.
Reference gauge used for the sample stitch counts below: 4.5 sts / inch (single crochet gauge round). If your gauge is different, recalc as:(Desired head circumference in inches) × (your spi) = target stitch count
Then round the number to the nearest multiple required by the stitch pattern (I list pattern multiples below).
Typical baby head circumferences (used here):
- Newborn (0–3 months): ~13.0 in
- Infant (3–6 months): ~15.5 in
- Baby (6–12 months): ~17.5 in
Using the reference 4.5 spi, the raw stitch counts (before rounding) are:
- Newborn → 58.5 stitches
- Infant → 69.75 stitches
- Baby → 78.75 stitches
Below I round those raw counts to pattern-friendly stitch counts (multiples suitable for the stitch repeat used). If your gauge differs, plug your spi into the formula above and round to the same multiples I indicate for each pattern.
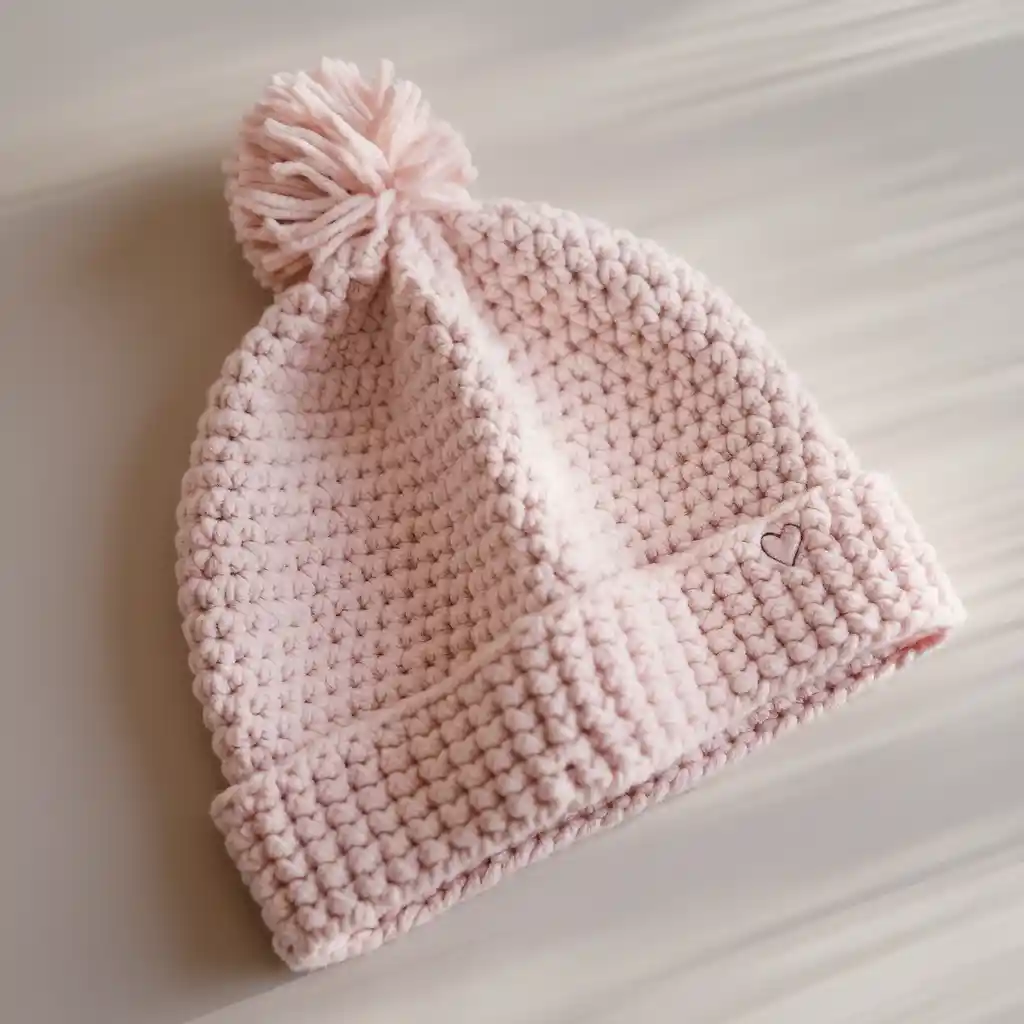
1. Crochet Ribbed Newborn Baby Hat Pattern
Ribbed hats are stretchy, comfortable, and very beginner friendly. This version uses front/post stitches (or BLO ribbing) so the hat hugs the head nicely.
Materials
- Worsted weight yarn (#4), approx 50–100 yds depending on size
- Hook: 4.0 mm (G-6) — use smaller hook if your stitches are loose
- Tapestry needle, scissors
- Pom-pom maker or cardboard for pom (optional)
- Safety note: remove pom for unsupervised sleep for infants under 12 months (see safety below).
Sample stitch counts (for reference gauge ≈ 4.5 spi)
(these are total stitches around the crown after increases — adjust for your gauge)
- Newborn (0–3m): 58 sts (multiple of 2)
- Infant (3–6m): 70 sts (multiple of 2)
- Baby (6–12m): 78 sts (multiple of 2)
Stitches used
- ch, sc, hdc, fpdc / bpdc (front/back post double crochet), sl st
Construction overview (top-down hat — magic ring increases)
We’ll start at the crown with a magic ring, increase in rounds until you reach the target stitch count above, then work ribbed rounds and finish with a folded brim or rib cuff.
Why magic ring + increase rounds? It produces a nice round crown without a hole and lets you precisely hit the stitch count you calculated.
Step-by-step
Crown increases (top down)
- Magic ring: MR, ch 1, work 6 sc into ring. Pull tight. (6)
- Round 2: inc in each stitch (inc = 2 sc in same st) — 12 sc.
- Round 3: sc 1, inc repeat around — 18 sc.
- Round 4: sc 2, inc repeat — 24 sc.
- Round 5: sc 3, inc repeat — 30 sc.
- Continue increasing in the same way — each round increasing the number of sc between increases by 1 — until your total round count is equal to the target stitch count for your size. Example sequence: 6, 12, 18, 24, 30, 36, 42, 48, 54, 60, 66, 72 … Stop at 58, 70 or 78 as listed above (you may need to stop mid-pattern and work a round that adjusts spacing slightly to land exactly on your chosen count). If your target is not exactly a number from this strict series, change a round to use a slightly different spacing (e.g., for 58 you could increase up to 54 then do sc 4, inc to get 59 or adjust a neighbor to get 58 — see notes below).
Tip for landing on odd counts: If your target is not reached by the standard progression, you can alter one increase round: instead of increasing every N+1 stitches evenly, make the increases slightly unevenly spaced (place the extra increase near the back) — the hat will still be round.
Work even
7. Once you reach the target stitch count (the full circumference), work even (no increases) in sc for 6–8 rounds (or more if you want deeper hat).
Ribbing (BLO hdc rib)
8. To make a ribbed texture that folds well, switch to BLO hdc rounds:
- Round: ch 1, hdc in BLO of each st around. Repeat until ribbing height is about 1.5–2.0 in for a folded cuff (or 0.75–1.25 in if you want a slight edge). Fold cuff under and sew in place for a neat brim.
Finish
9. Fasten off, weave in ends. Block lightly if desired.
Pom-pom finishing
- Make a pom-pom 1.5–2.5″ across (small for newborns). Attach with a long tail threaded through the top and tied securely inside the hat; reinforce with a few whipstitches. SAFETY: For infants under 12 months, remove pom for sleep and remove pom entirely if you’re gifting to a newborn who will be unsupervised. Poms can be a choking hazard if detached.
Variations
- Use a folded rib brim (longer ribbing folded twice) for extra ear coverage.
- Use a contrast color for last 3–4 rounds before ribbing to create a stripe band.
2. Crochet Simple Baby Hat Pattern
A plain textured hat that’s ideal for beginners. This one uses dc rounds for a soft, slightly slouchy fabric and a single pom-pom accent.
Materials
- Worsted weight yarn (#4), 50–100 yds
- Hook: 4.0 mm (G-6)
- Pom-pom maker or scraps of yarn, tapestry needle
Sample stitch counts (reference gauge 4.5 spi; pattern multiple = 4)
- Newborn: 60 sts (multiple of 4)
- Infant: 68 sts
- Baby: 80 sts
(If your gauge yields a slightly different raw count, use the formula in the swatch section and round to the nearest multiple of 4.)
Stitches used
ch, sc, dc, hdc, sl st
Construction — top-down (magic ring → increase rounds)
Crown
- MR, ch 2 (counts as first dc), 11 dc in ring — join (12 dc).
- Round 2: dc inc in each st -> 24 dc (dc in each st, inc into each st? For dc increase pattern, use the regular dc increase progression). A simple standard increase progression for dc crown: 12 → 24 → 36 → 48 → … Each round increase = add one dc between increases as done for sc version. Continue increasing (use dc n, inc rounds) until you reach target stitch count (60/68/80).
Tip: Another stable approach: start crown with 6 sc/6 dc ring then switch to dc increases to reach a round number for multiples of 4.
Body
3. Once circumference count is reached, work in dc (or alternating dc/hdc for bulk control) for about 5–6 rounds (or until desired height minus brim amount).
Brim
4. Finish with 6–8 rounds of sc (or hdc) worked in BLO for a slight cuff, or work 1×1 rib with fpdc/bpdc for a stretchy cuff.
Finish
5. Weave ends. Add small pom on top and secure tightly.
Styling & finish
- For a slouchy look, add extra length before starting brim.
- For a snug newborn fit, reduce body rounds.
- Embroider a small heart or star with contrasting yarn on the side (duplicate stitch) for a custom touch.
3. Crochet Lacy Baby Hat With Flower Pattern
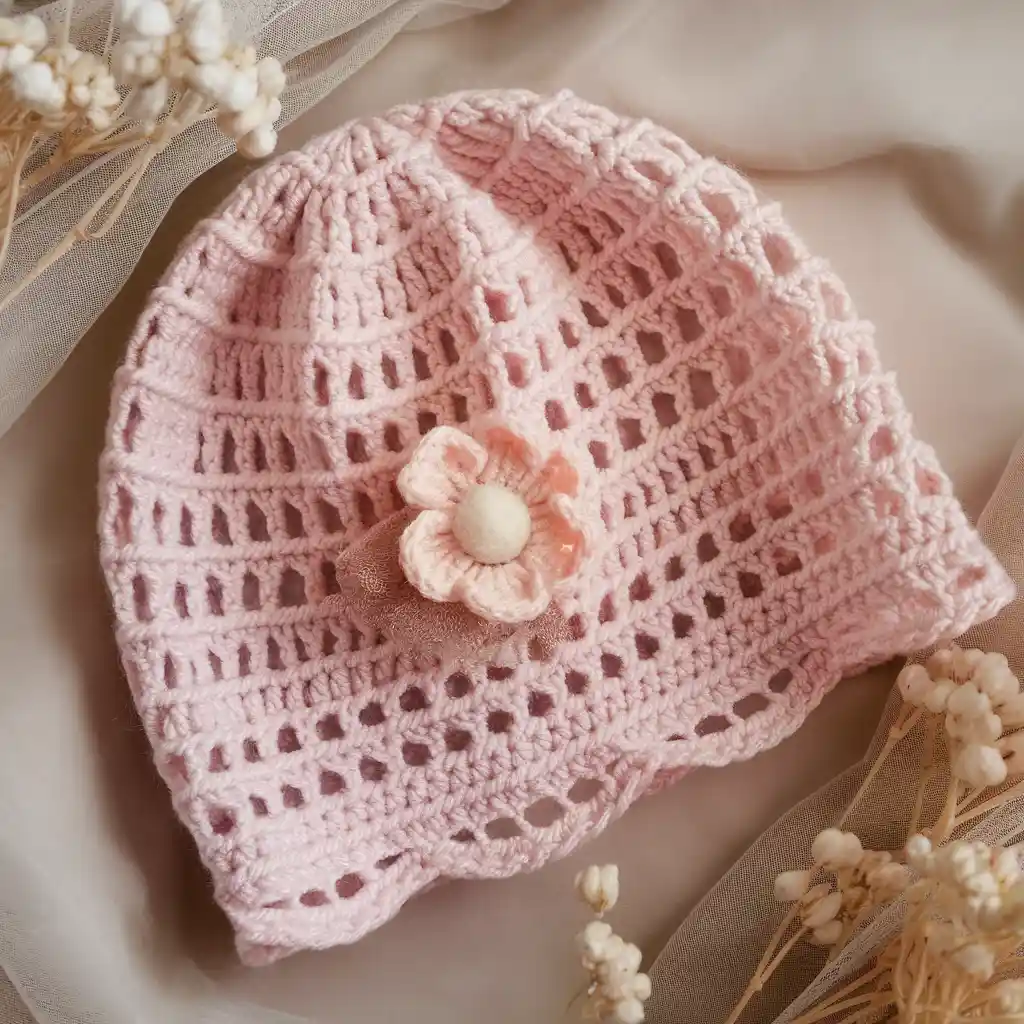
A pretty lacy hat perfect for baby photos — uses shell stitches and a small crocheted flower applique that doubles as the pom base.
Materials
- DK or light worsted yarn (#3–#4), 60–100 yds (lighter yarn will give a more delicate lace)
- Hook: 3.5–4.0 mm (use smaller for tighter lace)
- Tapestry needle, small button or felt for flower center, pom (optional)
Sample stitch counts (reference gauge 4.5 spi; pattern multiple = 6)
- Newborn: 60 sts (multiple of 6)
- Infant: 72 sts
- Baby: 78 sts
Stitches used
ch, sc, dc, shell (ex: 5 dc in one sp), sl st
Construction (top-down — use sc crown then transition to shell lace)
Crown & Transition
- Start with magic ring and 6 sc (or 6 dc depending on how tall you want first round), then increase in rounds to reach the target stitch count (use the same progressive increase method as earlier; target counts above). For ease, increase to 60/72/78 stitches total (a multiple of 6 so shells can be placed evenly).
Set lace foundation
2. Round (foundation for shells): ch 1, sc across for 1 round to stabilize.
3. Lace shell rounds (example repeat) — choose a shell repeat that fits 6-st multiples, for example a simple shell: skip 2 sts, (5 dc) in next st, skip 2 sts, sc in next st repeat around. Work 6–8 rows repeating shell and sc stabilization rows until hat reaches desired height (usually 4.5–6.5 in depending on size).
Edge
4. Work 2–3 rounds of sc or small picot edge for a delicate finish. If you want a brim that helps the hat stay on, work 4–6 rounds of BLO hdc for a flexible cuff.
Flower applique (quick)
- Center: MR, ch 1, 6 sc in ring, sl st to join; fasten off (tiny round).
- Petals (make 5–6): Join contrast yarn to any st, ch 3, 3 dc in same st, ch 3, sl st in same st — this makes a small petal loop — repeat around. Fasten off leaving long tail. Sew flower to side or front of hat. Optionally place the pom in the center or cover the center with a contrasting button/felt.
Pom-pom option
- A small pom is sweet — attach beneath flower (sew flower over the pom base) or make the flower center out of a tightly trimmed small pom.
Safety & wear
- Because lace has tiny holes, lining is optional but usually not necessary. However for newborns who may put hats in mouth, avoid tiny embellishment pieces that could loosen. Sew flower and any buttons extremely securely or skip them for very young babies.
Variations
- Use cotton yarn for summer hats; soft acrylic or wool blends for winter.
- Replace flower with a crocheted bow for a different look.
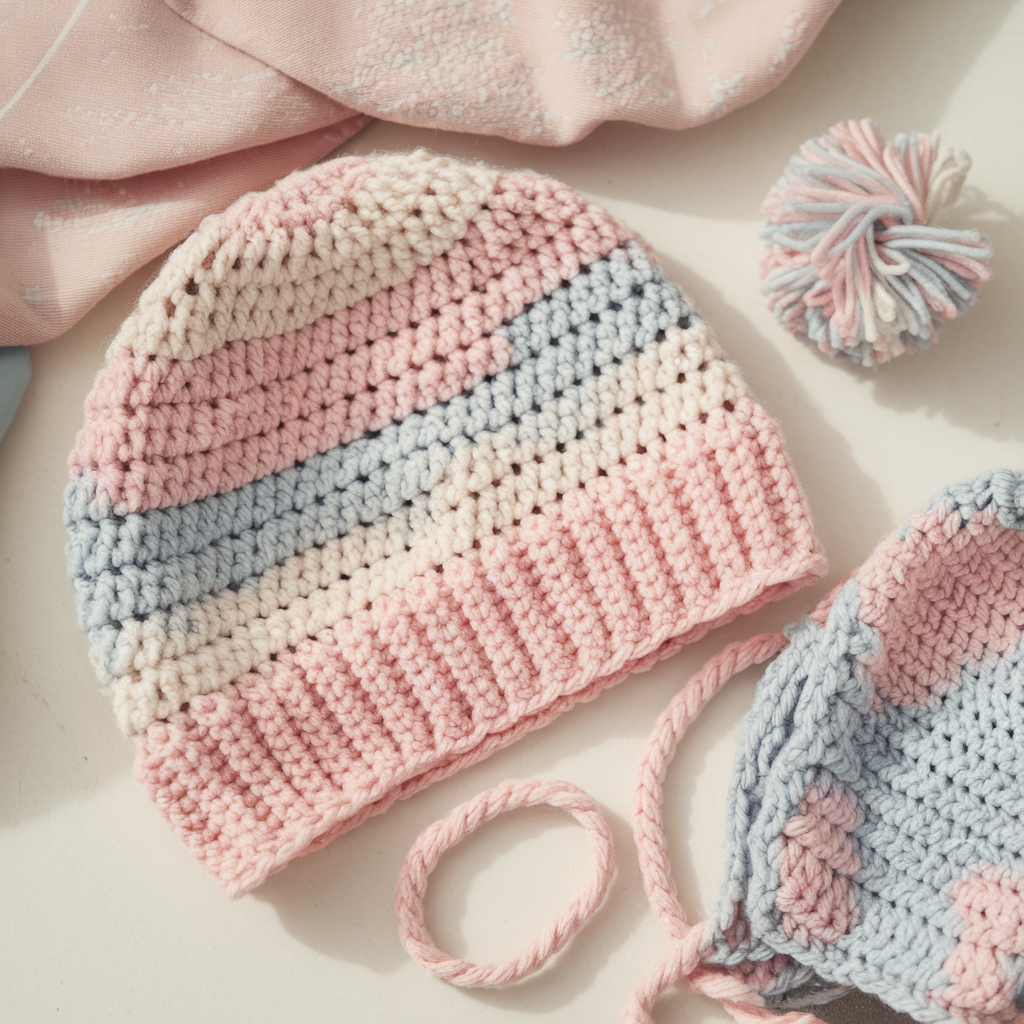
4. Crochet Vertical Striped Baby Beanie Pattern
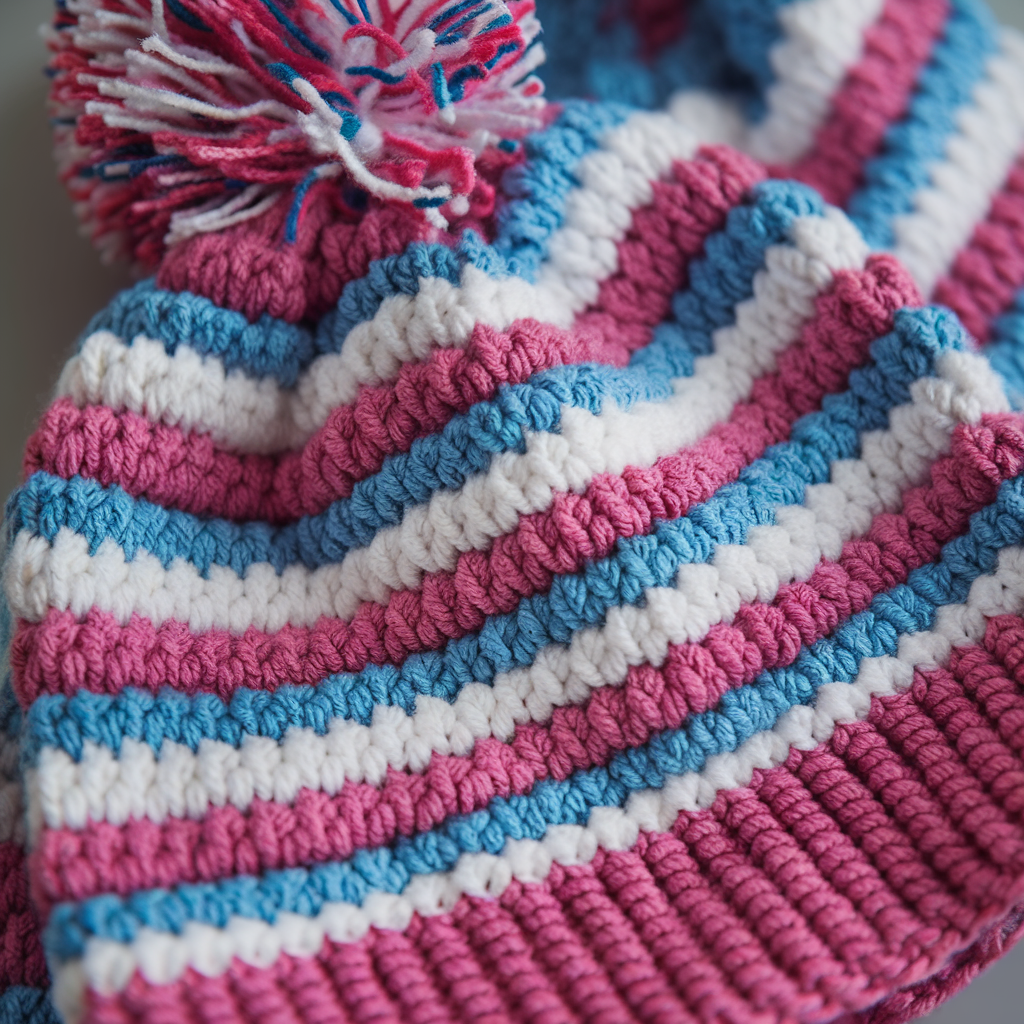
Vertical stripes are eye-catching — this pattern uses tapestry-style vertical panels (made by front/back post stitches) so the vertical color blocks appear raised.
Materials
- Two or three contrasting colors of worsted (or DK) yarn, about 80–100 yds total
- Hook: 4.0 mm (G-6)
- Pom-pom in one of the stripe colors, tapestry needle
Sample stitch counts (reference gauge; pattern multiple = 8)
- Newborn: 56 sts (multiple of 8)
- Infant: 72 sts
- Baby: 80 sts
Stitches used
ch, sc, dc, fpdc / bpdc (front/back post double crochet), sl st
Construction — top down & stripe technique
Crown increases
- Start with MR and increase rounds until you reach the stitch count for your size (56 / 72 / 80). Because this pattern relies on groups of stitches forming vertical panels, target counts are multiples of 8 so panels align.
Define stripe panels
2. Work a round of sc to stabilize. Then in following rounds switch to fpdc/bpdc columns to create vertical raised panels. Example repeat per 8-st panel: 2 fpdc, 4 sc, 2 bpdc — this creates texture and vertical lines. Repeat the 8-st panel across the round.
Continue rounds
3. Repeat the panel round until hat height reaches desired measurement (typically 4.5–6.5 in). The alternating post stitches create the raised vertical effect.
Brim
4. Finish with 6–8 rounds of BLO hdc or a 1×1 rib using fpdc/bpdc to make a stretchy cuff.
Pom & finishing
5. Add a pom in the dominant stripe color or two-tone pom. Attach securely with several stitches through crown.
Variations
- Use more colors for rainbow panels — change color every N rounds for vertical color changes.
- Make the panels wider (multiple of 16) for thicker stripes.
5. Crochet Rose Baby Earflap Hat Pattern
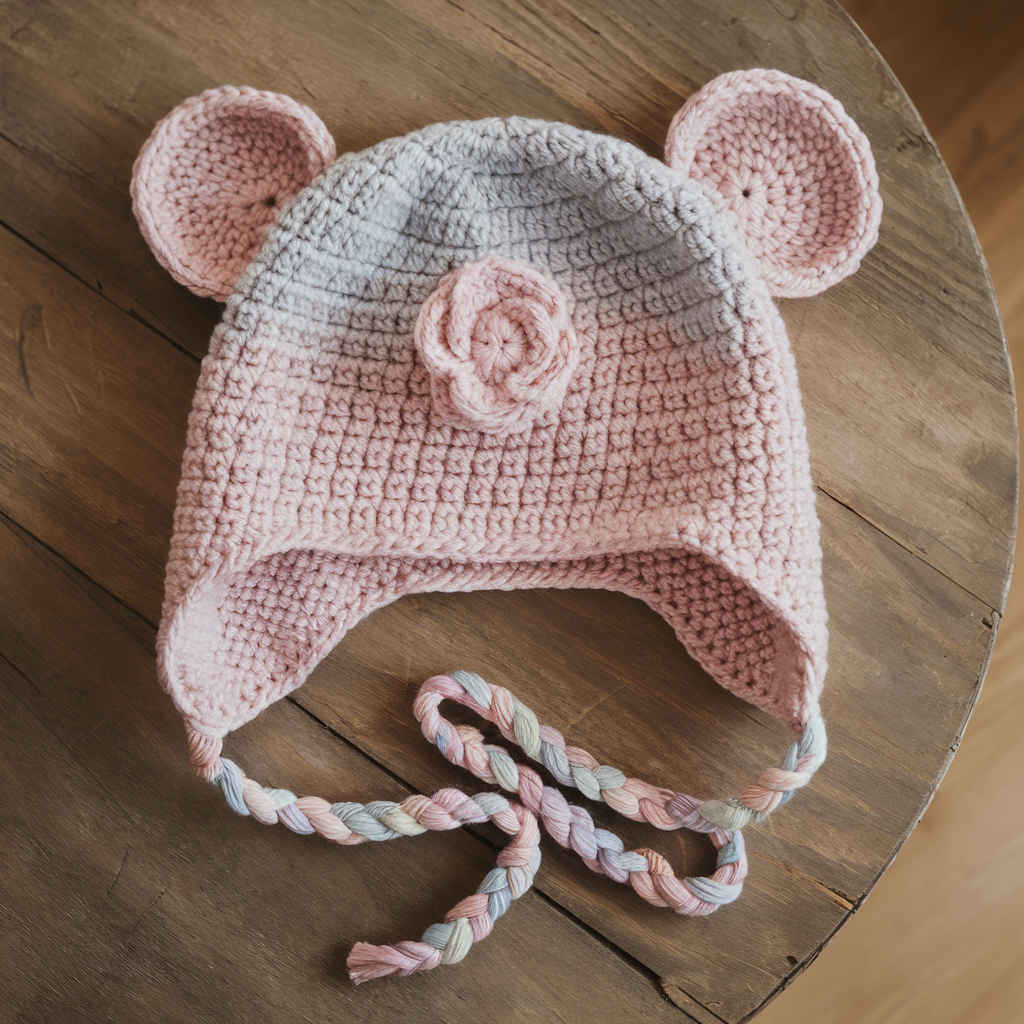
Classic earflap style with a rose applique — extra protection for ears, great for cold weather.
Materials
- Worsted yarn (#4), 100 yds approx
- Hook: 4.0 mm (G-6)
- Tapestry needle, small pom or button for rose center, optional earflap ties (braided yarn)
Sample stitch counts (reference gauge; pattern multiple = 4)
- Newborn: 60 sts (multiple of 4)
- Infant: 68 sts
- Baby: 80 sts
Stitches used
ch, sc, hdc, dc, tr, sl st
Construction (top-down with shaped earflaps added later)
Crown & body
- Magic ring → increase rounds to target count (60/68/80). Work even in sc or hdc for several rounds until crown height reaches about 3.25–3.75 in for newborns and more for older babies (measure and try on as you go).
Earflap placement
2. Decide where earflaps will be (usually centered front-to-back with flaps positioned on the sides). Each earflap will be worked over about 1/5–1/6 of total stitches. Example for 68 sts total, earflap width ≈ 68/6 ≈ 11–12 sts.
Work first earflap
3. Join yarn at earflap start point on RS:
- Row 1: sc across earflap stitches.
- Row 2: sc 4, sc2tog, sc across to last 4, sc2tog at end (decrease at edges) — this shapes.
- Continue decreasing at edges every other row until earflap is about 2.5 in tall (newborn) or 3.5 in for larger sizes. Fasten off.
Work second earflap
4. Skip the center band (the top) equal to earflap + top gap, and repeat earflap on opposite side symmetrically.
Ties
5. Add braided ties by attaching 3 small lengths of yarn to earflap tip and braiding or single-crocheting a cord. Knot ends.
Rose applique (quick small rose)
- Base spiral: ch 30, dc in 4th ch from hook then 2 dc in next ch, 2 dc in next to form a strip; turn the strip and work into chains to create a spiral of dc that you sew together in a spiral to form a rose. (Simpler method below.)
Simple rose method (fast):
- Make a small circular ruffle: ch 36. Row 1: sc in 2nd ch and across. Row 2: ch 3, 3 dc in next st repeat across to create ruffled edge. Roll the strip into a spiral and sew along base to secure — this forms a small rose. Attach to one side above earflap or center front.
Finish
6. Weave ends, block lightly to shape. For extra warmth, pick up stitches along earflap bottom and work 1–2 rounds of sc in BLO for neat edges.
Safety & notes
- Avoid attaching small beads or buttons to the rose for infants who could reach and grab; instead use sewn-down yarn roses with no tiny detachable bits. For very young babies remove any detachable adornments during sleep.
Extra helpful tips for all baby beanies
How to adjust if your gauge differs
- Use the simple formula:
target stitches = head circumference (in) × your spi. Round to the nearest pattern multiple listed for that design (I indicated multiples: rib = 2; simple = 4; lacy = 6; striped = 8; earflap = 4). Then increase in rounds from a small crown and stop when you reach that stitch count.
Trying hat on as you go
- Especially for babies, try the hat on during construction (or try on a similarly sized object) to check fit. If you’re making for a gift and cannot try it on, stick close to the sizes given and choose a slightly stretchier cuff for flexibility.
Pom-pom size guide
- Newborn: 1 – 1.5″ pom
- Infant: 1.5 – 2″ pom
- Baby (6–12m): 2 – 2.5″ pom
Always secure with a doubled and knotted thread and stitch through multiple times. Remove pom for unsupervised sleep (safe sleep guidance).
Care instructions
- Most acrylic/worsted hats: machine wash gentle cycle and lay flat to dry. Wool blends: hand wash and dry flat per yarn label. Pom-poms made of wool or faux-fur may require spot cleaning; consider removable pom design (tied on with a loop) to remove before washing.
Baby safety reminder (important)
- Never leave infants alone wearing hats with small embellishments (buttons, beads, small pom-poms). Remove pom or any detachable adornment for sleep. Securely stitch any appliqués so they can’t be pulled off.
Conclusion
These five baby beanies — Ribbed Newborn, Simple Baby Hat, Lacy Flower Hat, Vertical Striped Beanie, and Rose Earflap Hat — are designed to be quick, adorable, and friendly for crocheters of all levels. Start with the sizing method (measure + swatch), follow the crown increase method to reach the stitch counts I provided (or calculate your own with the formula), then follow the stitch pattern and finishing notes. Pom-poms and appliqués add charm — but remember safety first: keep small bits secured and remove embellishments for sleeping babies.