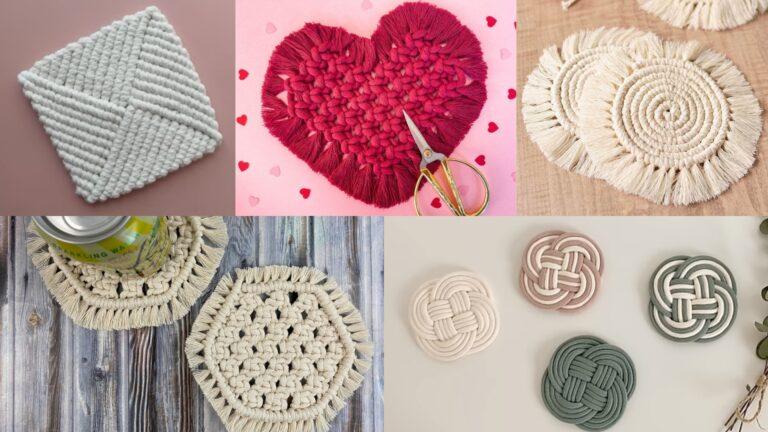
Crochet wall hangings can be built from a single round motif (mandala), a rectangular tapestry panel (tapestry crochet or filet), or an assembled collage of crocheted motifs and macramé details. Choose yarn and hook with the look and weight you want: cotton and cotton blends give crisp stitch definition and drape nicely for tapestry panels; acrylic and wool blends give softness, loft, and more sculptural texture; t-shirt yarn and rope create bold, sturdy forms. For most wall hangings I recommend working at a slightly tighter gauge than for garments so the panel holds shape and isn’t too floppy—drop ½–1 hook size if you’re unsure.
General tools & supplies (applies to all patterns)
- Yarn: choose yarns by weight given in each pattern below. For tapestry panels, use smooth plied yarn for crisp color edges; for textured hangings use bulky, boucle, chenille, or t-shirt yarn for impact.
- Crochet hooks: a range of hooks from 3.5 mm to 9.0 mm depending on yarn weight—each section lists suggested hooks.
- Wooden dowel, driftwood, branch, or metal rod for hanging; nails or hardware to mount.
- Scissors, tapestry needle for weaving ends, stitch markers, measuring tape.
- Optional: small wooden beads, macramé ring, hot glue for attaching non-textile elements (if you plan to use adhesives, do so only for décor pieces, not for items intended for heavy use).
- Blocking tools: blocking mat and rustproof pins (very useful for lace/mandala shaping).
Sizing & scaling (short method)
- Decide finished width (W) first—common sizes: small ~10–14″, medium ~18–26″, large ~30–40″+. Height typically equals or exceeds width because of tassels and fringe.
- For tapestry panels worked in rows, calculate chains needed from your stitch gauge (make a 4″ swatch in the same stitch—stitches per inch (spi) × desired width = foundation chain). I’ll show an example where relevant.
- For radial mandalas, choose number of rounds rather than direct inches—increase rounds until mandala reaches desired diameter.
Care & safety
- For dust-prone spaces, choose yarns that are washable or can be surface cleaned. Hand-wash and reshape, or vacuum with a low-suction upholstery attachment. Avoid fragile fibers where pets will be present.
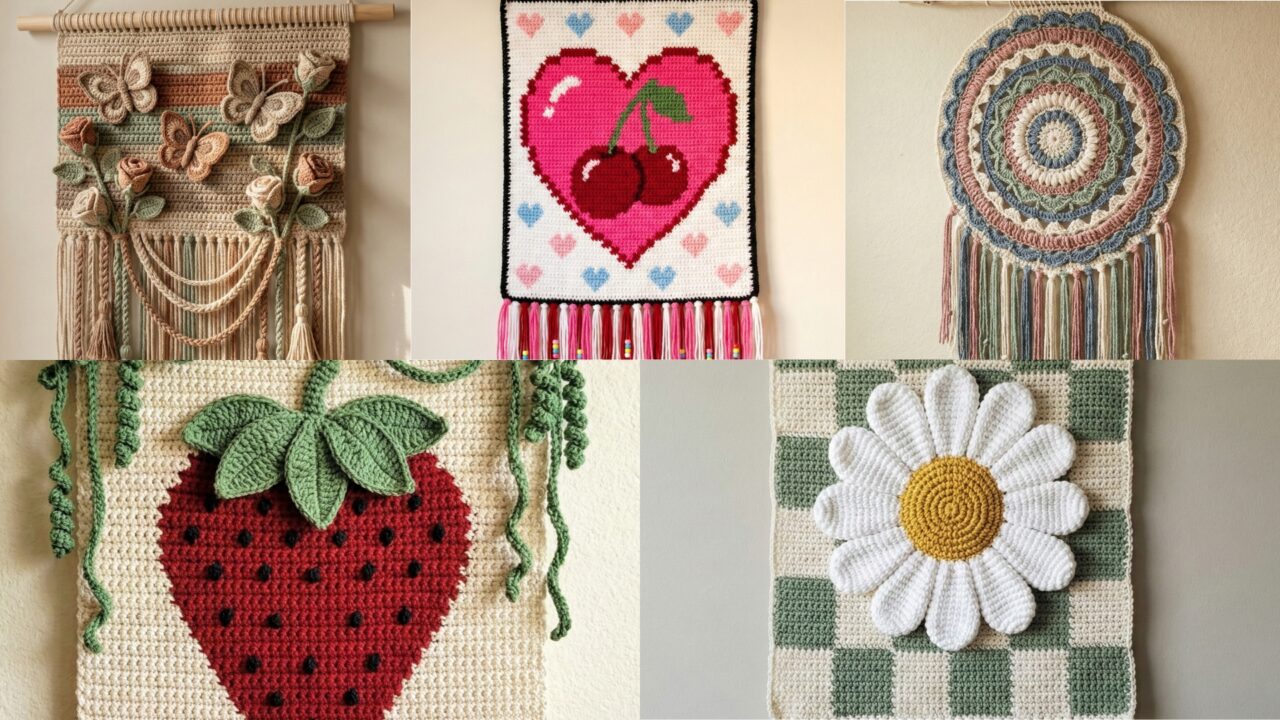
1. Crochet Mandala Wall Hanging Pattern
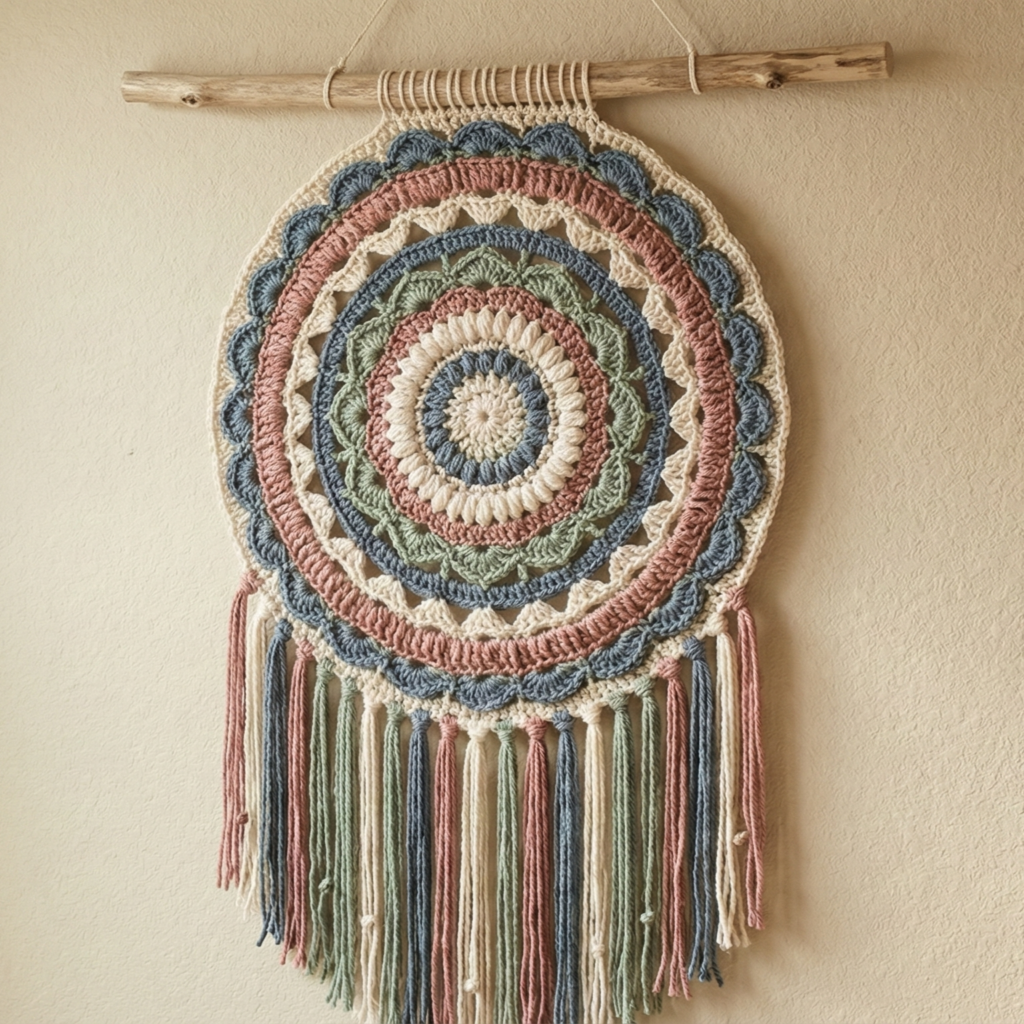
Skill level: Intermediate (familiar with rounds, post stitches, and some shaping)
Finished size: Mandala diameter ~14–22″ (depends on yarn/hook), finished hanging including fringe/tassels 22–32″
Materials
- Yarn: DK/Light worsted for detailed rounds OR bulky for a sculptural look. Example: DK main colors A–D: 200–300 yd total (mix of contrasts).
- Hook: 4.0 mm for DK; 6.0–8.0 mm for bulky.
- Wooden dowel 18–24″ (or branch), tapestry needle, stitch marker, small amount of wire (optional for shaping).
Design concept & structure
- Mandala worked in continuous rounds from center out. Use a balance of flat-round increases (to remain flat) and textured rounds (front/post, bobbles) to create 3D interest. Finish with decorative outer rounds and long fringes/tassels to hang from a dowel.
Step-by-step — round-by-round mandala (example using DK yarn & 4 mm hook; adjust hook if using thicker yarn)
Center & foundation
- MR (magic ring). R1: 8 sc in MR (8). Pull tight. Place marker at first st.
- R2: inc around (16).
- R3: (sc, inc) rep (24).
- R4: (sc x2, inc) rep (32). Keep increases even; these rounds create a nice flat circle.
Textured rounds (create petals)
5. R5: (ch3, skip 1, sl st in next) rep around to create small open arches — this makes a lacy center. Join.
6. R6: Work into each arch: (sc, ch2, 3 dc, ch2, sc) to form petal shells around center. Join.
Flattening & spacing
7. R7: sc in each st around to anchor petal round. If you note curling, add an extra sc round. Evaluate flatness—if dome is forming, reduce increases for a couple of rounds or add anchor rounds (sc) to stabilize.
Mid-mandala lace & texture
8. R8: fpdc (front post double crochet) around a dc two rows below, sc in next 3 sts repeat to introduce raised bands. These post stitches produce a flower-like texture.
9. R9: 3 dc shell in next sc, ch1, skip 1 repeat for alternating shells. This gives a ring of larger petals.
Bold outer rounds
10. R10–R12: alternate openwork rounds and puff/bobble rounds:
- Puff round: (yo, insert, pull up loop) × 3, yo pull through all loops, ch1, sl st into base — make bobbles spaced evenly.
- Open round: (ch4, dc in next sc) repeat to create airy spokes.
Outer border & hanging edge
11. R13: sc round in both loops to tidy edge. R14: Optional picot scallop: (sc, ch3, sl st to base, sc next 3) repeat.
12. Slip stitch to finish and fasten off.
Finishing & tassels
13. Create long tassels (12–18″) in contrast color: fold multiple yarn strands, knot at top, trim ends evenly. Attach tassels evenly along lower semicircle of mandala by folding tassel loop through edge and pulling tails through loop (lark’s head) for neat finish. Vary tassel lengths for dynamic effect.
14. Attach mandala to wooden dowel by sewing top edge to a narrow crocheted sleeve that slides onto the dowel, or tie discreet loops on the back.
Blocking & shaping
- Wet-block lightly, pin mandala flat to set the shape; careful with bobbles—block gently to avoid flattening too much.
Variations & design notes
- Create a layered mandala by making two concentric mandalas and sewing smaller to larger slightly off-center for shadow effect.
- Add metallic yarn held double on a single round for shimmer.
- For a boho-meets-modern look, make a monochrome mandala and use colored tassels only.
Styling & placement
- Hang centered over a sofa or crib for a focal point. Scale larger mandalas for entryways or gallery walls.
2. Crochet Checkerboard Daisy Flower Wall Hanging Pattern
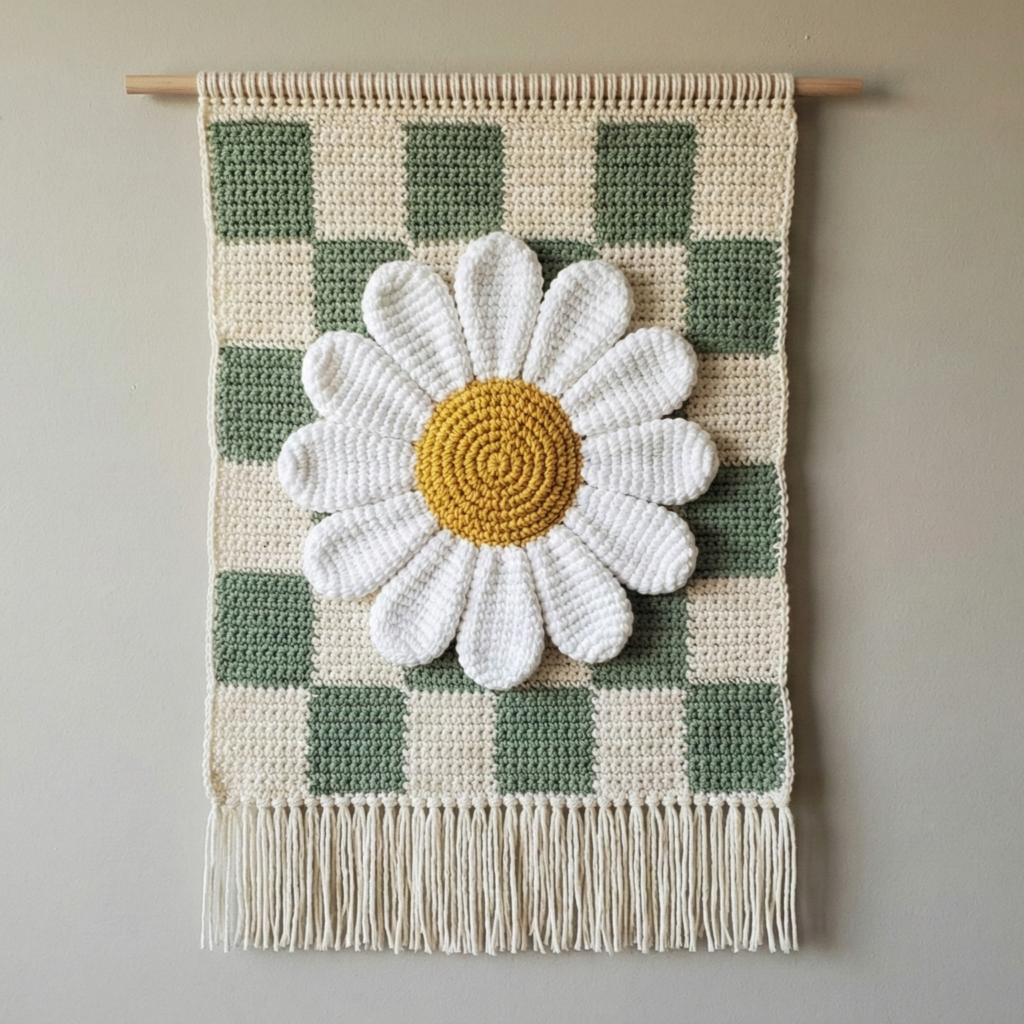
Skill level: Intermediate (tapestry crochet/graphing plus applique)
Finished size: Panel width ~18–24″, height with fringe 24–36″
Materials
- Yarn: Cotton DK or worsted for crisp tapestry (2–3 contrasting colors: background, flower color, checker accent).
- Hook: 4.0–5.0 mm (choose hook to suit yarn and desired density).
- Wooden dowel 20–26″, tapestry needle, printed grid for flower placement (graph paper).
Design concept
- A rectangular tapestry panel worked flat in tapestry crochet with a checkerboard background; daisies are added as small layered appliqués crocheted separately and sewn on. Bottom finished with geometric fringe and bead accents.
Construction notes: tapestry crochet basics
- Tapestry crochet: carry non-working color(s) along inside of stitches and crochet over floats to trap yarn; maintain consistent tension to avoid puckering. Work in rows, changing colors by completing the final yarn-over with the new color.
Step-by-step — panel & daisies
Panel graph & foundation
- Decide panel width W (e.g., 20″) and make a gauge swatch: determine stitches per inch (spi). Example spi = 4 st/in → foundation stitches = W × spi = 20 × 4 = 80 chains + 1 turning ch. For tapestry, chain foundation should match full panel width. Chain 80 + 1 and join to work flat.
- Chart the checkerboard: choose square size in stitches (e.g., each checker square 6 × 6 stitches). Draw grid on graph paper with daisy placements marked at intersections. Transfer graph to row-by-row color plan.
Tapestry row work
3. Work Row 1: ch1, sc in each ch across in the first color as base row. Turn.
4. Row 2 onward: follow chart—work sc in working color; when reaching a pixel that needs alternate color, change to that color as the last yarn-over of previous st; carry unused color(s) along top/back and trap with your working sc loop. Keep floats no longer than 4 stitches—catch long floats with a tiny whipstitch in back occasionally.
Daisy appliqués (make 8–10 depending on panel)
5. Daisy pattern (small applique): MR; Round 1: ch1, 6 sc in MR, join (6). R2: ch3, sl st in same st repeat to create petal loops (6 petals). R3: In each ch3 loop: 3 dc, sl st to base to form petal. Fasten off leaving tail. Make small yellow centers (MR 6 sc in yellow) and sew on.
Attach daisies
6. Place daisies per graph; tack with a few small stitches around center and secure. Use a little bit of craft glue for extra hold if desired, but sew primarily for durability.
Finishing edge & fringe
7. Add a simple geometric lower border: sc in both loops 1 round in a contrasting color, then make fringe—cut yarn lengths, fold over and lark’s head attach along bottom edge at regular intervals to echo the checker size. Add wooden beads to fringe tails for weight and boho texture.
Hanging
8. Make a crocheted sleeve on the top edge: sc around 2–3 rounds to create a ¾” pocket for the dowel. Slide dowel through and hang.
Variations & palette ideas
- Retro palette: mustard + teal + cream for Y2K/retro vibe.
- Soft modern: blush + stone + sage for nursery-friendly hanging.
Finishing & care
- Press lightly with steam if necessary; cotton tapestry panels can be hand-washed and reshaped.
3. Crochet Butterfly Rose Tapestry Boho Wall Hanging Pattern

Skill level: Advanced (tapestry foundation + appliqué 3D elements)
Finished size: Panel width ~16–22″, height ~24–34″ with cascades
Materials
- Yarn: Cotton DK for tapestry panel + worsted/bulky for 3D butterfly wings and roses.
- Hook: 4.0 mm for tapestry, 5.5–6.5 mm for appliqués.
- Wooden dowel or branch; small floral wire optional for wing supports; tapestry needle.
Design concept
- A tapestry background (subtle stripes or muted gradient) with layered appliqués: 3D butterflies, crocheted rose buds and leaves, and hanging macramé cords for boho movement. Balance two techniques: a strong flat panel to read from a distance and sculptural elements that catch the eye.
Step-by-step — background panel, butterflies, roses
Panel foundation
- Decide panel size and make a foundation chain per tapestry calculation (same method as checkerboard). For example W = 18″, spi = 4 → chain 72 + 1. Use muted stripes (work 4–6 rows per color, change color cleanly by switching yarn). Keep tension firm.
- Work tapestry-flat until panel height is 10–12″ (this leaves space for large appliqués and hanging cords). A long panel can have tapestry image like a subtle sky (gradient) or simple neutral.
Butterfly appliqué (make 3–4)
3. Butterfly body: using worsted yarn, MR, 6 sc; join; ch2, (hdc, dc, hdc) to make wing shapes; make two larger wings and two smaller wings. Sew wings together into layered butterfly, shape slightly with a bend and add a small stitch for thorax. For 3D lift place small loop of yarn or wire between wings to create elevation before sewing onto panel.
- Attach wings in asymmetrical clusters on panel using whipstitch; secure with thread and small backing felt disc for strength. If using wire, wrap wire in yarn and secure into panel edge or behind panel with sewn loop to avoid exposed wire.
Rose appliqué (make 4–6)
5. Crocheted rose spiral: ch 30; Row 1: sc across 29; Row 2: turn, sc across; Row 3: start shell edging: skip 1, 5 dc in next, skip 1, sl st next across. Roll strip tightly and sew coil edge to form rose. Make small leaf motifs (ch6, sc 5, shaping) and attach near rose bases.
Assembly & leafy cascade
6. Arrange butterflies and roses on panel—visualize diagonal flow (butterflies appear to flutter toward top right; roses at mid-left). Sew in place. Add long crocheted chains or macramé cords from the dowel hanging behind panel as trailing vines; attach crocheted leaves and small tassels to the cords.
Finishing touches
7. Add tiny seed beads to rose centers or bead accents along vine cords. Trim and block rose edges by steam to set shape if using wool-blend yarn.
Mounting & stability
8. Because it’s heavier than a flat tapestry, use two wall anchors and a thicker dowel/branch. Sew a narrow reinforcement strip of fabric along the top back if you expect extra weight.
Variations & styling
- Night-sky: dark panel background + iridescent thread in butterfly wings.
- Garden theme: increase rose count and add small crocheted bees.
Care
- Spot-clean appliqués and hand-wash tapestry panel if needed. Remove delicate items before washing.
4. Crochet Y2K Cherry Heart Tapestry Wall Hanging Pattern

Skill level: Intermediate to Advanced (graphic tapestry crochet + retro motif)
Finished size: width ~14–20″, total height with fringe 20–30″
Materials
- Smooth cotton or acrylic DK in bright retro colors (hot pink/red, black, white, contrasting blue or purple).
- Hook: 4.0–4.5 mm.
- Dowel 14–20″, tapestry needle, graph paper (for pixel heart/cherry chart).
Design concept
- Make a graphic, pixel-style tapestry panel inspired by Y2K aesthetics: bold heart in center with cherries or small icons repeated, then finish with geometric fringe and playful bead charms.
Graphing & planning
- Draw a pixel-heart and cherry chart on graph paper sized to your planned stitch count. Decide pixel size: e.g., heart 10 px × 10 px centered in a panel 60 px wide.
Foundation & tapestry crochet
2. Chain foundation: to get 18″ width at 4 spi: chain 72 + 1. Work sc tapestry across rows, following graph. Change colors cleanly—carry color on the back and catch floats as you go.
Cherry motif details
3. Cherry pixel: design cherries as two round pixels with stems and little leaf—plot them around the heart or in a repeating border. Use bright red for cherries and small green leaves. Keep motifs simple for pixel clarity.
Edge & retro fringe
4. Add a border: sc round in black or contrasting color for crisp framing. For fringe use grouped tassels in two or three colors spaced every 3–4 stitches to mimic Y2K beaded charm strings—use small plastic or wooden beads for that late-90s vibe.
Optional sparkle
5. Add metallic sparkles or small sequin-like crochet circles sewn sparingly around heart for extra pop. Or hold a thin metallic thread with main yarn on random rows.
Hanging & styling
6. Sew a sleeve on top for the dowel; finish with two hanging loops to create a slight curve when mounted.
Variations & modern twist
- Use pastel Y2K palette (bubblegum pink + baby blue) for subtle nostalgic vibe.
- Make mini versions as drawer-front decor or ornaments.
Care
- Cotton/gauge tapestry is durable—hand-wash and reshape if dusty.
5. Crochet Summer Strawberry Tapestry Wall Hanging Pattern
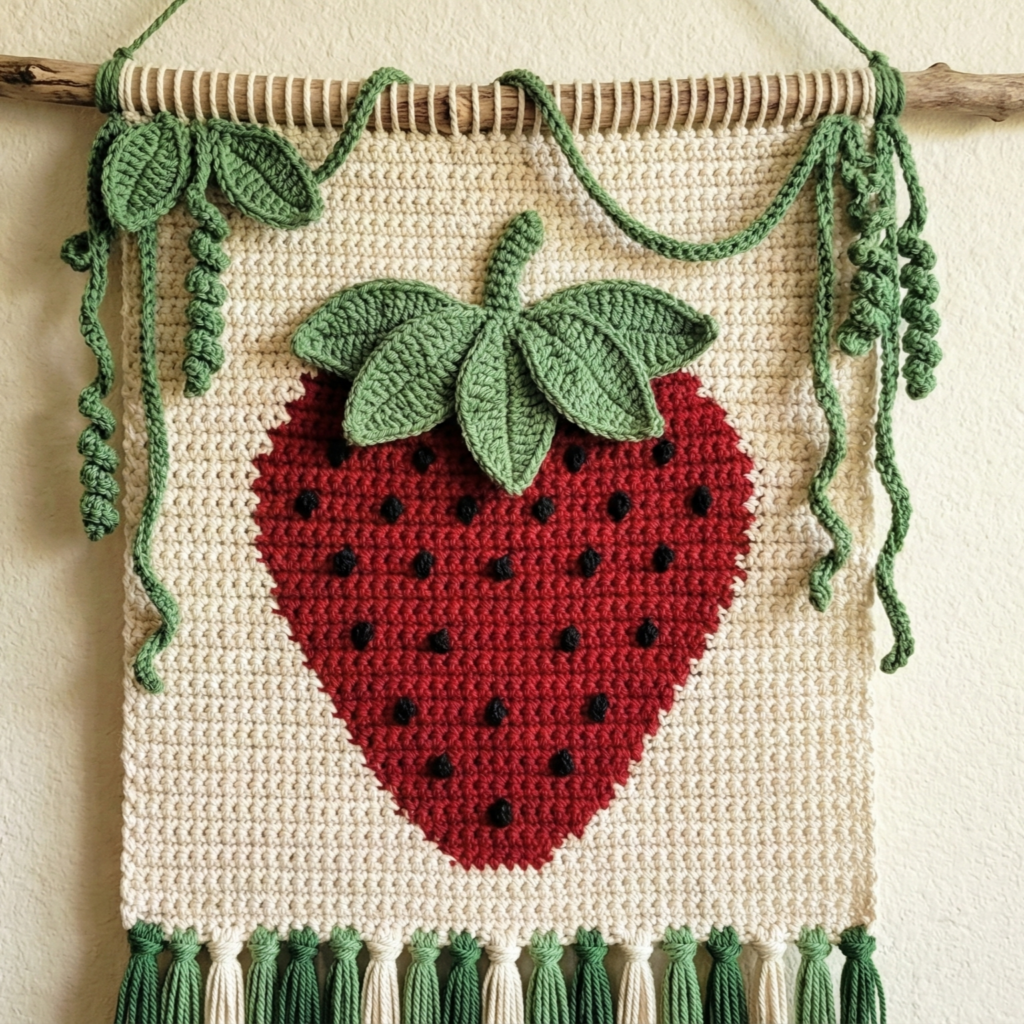
Skill level: Confident beginner → intermediate (simple tapestry + appliqué fruit)
Finished size: width ~12–18″, height with stems & tassels 18–28″
Materials
- Cotton DK in strawberry red, leaf green, cream for background, tiny black for seeds.
- Hook: 4.0 mm.
- Dowels or branches, tapestry needle.
Design concept
- A sweet, summery tapestry panel with large strawberry motif(s), embroidered seeds, and leafy macramé vines. The strawberry may be tapestry crocheted as a large shaped pixel motif, with appliqué leaves and a textured seed overlay (French knots simulated with small double-knot embroidery using yarn).
Step-by-step — panel and strawberries
Panel foundation (simple rectangular tapestry)
- Decide width W (e.g., 14″)—chain foundation using spi. Example spi = 4 st/in → chain 56 + 1. Work sc in the background color for a few rows until you reach the vertical placement for the strawberries.
Large strawberry motif (single large fruity focal)
2. Chart the strawberry as a pixel heart-like teardrop and convert to a row-by-row color plan. Tapestry crochet the red teardrop directly into the panel. Use green for calyx (the leafy top) worked in the same round or as an appliqué if you prefer shaping.
Textured seeds
3. Once the panel is complete, add seeds by emulating French knots with tiny stitches: with black or dark brown yarn, make short tightly pulled knots (or single-crochet small loops manually tied) every few pixels across the strawberry surface to create seed texture.
Appliqué leaves & vines
4. Crochet leaves separately: ch 8, sc across, then shape with sc/hdc/dc decreases to produce a point; make 3–5 leaves and sew onto top of strawberry. For vines, make long chains with attached small leaves/tassels that dangle from dowel for garden-like motion.
Tassels & macramé
5. Add lightweight macramé hitching beneath dowel—square knots or spiral knots in neutral cord between crocheted elements to give an organic mixed-media look. Attach small pom-pom “flowers” intermittently.
Finishing & hanging
6. Create top sleeve or tie loops; hang and allow vines to cascade. Use light-blocking if background yarn bleeds.
Variations & color palettes
- Rustic: cream background, muted red, sage green for country-chic feel.
- Fun & bright: hot red, lime green, sky blue background.
Care
- Remove vines before washing if they include mixed media. Hand-wash panel and reshape.
Conclusion
Those five wall-hanging patterns—Mandala, Checkerboard Daisy, Butterfly Rose Tapestry, Y2K Cherry Heart, and Summer Strawberry Tapestry—give you five different approaches to wall art: radial mandalas, graphic tapestry, layered appliqué collages, nostalgic pixel art, and seasonal story-telling. Each is designed so you can scale the size, swap color palettes, or combine techniques (for example, add a mandala center to a tapestry border, or stitch small appliquéd fruits onto a checkerboard background).
Quick finishing checklist (applies to all patterns)
- Always weave in ends on the wrong side and secure color changes—tapestry floats can be trapped with a tapestry needle as you go.
- Block flat panels and mandalas for crisp edges. Use rustproof pins and a shallow steam if fiber allows.
- Reinforce top sleeve seams if the piece is heavy—sew a narrow fabric strip or extra crocheted band across the back top to carry weight.
- Choose a hanging rod that matches scale and weight—heavy hangings may need two wall anchors.