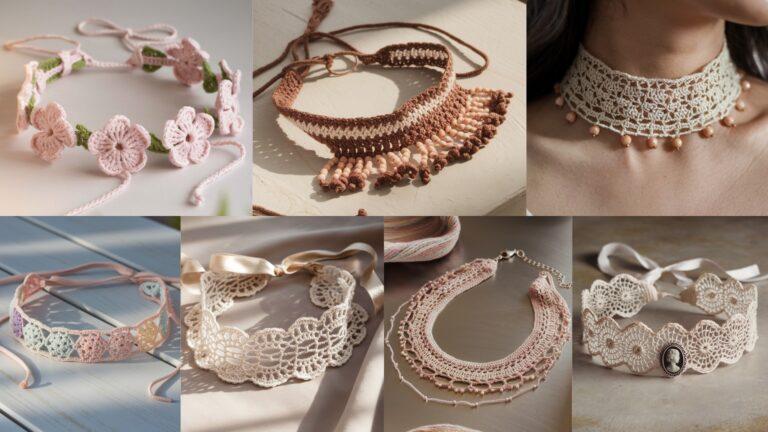
Handmade crochet necklaces are a wonderful way to combine fiber craft with jewelry-making. They’re lightweight, portable projects that let you experiment with texture, color, and shine — all while using just a hook, some yarn or thread, and a scattering of beads. Below you’ll find a one practical introduction (materials, tools, bead basics, measuring and finishing) and then five complete designs: a beaded lace choker, a lariat vine, an adorable flower “knit-look” necklace, a Lily-of-the-Valley dangling vine, and a bold boho colorful necklace. Each pattern includes skill level, an itemized materials list, exact step-by-step construction, variations and styling tips, troubleshooting, and care instructions.
Read the intro first — it covers bead-handling techniques and finishing options that apply to every pattern.
materials, tools, bead basics and finishing
Yarn / thread choices
- Cotton crochet thread (size 10–20) — best for delicate lace necklaces and vintage looks.
- Fingering / sport weight yarn — gives a soft, slightly rustic necklace that drapes nicely.
- Silk or bamboo yarn — luxurious drape and subtle sheen; use for more formal pieces.
- Embroidery floss or pearl cotton — excellent for beaded, tightly worked designs.
Match yarn weight to the aesthetic and bead hole size: very fine thread for seed beads (size 8–11), thicker yarn for larger beads (4–6 mm+).
Hooks and tools
- Steel crochet hooks (0.9–2.5 mm) for thread work. Standard hooks 2.5–4.0 mm for fine yarn.
- Beading needle (thin, long) to pre-string beads onto thread/yarn.
- Small jeweller’s pliers for attaching jump rings and clasps.
- Tapestry needle for sewing ends and finishing.
- Blocking mat & pins (optional) — useful for shaping lace and flowers.
Beads and findings
- Seed beads (size 8/10/11) — tiny glass beads for delicate sparkle.
- Glass pearls, Czech glass, crystal rondelles — for dressier necklaces.
- Metal beads and spacers — for boho or rustic styles.
- Findings: lobster clasp, jump rings, crimps (if using multiple strands), end caps, chain extenders, bead tips. Choose lightweight hardware so the necklace hangs comfortably.
Two ways to add beads
- Pre-stringing (most common): Thread all the beads onto your yarn/thread before you begin crocheting. Slide each bead up as required and secure it within the stitch (common for single crochet/tapestry or bead-in-chain methods).
- Add on the fly: Use a small beading needle and a spare thin thread to sew beads on after crocheting (best for large beads added to a finished motif).
How to secure a bead while crocheting (pre-stringing): slide bead into place, insert hook, yarn over and pull through so the bead sits between the designated stitches (for example, slip the bead up, then work a single crochet with bead trapped on the front).
Measuring & fit
- Necklace lengths (typical): choker 14–16″, princess 17–19″, matinee 20–24″, lariat/long 30″+.
- For fitted pieces (chokers) measure the neck and subtract ~0.25–0.5″ for a comfortable fit. For looser pieces add desired drape. If you plan to attach a clasp, allow ~1/2″ per end or use a chain extender.
Finishing options
- Clasp + jump rings — standard, removable.
- Crochet loop & button / bead toggle — integrated and often elegant.
- Tie closure (lariat) — no hardware needed: simply tie or wrap.
- Stabilize endings: glue the tail inside an end cap or whipstitch ends neatly and attach a small ring.
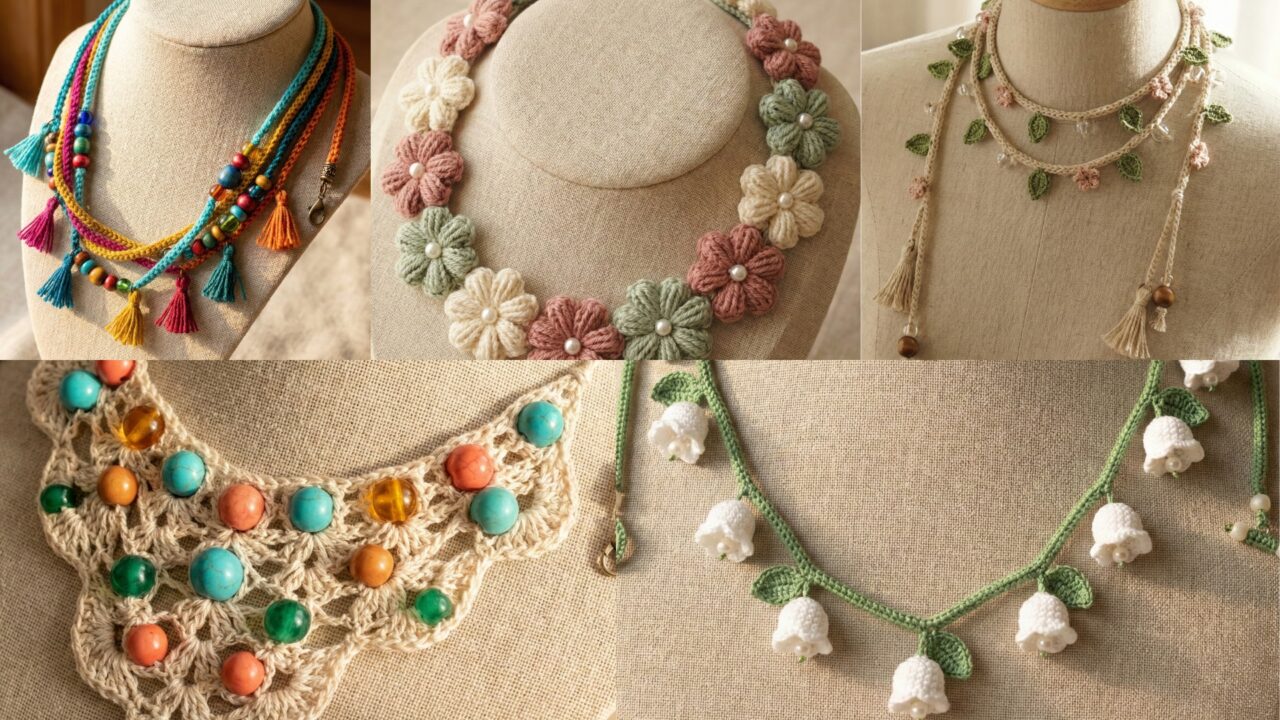
1. Crochet Beaded Lace Necklace Pattern
Skill level: Intermediate — lace stitches and pre-stringing beads
Finished length: 15–16″ (choker). Scale by adding foundation chains.
Materials (sample):
- Size 10 crochet cotton thread (pearl white) — ~50 yd
- Size 11 seed beads (glass) — ~200 beads
- Steel hook 1.5 mm
- Beading needle, small lobster clasp + two jump rings, crimp beads optional
- Tapestry needle, small pliers
Concept: a narrow lace strip worked in the round (or flat and joined) with single seed beads integrated into a repeating V-stitch lace motif.
Step-by-step
Preparation — pre-string beads
- Thread your beading needle with the crochet thread and slide ~200 seed beads onto the thread. Push beads far down the thread but keep them accessible.
Foundation
2. Chain 90 (example for a 15″ choker — recalc using your swatch: stitches per inch × desired length). Turn.
Row 1 (base)
3. Sc in 2nd ch from hook and across (89 sc). Ch 1, turn. This gives a neat foundation.
Row 2 (start lace + bead placement)
4. Ch 3 (counts as dc), slide 1 bead up, dc in next st catching bead on post so bead sits on front of fabric; ch 1, skip 1 st, dc in next st; repeat across. End with dc in last st. Turn.
Row 3
5. Ch 1; sc in dc, ch 3, sc in bead-studded dc space; repeat across. This creates small arches. Turn.
Repeat pattern
6. Repeat Rows 2–3 (or use 4-row repeat for your design) until the piece measures the same as your choker length. Block lightly to open the lace and show beads.
Edging and closure
7. Work one round of sc around the entire strip (if flat) to tidy edges. Add a small picot every 6–8 sts for delicate scallops.
8. Add jump rings to each end: fold ends inward and whipstitch the last 8 sts to make a small cord end, insert into end cap, and attach jump ring. Use pliers to affix lobster clasp to one ring.
Variations & styling
- Add a tiny pendant to the center ring for a focal point.
- Use two contrasting bead colors for a sunrise effect across the lace.
- Make longer (princess length) by increasing initial chain or repeating pattern more.
Troubleshooting
- If beads bunch: use a slightly larger hook or reduce bead frequency (every 3rd stitch).
- If the edge curls: add an additional sc round or use finer thread for base rows.
Care
- Hand wash gentle, reshape while damp, lay flat to dry. Avoid high heat.
2. Crochet Lariat Vine Necklace Pattern
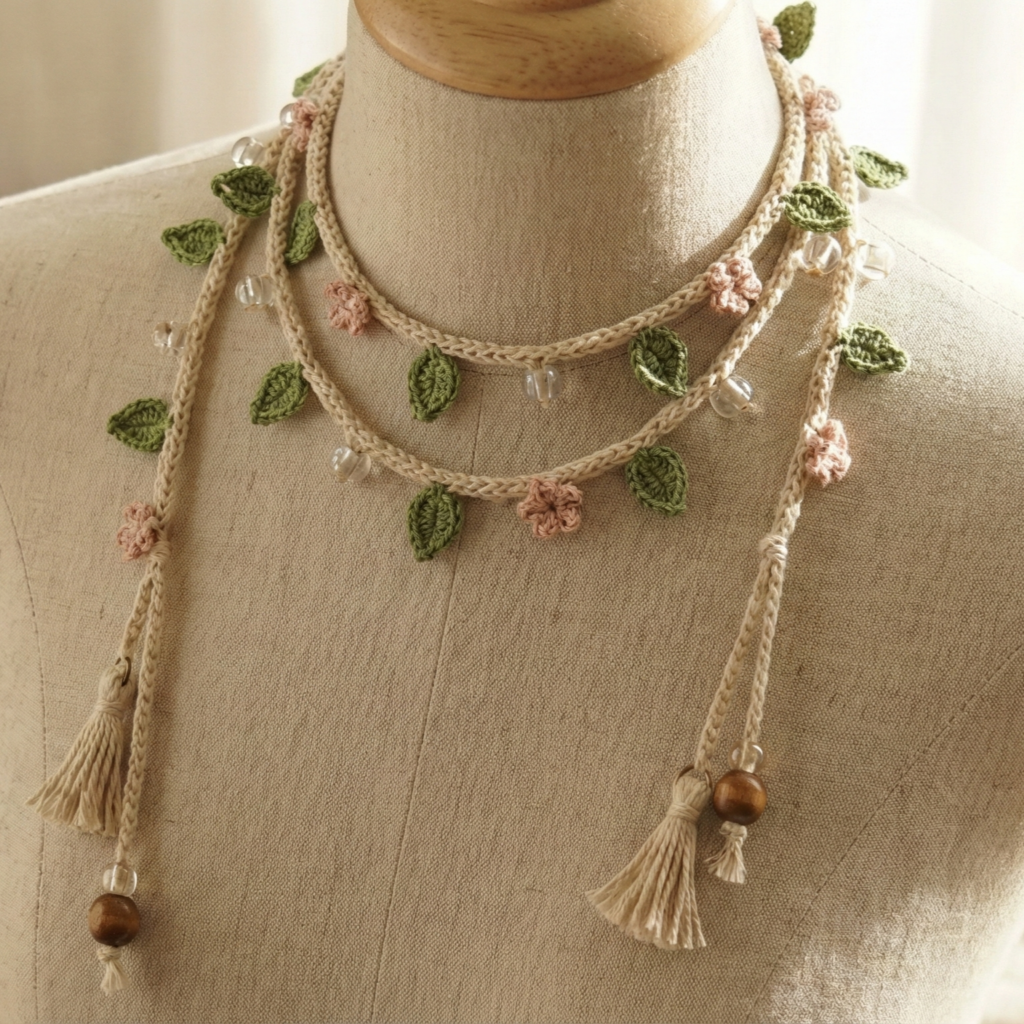
Skill level: Confident beginner — chain crochet, simple picot leaves
Finished length: 60–72″ (long lariat that wraps twice or thrice as desired)
Materials (sample):
- Fingering/sock weight yarn or bamboo (thin) — ~150–200 yd
- Small glass beads (4 mm) — 40–60 mixed along the length (optional)
- Crochet hook 2.75–3.5 mm (match yarn)
- Small tassel or bead for each end (optional)
Concept: a long crocheted cord embroidered with bead clusters and crocheted vine leaves and small flowers. No clasp: tie or loop closure.
Step-by-step
Cord base (i-cord / chain or Tunisian simple cord)
- The simplest way: make a narrow crocheted cord using the chain + slip stitch method for strong, flexible cord.
- Chain 4 (or 6 for thicker cord).
- Row 1: sl st in 2nd ch from hook and across to make a tight cord. Continue working in the round or fold and slip-stitch into the back loops for a tubed cord until desired length is reached (60–72″). Alternatively use a crochet braid (3 thin chains braided) for a boho look.
Add vine detail as you go (beads pre-strung optional)
2. If using beads: pre-string beads onto the yarn before beginning the cord. Slide a bead up every 12–15 stitches and work a small leaf around it: ch 6, sl st into bead base to form leaf loop, then continue cord. Or attach beads with a tiny picot stitch.
Leaf motif (worked into cord)
3. To make a leaf along the cord: pick up at the cord by inserting hook into a stitch or chain space, ch4, sc, hdc, dc (or for fine look sc, hdc, sc), sl st back into cord to secure. Space leaves every 3–6″.
Small flower (optional)
4. For a tiny flower: MR, ch1, 5 sc in ring, sl st to join; ch 3, 3 dc in same st, ch 3, sl st — five petals. Sew to cord where desired.
Finishing ends
5. Add heavier beads and a tassel or crocheted tassel at each end. Make a slip-loop near one end (a small cord loop) to tie around a bead for quick on/off.
Styling & variations
- Wrap twice around the neck and let the ends dangle with beads/tassels for a relaxed look.
- Use metallic thread for a subtle evening sheen.
- Make a detachable pendant by adding a small lobster clasp mid-cord.
Troubleshooting
- Long cords can stretch: use a non-stretch yarn or occasionally work a round of slip-stitch in the back loops only to create stability.
- If cord is too floppy, double up the yarn.
Care
- Hand wash or machine gentle inside a laundry bag; reshape and dry flat.
3. Crochet Adorable Flower Knit-Look Necklace Pattern
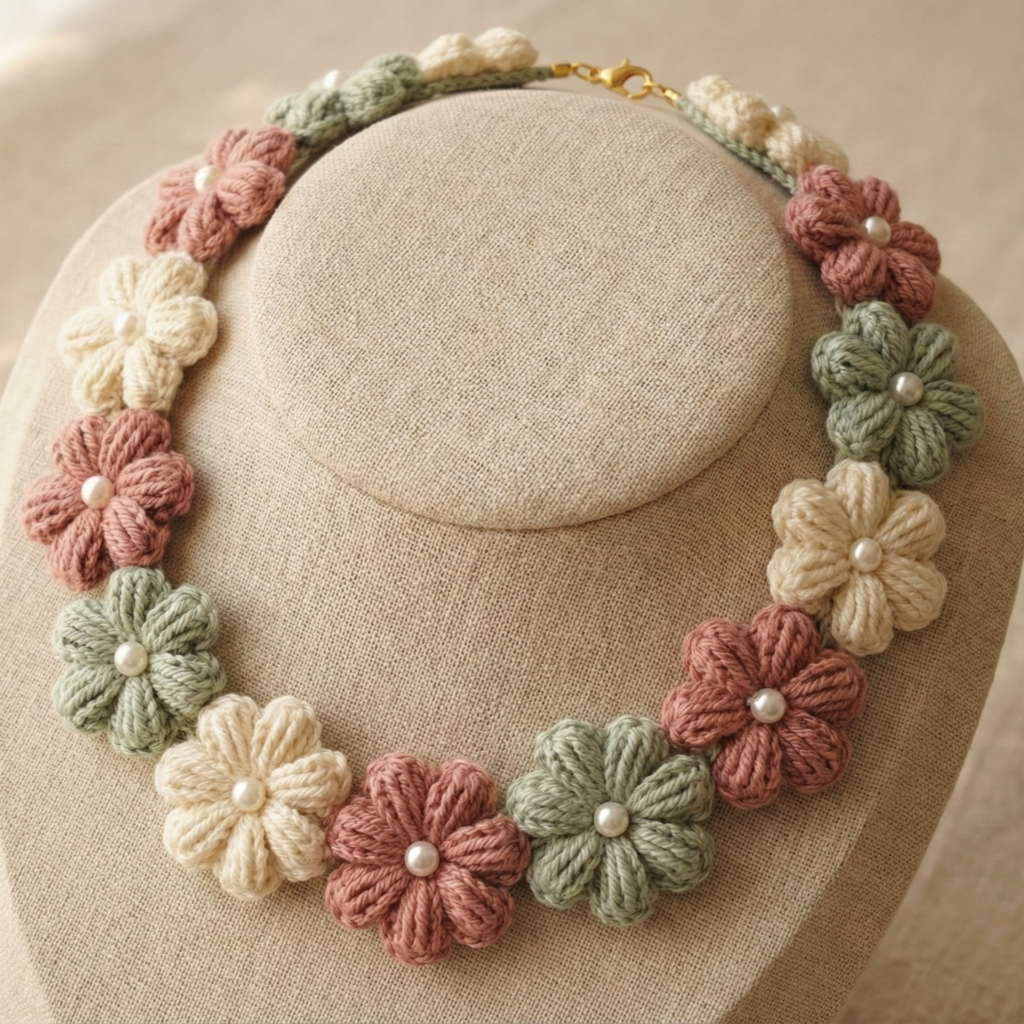
Skill level: Intermediate (shaping petals and joining motifs)
Finished length: 16–20″ (necklace composed of flowers)
Materials (sample):
- Soft sport/DK yarn (cotton or bamboo) in 2–3 colors — 150 yd total
- Hook 3.25–3.75 mm
- Small beads or pearls for flower centers — 12–20
- Tapestry needle, small clasp or crochet loop closure
Concept: crochet flowers worked so the petals appear knitted (use crossed stitches or raised slip-stitch rows), joined into a continuous necklace with small beads as centers.
Step-by-step
Flower motif (make 12–16)
- MR; Round 1: ch1, 8 sc in MR, sl st to join. (8)
- Round 2 (petal base): ch3, (3 dc, ch3, sl st) in next sc around to create 8 shell bases; sl st into base to secure. Fasten off or change color for petal tops.
- Petal row (knit-look): join contrast yarn at the start of a shell. Work petals using crossed front-post slip stitches to get a ribbed, “knit” texture:
- Into the shell: [sl st in shell, ch2, sl st in same spot, ch2, cross sl st of previous petal] — this sequence builds a raised rib; alternatively use fp sc and bp sc in succession to create ribbing.
- Make 12–16 flowers, each ~1.25–1.5″ across depending on yarn.
Join flowers
5. Join flowers edge-to-edge using slip-stitch or mattress stitch so they form a continuous strip long enough to encircle the neck (e.g., 12 flowers × 1.25″ ≈ 15″ — adjust count to fit). Add small pearls between flowers by sewing a tiny bead into the join for sparkle.
Backing & stability
6. For a neat finish, make a thin chain (2–3 mm cord) to pick up behind the flowers as a backing: single crochet along back of join to create a supportive band.
Closure
7. Add a small lobster clasp and extender chain at ends. Alternatively crochet a loop on one end and attach a decorative button on the other.
Variations & styling
- Use tonal gradient for an ombré necklace.
- Add tiny leaf appliqués between flowers for a posy look.
- Make a matching bracelet by joining 4–5 flowers and adding a button closure.
Troubleshooting
- If flowers flip: sew them down through the center to the backing strip.
- If petals flatten: block petal shapes using pins to cup them slightly.
Care
- Delicate hand wash recommended; lay flat to dry.
4. Crochet Lily of the Valley Vine Dangling Necklace Pattern
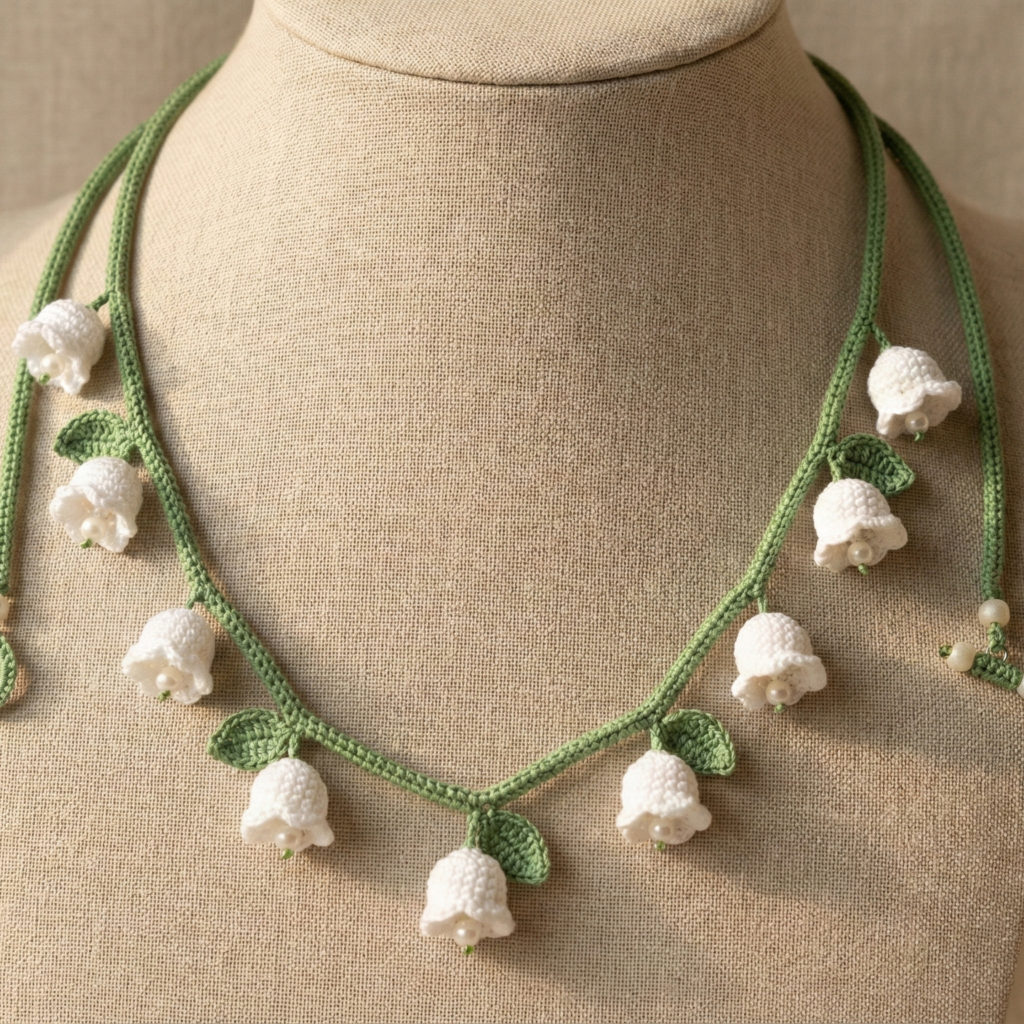
Skill level: Intermediate — patterning tiny bell motifs and attaching to vine base
Finished length: 18–22″ (vine with several dangling bells)
Materials (sample):
- Fine cotton thread or fingering yarn (white for bells, green for vine) — ~80–120 yd
- Tiny white bell beads or 3–4 mm white glass beads for centers — ~20
- Hooks: 1.75–2.75 mm for bells / 2.75–3.5 mm for vine
- Small jump rings and clasp optional
Concept: a delicate crocheted vine worked as a long cord with small bell motifs (dangles) attached at intervals to mimic lily-of-the-valley.
Step-by-step
Vine cord
- Chain length to desired necklace base (example: chain 80). Work a round of sc along the chain to form a cord, or use a tubular i-cord technique for a rounded vine. Continue until the cord measures desired length (18–20″).
Bell motif (make 12–16)
2. MR with white thread. R1: 6 sc into MR (6). R2: inc around (12). R3: sc around for 1 round. R4: sc, dec across to taper (8). Fasten off leaving long tail for sewing. Add a tiny white bead inside the bell and sew closed slightly, leaving bell open at bottom. Alternatively make a bell with open bottom (do not fully close).
3. Make 12–16 bells and lightly shape each by easing open with finger; block if necessary.
Attach bells to vine
4. Space bells at irregular intervals along the cord: every 1–1.5″. Sew bell tops to vine with sewing yarn through the bell top stitches; hide stitch inside the cord. Add a single small green leaf (ch5, sc, hdc, sc) near clusters for realism.
Embellishment
5. Add tiny sparkly beads at the base of some bells (sewn with thread) to catch light.
Closure
6. Attach a small clasp and chain extender, or make a small loop and single decorative bead toggle.
Styling & variations
- Make a matching hair vine by lengthening the cord and adding more bells.
- For bridal use, add tiny crystal beads inside bells for sparkle.
Troubleshooting
- If bells pull the vine down: make vine slightly thicker (tubular cord) to support weight.
- If bells fold in: sew a couple of internal stitches to hold the bell rim open.
Care
- Hand wash gently; reshape bells and dry flat.
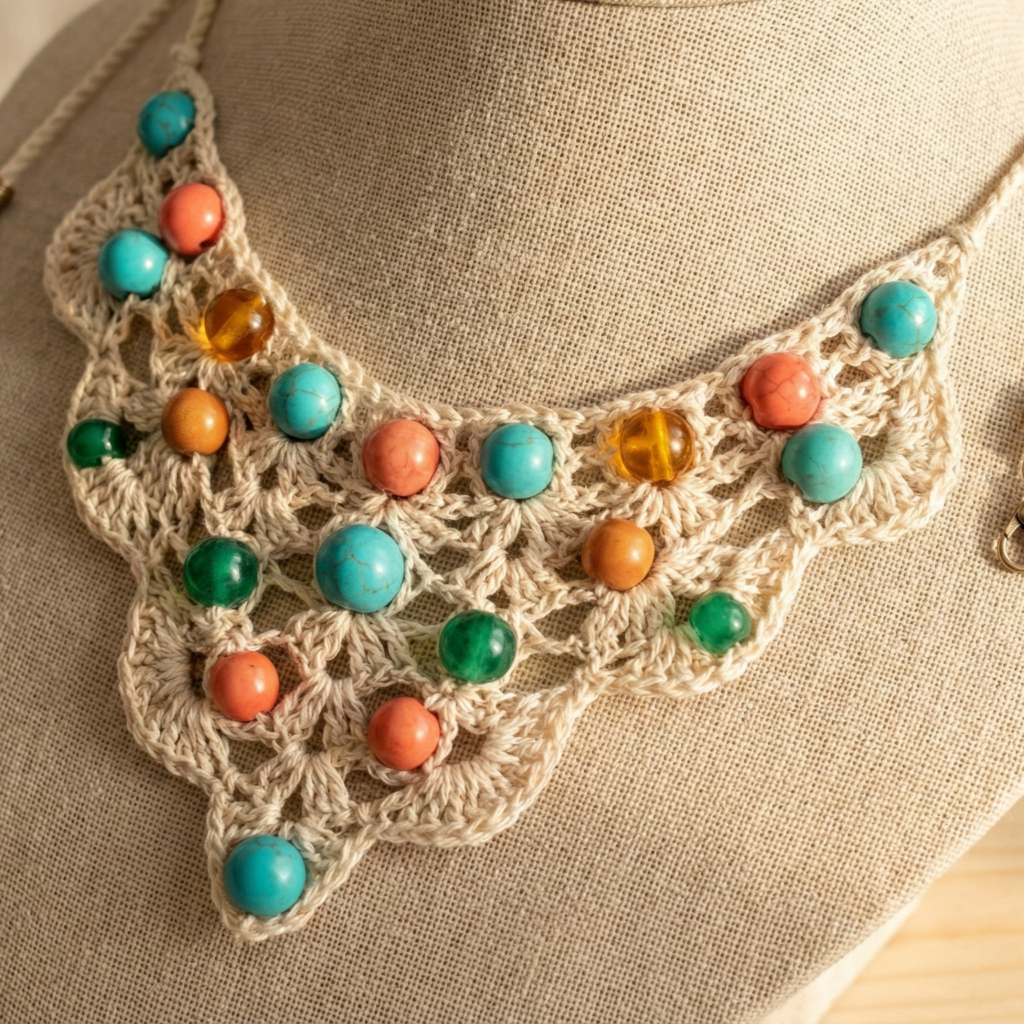
5. Crochet Boho Colorful Necklace Pattern
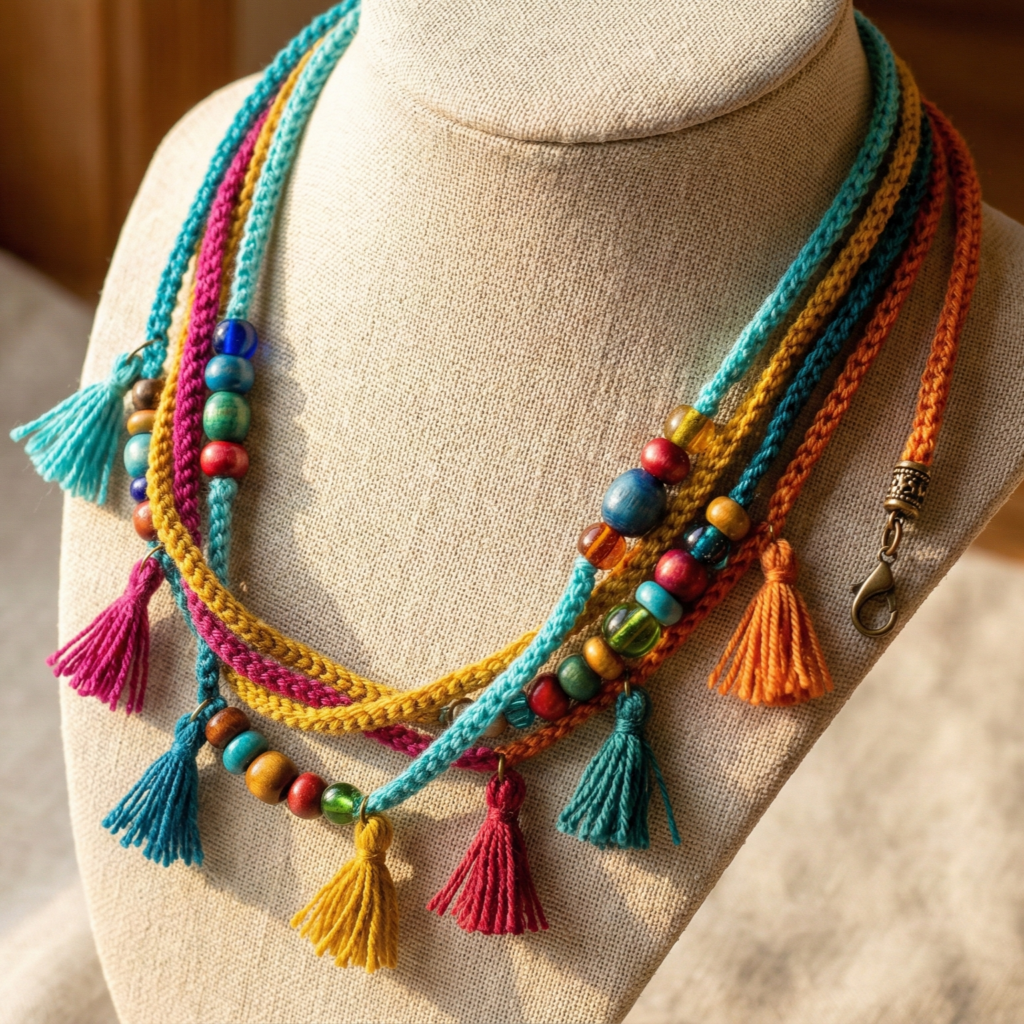
Skill level: Confident beginner — color changes and joining beads
Finished length: 18–22″ (collar / princess length)
Materials (sample):
- Multiple colors of fingering/sport yarn (5–6 colors), total ~150–200 yd
- Assorted wooden or glass beads (6–8 mm) — 20–30
- Hook 3.5 mm
- Jump rings, clasp optional
Concept: whimsical multi-strand necklace combining thin crocheted ropes, spaced beads, and small tassels — layered or single strand depending on preference.
Step-by-step
Make multiple cords
- Create 3–5 narrow cords in different colors: chain 150 (or desired length) and work 1–2 rounds of slip-stitch or sc to make slim cords. Alternatively make 2 cords of 22″ each for layered look.
Add beads
2. Slide larger beads onto the yarn before crocheting, or sew them on afterwards in spaced groupings (for example, three beads grouped then 10–12″ of plain cord). Secure each bead by stitching into place through the cord center.
Make small tassels
3. Make tiny tassels from leftover yarn: wrap yarn around a 1.5″ card 8–10 times, tie and cut one side. Trim and attach tassels at cord ends and several places in the strand for boho charm.
Assemble multi-strand necklace
4. Align cords on a flat surface in chosen order. Use an end cap or decorative bead tube to gather the ends and attach a jump ring. Repeat on the other side. Attach clasp and an extender chain.
Single-strand alternative
5. Twist two cords together for a thicker rope, add bead clusters and top with tassel ends. Finish with a single clasp.
Variations & styling
- Use macramé knot near beads for textural contrast.
- Make bright summer palette or earthy neutrals for fall boho.
Troubleshooting
- For uneven tension: practice even slip-stitch tension across cords, or make cords slightly longer to allow trimming.
Care
- Machine wash gentle in a mesh bag for sturdy yarns; hand wash for delicate fibers; lay flat to dry.
conclusion
Crochet necklaces offer enormous creative flexibility — from delicate seed-bead lace to rustic boho cords. A few final practical tips to make your post and patterns shine:
- Make swatches: even for jewelry, a small swatch helps tune tension and bead spacing so the finished piece drapes correctly.
- Use light hardware: jewelry feels better when hardware weight is in balance with fiber weight. Tiny jump rings and lightweight clasps are usually best for crochet necklaces.
- Think in layers: many crochet necklaces work beautifully layered — a fine beaded choker + a drapey lariat, for example.
- Photograph detail: show a close-up of beadwork, an overview shot of the whole necklace, and a styled image on a model or mannequin so readers can see scale.
- Offer variations: for each pattern consider a “dressy” (glass pearls/crystals) and “casual” (wood beads/cotton) version — this helps readers imagine multiple uses.
- Care labels: include washing and drying instructions with patterns and finished pieces.