Crochet mini food amigurumi is one of the most fun ways to turn yarn scraps into something cute, playful, and giftable. These tiny projects are quick to make, easy to customize, and perfect for decorating shelves, bags, keychains, play kitchens, pretend food sets, or handmade gift boxes. They also let you practice shaping, color changes, stuffing, and sewing in a way that feels simple and rewarding.
This collection includes five creative mini food amigurumi patterns: a Chocolate Bar, Chicken Leg, Taco, Strawberry Birthday Cake with a Candle, and a Miniature Spring Roll. Each pattern is written with beginners and intermediate crocheters in mind, and each one includes clear materials, step-by-step instructions, shaping tips, and finishing ideas so the result looks polished and adorable.
A few quick notes before starting:
- Use a smaller hook than usual if you want the stitches tight and clean.
- Cotton yarn works especially well for food amigurumi because it holds shape nicely.
- Stuff lightly unless you want a puffier shape.
- Embroider details securely if the item is going to be handled often.
Common abbreviations used in these patterns
- MR = magic ring
- ch = chain
- sc = single crochet
- inc = increase, 2 sc in the same stitch
- dec = decrease, usually sc2tog
- sl st = slip stitch
- hdc = half double crochet
- dc = double crochet
- st(s) = stitch(es)
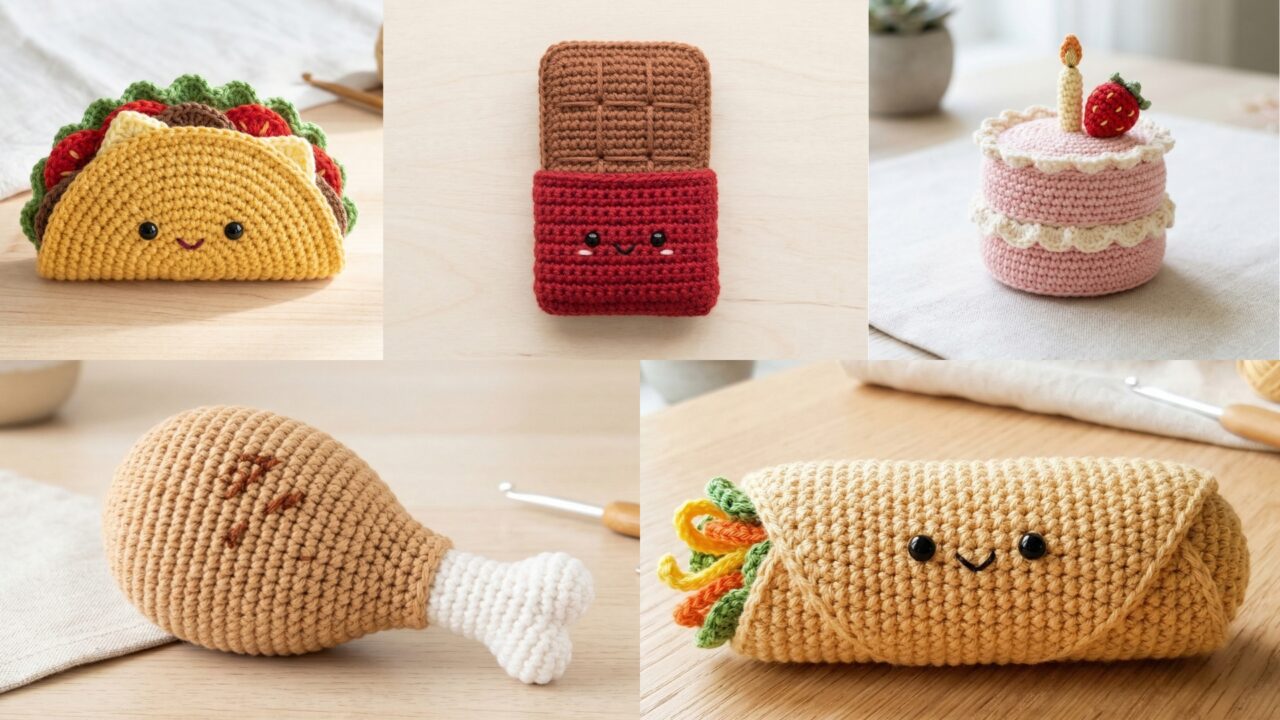
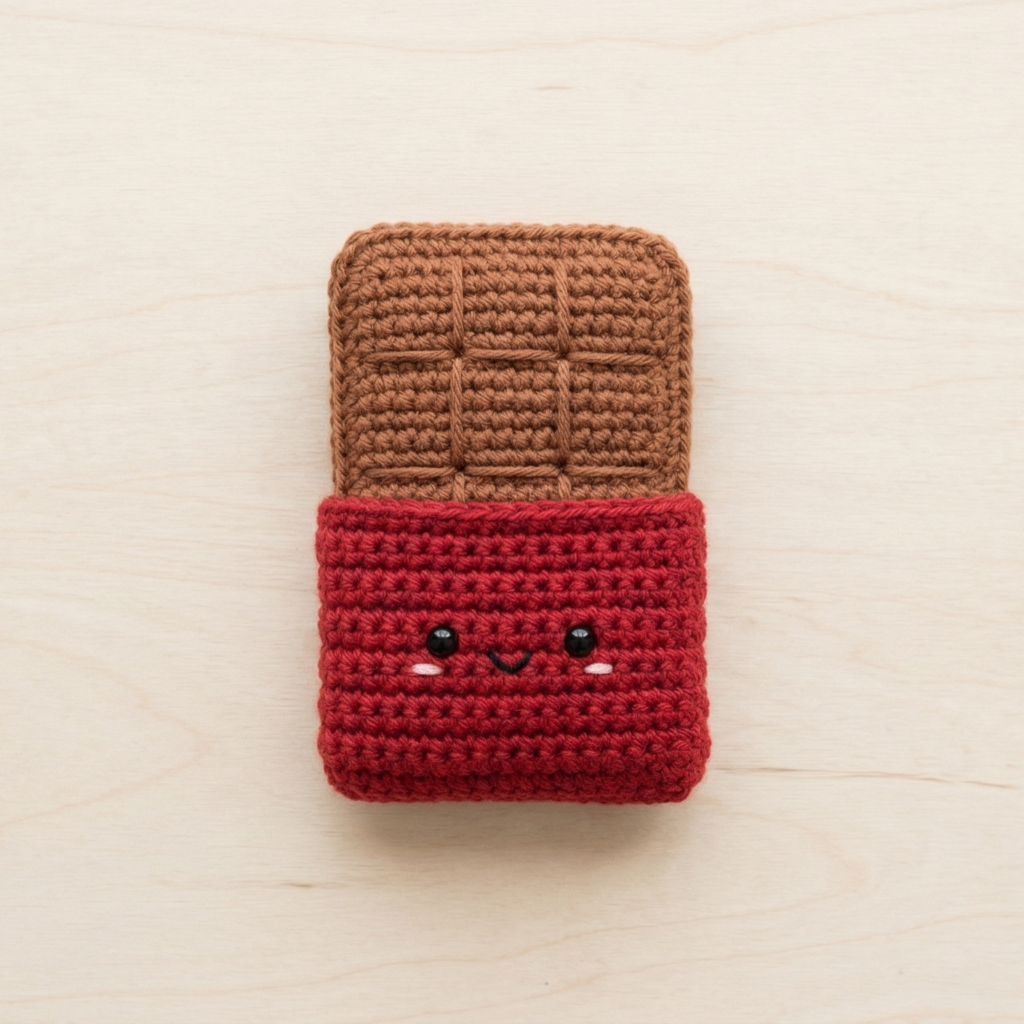
1. Crochet Chocolate Bar Amigurumi Pattern
Skill level: Beginner
Finished size: about 3 to 4 inches long
Style: Cute, simple, and perfect for scrap yarn
A chocolate bar amigurumi is a great starter project because it is small, rectangular, and easy to shape. You can make it plain, add “wrapper” details, or embroider little square segments on top to make it look like a real candy bar.
Materials
- Brown yarn for the chocolate
- A slightly lighter brown or cream yarn for wrapper details
- Crochet hook, usually 2.5 mm to 3.5 mm
- Polyester stuffing
- Tapestry needle
- Scissors
Step-by-step guide
Step 1: Make the main rectangle
- Start with a chain that gives you the width of the chocolate bar.
- Work sc across the chain to create the first row.
- Turn and continue with sc rows until the piece becomes a small rectangle.
- Keep the edges straight and even so the bar looks neat.
Step 2: Shape the bar
- Once the rectangle reaches the correct size, fold it in half lengthwise.
- Sew two sides together to form a small pouch shape.
- Leave one opening for stuffing.
Step 3: Add stuffing
- Fill the chocolate bar lightly with polyester stuffing.
- Keep it firm but not overstuffed.
- Close the final opening neatly with a tapestry needle.
Step 4: Add chocolate segments
- Use a tapestry needle and cream or slightly darker yarn to stitch lines across the top.
- Create small square sections to mimic a chocolate bar design.
- You can also stitch a tiny border around the edges for a wrapper look.
Step 5: Finish the piece
- Weave in all ends.
- Shape the bar with your hands so it looks clean and even.
- If you want a glossy candy look, use smooth cotton yarn.
Finishing tips
- Make a set in different shades of brown for milk, dark, and white chocolate.
- Add a tiny embroidered label for a boutique-style design.
- Keep the stuffing light so the bar stays flat and realistic.
2. Crochet Chicken Leg Amigurumi Pattern
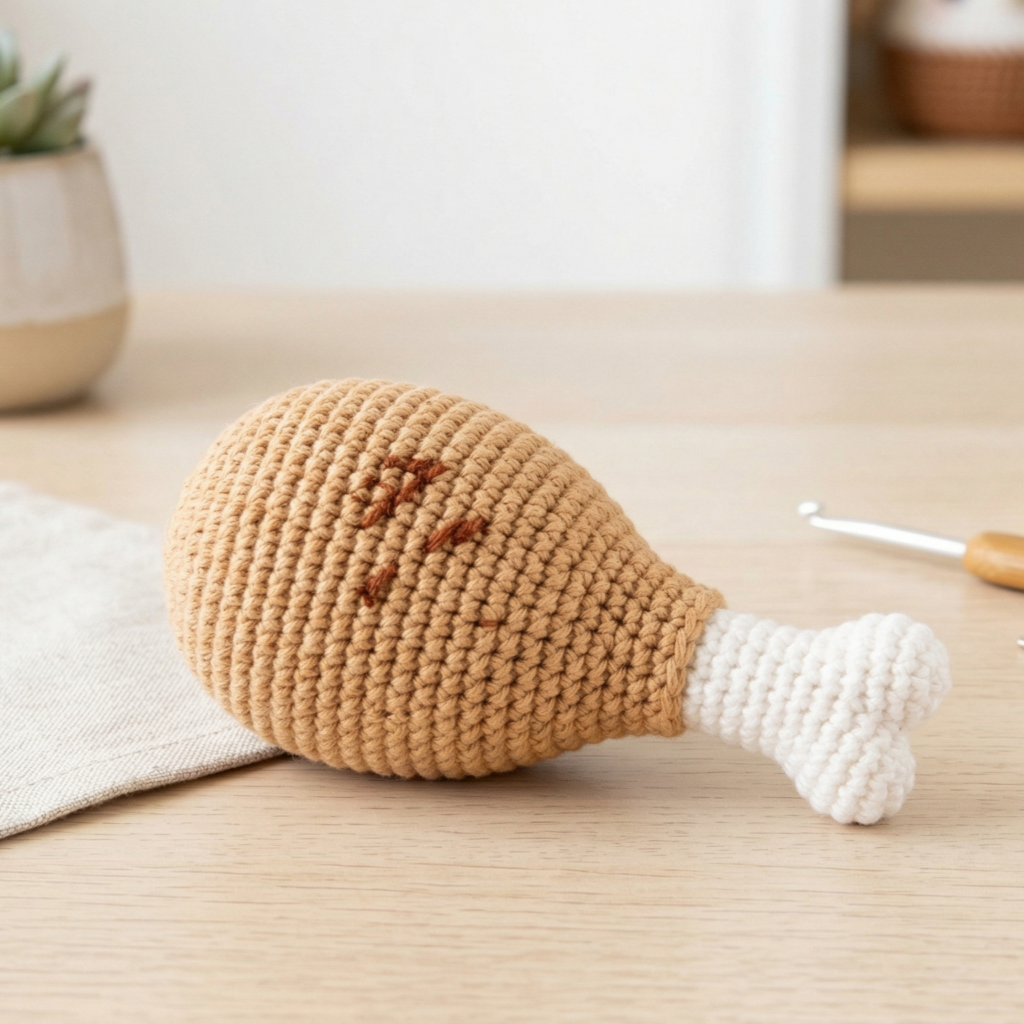
Skill level: Beginner to intermediate
Finished size: about 4 to 5 inches long
Style: Fun novelty food plush
This chicken leg amigurumi is playful and surprisingly easy to make. The drumstick shape is formed by a rounded top and a narrow bone, so it gives you a nice chance to practice shaping without needing complicated stitches.
Materials
- Tan or light brown yarn for the cooked chicken portion
- White yarn for the bone
- Crochet hook, usually 2.5 mm to 3.5 mm
- Polyester stuffing
- Tapestry needle
- Scissors
Step-by-step guide
Step 1: Make the chicken top
- Start with a magic ring and work 6 sc into it.
- Increase evenly in each round to make a rounded top.
- Continue with a few rounds of sc until the top becomes plump and drumstick-shaped.
Step 2: Shape the lower end
- Gradually decrease stitches at the lower side of the drumstick.
- This creates the narrowing where the bone will attach.
- Add stuffing as you go so the shape stays rounded.
Step 3: Make the bone
- Change to white yarn.
- Crochet a short tube using sc rounds.
- Keep the tube firm and narrow.
- Make the end slightly rounded by adding a few extra stitches or a small rounded cap.
Step 4: Join the bone and chicken portion
- Sew the white tube to the bottom of the chicken leg.
- Make sure it is centered and secure.
- Add a little extra stuffing around the transition if needed.
Step 5: Add finishing details
- Use a slightly darker brown yarn to embroider little roasted marks if you want more realism.
- Smooth the shape with your hands.
- Weave in all loose ends carefully.
Finishing tips
- Use a slightly firmer stuffing at the top so the chicken leg stays plump.
- Embroider tiny shading lines for a more roasted look.
- Make it in different sizes for pretend food play.
3. Crochet Taco Amigurumi Pattern
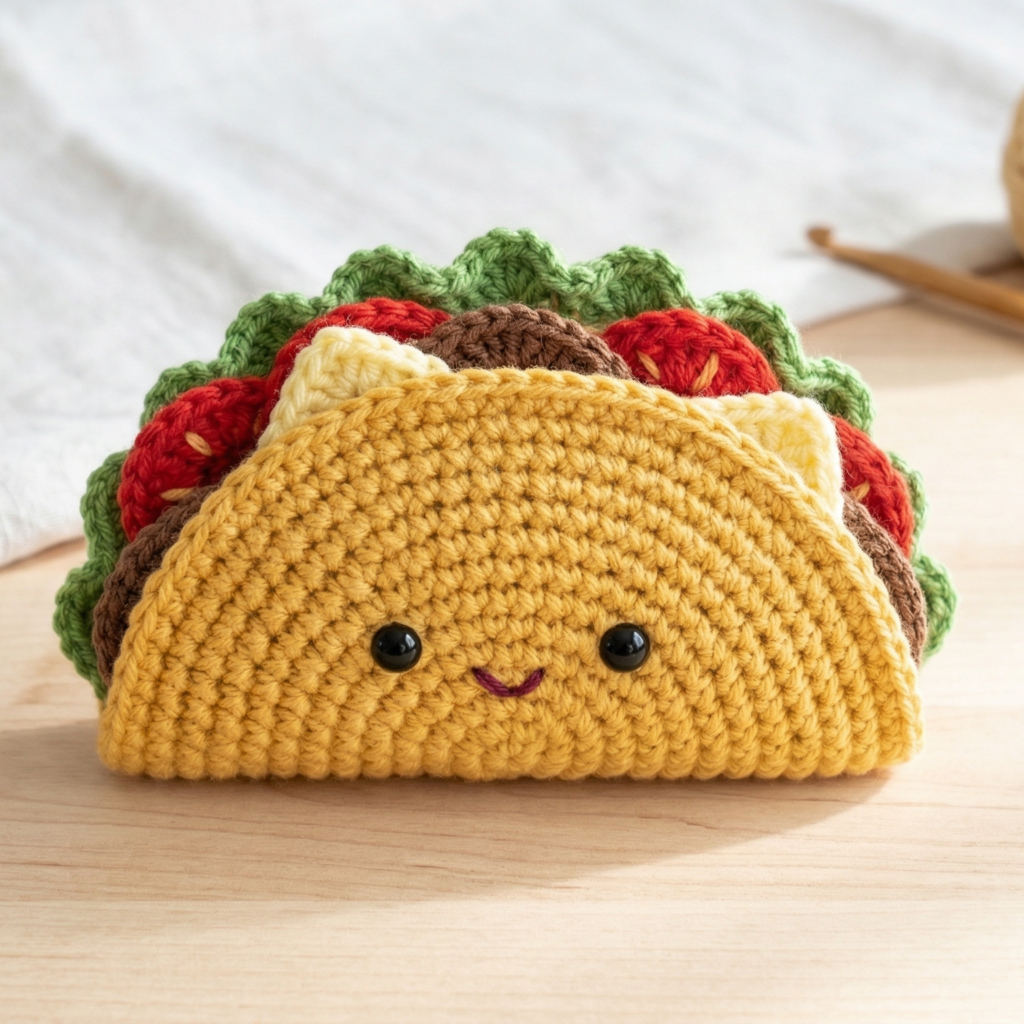
Skill level: Intermediate
Finished size: about 4 to 5 inches wide
Style: Colorful and layered food plush
A taco amigurumi is such a fun project because it gives you the chance to build layers. You can make the shell, lettuce, cheese, tomato, and meat separately and then assemble them like a little crochet meal.
Materials
- Yellow or golden yarn for the taco shell
- Green yarn for lettuce
- Red yarn for tomato
- Brown yarn for meat filling
- Cream or pale yellow yarn for cheese
- Crochet hook, 2.5 mm to 3.5 mm
- Stuffing
- Tapestry needle
- Scissors
Step-by-step guide
Step 1: Make the taco shell
- Chain a curved foundation length.
- Work sc rows to form a flat strip.
- Shape the strip slightly into a curved taco shell by increasing a little in the middle section.
- Fold it into a shallow U-shape and sew the sides partially together.
Step 2: Add the filling
- Make small stuffing bits or tiny layered pieces for the fillings.
- Crochet little ruffled strips for lettuce.
- Crochet a short brown strip or cluster for meat.
- Crochet thin yellow strands or short lines for cheese.
Step 3: Build the taco layers
- Place the brown filling inside the shell first.
- Add lettuce on top.
- Add cheese and tomato bits.
- Adjust the layers so they peek out naturally over the shell.
Step 4: Secure the layers
- Sew each piece lightly into the shell.
- Do not stitch too tightly or the taco will flatten too much.
- Make sure the fillings stay in place.
Step 5: Finish the taco
- Add a little stuffing if you want a fuller shape.
- Close any open seams.
- Weave in all ends neatly.
Finishing tips
- Make the shell in a warm golden color for a realistic taco look.
- Use bright greens and reds for a cheerful appearance.
- Keep the fillings slightly loose so the taco looks fluffy and fresh.
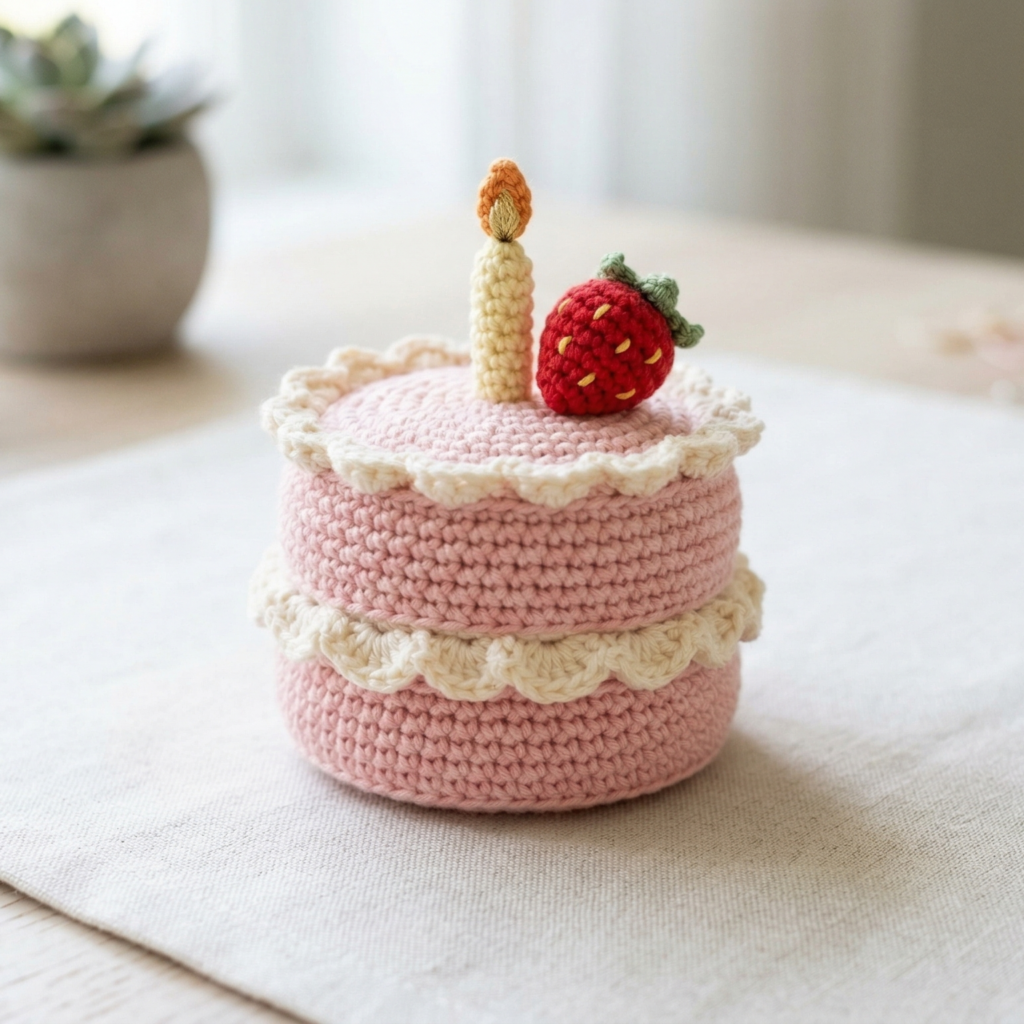
4. Crochet Strawberry Birthday with a Candle Amigurumi Pattern
Skill level: Beginner to intermediate
Finished size: about 3 to 4 inches tall
Style: Cute celebration plush
This strawberry birthday amigurumi is a charming little project that combines a fruit shape with a festive candle on top. It is perfect for birthday gifts, party décor, or seasonal handmade presents.
Materials
- Red yarn for the strawberry
- Green yarn for the leafy top
- Yellow or white yarn for the candle
- Small amount of orange or gold yarn for the flame
- Crochet hook, 2.5 mm to 3.5 mm
- Stuffing
- Tapestry needle
- Scissors
Step-by-step guide
Step 1: Make the strawberry body
- Start with a magic ring.
- Work 6 sc into the ring.
- Increase in rounds to make a rounded strawberry shape.
- Continue with a few rounds of sc so the body becomes slightly tapered and soft.
- Start decreasing near the bottom to shape the strawberry point.
- Stuff the body lightly before closing fully.
Step 2: Add strawberry seeds
- Use yellow or cream embroidery thread.
- Stitch tiny seed marks evenly around the strawberry body.
- Keep them small and spaced out so the strawberry looks neat.
Step 3: Make the leafy top
- Using green yarn, crochet several small leaf shapes.
- Each leaf can be made with a short chain and a few stitches worked back down the chain.
- Sew the leaves around the top opening of the strawberry.
Step 4: Make the candle
- Crochet a small white or yellow tube for the candle.
- Make it narrow and tall enough to sit securely on top.
- Stuff it very lightly or leave it hollow if you prefer a soft shape.
Step 5: Add the flame
- Use orange or gold yarn to crochet a tiny flame shape.
- Sew the flame to the top of the candle.
- Attach the candle to the center of the strawberry leaves.
Step 6: Finish the piece
- Check that all parts are sewn securely.
- Add extra stuffing if needed.
- Weave in all remaining ends.
Finishing tips
- Use bright red yarn for a classic strawberry look.
- Make the flame in a two-tone color for extra charm.
- This piece makes a lovely birthday decoration or small gift topper.
5. Crochet Miniature Spring Roll Amigurumi Pattern
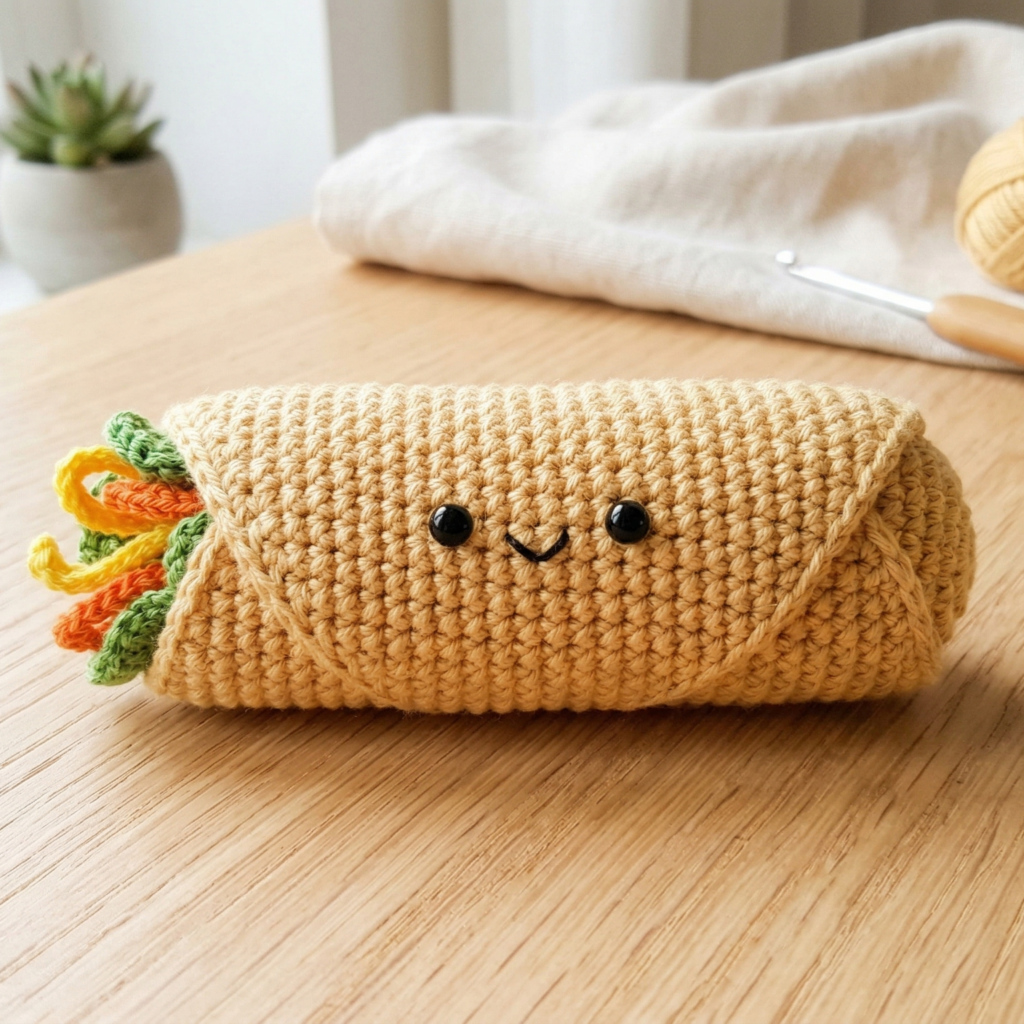
Skill level: Beginner
Finished size: about 3 to 4 inches long
Style: Cute food replica with simple shaping
A spring roll amigurumi is a wonderful project for anyone who likes food-themed crafts. It is simple, neat, and quick to make. The rolled shape is easy to form, and the details can stay minimal or more detailed depending on your style.
Materials
- Beige or light golden yarn for the wrapper
- Tiny amounts of green, orange, or yellow yarn for the filling
- Crochet hook, 2.5 mm to 3.5 mm
- Stuffing
- Tapestry needle
- Scissors
Step-by-step guide
Step 1: Make the wrapper
- Chain the length you want for the spring roll.
- Work sc rows across the chain to form a flat rectangle.
- Continue until the piece is long enough to wrap around into a roll.
Step 2: Add filling details
- Crochet small thin strips in green, orange, or yellow to represent vegetables.
- Make each strip short and narrow.
- These will peek out from the rolled wrapper.
Step 3: Roll the spring roll
- Place the filling strips near one end of the rectangle.
- Roll the piece carefully from one end to the other.
- Shape it tightly so it looks like a real spring roll.
Step 4: Sew the roll closed
- Use the yarn tail and tapestry needle to stitch the seam shut.
- Sew across the underside so the roll stays secure.
- Keep the stitches small and tidy.
Step 5: Finish the ends
- Tuck the filling slightly out of one end if you want a fresher look.
- Round the edges gently with your hands.
- Weave in all remaining ends.
Finishing tips
- Use a soft golden beige yarn for a fried spring roll look.
- Make the filling colors bright and varied for extra detail.
- Keep the roll firm so it does not open.
Conclusion
Mini food amigurumi is such a fun way to turn leftover yarn into tiny handmade treasures. These five patterns offer a nice mix of shapes and styles: a sweet chocolate bar, a playful chicken leg, a layered taco, a festive strawberry birthday piece, and a miniature spring roll. Each one is small enough to finish quickly but detailed enough to feel special.
The best part about food amigurumi is that you can customize the colors, add little details, and create entire sets for play, display, or gift giving. Whether you are making one piece or all five, these tiny projects are a great way to practice shaping, layering, and assembling while having fun with your yarn stash.