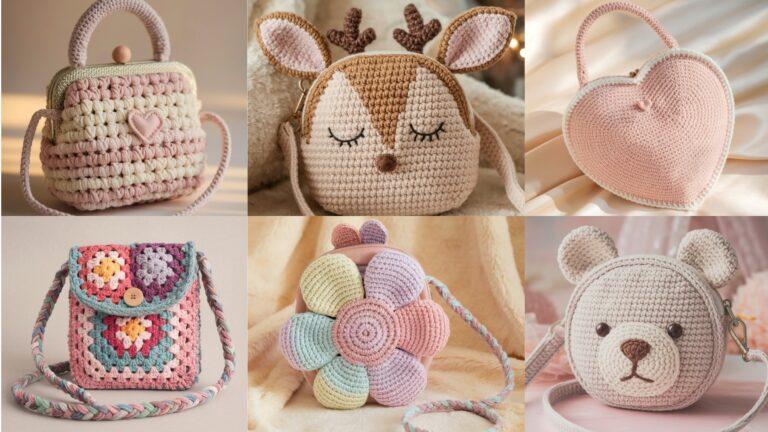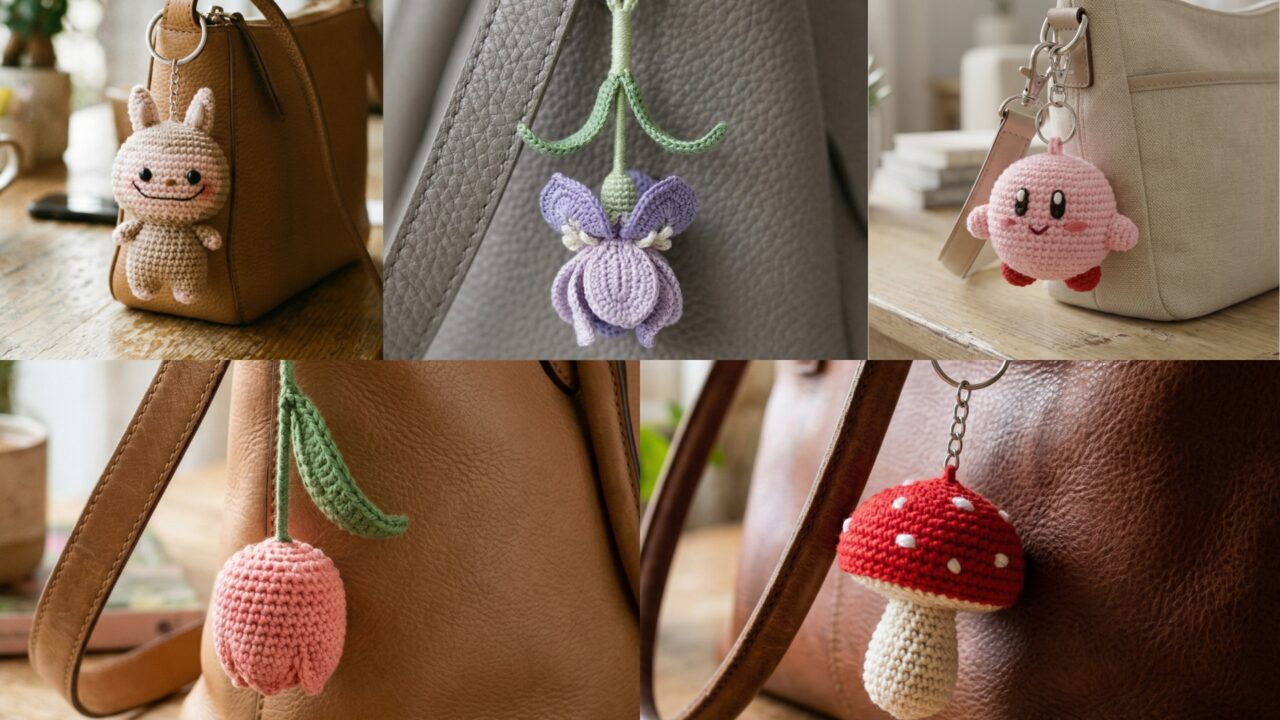
Crochet keychains are one of the most rewarding small projects you can make. They are quick, portable, and endlessly customizable, which makes them perfect for using leftover yarn and turning tiny scraps into something useful and fun. A handmade keychain may be small, but it can still make a big impression. It can brighten up your keys, decorate a bag, or become a thoughtful little gift that feels personal and unique.
What makes crochet keychains especially enjoyable is how much variety you can create in such a tiny format. You can make them cute, elegant, playful, floral, character-inspired, or themed around the seasons. Because they are so small, they are also a great way to practice shaping, color changes, tiny appliqués, and simple amigurumi-style construction without committing to a large project. That makes them ideal for beginners, but still satisfying for experienced crocheters too.
In this post, you will find five creative crochet keychain patterns with clear step-by-step guidance and practical finishing tips. Each one is designed to be small, lightweight, and easy to personalize. Whether you are making a gift, creating something for your own bag, or simply looking for a fun stash-busting project, these keychain ideas are a great place to start.
Quick Notes
Project type: Crochet keychains
Best for: Keys, bags, gifts, stocking stuffers, craft fairs, and stash-busting
Skill level: Beginner to intermediate, depending on shaping and detail
Hook size: Usually 1.75 mm to 3.5 mm, depending on yarn weight
Yarn weight: Lace, fingering, sport, or lightweight cotton works best
Best yarn choice: Cotton yarn or cotton blend for crisp shape and durability
Finished size: Usually 1.5 to 4 inches, depending on the design
Time to complete: About 20 to 90 minutes per keychain
Helpful stitches: Magic ring, chain, slip stitch, single crochet, increase, decrease, half double crochet, double crochet, bobble/puff stitch, embroidery stitches, simple appliqué shaping
Common Materials
Most crochet keychains can be made with a simple set of supplies.
- Thin yarn or lightweight cotton
- Crochet hook suited to your yarn
- Yarn needle
- Scissors
- Stuffing, if making plush-style keychains
- Keychain ring or clasp
- Small stitch marker, if needed
- Optional felt backing, embroidery thread, or safety eyes
- Optional fabric stiffener for flat designs
Because keychains are small and get handled often, it is important to choose materials that hold up well. Cotton yarn is usually the best option because it keeps a tidy shape and is easy to use for small details. A strong ring or clasp also helps the finished piece last longer.
1. Crochet Monster Labubu Keychain Pattern
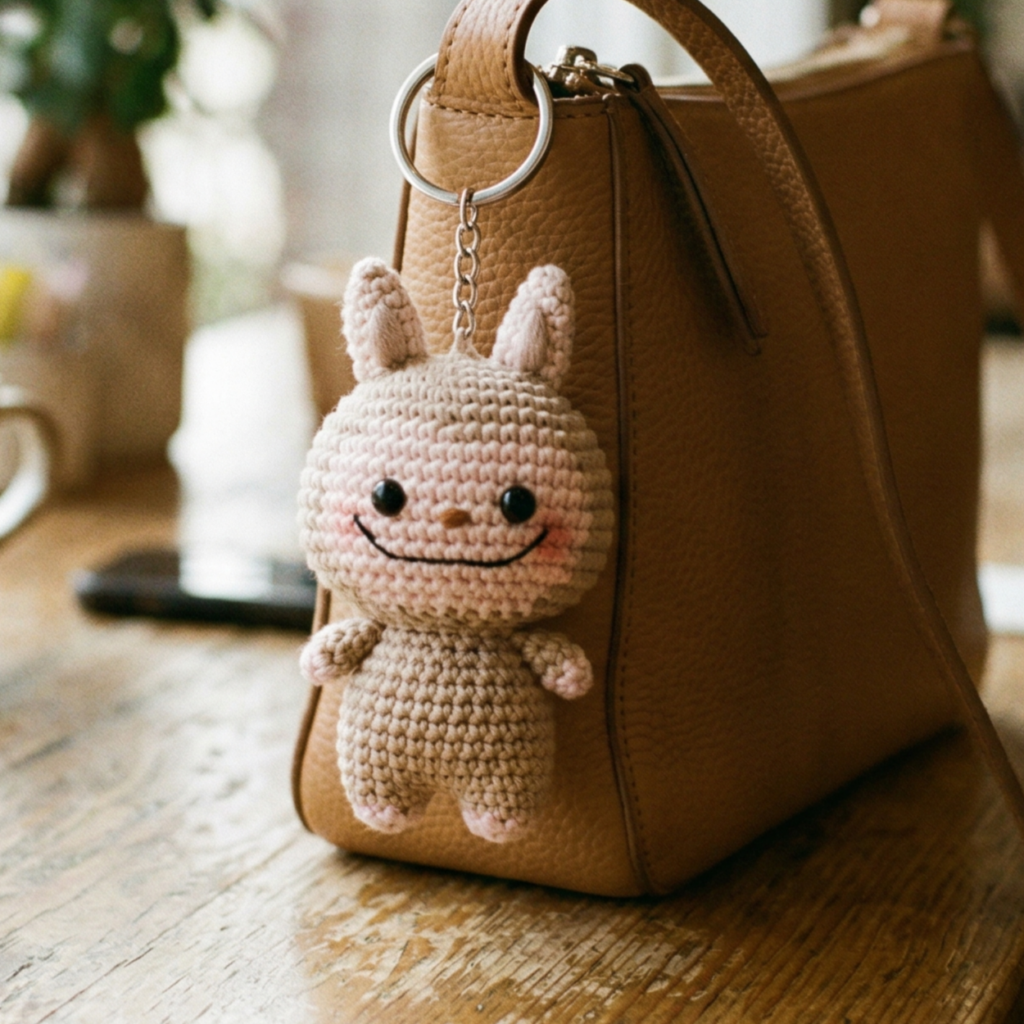
A monster-inspired Labubu-style keychain is playful, quirky, and full of personality. It is the kind of project that feels instantly fun because it turns a tiny bit of yarn into a character with expression and charm. For a keychain, the design should stay compact and lightweight while still keeping the mischievous monster feel.
Quick Notes
Skill level: Intermediate
Finished size: About 2 to 3.5 inches tall
Style: Cute, quirky, playful, monster-inspired
Best colors: Beige, brown, green, gray, pastel pink, or custom character-like shades
Materials
- Lightweight cotton yarn or fine acrylic yarn
- Small crochet hook
- Yarn needle
- Scissors
- Stuffing
- Keychain ring
- Optional safety eyes or embroidery thread
- Optional felt backing for the face
Step-by-Step Guide
Step 1: Decide on the body shape
For a tiny monster keychain, start with a simple rounded head or body shape. A compact oval or slightly round shape works best because it keeps the keychain small and easy to carry. Since it is inspired by a monster character, the shape should feel soft and slightly mischievous rather than too realistic.
A rounded base gives the character a friendly look.
Step 2: Crochet the head or body
Work in the round using single crochet stitches to form a small plush shape. Keep the stitches tight so the stuffing does not show through. If you want the keychain to feel more like a character, make the head slightly larger than the body or keep the body simple and rounded.
A tight stitch texture helps the form hold its shape.
Step 3: Add ears or pointed features
Tiny ears or small pointed details can make the monster design feel more recognizable. Make them separately and sew them on securely. The ears should be small enough that they do not overpower the keychain, but visible enough to give the character personality.
These little details are what make the design feel playful.
Step 4: Create the face
Use safety eyes or embroidery thread to make the eyes, mouth, and any tiny facial expression you want. Keep the face simple and centered so it remains clear at small size. Since the keychain is tiny, a minimal face often works best.
A simple face keeps the monster charming rather than cluttered.
Step 5: Stuff and shape
Fill the body lightly with stuffing so it feels soft but not overfilled. The keychain should stay compact and not feel too bulky in a pocket or bag. Shape it gently with your fingers to make sure both sides are even.
A firm but soft fill works best for everyday use.
Step 6: Attach the keychain loop
Create a small loop at the top or sew a narrow strap onto the top section. This loop will connect the plush to the keychain ring. Make sure it is strong enough to support repeated use.
The attachment should be sturdy, especially for a character-style keychain.
Step 7: Secure all finishing details
Check all seams, ears, and facial features carefully. Trim loose ends and make sure the keychain ring is attached firmly. If needed, add a small felt backing behind the face for extra support.
Helpful Tips
A monster-inspired keychain is perfect for using soft, slightly muted colors because they help the shape look cute rather than too intense. If you want a more playful style, you can use brighter colors or mismatched features. Keep the design small so it stays practical as a keychain.
2. Crochet Tulip Keychain Flower Pattern
A tulip flower keychain is delicate, cheerful, and lovely as a tiny accessory for keys or bags. It brings a soft floral touch without being too large or fussy. This is a wonderful project if you want something pretty, compact, and easy to gift.
Quick Notes
Skill level: Beginner to intermediate
Finished size: About 2 to 3 inches tall
Style: Floral, delicate, fresh, spring-inspired
Best colors: Pink, red, lavender, yellow, white, peach, green
Materials
- Cotton yarn in flower and leaf colors
- Small crochet hook
- Yarn needle
- Scissors
- Stuffing, optional
- Keychain ring
- Optional embroidery thread for details
Step-by-Step Guide
Step 1: Crochet the flower bud base
Start by making a small elongated shape that will become the tulip bud. Unlike a flat flower, a tulip keychain should feel slightly rounded and upright. Work in the round or make a small folded piece that creates a bud-like silhouette.
The bud shape is what gives the flower its tulip identity.
Step 2: Shape the petals
Tulips usually have smooth, slightly curved petals. Crochet a few small petal sections that wrap around the bud. You can make them as separate pieces or work them directly into the body depending on your style. Keep the petals simple and balanced.
A gentle petal shape keeps the flower elegant.
Step 3: Add the stem
Create a short green stem using a narrow crochet tube or a chain-based strip. The stem should be small and sturdy so it supports the flower without making the keychain too long. Attach it securely beneath the flower bud.
A short stem helps the keychain stay compact.
Step 4: Make the leaf
Tulip leaves are one of the most recognizable details. Crochet a small pointed leaf and sew it to one side of the stem. The leaf can be slightly curved for a natural look. Keep it small enough that it does not overwhelm the flower.
A tiny leaf adds botanical charm.
Step 5: Stuff lightly if needed
If the flower bud feels too flat, add a tiny amount of stuffing. The tulip should still remain lightweight and neat. Too much stuffing can make the flower lose its shape, so use only a little if necessary.
Light stuffing helps the flower feel full.
Step 6: Attach the keychain ring
Create a loop at the top of the stem or flower and attach the ring securely. This connection should be strong because the stem is often the narrowest part. Reinforce it with a few extra stitches if needed.
A secure top loop keeps the flower safe on the ring.
Step 7: Refine the petals and shape
Gently adjust the petals and bud so the tulip sits neatly. If you want a more polished look, add a tiny embroidered center line or subtle shading detail with yarn.
Helpful Tips
Tulip keychains look especially pretty in soft spring colors. A pink tulip with a green leaf is classic, but pastel purple or cream can also look lovely. This is a great gift idea because it feels sweet, handmade, and easy to personalize.
3. Crochet Mushroom Keychain Pattern
A mushroom keychain is whimsical, cute, and instantly charming. It has a little fairy-tale feel that makes it perfect for nature lovers, cottagecore fans, or anyone who enjoys playful handmade accessories. This pattern is usually worked as a small amigurumi-style charm, which makes it fun and satisfying to create.
Quick Notes
Skill level: Beginner to intermediate
Finished size: About 2 to 3 inches tall
Style: Cute, woodland, whimsical, cozy
Best colors: Red and white, brown and cream, rust, beige, forest green, pastel shades
Materials
- Cotton yarn or fine acrylic yarn
- Small crochet hook
- Yarn needle
- Scissors
- Stuffing
- Keychain ring
- Optional embroidery thread or small felt dots
Step-by-Step Guide
Step 1: Make the mushroom cap
Start with a small dome or rounded top shape for the mushroom cap. Work in the round and increase evenly so the top curves outward. The cap should be compact and smooth, because it will be the most recognizable part of the design.
A rounded cap makes the mushroom instantly readable.
Step 2: Add the mushroom spots
Create little spots on the cap using embroidery, tiny appliqué circles, or surface crochet. The spots do not need to be perfectly identical. In fact, small irregularities can make the mushroom feel more natural and handmade.
The spots give the mushroom its signature look.
Step 3: Crochet the stem
Make a short cylindrical stem in a light neutral color. The stem should be firm enough to support the cap but still soft and small. Keep it simple and slightly narrower than the cap so the shape stays balanced.
The stem gives the design its classic mushroom structure.
Step 4: Join the cap and stem
Sew the cap to the top of the stem carefully. Make sure the connection is centered and strong. Since the keychain is small, you want the mushroom to feel secure and not top-heavy.
A clean join helps the charm hang properly.
Step 5: Add stuffing if desired
You can lightly stuff the cap, the stem, or both depending on the shape you want. A little filling can help the mushroom look plump and playful, but keep it light so it remains suitable for a keychain.
A soft fill gives the mushroom more dimension.
Step 6: Add the keychain loop
Create a small loop at the top of the cap or just behind the stem. Attach the keychain ring securely. This loop should be firm enough to handle daily use.
A sturdy attachment is important for a small plush charm.
Step 7: Shape and finish
Gently round out the cap and stem with your fingers. Trim any loose ends and check that the spots are sewn on tightly. The finished mushroom should feel balanced, cute, and easy to clip onto keys or a bag.
Helpful Tips
Mushroom keychains look especially adorable in classic red-and-white, but earthy brown and cream versions can feel softer and more natural. You can also make a whole set in different colors for a woodland-themed collection.
4. Crochet Mini Kirby Keychain Pattern

A mini Kirby-inspired keychain is playful, round, and full of character. The shape is simple, which makes it a fun project for a tiny plush-style charm. Because it is so compact, this keychain is easy to carry and makes a very cute gift for fans of soft, character-inspired accessories.
Quick Notes
Skill level: Beginner to intermediate
Finished size: About 2 to 3 inches wide
Style: Cute, round, playful, character-inspired
Best colors: Pink, blush, cream, red, pastel tones
Materials
- Soft pink cotton or acrylic yarn
- Small crochet hook
- Yarn needle
- Scissors
- Stuffing
- Keychain ring
- Optional embroidery thread or felt for facial details
Step-by-Step Guide
Step 1: Make the round body
Start with a small sphere or slightly flattened round shape. Kirby-inspired keychains work best when they are soft and perfectly round. Work in the round and increase evenly to build the shape, then continue without increasing to form the body.
The round shape is what makes the character recognizable.
Step 2: Stuff the body lightly
Once the body begins to close, add stuffing so it feels soft and plump. It should be full enough to keep its shape but not so full that the stitches stretch. A round plush shape works best for this style.
A smooth fill makes the keychain more polished.
Step 3: Add the face
Use embroidery thread or small appliqué pieces to create the eyes, cheeks, and mouth. Keep the facial features simple and balanced. Since the body is already very round and cute, the face only needs a few details to bring it to life.
A minimal face keeps the design sweet and neat.
Step 4: Crochet the feet and hands, optional
If you want a more detailed version, make tiny arms and feet and attach them to the round body. Keep them very small so they do not overpower the keychain. These details add character without making the piece too bulky.
Tiny limbs add a playful touch.
Step 5: Create the keychain loop
Attach a small loop to the top of the body, or create a hidden top strap behind the shape. This loop needs to be strong and centered because the plush keychain should hang evenly from the ring.
A secure loop is essential for daily use.
Step 6: Check proportions
Make sure the face is centered and that the body stays evenly rounded. A slightly squashed or lopsided shape can look less polished, so adjust it gently with your hands if needed.
Step 7: Finish cleanly
Weave in all ends tightly and check that any facial features are secure. The keychain should feel soft but durable enough for regular use.
Helpful Tips
A mini Kirby-style keychain is especially cute in a soft pastel pink. If you want a different look, you can also make it in lavender, cream, or even red for a fresh twist. Keep the body compact so it stays lightweight and easy to clip onto a bag or key ring.
5. Crochet Elegant Iris Flower Keychain Pattern
An elegant iris flower keychain feels graceful, delicate, and a little more refined than a simple daisy or tulip. Iris flowers have a beautiful layered shape, which makes them perfect for a tiny botanical accessory. This pattern is lovely if you want something floral but more sophisticated and detailed.
Quick Notes
Skill level: Intermediate
Finished size: About 2 to 3 inches tall
Style: Elegant, botanical, floral, delicate
Best colors: Purple, lavender, white, yellow, deep blue, soft green
Materials
- Cotton yarn in flower and leaf colors
- Small crochet hook
- Yarn needle
- Scissors
- Keychain ring
- Optional fabric stiffener or light stuffing
- Embroidery thread for details
Step-by-Step Guide
Step 1: Start the flower center
Begin with a small rounded center that will anchor the petals. This center should be neat and compact because the iris flower will build outward from it. Keep the stitches tight so the shape stays clean.
The center gives the flower structure.
Step 2: Crochet the upper petals
Iris flowers often have a few larger upper petals. Crochet these as soft curved pieces or petal shapes and attach them around the center. These petals should look slightly raised and elegant, not flat or stiff.
The upper petals give the flower height and grace.
Step 3: Add the lower petals
Crochet the lower petals in a slightly different shape or size. These may be longer or more pointed depending on the look you want. The contrast between the upper and lower petals creates the signature iris shape.
The layered petals are what make the iris feel distinctive.
Step 4: Add the stem and leaf
Make a short green stem and one or two narrow leaves. The leaves should be elegant and slightly pointed to match the flower’s refined look. Keep the stem short enough that the keychain remains compact.
The stem and leaves help balance the flower.
Step 5: Assemble the flower
Sew the petals, stem, and leaves together carefully. Arrange them so the iris looks balanced and natural. Since this is a keychain, the flower should be small and tidy rather than too open or wide.
A neat arrangement makes the design feel polished.
Step 6: Add slight shaping
If the petals feel too floppy, lightly block them or stiffen them a little so they hold their form. This is especially helpful for flower keychains because it keeps the petals visible and elegant.
A bit of structure helps the flower stay beautiful.
Step 7: Attach the keychain ring
Create a secure loop at the top and attach the ring firmly. Make sure the flower hangs straight and that the petals do not twist around the hardware.
Helpful Tips
An iris flower keychain looks especially beautiful in purple tones, but white and yellow can also make it feel fresh and classic. If you want a more modern look, use a muted lavender with soft green leaves. This design makes a lovely handmade gift because it feels delicate and thoughtful.
Conclusion
Crochet keychains are a wonderful way to make something small, useful, and full of personality. They are quick to finish, easy to personalize, and perfect for using up yarn scraps in a creative way. That makes them a great choice for gifts, bag charms, everyday accessories, or just a fun little project you can complete without a huge time commitment.
These five keychain patterns each bring something different to the table. The monster-inspired keychain is playful and quirky. The tulip flower keychain is fresh and floral. The mushroom keychain is whimsical and woodland-inspired. The mini Kirby-style keychain is round, cute, and characterful. The elegant iris flower keychain feels graceful and refined. Together, they show how much variety you can create with just a little yarn and imagination.
A handmade keychain may be tiny, but it can still feel special every time you reach for your keys or clip it to your bag. With careful stitching, neat finishing, and the right amount of detail, these little projects can become favorites that are fun to make and even more fun to use.