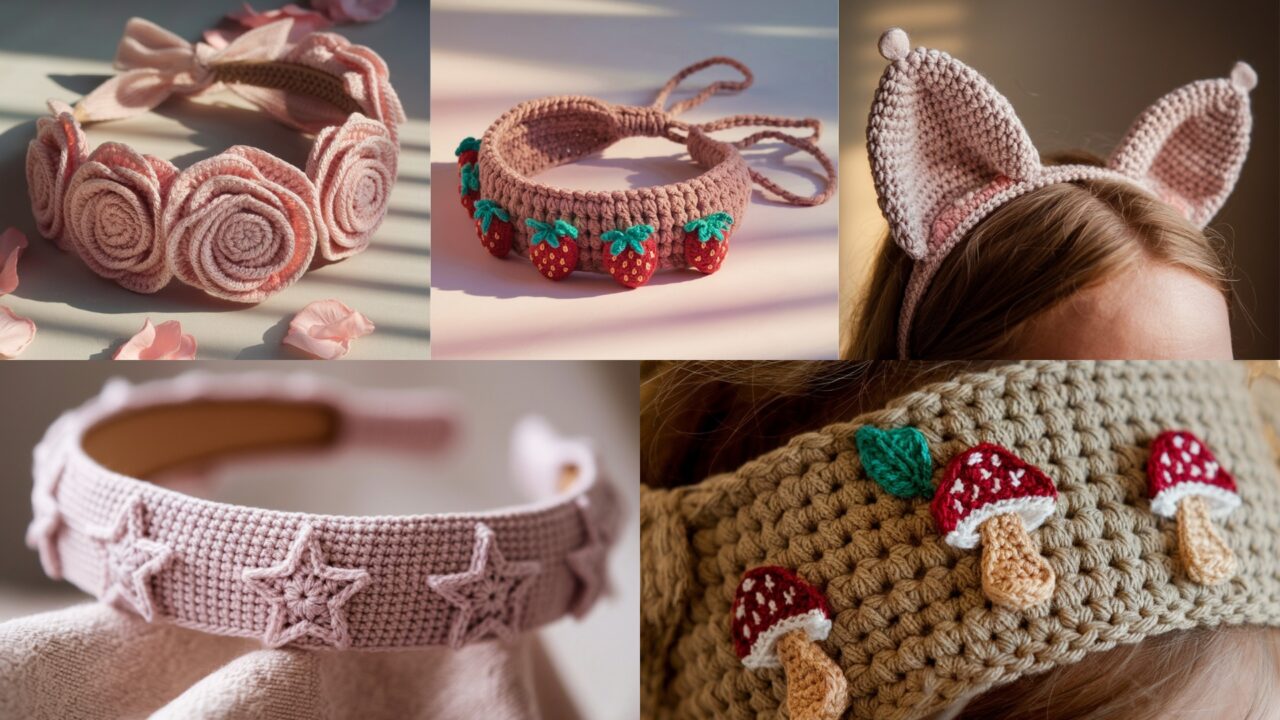
Headbands are the cheat code of accessories: one evening, a skein, and suddenly you look put-together without trying. These five headbands run the gamut — fruity apron-core, woodland whimsy, romantic roses, playful cat ears, and a tiny constellation of stars. I wrote each pattern top-to-bottom with materials, gauge, sizing math, exact round/row instructions, finishing, and quick variations so you don’t have to guess whether it will fit Aunt Karen or your roommate who wears a ski helmet to bed.
Do three things before you begin: swatch, measure the head, and pick a sturdy yarn if you actually expect the thing to survive your life.
Quick universal notes (read this once, ignore at your peril)
- Abbreviations (US): ch = chain, sc = single crochet, hdc = half double crochet, dc = double crochet, tr = treble, sl st = slip stitch, st(s) = stitch(es), MR = magic ring, inc = 2 sc in same st, dec = sc2tog (or invisible decrease), BLO / FLO = back/front loop only.
- Yarn & hook baseline: Most samples use worsted weight (#4) yarn and a 5.0 mm (H) hook. If you use lighter yarn (DK or sport), swap to a 4.0–4.5 mm hook and recalc gauge. If in doubt, swatch.
- Swatch & math (do it): Make a 4″ (10 cm) square in the stitch you’ll use, blocked if your finished headband will be blocked. Count stitches across 4″: e.g. 16 sts → 4 sts/in. To compute foundation chain for a finished head circumference target: finished circumference × sts/in = stitches needed. Example: 21″ × 4 sts/in = 84 stitches. Round to nearest pattern multiple when required; I’ll call out multiples per pattern.
- Sizing targets (finished circumference; negative ease): baby 14–15″, child 16–18″, teen/small adult 18–20″, adult medium 20–22″ (typical sample here), adult large 22–24″. For snug headbands use 0–1″ negative ease; for stretchy lace choose closer to head measurement.
- Construction style: Most headbands here are worked flat then seamed (or joined with a decorative knot); some use a short circular join. I give exact stitch counts for sample adult-medium (≈20–21″ finished circumference) for an easy start.
- Finishing: Always weave in ends securely; wash gently if your yarn label says so; block if pattern benefits from opening lace or flattening motifs. Use mattress stitch or whipstitch for neater seams.
1. Crochet Afghan Needle Strawberry Headband Pattern

Yes, strawberries. Slightly nostalgic, definitely cute. Uses surface embroidery for seeds and a small leaf accent. Works with worsted or chunky yarn for squish.
Skill level: Confident Beginner
Finished sample size: adult medium ~20″ finished circumference × 3″ band width (including leaf).
Materials: worsted cotton or acrylic (#4), 5.0 mm hook, tapestry needle, small amount green + white + yellow for details, stitch marker.
Gauge example used below: 4″ = 16 sc → 4 sts/in.
Repeat / multiple: band is worked as a simple dense panel; foundation stitches equal target stitches (no special repeat).
Sizing math (example)
Target finished circumference = 20″. Gauge 4 sts/in → 20 × 4 = 80 stitches. So foundation chain = 81 ch and sc in 2nd ch to make 80 sc across. (Easier alternative: chain 80 + 1 turning chain — same logic.)
Pattern — panel (flat)
- Ch: ch 81. (This produces 80 sc across when worked in 2nd ch from hook.)
- Row 1: sc in 2nd ch from hook and across — 80 sc. Turn.
- Rows 2–Rows 8 (band height): ch1, sc across 80 sc. Repeat until band measures ~3″ high (approx 8 rows depending on your row gauge). Fasten off and block lightly if needed.
Strawberry appliqué (make 3–5 small berries)
- MR, ch1, 6 sc in MR, sl st to join. (6 sts)
- R2: inc in every st around → 12 sc.
- R3: sc1, inc ×6 → 18 sc.
- R4–R5: sc around (2 rounds) for shape.
- R6: sc1, dec ×6 → 12 sc. Stuff lightly (tiny scrap) if you want 3D berries; for flat applique omit stuffing. Close with sl st and finish. Leave tail to sew down.
Green leaf crown (tiny)
- ch 6, sc in 2nd ch, hdc, dc, hdc, sc; sl st into base. Make 1–2 per berry.
Attach & seed embroidery
- Sew berries spaced across top edge or staggered; tack leaves at berry tops.
- For seeds, use yellow or white embroidery yarn and tiny French knots or straight stitches across berry bodies.
Assembly & finishing
- Fold band into loop and seam with mattress stitch or slip-stitch for a visible seam. For a “headband knot” look, wrap center with a short contrast strip and sew on the back to hold shape (no bulky seams to your head).
- Weave ends and secure.
Variations & tips
- For a chunky, more boho look, hold two strands and use 6.5 mm hook.
- Want a reversible band? Make two identical panels, join together with slip-stitch leaving seam on inside, and stuff lightly for a puffy band.
2. Crochet Mushroom Headband Pattern

Small forest vibes. Features tiny mushroom appliqués and a textured moss-stitch panel for a cozy rustic look.
Skill level: Confident Beginner → Intermediate
Finished sample size: adult medium ~20″ circumference × 2.5″ band width.
Materials: worsted (#4) in neutral + red + white + tan, 5.0 mm hook, tapestry needle.
Stitch repeat/multiple: Moss stitch (linen stitch) is used: repeat multiple is 2 + 1 turning chain; we’ll compute width by sts-per-inch.
Sizing math & foundation
Using the example gauge 4 sts/in and target 20″: 20 × 4 = 80 stitches. For moss stitch use chain = 80 + 1 (odd number), so ch 81.
Panel — moss stitch (flat)
- Ch 81.
- Row 1: sc in 2nd ch from hook, ch1, sk1, sc in next across. Turn.
- Row 2: ch1, sc in first ch-1 space (the little chain space), ch1, sc in next ch-1 space across. Turn.
- Repeat Row 2 until band height ~2.5″. This gives a dense, slightly textured reversible fabric.
Mushroom appliqué (tiny) — make 4–6
Cap: MR, ch1, 6 sc in MR, sl st to join. R2: inc around → 12 sc. R3: (sc1, inc) ×6 → 18 sc. Fasten off leaving tail. Fold cap in half and sew a tiny gathering stitch at the back to shape a curved cap.
Stem: ch 4, sc in 2nd ch from hook and across (3 sc), ch1, turn, sc across for 2 rows, attach to cap base and secure.
Spots: embroider small white dots on caps with satin stitch.
Assembly
- Position mushrooms across band slightly off-center, sew firmly through panel.
- For secure wear, reinforce sandwich seam with a small inner lining strip then join ends. Lining helps mushrooms stay put and stop stitches from stretching.
Finishing & styling
- Add a little leaf cluster embroidered between mushrooms if you’re feeling extra.
- Care: hand wash cold, reshape flat.
3. Crochet Rose Flower Headband Pattern

Romantic, slightly Victorian, great for weddings or dramatic selfies. Uses layered rose appliqués and a wide textured band.
Skill level: Intermediate
Finished sample size: adult medium ~20″ circumference × 3–3.5″ width (with roses).
Materials: worsted or DK (for delicacy), 4.0–5.0 mm hook (use smaller for DF petals), tapestry needle. Optional: wire stem for wearable corsage style (but we won’t do wiring — don’t be that person).
Repeat / multiple: band uses shell repeats (multiple of 6 + 1). Example math below.
Sizing math
Assuming 4 sts/in and target 20″: 20 × 4 = 80 stitches. If shell pattern uses multiple of 6 + 1, find nearest: 80 − 1 = 79; 79 ÷ 6 = 13 remainder 1. To get a whole multiple pick 13 × 6 = 78 +1 = 79 or 14 × 6 = 84 +1=85. Choose 79 (close) or 85 (looser). For snug prefer slightly fewer stitches — we’ll use 79 chain.
Band — shell lace panel
- Ch 80 to produce 79 sc across (worked in 2nd chain).
- Row 1: sc across 79 sts. Turn.
- Row 2 (shell row): ch3 (counts as dc), skip2, (5 dc in next st, skip2, dc in next) repeat across. Turn.
- Row 3: ch1, sc across in spaces & tops to anchor shells. Turn.
- Repeat Rows 2–3 to reach about 2–2.5″ height. Fasten off.
Rose appliqué (layered spiral rose) — make 3 medium roses
- Foundation spiral: ch 51 (or more for bigger rose), sc in 2nd ch from hook and across. Turn.
- Row2: work shell edging along the strip: ch3, 3 dc in next st, ch3, sl st in next repeating to create scallops along the strip’s long edge. This forms petals.
- Form rose: roll the scalloped strip tightly from one end and sew the base as you roll to secure; the scallops become layered petals. Fasten off and weave tail into the center.
- Make a smaller rose by using ch 31 for variation; stack smaller on larger if desired.
Assembly
- Arrange roses across band (centered or offset). Sew through base securely into band using several passes; use a small felt circle underneath each rose to hide stitches and distribute stress.
- Join band into loop with mattress stitch; for a clean back, attach a small oval of felt over the seam.
Finishing
- Light blocking if needed. For bridal use, attach a snap or small sewn tab under one rose so headband can be repositioned or removed easily.
4. Crochet Cat Ears Headband Pattern

Because you need to feel superior and adorable simultaneously. Built as a narrow band with two small triangular ears seamed on top. Comfortable, light, and flexible.
Skill level: Confident Beginner
Finished sample size: adult medium ~20″ circumference × 1.25″ band width; ears add ~2.25″ height.
Materials: worsted yarn, 4.5–5.0 mm hook, tapestry needle. Optional safety for kids only if well-stitched — no small beads.
Repeat / multiple: band is simple sc strip; ear triangles are small sets of decreases.
Band
- Ch 81 for 80 sc across (20″ × 4 sts/in = 80). Row1 sc across 80 sts.
- Rows 2–Rows 5: ch1, sc across 80 sts to make a 1.25″ wide band. Fasten off.
Ear triangle (make 2)
- Ch 7. Row1: sc in 2nd ch from hook and across → 6 sc. Turn.
- Row2: ch1, sc across 6. Row3: ch1, sc2tog, sc in next 2, sc2tog — now 4 sts. Row4: ch1, sc across 4. Row5: ch1, sc2tog twice → 2 sts. Row6: ch1, sc2tog → 1 st. Fasten off leaving long tail. Repeat for second ear.
Optional style: work ear with BLO on base row to give a folded edge or add a little contrasting inner ear by making a smaller triangle in pink and sewing on.
Assembly
- Position ears on top of band about 3–4″ apart centered (or closer for kitten look). Fold band into loop and stitch seam; before closing, pin ears so they point forward and sew multiple passes through base of ear into band. Put a small felt patch inside to reinforce base and hide stitching.
Finishing & durability
- Cat ears tend to flop if only single-layer; for sturdiness stitch a second identical band behind the first and sew together, creating a double-thickness band that holds ear bases upright without wire. Do not insert wire — headbands with wires are unsafe if you drop or sit on them.
5. Crochet Star Headband Pattern

Tiny stars scattered on a slim ribbed band. Space efficient, modern, and surprisingly wearable with a coat.
Skill level: Confident Beginner
Finished sample size: adult medium ~20″ circumference × 1.25″ band width; stars ~1″ across, spaced 1.5–2″ apart.
Materials: worsted or DK for delicate stars, 4.0–5.0 mm hook, tapestry needle.
Repeat / multiple: band uses BLO hdc ribbing; foundation chain multiple = any number. I’ll show sample chain for 80 stitches.
Band — ribbed (BLO hdc worked in rows)
- Ch 81 (80 sts across). Row1: hdc in 3rd ch from hook and across (80 hdc). Turn.
- Row 2: ch2, hdc in BLO across (80 BLO hdc). Turn.
- Rows 3–Rows 8: repeat Row2 until band height ≈1.25″. This creates nice stretch for a slim headband.
Tiny 5-point star motif (make 8–10)
Method 1 — worked flat and sewn:
- ch6, join to form ring with sl st. (ch2, tr, ch2, sl st) in ring five times to make points. Tighten center and shape. Or follow this tidy version:
Method 2 — 5-point star (compact)
- MR, (ch3, sl st into MR) repeat 5 times to create 5 loops. Tighten.
- Into each loop: sc, hdc, dc, hdc, sc — pull slightly to shape a point. Sew tightly and fasten off.
Placement & attachment
- Sew stars evenly across band, spacing about 1.5–2″ apart. Use tiny stitches through the back loops of ribbing to anchor; if you want them removable, sew with a small shank or loop that slips over button so stars can be taken off to wash band. Clever, practical.
Finishing
- Fold band and seam or use a decorative knot in front (wrap a short strip around to hide seam). Weave ends and trim.
Final fitting, care & real-world tips
- Try it on before final seaming. When band is nearly done, loop it around the model head (or your own) to check fit — adding/subtracting rows is easy before seaming.
- Seam neatly. Use mattress stitch or invisible join for the back so the headband sits comfortably on your skull. If the band will be visible on top (for twist designs), make the seam opposite the main design.
- Reinforce appliqués. Felt backing or a small inside stitch plate keeps flowers, mushrooms, or strawberries from pulling through the stitches or flattening with wear.
- Washing: cotton and acrylic are usually machine-washable on gentle; wool or delicate thread may prefer hand wash and flat dry. If the band has glued bits or delicate embroidery, hand wash.
- Storage: keep roses away from compression; store flat or on a small hook.
Conclusion
There — five headbands you can actually wear, not hide in a “projects” drawer. Swatch, measure, and sew smart: that’s the difference between a headband that survives your commute and one that sheds half its accents by Wednesday. Pick a pattern (strawberries are addictive), follow the stitch counts, and don’t be afraid to scale up or down for kids or big-headed friends.