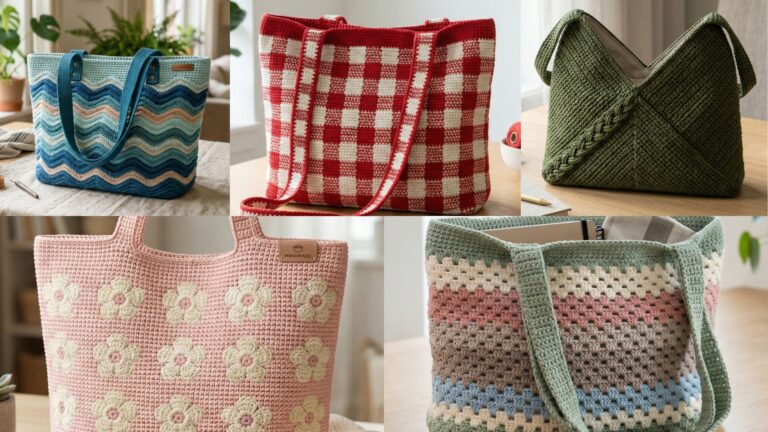
A crochet crossbody bag is one of the most fun accessories you can make because it blends style, function, and personality in one project. It is the kind of bag that can become part of your everyday outfits while still feeling special enough to spark compliments wherever you go. Unlike larger bags or complicated garments, crossbody bags give you the chance to create something wearable, useful, and creative without needing a huge time commitment. That makes them a perfect project if you want something satisfying to make and exciting to show off.
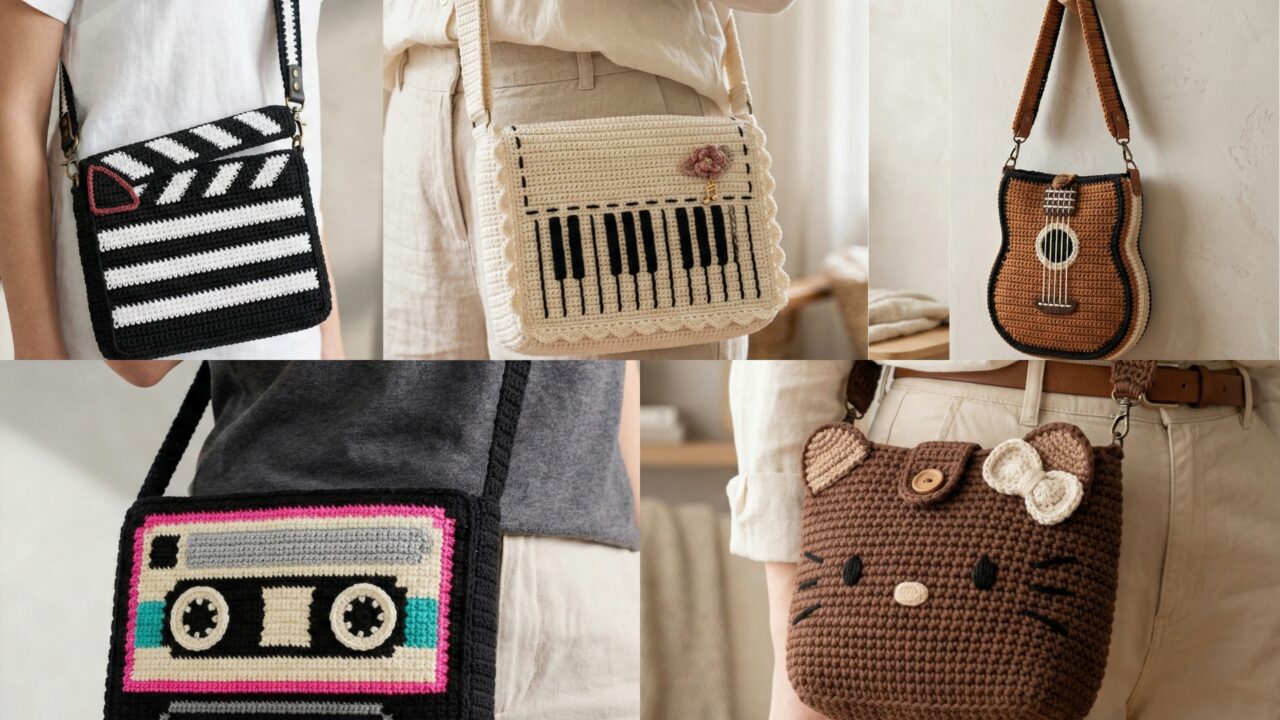
What makes crochet crossbody bags so appealing is how much room they give you to play with theme, shape, texture, and color. A guitar-inspired bag can feel bold and artistic. A piano-inspired cottagecore lacy bag brings a softer, romantic feel. A clapboard movie bag feels playful and cinematic. A C2C cassette tape bag has a nostalgic retro vibe. A brown character-inspired bag adds a cute and whimsical twist. Each one has its own style, but all of them can become bags that people notice, ask about, and remember.
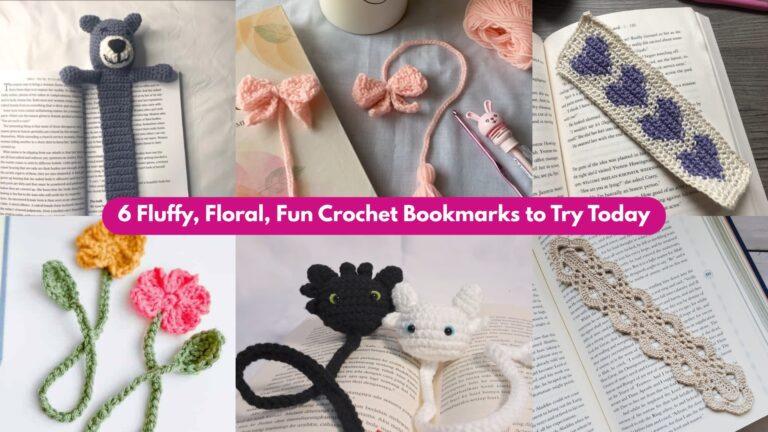
In this post, you will find five crochet crossbody bag ideas with detailed step-by-step guidance, helpful notes, and practical finishing tips. Each section is written to be easy to follow while still giving you enough detail to create a bag that looks polished, feels sturdy, and works beautifully in everyday life. If you want a crochet project that is both functional and conversation-worthy, these patterns are a wonderful place to start.
Quick Notes
Project type: Crochet crossbody bags
Best for: Everyday wear, gifts, themed outfits, festivals, and handmade fashion
Skill level: Beginner to intermediate, depending on shaping and detailing
Hook size: Usually 3.0 mm to 5.0 mm, depending on yarn weight and desired firmness
Yarn weight: Cotton, cotton blends, DK, or worsted weight yarn
Best yarn choice: Cotton yarn for durability, structure, and clear stitch definition
Finished size: Small to medium crossbody bag, customizable by design
Time to complete: Several hours to a few days depending on detail and assembly
Helpful stitches: Chain, slip stitch, single crochet, half double crochet, double crochet, increases, decreases, color changes, tapestry crochet, C2C, lace stitches, seaming, strap making
Common Materials
Most crochet crossbody bags can be made with a similar set of supplies.
- Yarn in your chosen colors
- Crochet hook matched to the yarn
- Yarn needle
- Scissors
- Stitch markers
- Bag lining fabric, optional
- Zipper, button, magnet snap, or flap closure
- Crossbody strap hardware or a crocheted strap
- Optional interfacing or bag stiffener for structure
- Optional embroidery thread or appliqués for details
For crossbody bags, yarn choice matters a lot because the bag needs to hold shape and support daily use. Cotton yarn is often the best choice because it is sturdy, clean-looking, and less likely to stretch out too much. If you want a softer or more flexible bag, you can use a cotton blend, but if you want a bag that feels reliable and structured, cotton is usually the safest choice.
1. Crochet Guitar Inspired Bag Pattern
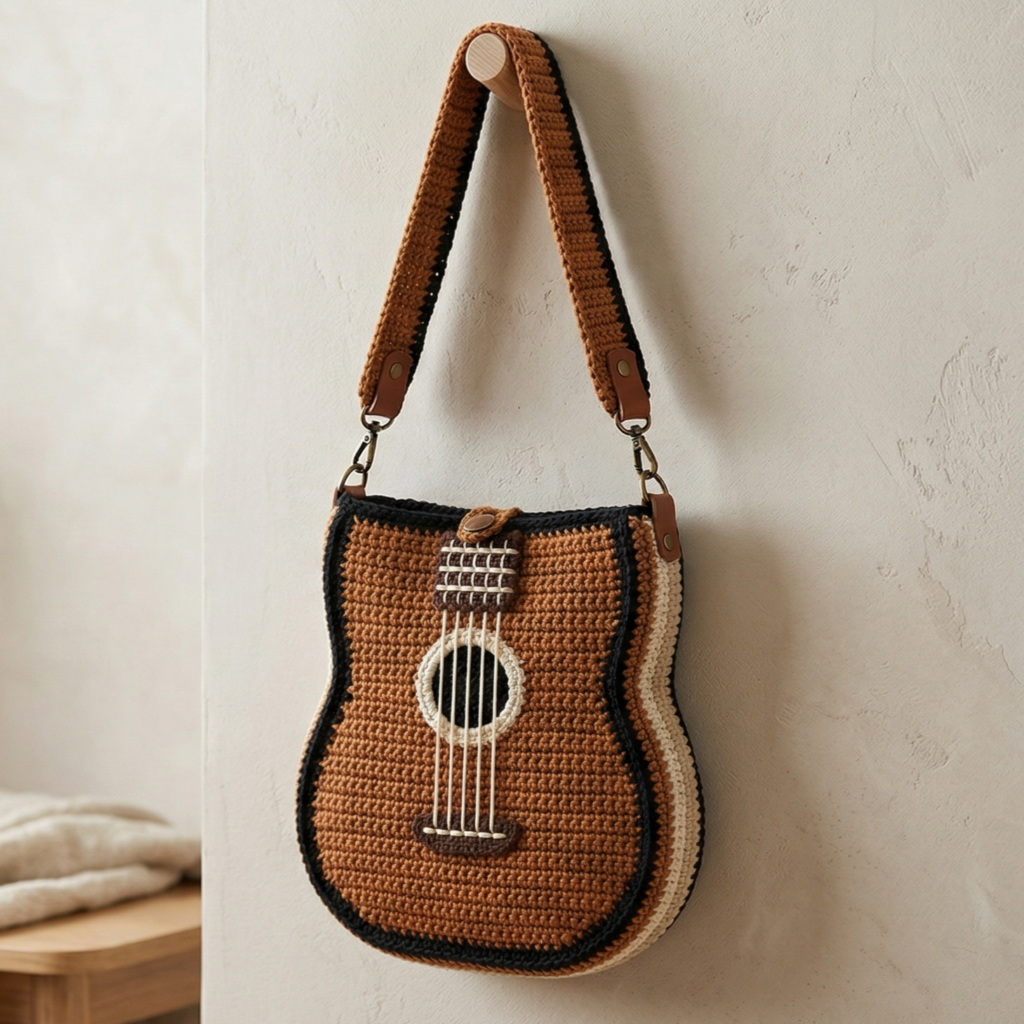
A guitar inspired crochet crossbody bag is bold, artistic, and full of personality. It is the kind of bag that feels creative without being overly complicated, and it is perfect for anyone who loves music-themed accessories. The shape and decorative details can be simple or more detailed depending on how much character you want to add.
Step-by-Step Guide
Step 1: Decide the bag silhouette
Before you start, choose the shape of the bag. A guitar-inspired crossbody bag can be rectangular with rounded corners, or it can have a more stylized guitar body shape if you want something playful. A simple silhouette is easier for beginners, while a shaped silhouette gives a stronger themed look.
A clear shape makes the bag easier to build and decorate.
Step 2: Choose your guitar colors
Pick a color palette that feels musical and fun. Classic brown, black, cream, and gold can give the bag an instrument-like feel, while brighter colors can make it more playful and modern. If you want a true guitar-inspired effect, think about the body, neck, strings, and decorative accents.
The colors will define the bag’s personality.
Step 3: Crochet the main body panels
Start with two main panels for the front and back of the bag. Keep the stitches firm so the fabric does not become too floppy. A dense stitch such as single crochet or half double crochet works well for bag construction.
A sturdy base is important for a crossbody bag.
Step 4: Add guitar-style details
Use contrasting yarn or embroidery to create string lines, sound-hole shapes, or guitar-like striping. These details do not have to be exact replicas of a real guitar. The goal is to give the bag a recognizable musical mood without making the design too busy.
The decorative details are what make it instantly themed.
Step 5: Shape the front and back evenly
Make sure both panels match in size so the bag closes neatly. If you are creating a more stylized guitar shape, check that the curves are balanced. Even small differences can become noticeable once the bag is sewn together.
Symmetry helps the bag look polished.
Step 6: Join the panels
Sew the front and back together along the sides and bottom, leaving the top open. If you want the bag to be extra durable, line the inside before joining it fully. This is especially helpful if the bag will be used often.
A secure seam gives the bag strength.
Step 7: Add the strap and closure
Attach a long crossbody strap that feels comfortable and sturdy. You can crochet the strap, use a ready-made strap, or combine both. Add a zipper, button, or snap closure depending on how secure you want the bag to be.
A good strap makes the bag practical for everyday wear.
Helpful Tips
This bag works especially well in earthy tones, black-and-cream combinations, or bold contrast colors. If you want a more playful version, add tiny embroidered stars or musical notes. The bag becomes even more fun when the details feel personal and handmade.
2. Crochet Piano Inspired Cottagecore Lacy Bag Pattern
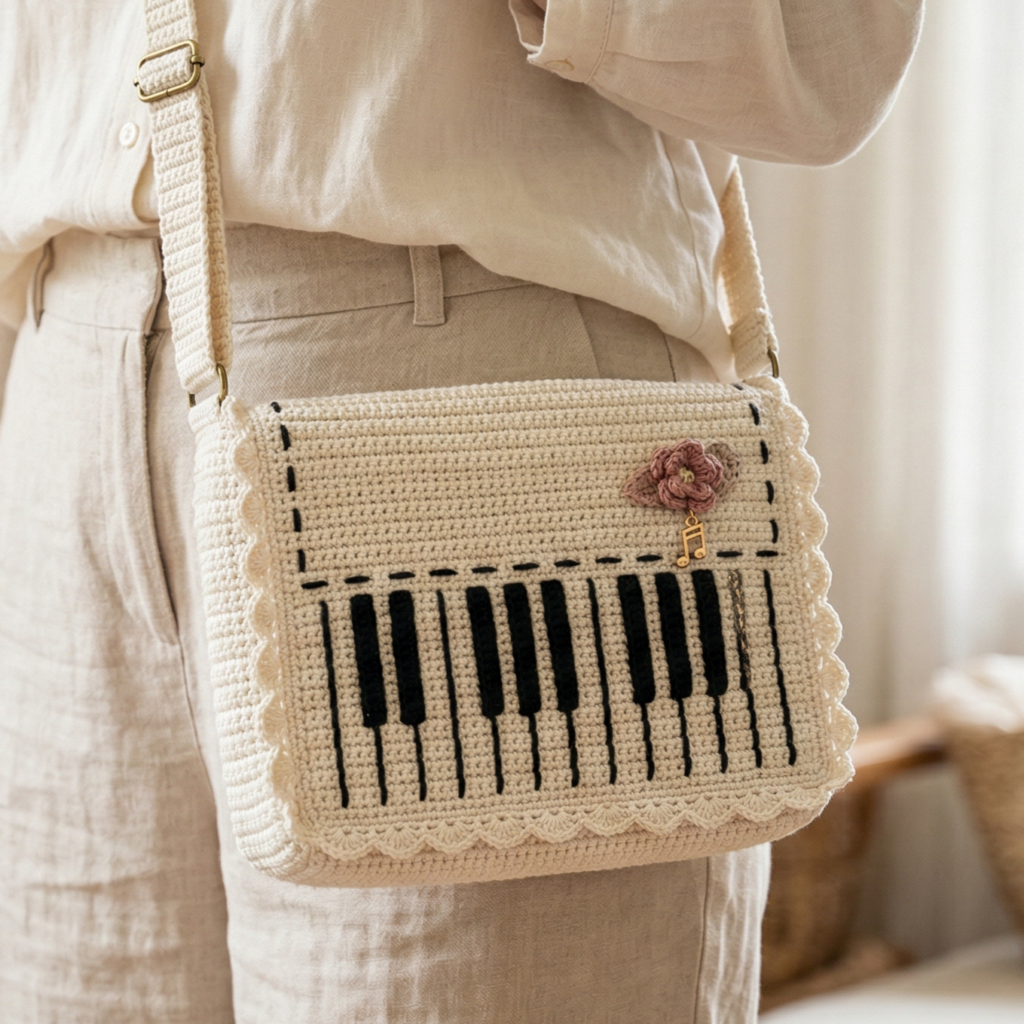
A piano inspired cottagecore lacy bag feels soft, romantic, and dreamy. It combines musical inspiration with a gentle cottagecore aesthetic, making it a lovely choice if you want a bag that feels elegant and delicate. Lacy details give the bag a light, pretty look while still allowing it to remain practical as a crossbody accessory.
Step-by-Step Guide
Step 1: Choose soft cottagecore colors
Pick colors that feel natural, calm, and vintage-inspired. Cream, ivory, beige, dusty rose, sage, and soft brown all work beautifully. Since this bag is inspired by both the piano and cottagecore style, a soft neutral palette usually works best.
A gentle color palette sets the mood right away.
Step 2: Decide on the bag structure
This bag can be made as a simple rectangular body with lace details, or with a slightly rounded silhouette for a softer appearance. Because the style is cottagecore, the bag should feel graceful and light rather than rigid or overly modern.
The structure should feel soft but still sturdy.
Step 3: Crochet the base panels
Make the front and back panels using a stitch that gives enough structure to support the lace. A denser foundation with lace sections added on top works especially well. Keep the pieces even so the bag stays balanced once assembled.
A balanced base helps the lace stand out.
Step 4: Add piano-inspired details
You can use black and white striping, piano-key-like sections, or contrasting vertical accents to suggest the look of piano keys. Keep the detail subtle so it blends into the cottagecore style rather than overpowering it.
The piano detail gives the bag its theme.
Step 5: Add lacy stitch sections
Work lace rows, shell stitches, or openwork panels into part of the design. The lace gives the bag a soft, airy feel and helps it align with the cottagecore aesthetic. Keep the lace delicate enough to be pretty, but not so open that the bag loses structure.
The lace adds softness and visual charm.
Step 6: Join the panels carefully
Sew or crochet the front and back together neatly. If the lace is delicate, take extra care not to pull or distort it while joining. A clean seam will help the bag feel refined and wearable.
A neat join preserves the lacy look.
Step 7: Add lining and strap
A lining is highly recommended for this bag because lace sections may be too open to hold smaller items securely. Add a comfortable crossbody strap and a secure closure such as a zipper, flap, or button if desired.
Lining helps the bag stay practical.
Helpful Tips
This bag looks especially beautiful in cream with black accents or in soft ivory with dusty rose details. If you want the piano motif to be more visible, keep the contrast simple and elegant. This design is perfect for anyone who loves a softer, romantic handmade style.
3. Crochet Clapboard Movie Bag Pattern
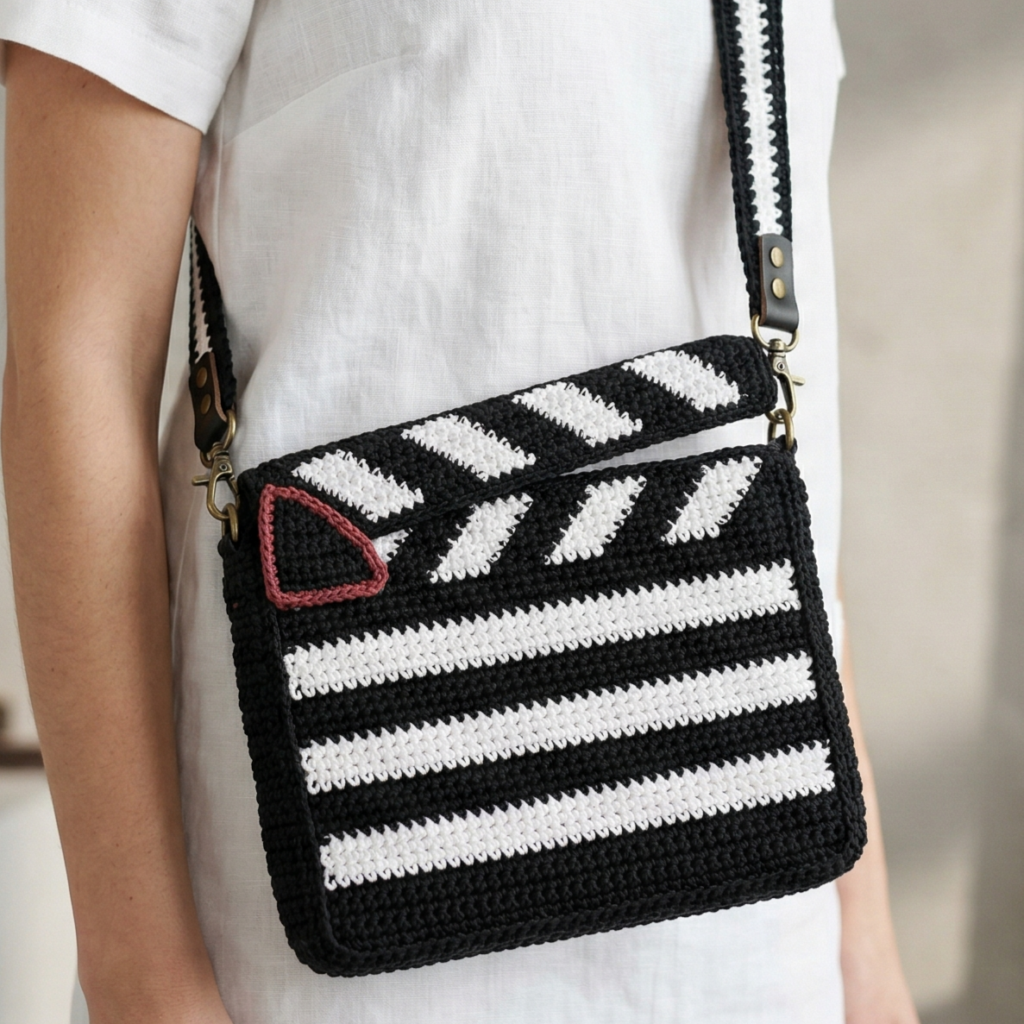
A clapboard movie bag is playful, graphic, and instantly recognizable. It is a perfect choice for film lovers, theatre fans, or anyone who wants a crossbody bag with a little bit of fun personality. The shape and stripe details can be made to resemble a movie clapboard while still remaining practical and stylish.
Step-by-Step Guide
Step 1: Plan the clapboard shape
A clapboard-inspired bag usually works best with a rectangular or slightly angled top section. Think about the classic film slate shape and how you want to translate it into a wearable bag. You can keep the shape simple with a strong diagonal flap or accent section.
The shape is what gives the bag its identity.
Step 2: Choose classic black-and-white colors
Traditional black, white, and gray give the bag a film-clapboard feel right away. You can also add a little red or silver if you want a more stylized movie theme. The contrast should be strong enough that the design reads clearly from a distance.
The color choice creates the movie vibe.
Step 3: Crochet the front and back panels
Work two sturdy panels for the bag body. Use a tight stitch so the shape stays crisp. If you want the clapboard look to stand out more, you can make the front panel slightly more decorative than the back.
A firm fabric makes the bag feel more polished.
Step 4: Add clapboard stripe detailing
Use alternating color bands or angled stripe sections to mimic the classic clapboard. Keep the stripes neat and evenly spaced so they look graphic and intentional. This is the most recognizable visual element of the design.
The stripes are the signature detail.
Step 5: Add the flap or top section
If you want a more literal clapboard shape, crochet a flap or angled top piece. This helps the bag feel more theatrical and makes the design look more unique. The flap can also work as part of the closure.
The flap gives the bag extra character.
Step 6: Join the panels and shape the body
Sew the front and back together along the sides and bottom. Keep the top structured so it maintains the clapboard style. A lining will help the bag hold its shape, especially if it will be worn often.
Step 7: Finish with a strap and closure
Add a crossbody strap that feels sturdy and comfortable. A magnetic snap, button, or flap closure works well with this design. If you want to push the movie theme further, you can add tiny embroidered stars or a film reel detail.
Helpful Tips
This bag looks great in black and white, but it can also work in cream, charcoal, and silver for a softer film-themed style. If you want it to feel more playful, add a pop of red as an accent. This is one of those designs that always gets noticed.
4. Crochet C2C Cassette Tape Inspired Bag Pattern
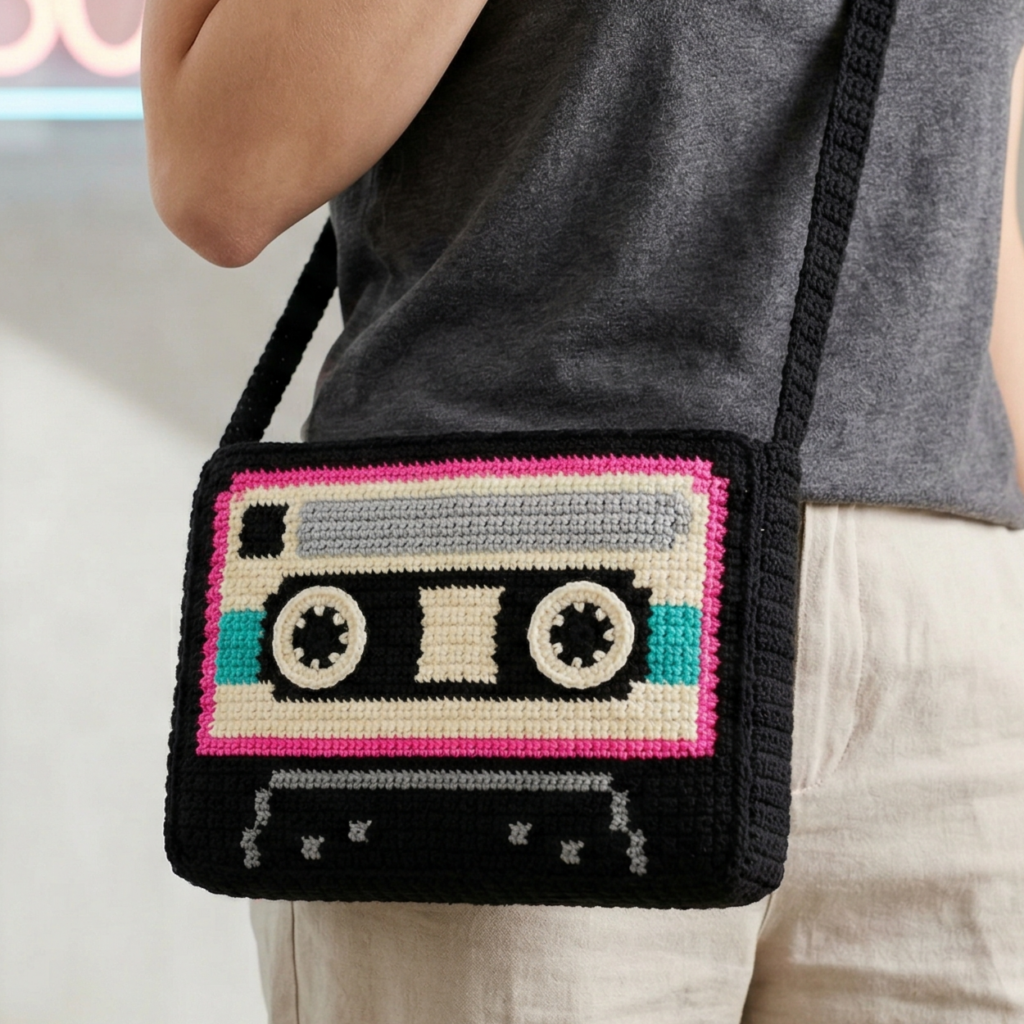
A C2C cassette tape inspired bag brings a strong retro vibe that feels nostalgic and fun. The corner-to-corner construction makes it especially suitable for geometric shapes and graphic motifs, which is why it works so well for a cassette tape design. It is a wonderful project if you love 80s-inspired fashion and want a bag that feels both retro and trendy.
Step-by-Step Guide
Step 1: Learn the C2C shape
Before starting, make sure you are comfortable with corner-to-corner construction. C2C grows diagonally, which makes it perfect for a cassette tape silhouette. If you have never made C2C before, practice a small swatch first so you can get used to the rhythm.
The C2C method gives the bag its structure.
Step 2: Choose a cassette-inspired palette
Classic cassette colors include black, gray, white, silver, and bold accent colors. You can also create a personalized look with pastel retro tones if you want something softer. Pick a palette that clearly suggests a cassette tape.
The colors help the theme read immediately.
Step 3: Crochet the front panel
Using C2C, build the front panel into a cassette tape shape. Add geometric sections to represent the tape window, label area, and outer edges. Keep the stitches even so the cassette shape stays clear and balanced.
The front panel is the focal point of the bag.
Step 4: Crochet the back panel
Make a second panel to match the first. If you want the bag to feel more detailed, you can simplify the back or create a mirrored design. Just make sure the overall size remains consistent so the bag can be assembled neatly.
Step 5: Add cassette details
Use embroidery or small color blocks to create the tape spools, label strip, or border accents. Keep the details graphic and clean. Because C2C naturally creates a pixel-like feel, it works beautifully for a cassette-inspired image.
The details make the cassette theme unmistakable.
Step 6: Join the panels
Sew the front and back together along the edges. If needed, line the interior with fabric so the bag holds its shape better. The lining is especially helpful if the design includes open or textured areas.
A clean join keeps the cassette shape crisp.
Step 7: Add the strap and closure
Finish the bag with a comfortable crossbody strap and a secure closure. A zipper or snap works well if you want the bag to feel practical. Make sure the strap balances the slightly structured shape of the cassette.
Helpful Tips
This bag looks great in black and silver for a classic retro feel, but bright neon accents can make it feel more playful and fun. If you want it to really stand out, add a tiny embroidered label or bold stripe detail across the front.
5. Crochet Brown Hello Kitty Inspired Bag Pattern
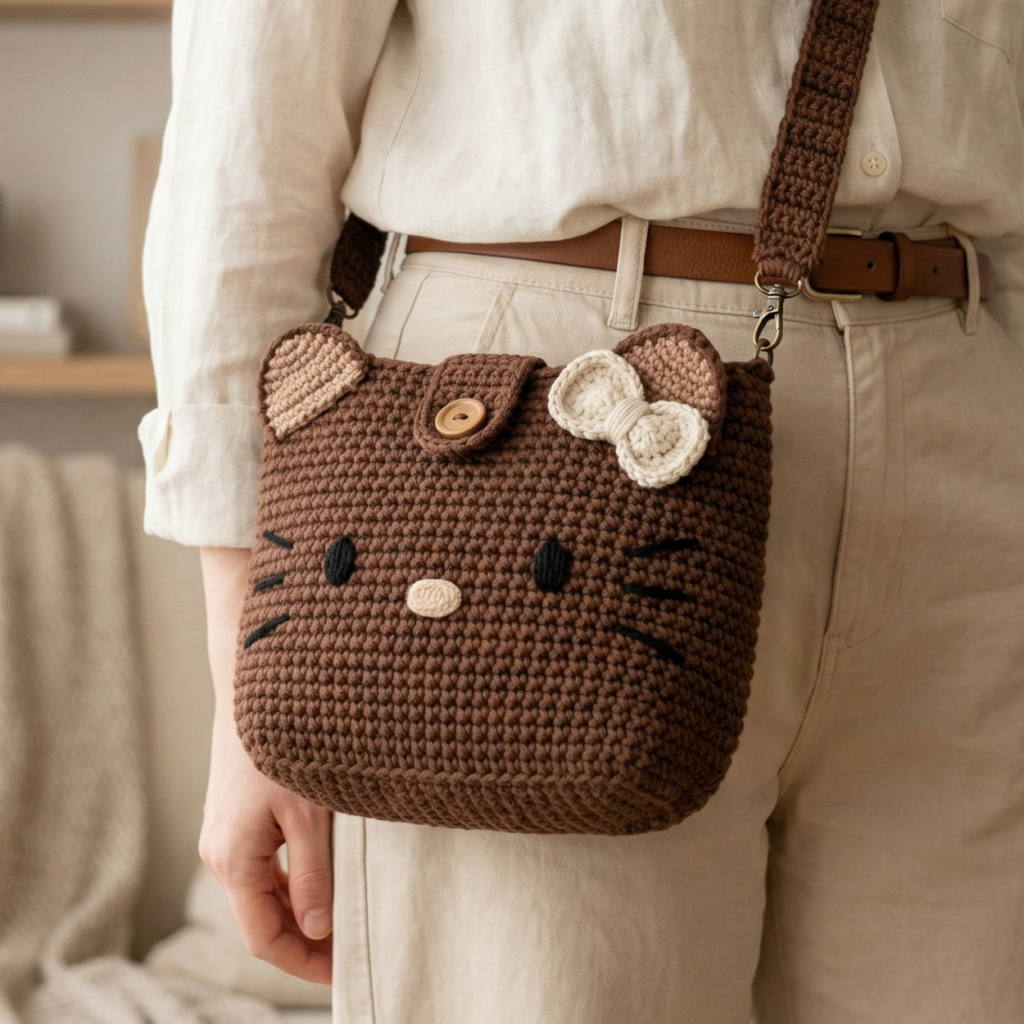
A brown character-inspired crossbody bag feels cute, whimsical, and a little nostalgic. The soft brown palette gives the design a warm and cozy appearance, while the character-inspired details make it instantly adorable. This is a perfect project if you love cute accessories that still feel wearable and stylish.
Step-by-Step Guide
Step 1: Choose the base shape
Decide whether you want the bag to be round, oval, or slightly rectangular with rounded edges. For a character-inspired design, a rounded shape usually feels the sweetest and most recognizable. Keep the silhouette simple so the face details remain the focus.
The shape should support the cute theme.
Step 2: Pick the brown color palette
Choose a warm brown base color and decide on lighter or darker accent shades. Cream, beige, tan, and soft white all work well for facial details or trim. The brown tone gives the bag a cozy, soft feel that makes it easy to style.
The color palette gives the bag its charm.
Step 3: Crochet the front and back panels
Make two matching panels using a firm stitch. Keep the fabric dense enough to support the appliqué details and the bag structure. If you want the face details to stand out clearly, use a smooth background texture.
A clean base helps the character features shine.
Step 4: Add the face details
Use crochet appliqués or embroidery to create the face. Simple eyes, a nose, whisker lines, or a bow detail can make the bag feel character-inspired without being overly busy. Keep the facial features balanced and centered.
The face is the main decorative focus.
Step 5: Add ears or other character accents
If you want a fuller character-inspired look, crochet small ears or shaped details and sew them to the top. Keep them soft and proportional so they do not make the bag too bulky. These details can be simple but still very recognizable.
The ears help the bag feel playful.
Step 6: Assemble the bag
Join the front and back panels along the sides and bottom. If you want the bag to last longer, add a lining inside. This is especially useful if the bag will be used for everyday items.
Step 7: Attach the strap and closure
Use a comfortable crossbody strap that matches the warmth of the design. A zipper, snap, or flap closure works well. Make sure the bag opens and closes easily while still keeping its cute shape intact.
Helpful Tips
This bag looks especially sweet in soft brown with cream accents. If you want a more modern look, use a slightly darker brown and keep the face details minimal. The bag becomes even more charming when the features are small, neat, and well placed.
Conclusion
Crochet crossbody bags are such rewarding projects because they are both useful and expressive. They give you the chance to make something that can actually be worn every day while still feeling personal, creative, and handmade. That is what makes them such memorable pieces. A good crossbody bag does not just hold your essentials. It also tells a little story about your style.
These five crochet bag patterns each offer something different. The guitar-inspired bag feels artistic and bold. The piano-inspired cottagecore lace bag is soft and romantic. The clapboard movie bag is graphic and playful. The C2C cassette tape bag brings retro nostalgia. The brown character-inspired bag is cute and whimsical. Together, they show how much variety you can create with a simple crossbody shape.
Whether you are making one for yourself, for a gift, or for a craft fair table, these bags are the kind of projects that people notice and ask about. With the right yarn, a sturdy structure, and a thoughtful finish, any of these designs can become a favorite accessory that is both practical and conversation-worthy.