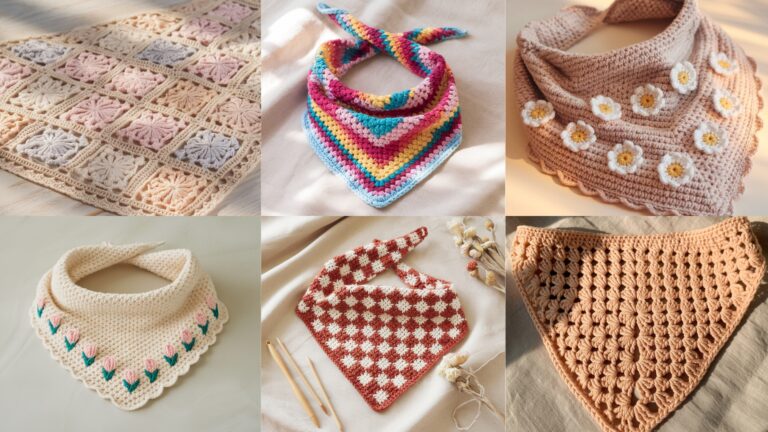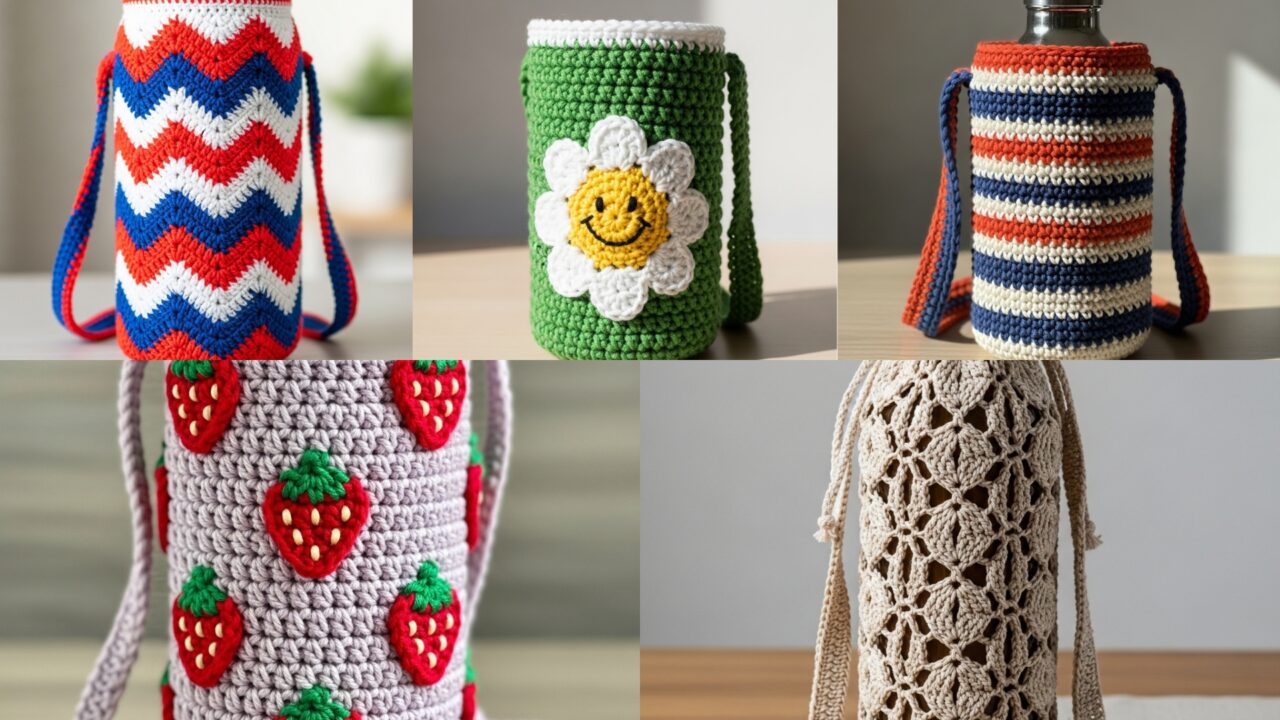
A crocheted bottle holder (carrier, sling, or cozy) is one of the most useful accessories you can make: portable, quick to stitch, and perfectly suited to personal style. They protect your bottle, keep hands free, and look great across seasons — from lacy boho slings for summer festivals to sturdy striped carriers for everyday commutes. Below are five distinct, fully detailed designs you can make today: a lacy boho sling, a strawberry-themed holder, a zig-zag water bottle carrier, a classic striped holder, and a cheerful smiley-daisy cozy. Each pattern includes materials, sample gauge and finished-size guidance, step-by-step instructions, variations, and finishing tips.
Quick notes to read first (applies to all patterns)
- Terminology & abbreviations: ch = chain, sl st = slip stitch, sc = single crochet, hdc = half double crochet, dc = double crochet, tr = treble (US terms), BLO = back loop only, FLO = front loop only, rep = repeat, MR = magic ring.
- Sizing & fit: Measure your bottle’s maximum circumference and height (including any lid or spout you’ll use while inside the carrier). I give example stitch counts for an average 20–24 oz reusable water bottle (approx. 8–9 in tall, 2.75–3.0 in diameter). Adjust numbers using stitches-per-inch from your own swatch.
- Yarn choices: Use cotton, cotton blends, or sturdy acrylic for durable holders. For festival-style or market bags that need structure, use worsted-weight cotton or t-shirt yarn. For delicate slings or coasters-style cozies use DK or fingering cotton.
- Hooks: I recommend the hook size the yarn label suggests for a balanced fabric — you may want a slightly smaller hook if you prefer denser, less stretchy fabric (useful for holding liquids safely).
- Finishing: Work secure joins and weave in ends. If you plan to hang keys or a carabiner, reinforce that attachment with extra stitching or a small metal eyelet. For machine-washable carriers select washable yarns.
1. Crochet Boho Lacy Bottle Holder Pattern
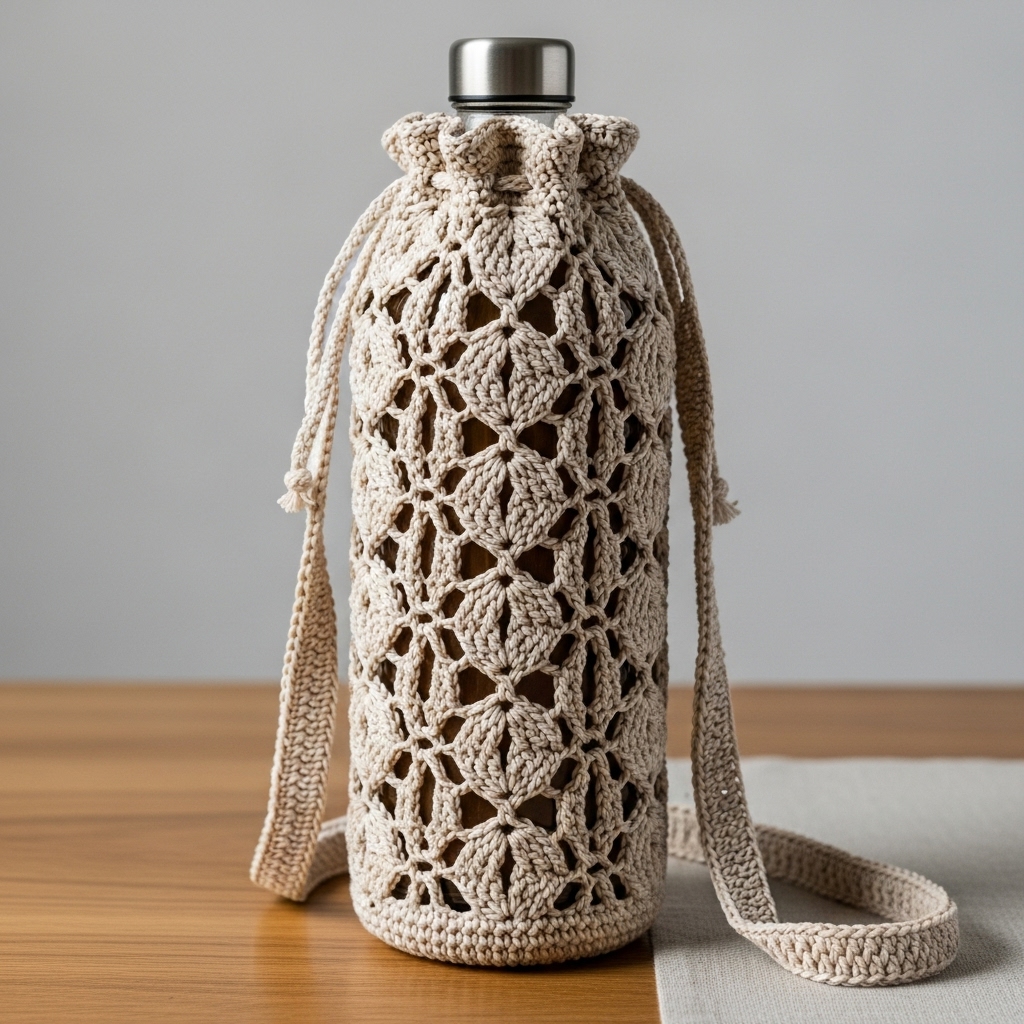
A breezy, open-lace bottle sling perfect for summer and festival style. Lightweight, fashionable, and works well with a drawstring or top loop closure.
Skill level: Confident beginner — basic stitches, working in the round, and simple lace repeats.
Materials
- Worsted-weight cotton or cotton-blend (approx. 150–250 yds depending on height).
- Hook 5.0 mm (or size to match gauge).
- Tapestry needle, scissors.
- Optional: small cord or leather strap for top reinforcement.
Sample gauge & finished size
- Gauge (example): 13 sc = 4 in in single crochet.
- Designed for 24 oz bottle (approx. 3.0 in diameter). Example foundation circumference = 3.0 in × 13 st/in = ~39 sts around. We’ll use 40 sts for neat repeats.
- Height: work body to about 7.5–8.5 in before adding strap.
Stitch pattern (lace repeat)
- The lace uses a shell-and-chain open motif: (dc3, ch2, dc3) shell spaced with vertical chain columns.
Step-by-step
- Make a base ring (flat circular base)
- MR, R1: ch1, 8 sc in MR — 8 sts. Sl st to join.
- R2: inc around — 16 sc.
- R3: sc 1, inc around — 24 sc.
- R4: sc 2, inc around — 32 sc.
- R5: sc 3, inc around — 40 sc. Stop when base diameter equals bottle base (measure). This gives a base circumference ~40 sc.
- Work the body in the round — set up
- Join in with ch 1, sc in each st around for 1 round to stabilize. Place marker at start.
- Round 1 (setup for lace): (ch3, skip 2 sc, dc 3 in next st, ch2, dc3 in same st, skip 2 sc, ch3, sc in next sc) — Repeat around. This places shell clusters and chain columns. Adjust so you land cleanly on the marker; you may need to fudge one sc between repeats.
- Round 2 (open rounds): Sl st to center of shell, ch3, dc in each dc across shell sections, ch2, skip ch2 sp, sc in top of next sc, repeat around. Essentially you’re working into shell arch centers to stack shells.
- Repeat Rounds 1–2 until body height ~7–8 in (or desired height). Keep the pattern matched so shells stack neatly.
- Top edge & optional drawstring casing
- Work 1–2 rounds of sc around edge to firm it.
- To make a drawstring casing: work one round of dc in next 2, ch2 around to make chain spaces, then one round of sc across to reinforce. Insert cotton cord or tie string through ch2 spaces and knot ends.
- Strap
- Option A (simple crocheted strap): Join yarn at top edge; ch 100 (or length to go over shoulder comfortably), sl st to next top stitch and sc across 2 rows to create strap width. Reinforce both ends with additional rounds (sc around strap ends and stitch to top edge).
- Option B (leather strap): sew leather strap into place at top edge with strong thread and a few whipstitches; also apply a small bar-tack of crochet stitches around the attachment for durability.
Variations
- Make a denser fabric by substituting hdc for dc in shell clusters.
- Work in color blocks (every 4 rounds change color) for a boho-stripe look.
- Add tassels at strap ends for festival appeal.
Finishing & care
- Weave in ends; block lightly to settle lace pattern.
- Machine-wash cold on gentle for cotton blends; reshape while damp.
Use tips
- Test with bottle in holder before heading out — open lace may allow some tilt; use a small elastic at top if you need more security.
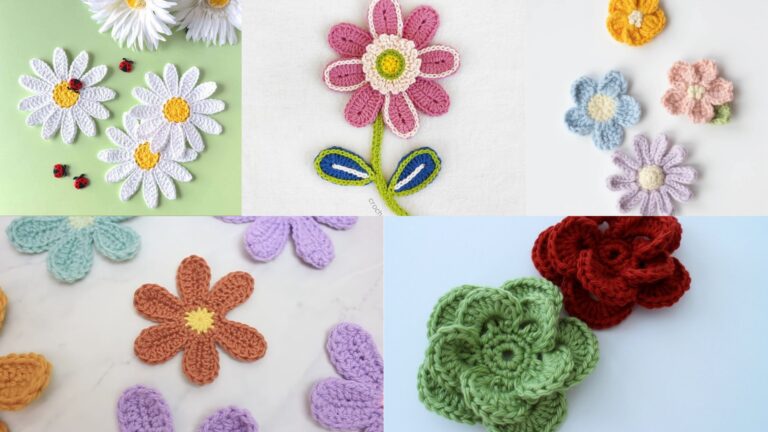
2. Crochet Strawberry Bottle Holder Pattern
A cute, decorative cozy with a strawberry applique or motif integrated into the body. This works as a cozy for tumblers or a small carrier for glass bottles.
Skill level: Confident beginner — working in rounds, small appliqué.
Materials
- DK or worsted cotton in red, green, and small bit of yellow/white for seeds.
- Hook 4.0–4.5 mm.
- Tapestry needle, optional small amount of fiberfill if you want a puffed berry applique.
Sample gauge & finished size
- Target circumference: 36–40 sc around for a typical reusable bottle (adjust per bottle).
- Height: 7–8 in for full coverage; if used as cozy only, 5–6 in.
Step-by-step
- Base (if making a cozy that covers bottle bottom)
- MR, R1 8 sc, R2 inc to 16, R3 sc1 inc to 24, R4 sc2 inc to 32, R5 sc3 inc to 40 — stop when base width matches bottle base.
- Body (cozy)
- Work in continuous rounds of sc until you have circumference (e.g., 40 sc) around. You may join last base round with sc then work sc rounds up the side.
- If you don’t want to cover the base, start with a foundation chain that fits your bottle circumference then join into a round and sc for a sturdy tube.
- Add strawberry motif (appliqué)
- Make a small flat strawberry:
- MR: ch1, 6 sc in ring (6). R2: inc around (12). R3: sc1, inc around (18). R4: sc around 18. Shape crown by flattening a bit.
- Optional: make it lightly puffed by working R4–R5 with slight stuffing then close.
- Leaf (make 3 small leaves): ch 6; sc in 2nd ch, hdc, dc, hdc, sc; fasten off.
- Sew leaves to top of strawberry, add tiny French knots or surface crochet dots for seeds (yellow/white).
- Make a small flat strawberry:
- Attach strawberry to cozy
- Center strawberry on the side of cozy and sew securely. You can make several small strawberries spaced vertically for pattern.
- Top edge
- Work a round of sc in BLO to create a neat rim. Optionally add a picot edge or a round of shells for decorative top.
- Strap or handle (optional)
- Ch 60–80 for shoulder strap; sc across a few rows to create width. Attach both ends opposite each other on the cozy top edge. Reinforce attachment with extra sewn stitches.
Variations
- Make an all-over strawberry pattern by crocheting tiny motif repeats and slipping them into the body as you go (intarsia or sewn-on appliqués).
- For a child’s water bottle, scale down motif sizes and sew very flat appliqués for safety.
Finishing & care
- Weave in ends. Hand wash for appliqué security, or machine wash gentle and line-dry.
3. Crochet Zig Zag Water Bottle Holder Pattern
Eye-catching chevrons form this bold holder. The zig-zag can be worked in single crochet with increase/decrease shaping or by assembling triangular panels for a modular approach.
Skill level: Intermediate — counting increases/decreases and shaping or joining panels.
Materials
- Worsted-weight cotton (two or three contrasting colors).
- Hook 5.0 mm.
- Tapestry needle.
Sample gauge & finished size
- Use multiple of chevron repeat; for example a 10-st chevron repeat across 4 repeats = 40 sts circumference. Adjust per bottle.
Method A — Single-panel chevron tube (recommended simplified approach)
- Foundation chain
- Chain the number of stitches for your circumference (e.g., 40 ch). Join into a round without twisting.
- Base rounds
- Round 1–3: sc in each ch around to form sturdy base band.
- Chevron rounds (working flat around as tube)
- Use a simple chevron repeat in sc: sc2tog, sc in next 4, (3 sc in one stitch) [peak], sc next 4, sc2tog — that builds a small V. Work this repeat across round to form zig-zag.
- On the next round, offset peaks by shifting placement so chevrons align vertically.
- Work in continuous rounds switching colors every 4–6 rounds to emphasize chevrons.
- Alternative method (easier modular)
- Make several triangle panels: right-lean triangle and left-lean triangle. Join triangles edge-to-edge to form zig-zag tube.
- This is easier if counting decreases for chevrons in continuous Tunisian or SC becomes cumbersome.
- Top edge & strap
- Finish with 2 rounds of sc to firm the edge.
- Add a strap: either crocheted strap in single crochet or braided cord for contrast. Attach with reinforced stitches.
Variations
- Use more than two colors for rainbow chevrons.
- Make the peaks taller by increasing cluster size (5 sc peak).
Finishing & care
- Block lightly if stitches look uneven. Machine wash cold, line-dry recommended.
4. Crochet Striped Water Bottle Holder Pattern
A timeless and practical design: horizontal stripes worked in sturdy stitches with reinforced handles. Great for shopping, beach, or everyday use.
Skill level: Confident beginner
Materials
- Worsted cotton or cotton-blend (choose 2–4 colors).
- Hook 4.5–5.5 mm for solid fabric.
- Tapestry needle.
Sample gauge & finished size
- Circumference target: 40–44 sc around depending on bottle diameter.
- Height: 8–9 in to include bottom coverage or 5–7 in for cozy only.
Step-by-step
- Base
- MR; R1 8 sc; R2 inc to 16; R3 sc1 inc to 24; R4 sc2 inc to 32; R5 sc3 inc to 40 — stop when base diameter equals bottle bottom. This creates a round base.
- Alternatively, chain foundation and join to make a tube if you don’t want to cover the bottom.
- Body (striped rounds)
- Round 1: sc around in Color A. Work in continuous rounds to avoid visible join lines.
- After desired number of rounds (e.g., 6–8 rounds) change to Color B by finishing a round with the new color in the last pull-through, then continue sc rounds for the stripe height.
- Repeat color changes to create stripes.
- Reinforced handles
- Option A (side strap): measure strap length to go across body (for crossbody) or short handle (for hand carry). Join yarn at top edge seam; ch desired length + 1, sc back across to make strap width 2–3 sts deep; join other end to top opposite side. Reinforce with 2–3 rows of sc if you expect heavy weight.
- Option B (long strap): make longer strap and sew ends into top edge; reinforce with extra stitching row.
- Top edge & closure
- Add 1–2 rounds of sc or crab stitch (reverse sc) to firm top edge.
- Optional: add snap closure, toggles, or a drawstring through a ch-round.
Variations
- Use a mesh band in the middle: work alternate rounds of sc and ch3 spaces for breathability (useful for wet beach bottles).
- Add a small pocket on the outside by working a rectangle, seaming at sides and bottom, leaving open at top.
Finishing & care
- Weave ends neatly on the inside of the carrier. Machine wash warm on cotton blends; reshape while damp.
5. Crochet Smiley Daisy Bottle Holder Pattern
A cheerful design with a smiling daisy motif appliquéd or integrated into the body. Ideal for gifting or making gear for summer picnics.
Skill level: Confident beginner — basic motif making and sewing.
Materials
- Worsted/DK cotton in white (petals), yellow (center), green (background/body), and contrasting color for body.
- Hook 4.0–5.0 mm.
- Tapestry needle, optional small safety ring if you want to attach a carabiner.
Sample gauge & finished size
- Target circumference: 40 sc. Height: 7–8 in.
Step-by-step
- Make the holder body (tube or base-start as in previous patterns)
- Create round base as needed (follow base instructions from previous patterns).
- Work sc in the round for body using your main body color until you reach height where you want the daisy centered.
- Make daisy motif
- Center (yellow): MR, ch1, 6 sc in ring; sl st to join, R2 inc around — 12 sc. Fasten off leaving tail.
- Petals (white): Attach white yarn in a ch-1 space between sc of the yellow center or around center edge; ch4, sl st into next sc around to make loops (6–8 loops). In each loop work (sc, hdc, dc, hdc, sc) to build petals. Fasten off and tuck ends.
- Face (smile): With black embroidery thread make two small vertical stitches for eyes and a small curved satin stitch for smile on the yellow center. For a safer, washable option, use surface crochet instead of embroidery.
- Attach daisy to body
- Sew daisy to body of holder with tight, even stitches. Position it centrally; add extra stitching around edges. You can make several daisies in a vertical line or cluster for more impact.
- Top edge & strap
- Work 1–2 rounds of sc to make the top edge firm.
- Add strap or carry loop as desired (crocheted strap or leather).
- Optional pocket and charms
- Add a tiny pocket underneath daisy for keys or a coin; sew a small metal D-ring at top edge for key attachment.
Variations
- Make a row of daisies as a band.
- Embroider cheek blush on the daisy center with pink for cuteness.
Finishing & care
- Fasten all ends; hand wash recommended for embroidered faces; machine wash gentle for simple appliqués.
Final finishing & professional tips (applies to all five designs)
- Reinforce stress points: Where straps or handles attach, add extra rows of sc and hand-sew with the tapestry needle through multiple layers to prevent tearing when carrying heavy bottles.
- Edge stabilization: Work a final round of sc in a contrasting color or crab stitch for a polished look and to help edges keep their shape.
- Blocking: Cotton holders respond well to light blocking to even stitches and set lace patterns; stretch gently when wet and pin to shape. Avoid excessive stretching that alters bottle fit.
- Hardware: For durability, use metal D-rings or carabiners at strap ends — sew through multiple stitches and back-and-forth for reinforcement; consider an inner fabric patch if you plan to attach hardware to thin crochet fabric.
- Make it washable: Choose washable yarn if you expect the holder to get dirty often; line-dry instead of tumble drying to preserve shape and elasticity.
Conclusion
These five bottle holder patterns cover a wide range of styles and uses: the airy Boho Lacy Sling for festivals and summer, the cute and seasonal Strawberry Cozy, the bold graphical Zig Zag Carrier, the reliable Striped Everyday Holder, and the cheerful Smiley Daisy Cozy for gifting. Each design can be adapted in size, colors, and strap style to fit different bottles and personal tastes. They’re quick enough for a weekend project and practical enough to become daily companions.