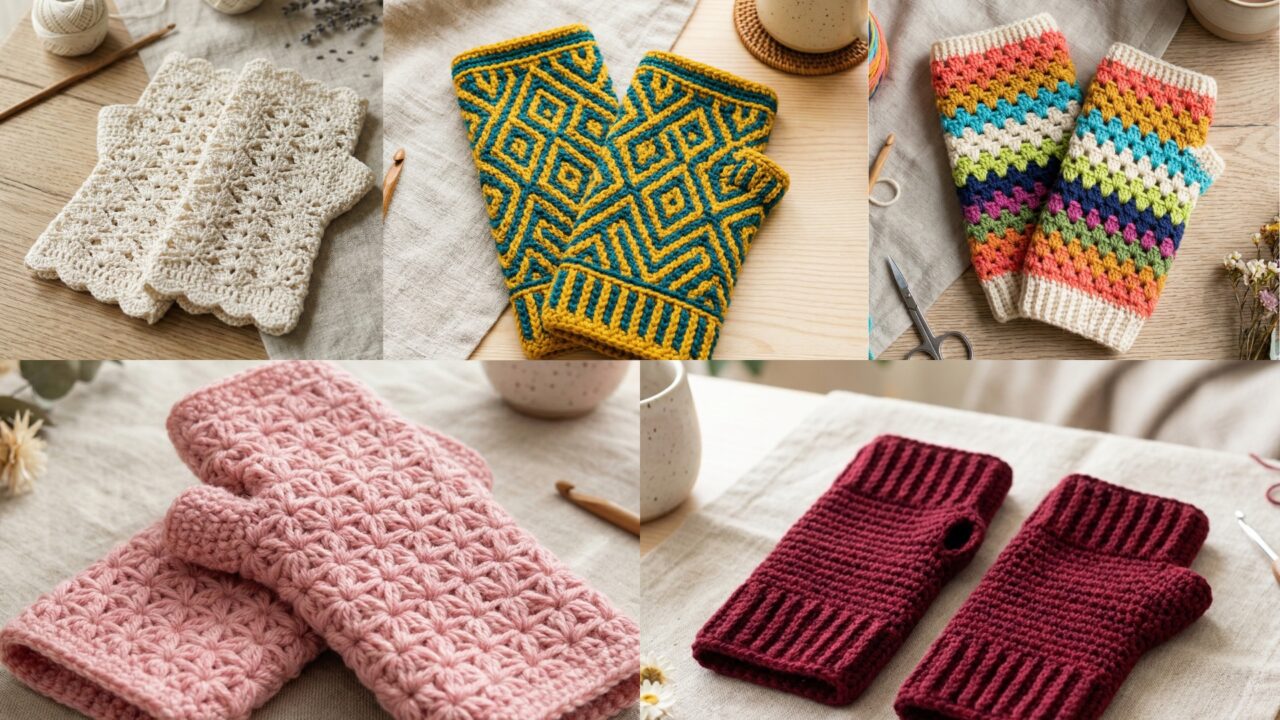
Crochet wrist warmers are the perfect small project when you want something practical, stylish, and fast to make. They are warm enough for cool mornings, light enough to wear indoors, and simple enough to customize in all kinds of colors and stitch textures. They also make thoughtful gifts because they feel personal without requiring a huge time commitment.
The five wrist warmer patterns below are designed to be cozy, comfortable, and easy to wear every day. Each one has a different look: textured and seamless, geometric and modern, decorative with star motifs, soft and lacy, and classic granny stripes. They are written with clear, step-by-step instructions so they are easy to follow even if you are working on a small project between bigger makes.
A few quick notes before starting:
- Cotton, cotton blends, wool blends, and soft acrylics all work well.
- Wrist warmers should fit snugly without feeling tight.
- A smaller hook than usual often gives a better, warmer fabric.
- Measure the hand and wrist before beginning so the cuff slips on comfortably.
Shared abbreviations
- ch = chain
- sc = single crochet
- hdc = half double crochet
- dc = double crochet
- sl st = slip stitch
- BLO = back loop only
- FLO = front loop only
- MR = magic ring
- inc = increase
- dec = decrease
- st(s) = stitch(es)
1. Crochet No Sew Textured Wrist Warmer Pattern
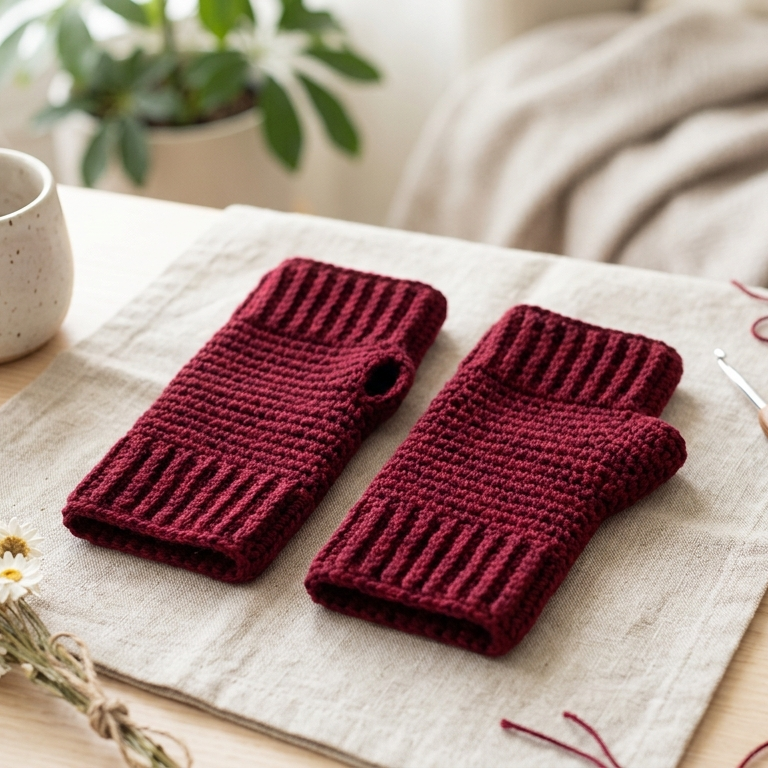
Skill level: Beginner to intermediate
Style: Cozy, stretchy, seamless
Best for: Everyday wear, quick gifts, beginner-friendly projects
This wrist warmer is made as a tube, so there is no sewing needed at the end. The texture gives it a classic handmade look, and the seamless shape makes it comfortable to wear for long periods.
Finished size
About 6 to 8 inches around and 6 to 7 inches tall, depending on yarn and gauge.
Materials
- Soft worsted or DK yarn
- Crochet hook, 3.5 mm to 4.5 mm
- Tapestry needle for weaving ends
- Scissors
Step-by-step guide
Step 1: Measure the hand and wrist
- Measure around the widest part of the hand, usually across the knuckles.
- Subtract about 1/2 inch so the cuff fits snugly.
- Chain that length to begin the wrist warmer.
Step 2: Create the cuff base
- Chain the measured number of stitches.
- Join to form a ring, being careful not to twist the chain.
- Work sc or hdc around the ring to create the first round.
- Continue in rounds until the cuff reaches the desired width at the wrist.
Step 3: Add texture
- On the next round, work stitches in the back loop only.
- This gives the fabric a ridged, knit-like texture.
- Repeat BLO rounds for several rows.
- If you want a more detailed texture, alternate BLO and normal rounds.
Step 4: Shape the thumb opening
- When the cuff reaches the lower thumb area, leave a small space on one round.
- Chain a few stitches over the thumb gap.
- Continue working in the round.
- This opening helps the wrist warmer fit more naturally on the hand.
Step 5: Finish the top edge
- Work a final round of sc or hdc to keep the top edge neat.
- Fasten off and weave in all ends securely.
- Try the wrist warmer on and check the fit.
Finishing tips
- Use soft yarn so it feels comfortable against the skin.
- Keep the tension even so the cuff stays stretchy.
- If the cuff is too loose, go down one hook size.
Style ideas
This pattern looks beautiful in earthy neutrals, deep green, wine red, or classic cream.
2. Crochet Mosaic Wrist Warmer Pattern
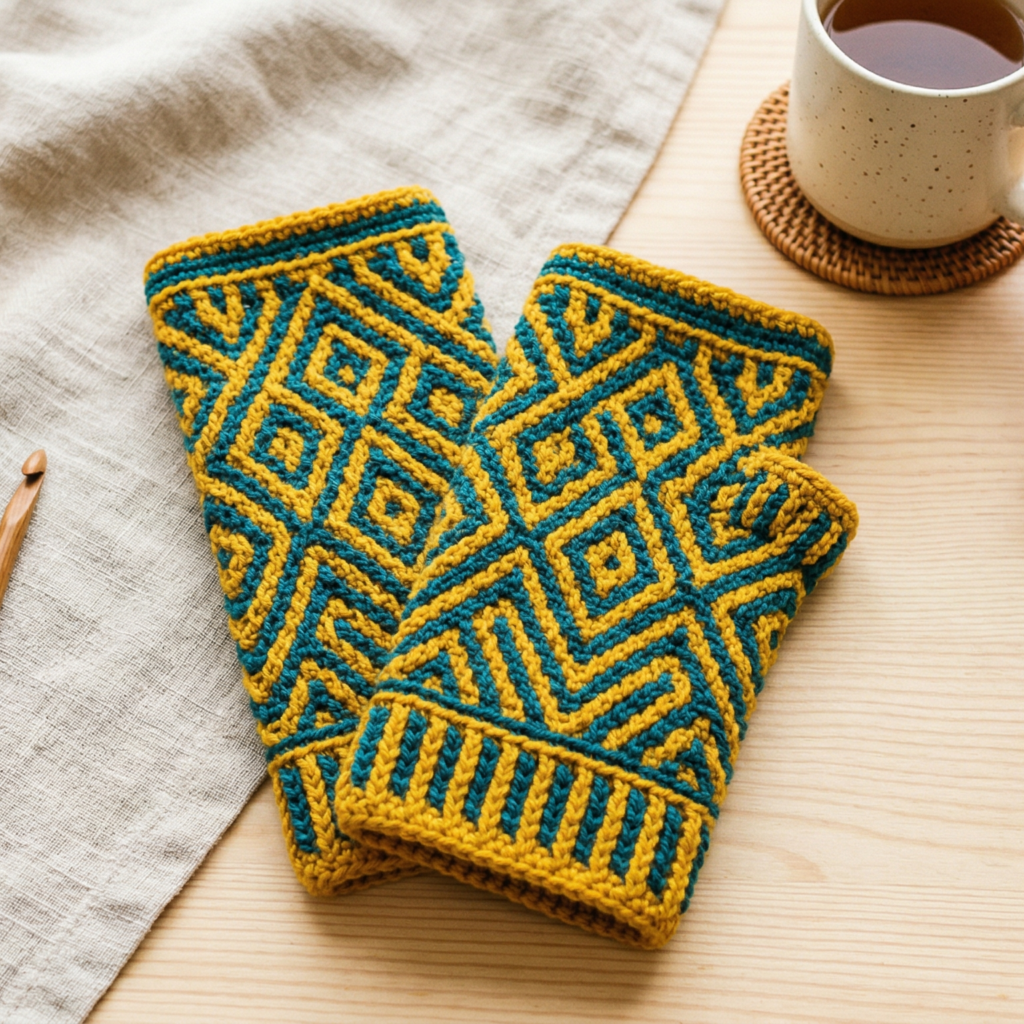
Skill level: Intermediate
Style: Graphic, modern, textured
Best for: Colorwork lovers and stash-busting
Mosaic crochet gives the wrist warmer a crisp, woven look without needing complicated strands carried across the back. It is a great way to create bold geometric detail in a small project.
Finished size
About 6.5 to 8 inches around and 6 to 7 inches tall.
Materials
- Two contrasting yarn colors
- Crochet hook, 3.5 mm to 4.5 mm
- Tapestry needle
- Scissors
Step-by-step guide
Step 1: Choose your colors
- Pick one main color and one accent color.
- High contrast works best for mosaic patterns.
- Decide if you want a bold modern look or a softer subtle one.
Step 2: Make the base chain
- Chain the length needed to wrap around the wrist comfortably.
- Make sure the number of chains works with your mosaic repeat.
- Join carefully to form a tube.
Step 3: Work the first round
- Crochet a round of sc or hdc in the main color.
- This creates the base of the fabric.
- Keep the stitches even and firm.
Step 4: Begin the mosaic pattern
- Change to the second color.
- Work short repeats of dc and skipped stitches to create the geometric shapes.
- Keep each row neat so the design stays sharp.
- Alternate colors as the pattern requires.
Step 5: Continue the design
- Repeat the mosaic rows until the wrist warmer is tall enough.
- Make sure both wrist warmers match if you are making a pair.
- Keep the pattern centered so the design looks balanced.
Step 6: Finish the top and bottom
- Add one round of sc in the main color around the top and bottom edges.
- This makes the cuff look clean.
- Fasten off and weave in the ends.
Finishing tips
- Use a smaller hook than usual to keep the mosaic fabric neat.
- Block lightly if needed to sharpen the geometric pattern.
- This pattern works especially well in deep jewel tones or monochrome combinations.
Style ideas
Try black and cream for a bold look, or dusty blue and soft gray for a modern winter style.
3. Crochet Star Motif Wrist Warmer Pattern
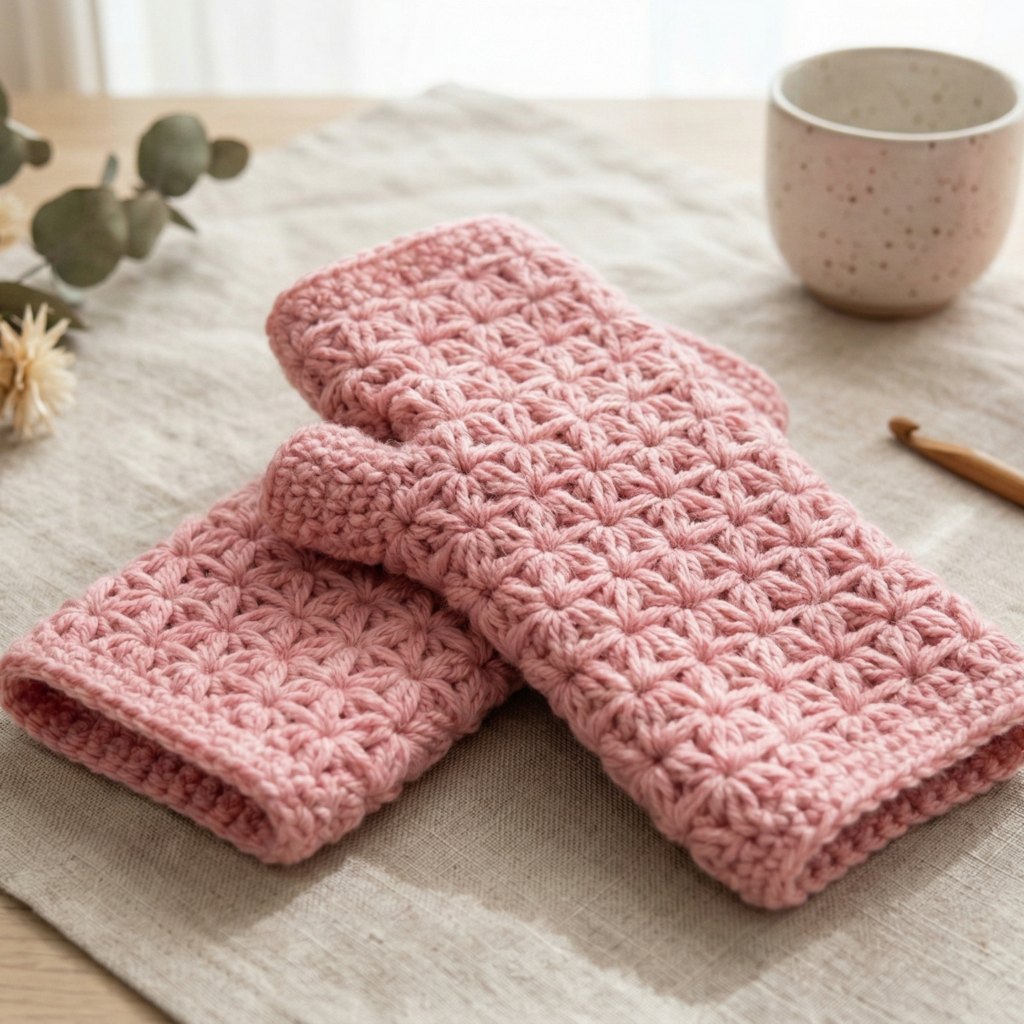
Skill level: Beginner to intermediate
Style: Playful, decorative, slightly boho
Best for: Cute gifts and statement accessories
This wrist warmer uses star motifs or star-like textured stitches to create a lively surface. It is a charming project if you like small decorative details.
Finished size
About 6 to 8 inches around and 6 to 7 inches tall.
Materials
- Sport, DK, or worsted yarn
- Crochet hook, 3.5 mm to 4.5 mm
- Tapestry needle
- Scissors
Step-by-step guide
Step 1: Make the base band
- Chain the width needed for the wrist warmer.
- Join into a ring.
- Work a few rounds of sc or hdc to create the cuff base.
Step 2: Make the star texture
- Use a star stitch or star-like cluster stitch across the fabric.
- Pull up loops carefully so the stars remain even.
- Close each star stitch fully before moving to the next.
- Repeat the pattern row by row.
Step 3: Shape the wrist warmer
- Continue the star stitch pattern until the fabric reaches the needed height.
- Keep the cuff snug but flexible.
- Test fit as you go if possible.
Step 4: Finish the edges
- Add one round of sc at the top and bottom for structure.
- This keeps the star pattern from stretching out.
- Fasten off and weave in ends.
Finishing tips
- Solid colors show off the star texture best.
- If the stars look too tight, use a slightly larger hook.
- Keep the yarn soft so the stars do not feel scratchy.
Style ideas
This pattern looks lovely in gold, soft pink, lavender, or winter white.
4. Crochet Retro Lacy Wrist Warmer Pattern
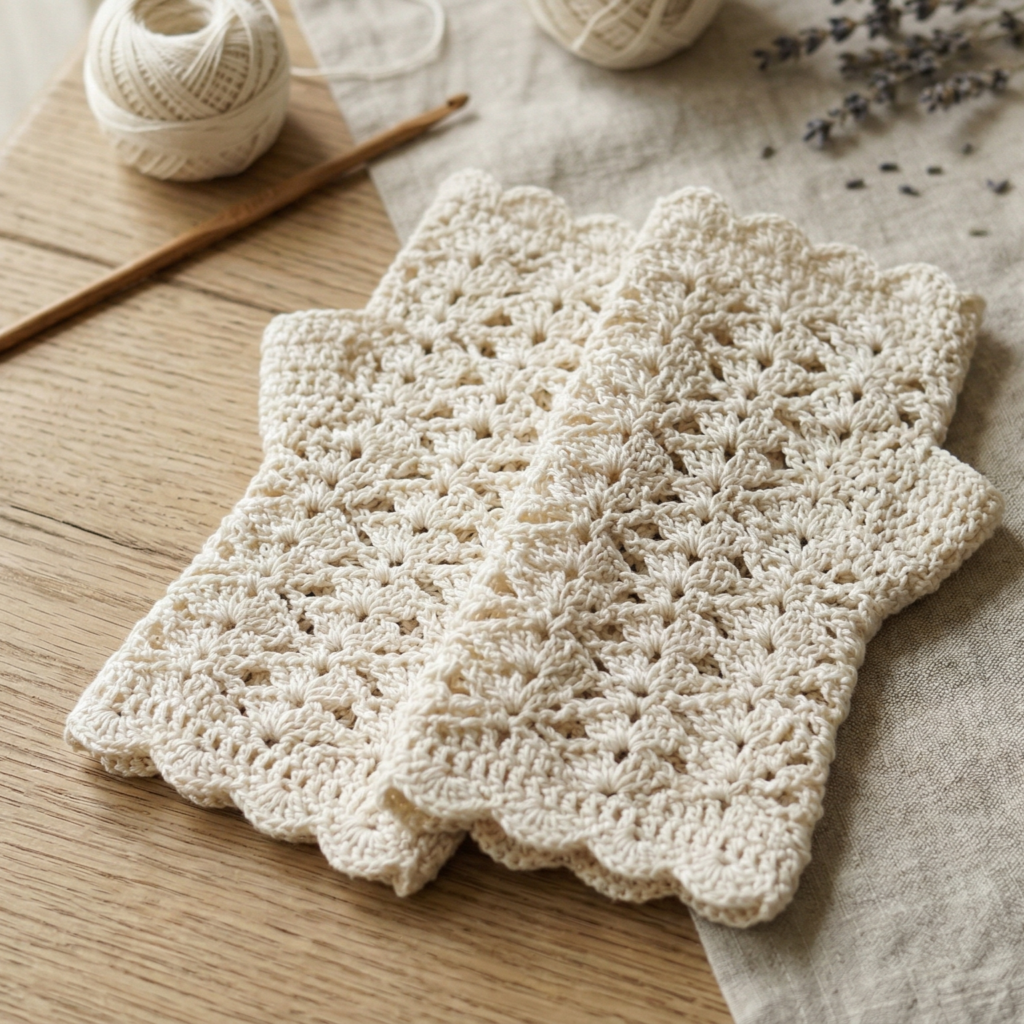
Skill level: Intermediate
Style: Delicate, vintage, romantic
Best for: Fashion accessories, layering, dressy outfits
A lacy wrist warmer adds a soft feminine touch to any outfit. This retro style is light and elegant, making it ideal for layering with long sleeves or dresses.
Finished size
About 6.5 to 8 inches around and 6 to 7 inches tall.
Materials
- Lightweight yarn such as sport, fingering, or fine cotton
- Crochet hook, 2.5 mm to 3.5 mm
- Tapestry needle
- Scissors
Step-by-step guide
Step 1: Start with a foundation chain
- Chain a length that fits around the wrist comfortably.
- Join into a round carefully.
- Make sure the chain is not twisted.
Step 2: Create the lace base
- Work a round of sc or hdc.
- Add chain spaces to form the lace openings.
- Repeat a lace repeat such as shell stitches or V-stitches.
- Keep the pattern airy but not too loose.
Step 3: Build the lace rows
- Continue repeating the lace pattern.
- Keep the shape even so the cuff stays straight.
- If needed, add a plain row between lace rows for stability.
Step 4: Shape the top and bottom edges
- Finish with a round of sc.
- This helps the wrist warmer keep its shape.
- Make sure the edge is smooth and tidy.
Step 5: Add optional trim
- Add a picot edge or small scallops for a vintage finish.
- Fasten off and weave in ends.
- Block the wrist warmer gently to open the lace.
Finishing tips
- Fine cotton gives the cleanest lace effect.
- Blocking is important here because it helps the pattern open up.
- Use soft pastel or cream shades for a true retro look.
Style ideas
This wrist warmer looks beautiful in ivory, pale blue, blush pink, or sage green.
5. Crochet Granny Stripes Wrist Warmer Pattern

Skill level: Beginner
Style: Classic, colorful, stash-friendly
Best for: Scrap yarn projects and quick handmade gifts
Granny stripes are a fun way to use leftover yarn and create a cheerful wrist warmer. The stripe design adds color without making the project complicated.
Finished size
About 6 to 8 inches around and 6 to 7 inches tall.
Materials
- Small amounts of yarn in several colors
- Crochet hook, 3.5 mm to 4.5 mm
- Tapestry needle
- Scissors
Step-by-step guide
Step 1: Choose your color order
- Select 3 to 5 colors that work well together.
- Arrange them in the order you want to use them.
- Make sure the yarn weights match as closely as possible.
Step 2: Make the foundation round
- Chain enough to fit around the wrist.
- Join to form a ring.
- Work a base round of sc or hdc.
Step 3: Add the granny stripe rows
- Use granny stitch clusters across the round.
- Change colors after each stripe or after every two stripes.
- Keep the stripes even and balanced.
Step 4: Continue the cuff
- Repeat the granny stripe pattern until the wrist warmer is the desired height.
- Try to keep the color changes neat.
- Use the same stripe sequence for the second cuff so they match.
Step 5: Finish the edges
- Work a round of sc around the top and bottom.
- This gives the cuff a neat frame.
- Fasten off and weave in the ends carefully.
Finishing tips
- This pattern is perfect for using small scraps.
- Keep the stripes narrow if you want a more elegant look.
- Use soft, cozy yarn so the cuff is comfortable for daily wear.
Style ideas
Make rainbow stripes for a playful look or stick to soft neutrals for something more subtle.
Conclusion
Crochet wrist warmers are one of the best small projects for adding handmade style to everyday wear. They are quick to make, easy to personalize, and practical enough to use all season long. Whether you prefer the smooth comfort of a no-sew textured cuff, the modern look of mosaic crochet, the playful charm of star motifs, the elegance of retro lace, or the cozy colorfulness of granny stripes, there is a pattern here to match your style.
These wrist warmers also make thoughtful gifts because they feel special without needing a huge amount of time or yarn. Once you make one pair, it is easy to adjust the colors, size, or stitch style to create more. A well-made pair of wrist warmers can become a favorite accessory for cool mornings, study sessions, winter walks, or simply adding a soft handmade touch to an outfit.