Crochet mittens are one of the best cold-weather projects you can make because they are practical, quick to personalize, and deeply satisfying to wear. Unlike larger garments, mittens are small enough to finish in a reasonable amount of time, yet they still give you the chance to play with texture, shaping, and color in a way that feels meaningful. A good pair of handmade mittens does more than keep your hands warm. It adds personality to your winter wardrobe and gives you something useful that was made stitch by stitch with care.
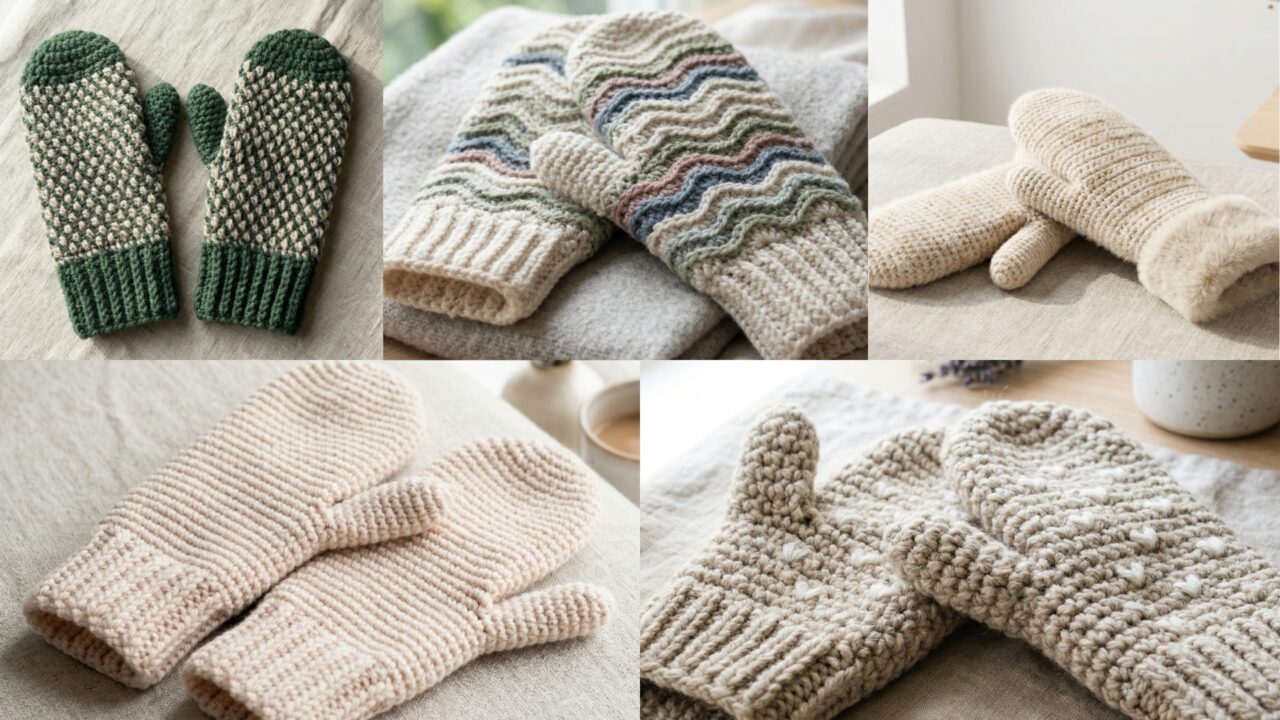
What makes crochet mittens especially appealing is how much variety you can create from a simple shape. A wavy mitten can feel playful and modern. A double seed stitch mitten brings a rich, sturdy texture. Bulky thrummed mittens with puffy hearts feel extra cozy and charming. Faux fur mittens create a soft, luxurious look. Super easy soft mittens offer a beginner-friendly project that still feels polished and wearable. Each design has its own style, but all of them are made to keep your hands warm and comfortable through the colder months.
In this post, you will find five cozy crochet mitten patterns with detailed step-by-step guidance, helpful notes, and practical finishing tips. Each section is written to be easy to follow while still giving you enough detail to make mittens that look neat, fit well, and feel wonderful to wear. If you want a winter project that is both functional and beautiful, these mitten ideas are a great place to start.
Quick Notes
Project type: Crochet mittens
Best for: Winter wear, gifts, cold-weather outfits, handmade accessories, and stash-busting
Skill level: Beginner to intermediate, depending on thumb shaping and texture
Hook size: Usually 4.0 mm to 6.5 mm, depending on yarn weight and fit
Yarn weight: DK, worsted, bulky, or plush yarn depending on the design
Best yarn choice: Wool blends, acrylic blends, or soft yarns with warmth and structure
Finished size: Sized for hands, customizable by palm and finger length
Time to complete: Several hours to a few days per pair depending on detail
Helpful stitches: Chain, slip stitch, single crochet, half double crochet, double crochet, increases, decreases, post stitches, seed stitch, texture stitches, thumb shaping, seaming
Common Materials
Most mitten patterns use a similar set of supplies.
- Yarn in your chosen colors
- Crochet hook matched to the yarn
- Yarn needle
- Scissors
- Stitch markers
- Measuring tape
- Optional fleece or lining fabric
- Optional faux fur yarn
- Optional stuffing or thrums for extra warmth
For mittens, yarn choice matters a lot because the fabric needs to be warm, soft, and durable. A yarn with some structure helps the mittens hold their shape, while softness makes them comfortable to wear. If you want extra warmth, choose a wool blend or a thicker yarn. If you want a lighter mitten, a soft acrylic or cotton blend can work, but warmer yarns are usually best for cold weather.
1. Crochet Wavy Mittens Pattern
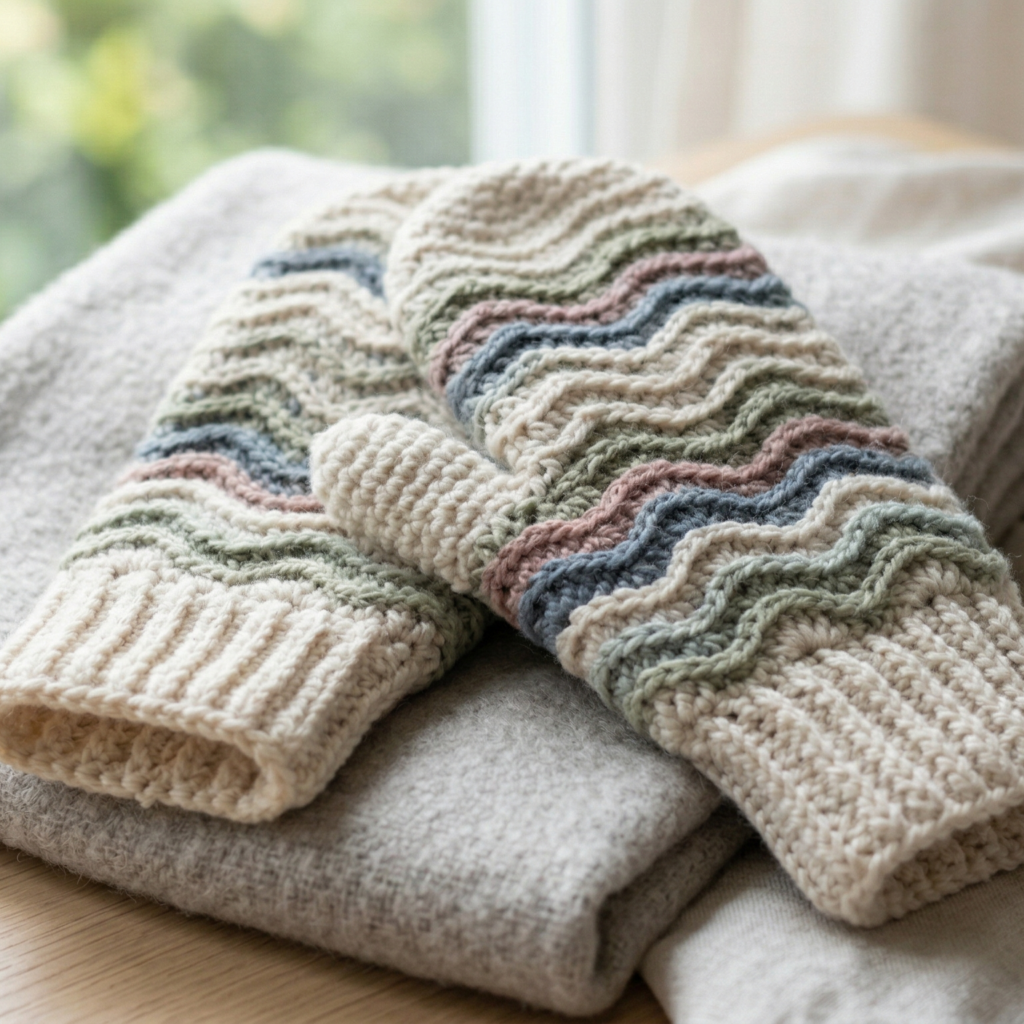
Wavy mittens are playful, stylish, and a little unexpected in the best way. The wave texture adds movement and visual interest, making the mittens feel modern while still being cozy and practical. They are a lovely choice if you want winter accessories that stand out without being overly complicated.
Step-by-Step Guide
Step 1: Measure the hand
Before you begin, measure around the hand and along the palm and finger length. Mittens should fit snugly but not tightly, since they need to keep warmth in while still allowing movement. Accurate measurements help you shape the mitten properly from the beginning.
A good fit is essential for comfortable mittens.
Step 2: Start with the cuff
Begin with the cuff section of the mitten. A ribbed or slightly stretchy cuff works well because it helps the mitten stay in place around the wrist. You can crochet this part in rows and then join it into a tube, or work it in the round depending on your preferred method.
The cuff provides a secure and comfortable base.
Step 3: Build the hand section
Once the cuff is finished, continue upward into the main hand section. This part should be slightly wider than the wrist and roomy enough for the palm. Keep the stitches even so the mitten feels smooth and comfortable when worn.
The hand section shapes the mitten’s body.
Step 4: Add the wavy stitch pattern
Work the wavy stitch repeat across the mitten body. This may involve increases and decreases or a decorative wave stitch sequence. Keep the pattern consistent so the waves remain even and readable. The wave effect should feel soft and flowing rather than crowded.
The wavy texture is the main visual feature.
Step 5: Shape the thumb opening
At the point where the thumb should sit, leave a thumb opening or create a small chain gap depending on the pattern style. The thumb opening should be positioned carefully so the mitten fits naturally on the hand. If the opening is too high or too low, the mitten may feel uncomfortable.
The thumb area is important for fit and movement.
Step 6: Continue to the fingertip area
After the thumb section, continue crocheting the top of the mitten until it reaches the length needed to cover the fingers. The top should be gently rounded so it fits the shape of the hand. You can decrease gradually to close the top neatly.
A rounded top helps the mitten look polished.
Step 7: Make the thumb
Crochet the thumb as a small separate piece or work it from the opening if your pattern allows. Keep the thumb snug and comfortable. It should feel well proportioned with the rest of the mitten, not too large or too short.
The thumb completes the wearable shape.
Step 8: Finish and seam
Weave in all ends carefully and make sure the thumb and top seams are secure. Try on the mitten to check the fit. If needed, adjust the thumb placement or cuff tension for the next mitten so the pair matches well.
Helpful Tips
Wavy mittens look beautiful in solid colors because the texture becomes the focus. If you want a soft modern style, try cream, sage, or dusty blue. If you want something bolder, use a rich winter color like burgundy, forest green, or deep navy.
2. Crochet Double Seed Stitch Mittens Pattern
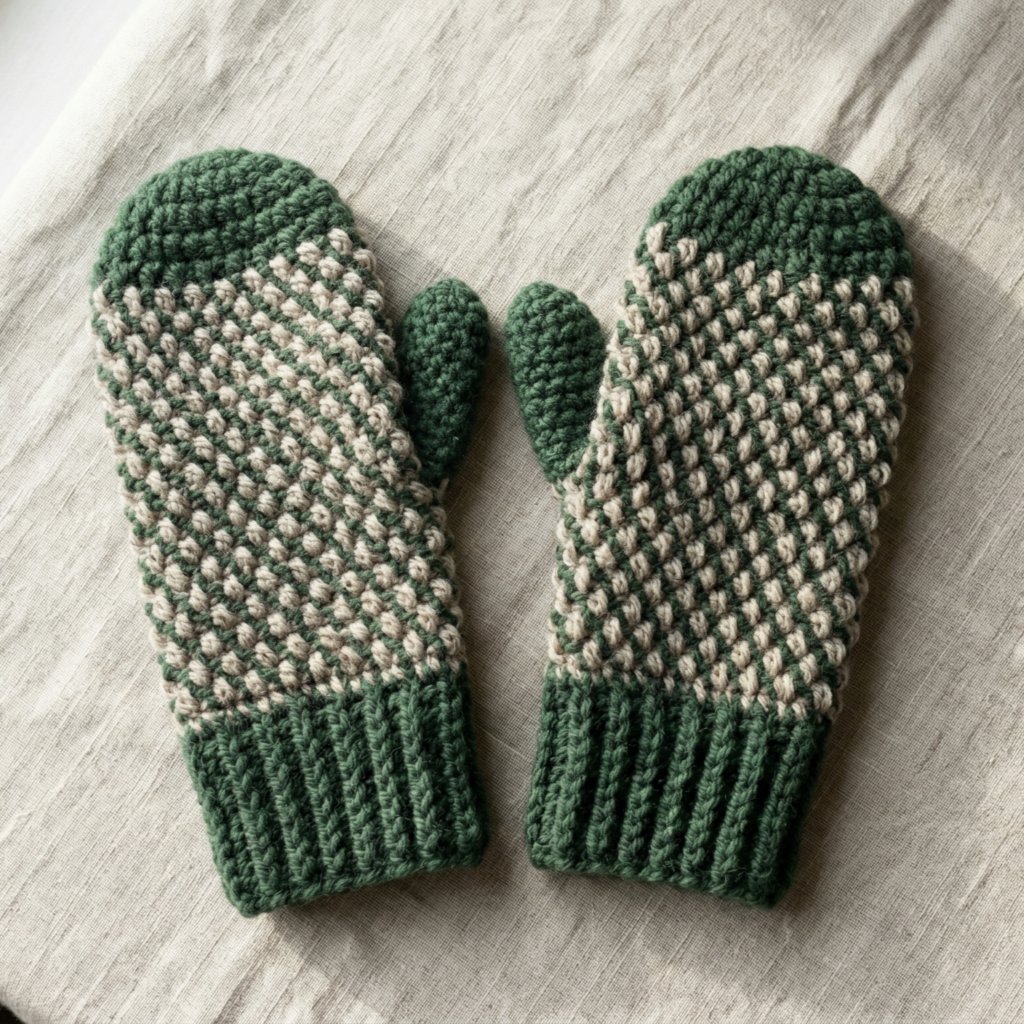
Double seed stitch mittens are textured, cozy, and wonderfully sturdy. The seed-like texture gives the mittens a classic handmade look that feels warm and timeless. This pattern is especially nice if you want mittens that look detailed but are still practical for everyday winter use.
Step-by-Step Guide
Step 1: Take hand measurements
Measure the wrist, palm, thumb placement, and mitten length. Since seed stitch creates a denser fabric, the fit should be planned carefully so the mittens stay comfortable. Make sure to allow just enough ease for movement.
A careful fit makes textured mittens more wearable.
Step 2: Crochet the cuff
Start with a ribbed or simple stretchy cuff. A snug cuff helps keep the mitten secure and prevents cold air from slipping inside. You can make the cuff slightly longer for a cozier winter look.
The cuff helps hold the mitten in place.
Step 3: Begin the seed stitch repeat
Work the double seed stitch pattern across the mitten body. This stitch creates a small, bumpy texture that feels thick and cozy. Keep the stitch order consistent so the texture remains even and balanced.
The seed stitch gives the mitten its classic texture.
Step 4: Shape the mitten body
Continue the seed stitch rows as the mitten rises over the hand. Keep the tension firm enough to hold warmth, but not so tight that the mitten becomes stiff. This stitch is especially good for winter because it creates a dense, insulating fabric.
The body should feel warm and supportive.
Step 5: Add the thumb opening
When you reach the thumb position, create the opening according to your pattern. Leave enough space for the thumb to move naturally. The placement should be centered in a way that feels comfortable when worn.
A well-placed thumb opening improves function.
Step 6: Close the top
Continue crocheting until the mitten reaches the top of the fingers, then decrease gradually to close the tip. The top should feel rounded and smooth so the mitten fits the hand naturally. Check the fit as you go.
A clean top finish makes the mitten look professional.
Step 7: Crochet the thumb
Work the thumb separately, keeping it snug but not tight. Because the seed stitch texture is already dense, the thumb should stay simple and proportionate. Attach it securely to the opening.
Step 8: Finish the pair
Weave in all ends and check both mittens for symmetry. If one side feels slightly different, adjust the tension or stitch count for the second mitten so the pair matches better.
Helpful Tips
Double seed stitch mittens look especially nice in earthy or neutral colors. If you want a rustic winter feel, choose oatmeal, brown, gray, or forest green. The texture is already strong, so a solid yarn color usually works best.
3. Crochet Bulky Thrummed Mittens with Puffy Hearts Pattern
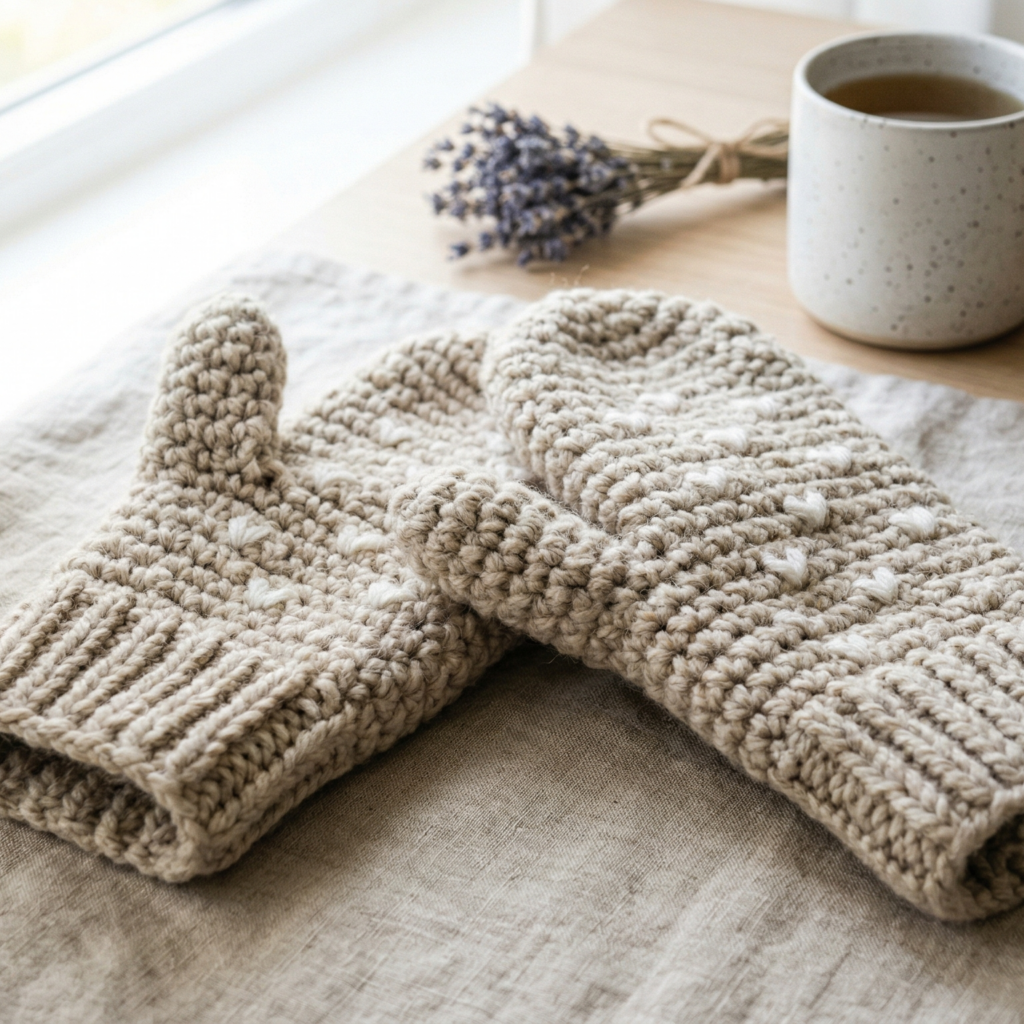
Bulky thrummed mittens with puffy hearts are warm, whimsical, and incredibly cozy. Thrumming adds extra insulation inside the mitten, which makes them ideal for very cold weather. The puffy heart detail gives them a sweet, handmade charm that makes them feel special and gift-worthy.
Step-by-Step Guide
Step 1: Choose a bulky yarn
Since these mittens are meant to be extra warm, start with a bulky yarn or a thick wool blend. The yarn should be soft but sturdy enough to support the thrumming and decorative details. Choose a color that suits the winter feel you want.
Bulky yarn helps create a warm mitten base.
Step 2: Plan the thrummed lining
Thrummed mittens use small tufts of wool or fiber added to the inside of the mitten for extra warmth. Before you begin, decide where you want the thrums to sit and how dense you want them to be. Even spacing helps the lining feel cozy without becoming too bulky.
The thrumming is what makes the mittens extra warm.
Step 3: Crochet the mitten body
Work the mitten body in the round using firm stitches. Keep the fabric snug so the thrums remain inside and the mitten retains its shape. Because this is a warm winter piece, the mitten should feel thicker than a lightweight pair.
The body gives the mitten its structure.
Step 4: Add the thrums
Insert small puffs of wool or fiber as you crochet the lining section. These tiny tufts create a soft insulating layer inside the mitten. Keep them evenly placed so the inside feels comfortable and not lumpy.
The thrums add warmth and softness.
Step 5: Crochet the puffy hearts
Make the heart appliqués separately using puff stitches or small stuffed shapes. These hearts should be compact and soft so they can be sewn neatly onto the outside of the mitten. Choose a contrast color if you want the hearts to stand out more.
The hearts add a sweet decorative finish.
Step 6: Add the thumb
Crochet the thumb section after the main body is complete. Make it roomy enough to wear comfortably over or around the thrummed interior. Keep the thumb shape simple so the focus remains on warmth and the heart detail.
Step 7: Attach the hearts
Sew the puffy hearts onto the back or outer side of the mitten. Make sure they are firmly attached and evenly placed. A single heart on each mitten or a small cluster can both look lovely.
Step 8: Finish carefully
Weave in all ends securely, check the lining for comfort, and try the mittens on to make sure they fit well. Thrummed mittens should feel very warm but still easy to move in.
Helpful Tips
These mittens are perfect for gifts because they feel thoughtful and cozy. Neutral outer colors with bright puffy hearts create a lovely contrast, while soft pinks or reds make the design feel sweet and romantic. Because of the thrumming, these mittens are especially good for very cold weather.
4. Crochet Faux Fur Mittens Pattern
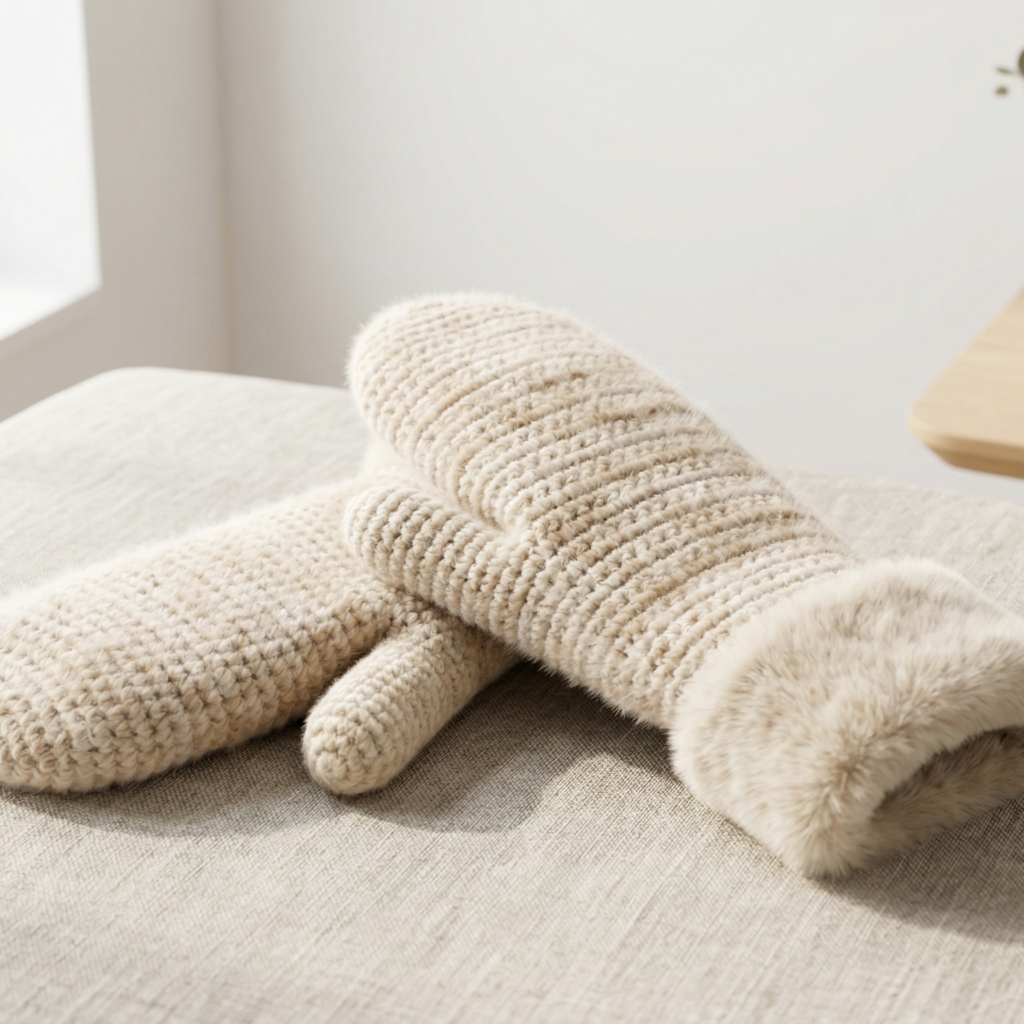
Faux fur mittens feel luxurious, soft, and beautifully winter-ready. They are perfect if you want a mitten that looks plush and stylish while still offering warmth. This design is a wonderful choice for anyone who loves a cozy, elegant cold-weather accessory.
Step-by-Step Guide
Step 1: Pick a faux fur yarn or trim
Choose a yarn that gives a faux fur effect or a yarn combination that can be paired with faux fur trim. The goal is a mitten that feels fluffy and soft without losing shape. A neutral color often looks especially elegant in faux fur styles.
The fur effect gives the mittens their plush look.
Step 2: Crochet the base mitten
Start with a simple mitten shape in a yarn that supports the faux fur texture. The base should be snug and well-shaped because the plush surface will add volume. Keep the stitches firm so the mitten does not feel loose.
The base keeps the mitten wearable.
Step 3: Shape the cuff
A ribbed or slightly fitted cuff works well with faux fur mittens because it balances the fluffier upper part. The cuff should feel secure at the wrist and help keep warmth inside. You can make the cuff slightly longer if you want a more dramatic winter look.
The cuff helps define the mitten shape.
Step 4: Add the plush texture
If your pattern uses faux fur yarn, continue crocheting the main body with the fluffy texture. If you are using a plain yarn with faux fur trim, attach the trim around the cuff, palm edge, or top border. Keep the texture even so the mittens feel soft and balanced.
The plush texture is the star of the design.
Step 5: Create the thumb opening
Add the thumb opening carefully so the mitten fits comfortably despite the extra texture. Faux fur yarn can be bulkier than regular yarn, so make sure the thumb area has enough room to move naturally.
Step 6: Crochet the thumb
Work the thumb in the same yarn or a matching plain yarn depending on the pattern style. Keep it simple and snug. If you use faux fur yarn for the thumb, make sure the stitches are secure so the shape stays neat.
Step 7: Finish the edges
Add clean borders to the cuff or opening if needed. Faux fur can look best when paired with simple finishes, because too many extra details can overwhelm the soft texture. Check that the mittens are comfortable and not too bulky.
Helpful Tips
Faux fur mittens look especially elegant in cream, beige, gray, or soft brown. If you want a more fashion-forward winter accessory, use a dark neutral with a fluffy trim. Keep the silhouette simple so the plush texture remains the focal point.
5. Crochet Super Easy Soft Mittens Pattern
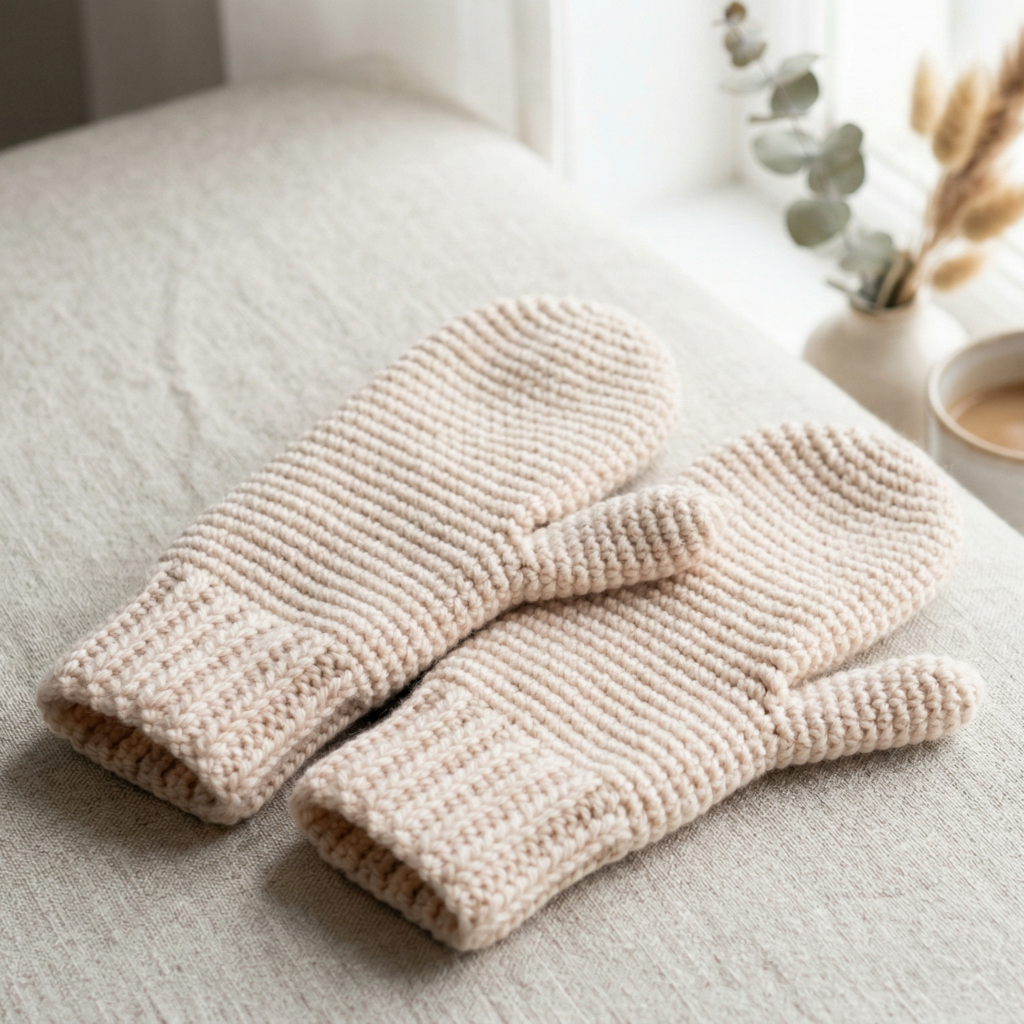
Super easy soft mittens are ideal for beginners or anyone who wants a simple, cozy project without complicated shaping. They are soft, practical, and quick to make, which makes them a great choice for gifts or everyday winter wear. This pattern focuses on comfort and ease rather than advanced texture or shaping.
Step-by-Step Guide
Step 1: Measure the hand
Begin by measuring the hand and wrist so you know how large to make the mittens. Even simple mittens need the right fit, especially around the wrist and thumb. Since this pattern is meant to be easy, planning the size first helps prevent problems later.
A good fit is the key to comfortable mittens.
Step 2: Crochet the cuff
Start with a simple cuff, often in ribbing or a stretchy row pattern. This part should fit snugly around the wrist and hold the mitten in place. A clean cuff also helps the mitten look more polished.
The cuff is the easiest place to start.
Step 3: Work the main mitten body
Continue crocheting the main body in a straightforward stitch such as single crochet or half double crochet. Keep the fabric soft and even. The mitten should feel smooth and comfortable rather than overly dense or complicated.
The body should be simple and wearable.
Step 4: Create the thumb opening
When you reach the thumb position, leave an opening or chain gap. This is one of the few shaping steps you need for a simple mitten. Make sure the opening is not too small, because a comfortable thumb placement makes the mittens much more useful.
A well-placed thumb opening helps the fit.
Step 5: Continue to the top
Keep crocheting until the mitten covers the hand comfortably. Then decrease gradually at the top to close it. A rounded top gives the mitten a clean finish and makes it feel soft and balanced.
Step 6: Crochet the thumb
Make the thumb as a separate small section and attach it securely to the opening. Keep the shape simple and snug. Since the overall mitten is meant to be easy, the thumb should also remain straightforward.
Step 7: Finish and try on
Weave in all ends and try the mitten on to make sure the fit feels good. If the cuff is too loose or the thumb feels tight, adjust the next mitten accordingly. Simple mittens are especially good for learning fit basics.
Helpful Tips
These mittens are great in soft solid colors like cream, gray, or blush. Because the design is simple, the yarn texture and color become the main visual features. This is a perfect beginner project if you want something useful without a lot of fuss.
Conclusion
Crochet mittens are such a satisfying winter project because they are practical, cozy, and full of handmade charm. They keep your hands warm while giving you a chance to experiment with texture, shape, and color in a smaller project that still feels meaningful. Whether you want something classic, playful, plush, or beginner-friendly, mittens are a lovely place to start.
These five mitten patterns each bring a different mood. The wavy mittens feel modern and playful. The double seed stitch mittens are textured and sturdy. The bulky thrummed mittens with puffy hearts are extra warm and sweet. The faux fur mittens feel soft and luxurious. The super easy soft mittens are simple and approachable for beginners. Together, they show how much variety you can create with just one cold-weather accessory.
A good pair of handmade mittens does more than protect your hands from the cold. It becomes part of your winter wardrobe, a thoughtful gift, or a small project that leaves you with something both beautiful and useful. With the right yarn, careful shaping, and neat finishing, these mitten patterns can become favorites you reach for every winter.