Kindle sleeves are fast, practical, and a lovely little handmade gift for readers. Below you’ll find a single, practical introduction that covers yarn, sizing, device measurement, closures, linings and abbreviations, followed by five full patterns: Strawberry, Granny Square with Cherry Pom-Pom, Lacy Border Love Letter, Boho, and No-Sew. Each pattern includes: skill level, materials, finished size guidance (with a clear method for grading to your device), a step-by-step construction method, assembly/lining notes, variations, and care/finishing tips. The tone is clear and professional so you can paste this directly into a blog post.
yarn, hooks, measuring your Kindle, sizing, closures, lining & abbreviations
Which yarn & hook to use
- Recommended weight: Worsted/Aran (weight 4) is the most forgiving and gives a sturdy protective fabric. Use DK (weight 3) for a lighter, sleeker sleeve.
- Fiber choice: Cotton or cotton blends — crisp, durable and machine washable. Acrylic or acrylic blends — soft, inexpensive and washable. For a plush sleeve, use chenille/velvet yarn but beware special washing needs.
- Hooks: For worsted use 4.0 mm (G/6) or 4.5 mm; for DK use 3.5 mm. Use a slightly smaller hook than the yarn label if you want a tighter, protective fabric.
Measure your device (do this first)
- Measure the height (H) and width (W) of your Kindle including any case you want the sleeve to fit over. Record both values in inches.
- Add 0.25–0.5 in allowance to each dimension for a snug fit (0.5 in for thicker cases or if you want to ease the insertion). Example: If your Kindle is 6.6″ × 4.6″, target sleeve interior ≈ 7.1″ × 5.1″.
- Decide sleeve style: full slip pocket, flap closure, or zip/no-sew envelope. This affects length and whether to allow more height.
How to plan stitch counts from gauge — simple method
- Make a 4″ × 4″ swatch in the stitch you plan to use, block it if needed.
- Count stitches across 4″ to get stitches per 4 inches (call this S4). Divide by 4 to get stitches per inch (spi). Count rows per 4″ to get rows per inch (rpi).
- Compute foundation stitches = desired width (in inches) × spi. Round to a multiple required by the stitch repeat, or to an even number if no repeat.
- Compute number of rows = desired height (in inches) × rpi.
Example (illustrative): If your swatch gives 14 sc across 4″ → spi = 14/4 = 3.5 sc/in. For a sleeve width of 5.1″ → 5.1 × 3.5 = 17.85 → use 18 foundation sc (rounded).
Construction approaches
- Worked flat then seamed — easiest for decorative fronts and lining.
- Worked in the round (tube) — seam-free and quick.
- Motif assembly (granny squares, appliqués) — decorative and scrap-friendly.
- No-sew envelope — rectangle folded and topped with sewn button or slide closure.
Closures & hardware
- Button + loop (crochet loop) — simple and elegant.
- Snap / magnetic clasp — streamlined; sew onto felt backing for strength.
- Zipper — secure but requires sewing and zipper installation (optional).
- Elastic band or leather strap and stud — rustic, durable.
Lining (recommended)
- A thin felt or cotton lining hides inner seams and protects the device from scratches. Sew lining by hand to the sleeve interior with small running stitches. Avoid adhesives.
Abbreviations (US)
- ch — chain
- sc — single crochet
- hdc — half double crochet
- dc — double crochet
- tr — treble (UK = treble)
- sl st — slip stitch
- st(s) — stitch(es)
- sk — skip
- inc — increase (2 sc in same st)
- dec — decrease (sc2tog)
- BLO / FLO — back loop only / front loop only
- RS / WS — right side / wrong side
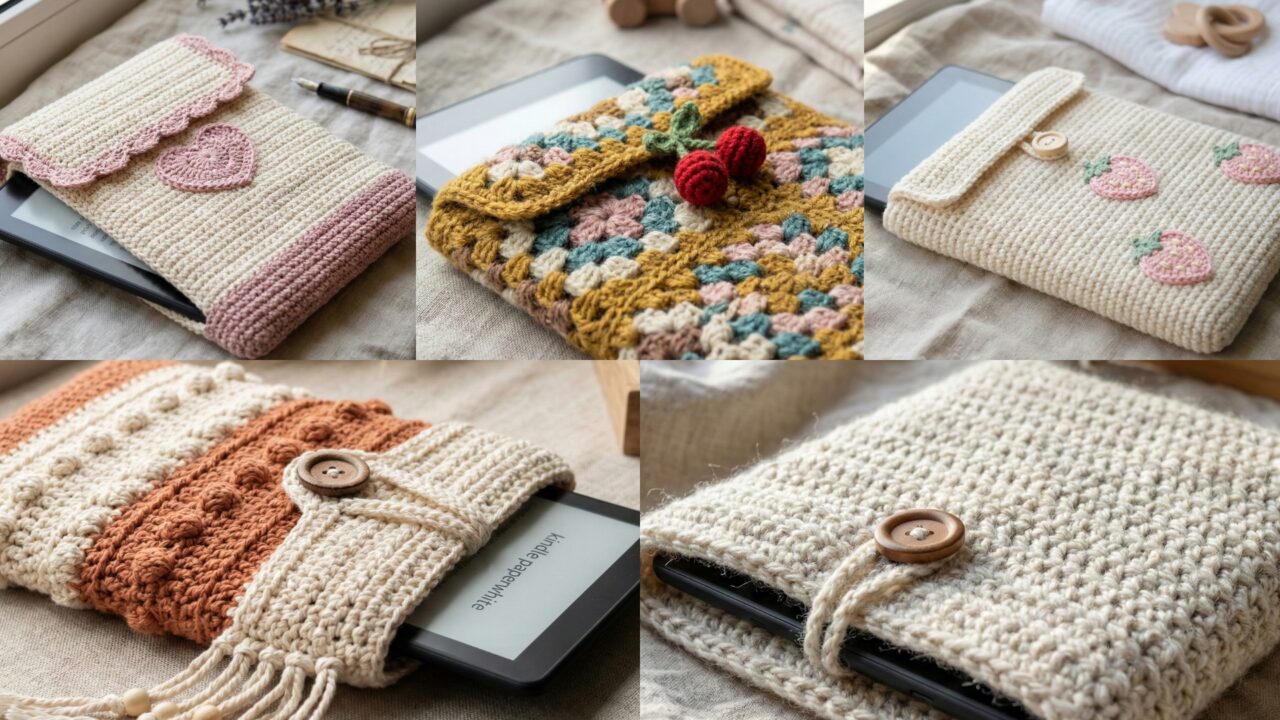
1. Crochet Strawberry Kindle Sleeve Pattern
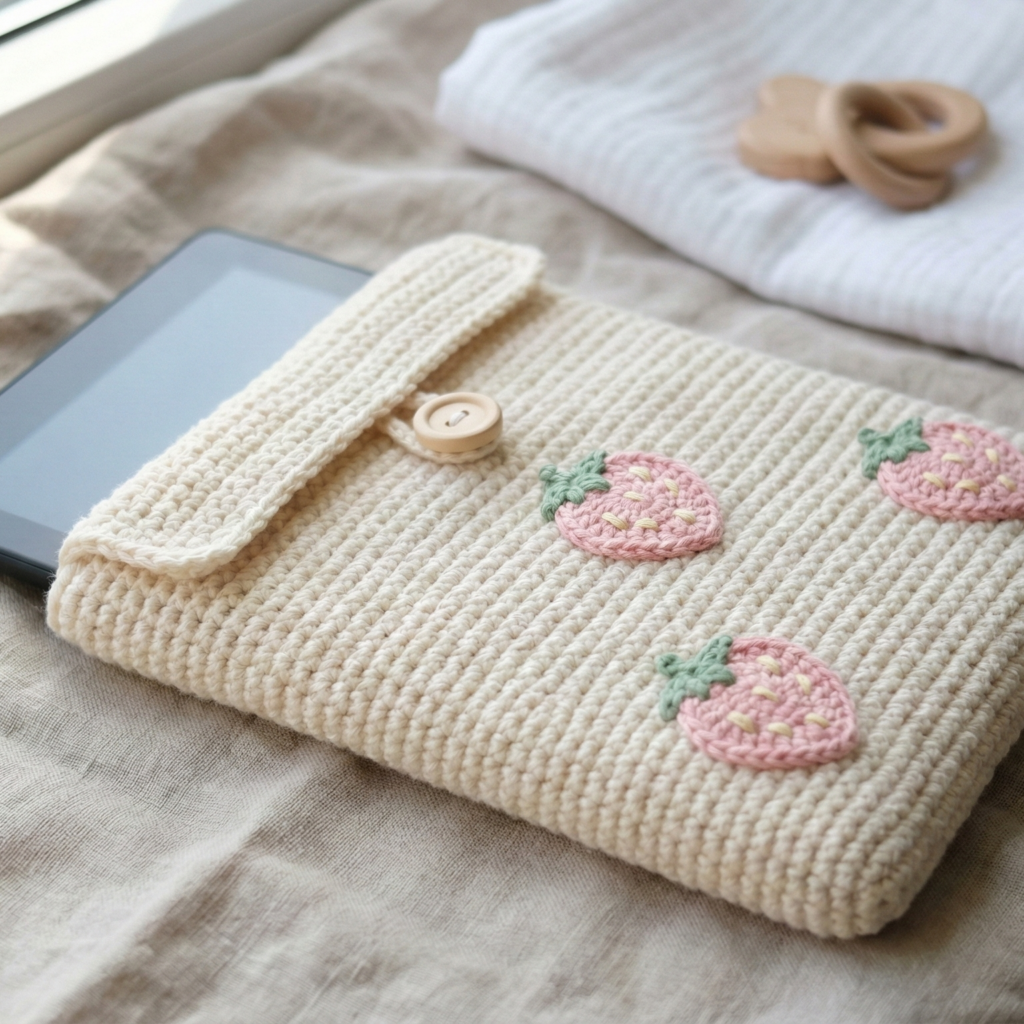
Style & vibe: Playful, slightly padded sleeve with bright strawberry appliqués and a buttoned flap. Cute for gifting and quick to make.
Skill level: Confident beginner
Materials (sample for a standard 6–7″ Kindle)
- Worsted weight yarn (main color): 150–200 yd. Red for strawberry contrast: 30–50 yd. Green small amount for leaves.
- Hook: 4.0 mm.
- 1 small wooden or decorative button.
- Thin felt for lining (optional).
- Tapestry needle, stitch marker.
Finished dimensions (example)
- Target interior: Width ≈ 5.1″, Height ≈ 7.1″ (adjust per your device measurement).
Gauge (illustrative)
- Example swatch: 14 sc × 16 rows = 4″ → spi = 3.5 sc/in ; rpi = 4 rows/in. Use your own swatch numbers.
Step-by-step
A. Compute foundation
- Using example spi 3.5 sc/in and target width 5.1″ → 5.1 × 3.5 = 17.85 → use 18 foundation sc.
B. Make the back panel (worked flat)
- Chain 18. Row 1: sc in 2nd ch from hook and across — 17 sc. Turn. (If you prefer to work true width, chain foundation for 18 sc and sc 18.)
- Rows 2–(N): sc across until panel height equals device height minus flap height. For example with rpi = 4 rows/in and target interior height 7.1″, compute rows = 7.1 × 4 = 28.4 → 28–30 rows. If making a flap, stop flap_height rows from the top. Example make body 24 rows and reserve 6 rows for flap.
C. Make the flap
3. After body rows, continue by shaping a flap: Row (body+1): ch1, sc across; repeat for 6 rows (or desired flap height). Optionally shape a rounded flap by decreasing stitches at each end on successive rows to create an arch. Fasten off.
D. Make front panel
4. Make a second identical panel (or a slightly shorter front if you want an inset flap). For a buttoned flap, front panel can be full height and flap folds over front. Fasten off.
E. Strawberry appliqué (make 3–5)
5. Small strawberry (worked flat): MR; R1: ch2, 6 dc in MR, sl st to join (6). Fasten off and leave tail. Flatten and sew base slightly to make a teardrop shape. For seeds, embroider small yellow French knots. Add two tiny green leaves: ch6, sc pattern to form leaf; sew to top.
F. Assembly
6. With RS facing, place front and back panels together and whipstitch or mattress stitch three sides (two long sides and bottom), leaving top (flap side) open. Turn RS out. If you want seam-free interior, attach felt lining now before closing top.
7. Sew strawberries on front in an attractive cluster. Sew button to flap center and crochet a small loop (ch6, sl st to base) or a small sc loop on front where button engages.
G. Optional padding
8. If you want more protection, work a second inner panel (same size) and slip it inside and hand-stitch along the edges to create a padded sandwich.
H. Finishing
9. Weave ends, trim. Add felt lining: cut felt to interior size and slip inside, hand stitch along edges into seam allowance.
Variations
- Make strawberries in variegated yarn for a relaxed look.
- Replace strawberry appliqués with tiny crochet hearts or flowers.
Care
- Machine wash gentle for acrylic/cotton. For lined sleeves with felt, hand wash and air dry.
2. Crochet Granny Square Kindle with Cherry Pom-Pom Sleeve Pattern
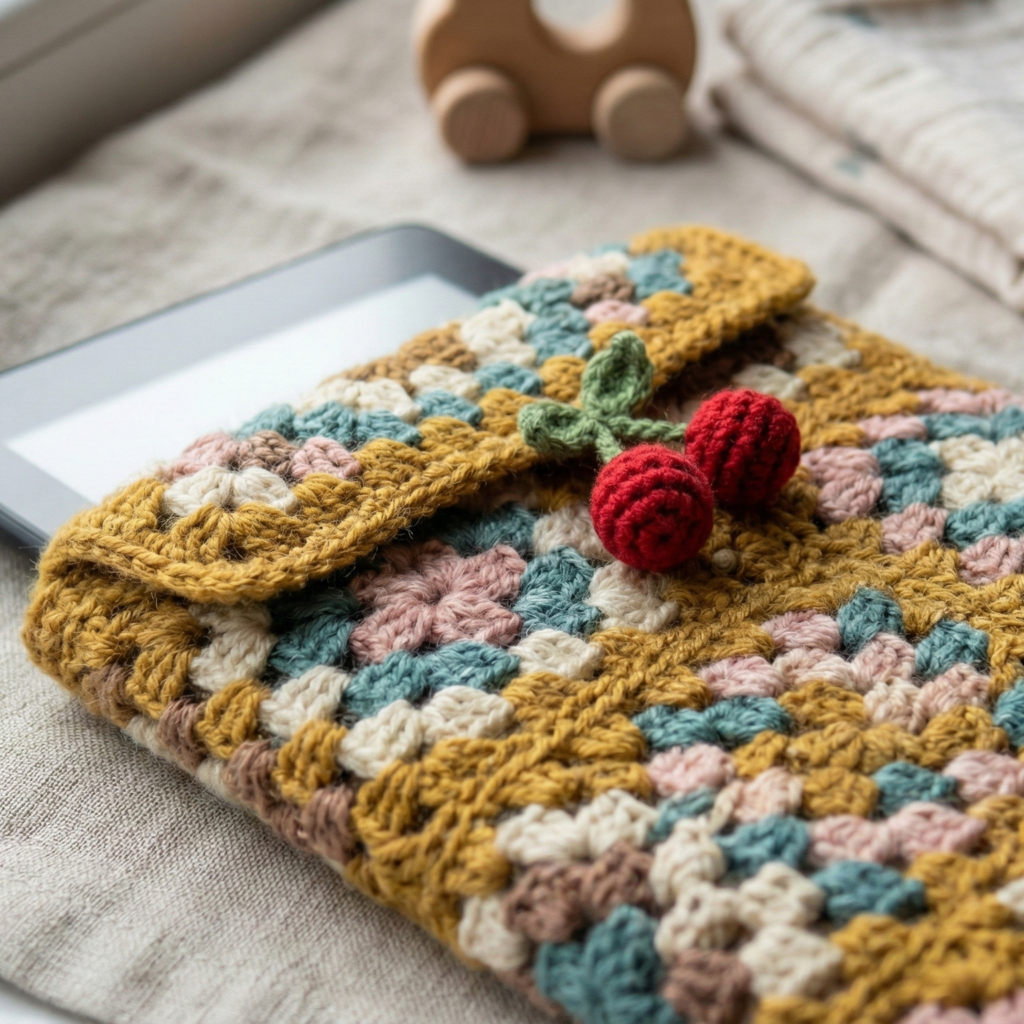
Style & vibe: Retro granny squares joined into a cozy wrap; cherry pom-pom on the flap adds a seasonal touch.
Skill level: Confident beginner (granny squares + joining)
Materials
- DK or worsted scrap yarns for squares (about 150–250 yd total depending on square size).
- Hook: 3.5–4.0 mm.
- Small red pom-pom or crochet a cherry pom with felt stem.
- Felt for lining (optional), tapestry needle.
Finished dimensions
- Arrange granny squares into a rectangle approximately target interior size; e.g., 3 squares across × 4 squares down (with squares ≈ 1.75″–2″ finished) to reach ~6–8″ height depending on square size.
Step-by-step
A. Make mini granny squares
- Mini granny (approx 1.5–2″ finished): MR; ch3 (counts as dc), 2 dc, ch2, 3 dc, ch2 × 3; join with sl st; fasten off. Add one or two rounds of color to reach desired size (test and block to match others). Make enough squares to form a rectangle slightly larger than target interior (include seam width).
B. Layout & join
2. Layout squares in a pleasing color arrangement. Join-as-you-go (JAYG) or whipstitch squares on WS for a clean look. Join them into a rectangle with short edges for width and long edges for height.
C. Create flap
3. Choose top row to become flap — either leave that row one square shorter (cut the rectangle accordingly) or fold top edge down and seam sides to create built-in flap.
D. Assemble sleeve
4. With RS facing in, fold rectangle and seam sides leaving top open (and optionally leaving one side unseamed if you want envelope style). Add felt lining if desired: cut felt to interior dimensions and hand sew inside.
E. Cherry pom
5. Make a small cherry pom: either a store-bought tiny pom-pom, or crochet a small sphere MR; R1: 6 sc in MR; R2: inc around (12); R3: sc around (12); stuff lightly and close. Add a crochet ch stem (ch 6) or use a felt stem and sew to flap top center. Reinforce with extra stitches or a small felt patch behind the flap to distribute stress.
F. Finishing
6. Weave ends, trim. If you used JAYG, hide loose ends on WS and secure.
Variations
- Make two rows of squares across for a wider sleeve that holds a small paperback or tablet.
- Add a narrow border of sc around the entire sleeve for cohesion.
Care
- Machine wash gentle if yarn fibers allow; remove pom prior to washing or make pom detachable with a snap for easy laundering.
3. Crochet Lacy Border Love Letter Kindle Sleeve Pattern

Style & vibe: A refined sleeve with a lacy scalloped border and an embroidered “love letter” motif or appliqué — romantic and vintage-inspired.
Skill level: Intermediate (lace borders + embroidery/appliqué)
Materials
- DK yarn (soft cotton or cotton blend) ~150–200 yd.
- Hook: 3.5 mm.
- Felt or cotton for lining, small embroidery thread for motif, tapestry needle.
- Small snap or hidden magnetic clasp (optional).
Finished dimensions
- Use the measuring method from the introduction; this sample targets interior 5.1″ × 7.1″.
Gauge (illustrative)
- Example: 16 dc × 14 rows = 4″ (use your swatch).
Step-by-step
A. Make body panel
- Compute foundation stitches as earlier. Example: spi 4 dc/in × width 5.1″ = 20.4 → 20–21 dc. Chain 21 and work in dc rows for a sleek fabric. Row 1: dc in 3rd ch from hook and across. Row 2–(R): dc across until panel reaches height minus scallop border and flap allowance (for example 24 rows if using rpi = 4).
B. Create scalloped border
2. When you’re ready to add scallop, change color (or remain same) and work one round of sc across the top edge. Then work a scallop round: skip 2 sts, (5 dc) in next st, skip 2 sts, sc in next repeat to create scallops. For a smaller scallop use (3 dc), for larger (7 dc). Repeat 1–2 rows of scallops for a fuller lacy edge.
C. Make flap & motif
3. For a love-letter motif: embroider a tiny envelope outline or heart on the front panel before seaming. Use a backstitch with embroidery floss and make a small stitched outline centered near the flap location. Alternatively crochet a small envelope applique and sew on.
4. Work a neat rectangular flap: continue body rows on the flap area or shape a rounded flap using gradual decreases.
D. Assembly & lining
5. Seam sides and bottom with mattress stitch. Add a thin felt lining to the interior, hand sew in place. If using a magnetic clasp, attach through the lining and reinforce with a small felt patch.
E. Finishing
6. Weave ends and block the scalloped border slightly to open the lacy edges.
Variations
- Use two-color edging for contrast.
- Add a small crochet tassel inside the flap resembling a wax seal.
Care
- Hand wash if delicate lace and embroidery; otherwise machine gentle if yarn allows.
4. Crochet Boho Kindle Sleeve Pattern
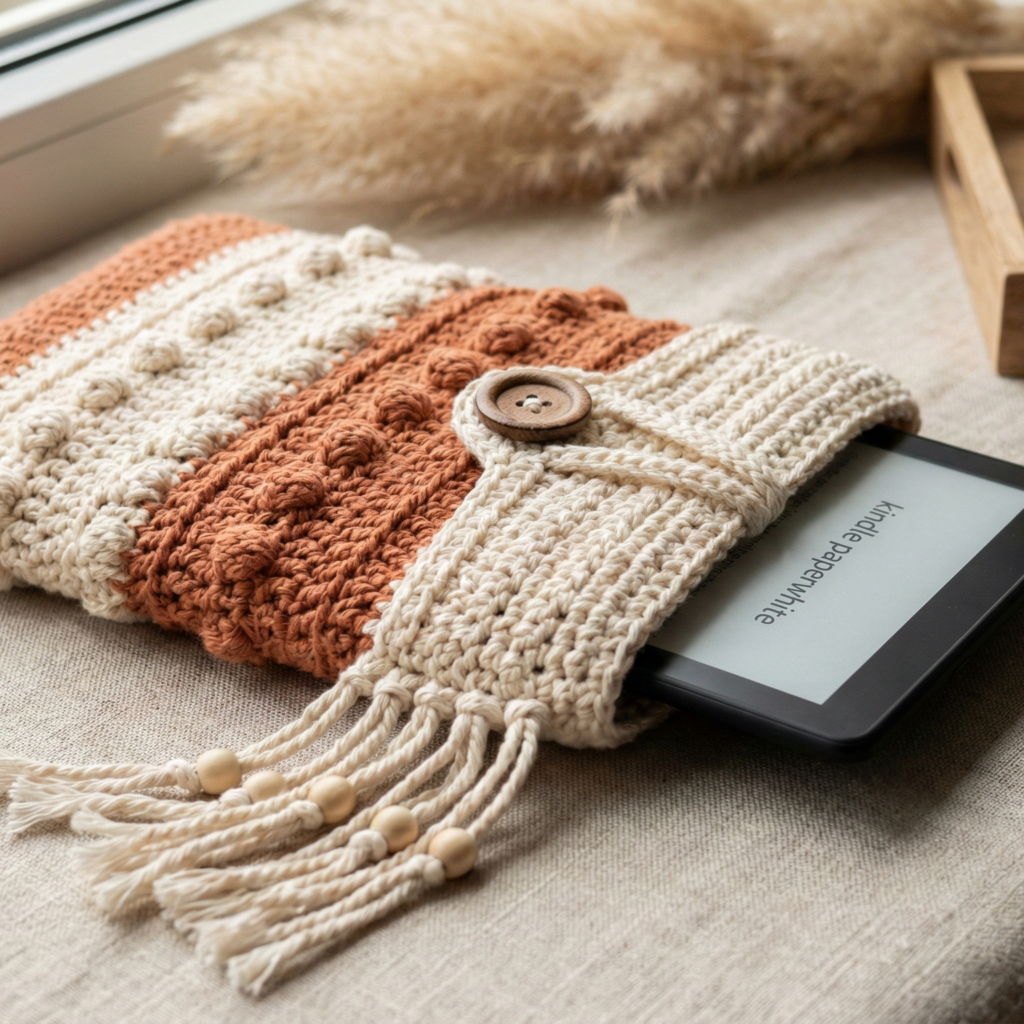
Style & vibe: Bohemian, textured sleeve with macramé-style fringe at the bottom and a simple buttoned top; uses textured stitches (front post, bobbles, shells) for visual interest.
Skill level: Intermediate (post stitches, texture and fringe)
Materials
- Worsted or DK yarn (neutral + accent color) ~200–300 yd.
- Hook: 4.0 mm for worsted, 3.5 mm for DK.
- Wooden button, small piece of felt for backing, tapestry needle.
Finished dimensions
- Adjust per device measurement; this sample uses interior ≈ 5.1″ × 7.1″.
Step-by-step
A. Compute counts & make panel
- Compute foundation as usual; for example 18–20 sc foundation using sample spi. Work a textured stitch panel in rows: establish a 4-row repeat such as:
- Row A: sc across
- Row B: fpdc around next st, bpdc around next st repeat (creates vertical ribs)
- Row C: sc across
- Row D: (2 dc, ch1, 2 dc) shell in every 6th stitch for occasional shells
- Repeat this 4-row pattern until the panel is desired height minus fringe and flap.
B. Fringe
3. For fringe after the bottom edge: cut multiple lengths of yarn double the desired fringe length, fold in half and pull loop through edge stitches, pull ends through loop and tighten to make larks head knots. Make fringe across the bottom in groups every 3–6 stitches for boho fullness. Trim straight or angled.
C. Flap & closure
4. Fold top to form flap or crochet a separate flap. Attach a wooden button and make a crochet loop on the front panel to fasten. Reinforce button area with a felt patch inside.
D. Assembly & lining
5. Seam sides and bottom, add lining if desired, then attach fringe after seaming for even distribution.
E. Finishing
6. Block panel lightly if using cotton to open texture. Trim fringe evenly.
Variations
- Add small wooden beads threaded onto fringe strands for a rustic accent.
- Make the flap triangular or semicircular for boho variety.
Care
- Remove beads before washing if not water resistant; machine wash gentle for most cottons.
5. Crochet No-Sew Kindle Sleeve Pattern

Style & vibe: Quick, no-sew envelope style — a single rectangle folded into a sleeve and secured with a button loop or elastic. Great for beginners and for markets where speed matters.
Skill level: Beginner
Materials
- Worsted yarn ~150–200 yd (one color or striped).
- Hook: 4.0 mm.
- Large button and a piece of elastic or crochet loop. Felt for optional internal slip pocket.
Finished dimensions
- Rectangle should be target interior width × (twice interior height minus flap allowance). Example if interior height is 7.1″ aim rectangle height ≈ (7.1 × 2) – 1.0 = 13.2″ so when folded you have a 1″ flap overlap.
Step-by-step
A. Make a rectangle
- Compute foundation stitches for width as earlier. Example 18 foundation sc. Chain 18 (or foundation sc 18). Row 1: sc across. Row 2–(R): sc across until rectangle reaches desired height (example 13 rows per inch × 13.2″ = ~171 rows — this is large; use your rpi to compute actual rows). In practice, count rows using your rpi: rows = rectangle_height (in) × rpi.
B. Fold & secure
2. Fold rectangle so lower edge meets upper edge leaving a flap overlap (fold at the point that gives a pocket depth for your device). Tuck the device in to test the fit.
3. Folded edges will form sides; you can secure the folded sides using a few slip stitches through both layers along left and right edges at the seam line (this is still “no-sew” as you do it all by crochet). Or leave unstitched relying on friction — but slip-stitching gives a neater finish.
C. Closure
4. Add a crochet loop for a button: attach yarn to the flap, ch6 (or size needed), sl st back to base to make a loop and secure. Sew on large button on front panel. Optionally attach an elastic band button loop for more stretch.
D. Optional pocket
5. For a small card or bookmark pocket, fold a small rectangle of felt and swivel stitch through the inner fold to create an internal pocket without sewing.
E. Finishing
6. Weave ends, trim. This sleeve is done entirely without hand sewing except for finishing the button if you prefer.
Variations
- Make stripes by changing colors every few rows.
- Add a contrasting edge by working 1 round of sc around the exterior after folding (requires a little blocking and careful stitching).
Care
- Machine wash gentle for acrylic/cotton; reshape and dry flat.
Conclusion
You now have five complete Kindle sleeve patterns covering playful, vintage, boho and ultra-quick no-sew styles. A few practical finishing tips and selling/photography ideas to make your blog post more helpful and professional:
Final finishing & reinforcement
- Lining: always recommend an optional thin felt or cotton lining for scratch protection — hand stitch it in with tiny running stitches along the seam allowance. Avoid glue.
- Reinforce stress points: add a small circular felt patch behind buttons or pom-pom attachments and stitch through the patch and sleeve several times to distribute stress.
- Blocking: for cotton or stitch-pattern sleeves, block gently to even edges and shape scalloped or lacy borders.
Grading & device variants
- Provide readers with a short table for common device sizes (e.g., e-reader 6″, small tablet 7–8″, medium tablet 9–10″) and explain how to recalc using the stitches per inch × target inches method from the introduction. Encourage a quick swatch test.
Care labels & notes for buyers
- Always include yarn content and washing instructions in your pattern or product listing. Example card: “100% cotton — machine wash gentle; reshape & dry flat. Remove sleeve for use in warm environments.”
Photography tips for the blog
- Shots to include: flat full-sleeve photo, sleeve on a neutral tablet or mock Kindle for scale, closeup of detail (stitch, scallop, pom), interior shot showing lining, and a lifestyle shot with a book/coffee for ambiance. Use natural, diffused daylight and a shallow depth of field for tactile closeups.
SEO & pinning
- For Pinterest create a vertical 9:16 pin featuring the most photogenic sleeve (closeup + title overlay), and include keywords such as “crochet Kindle sleeve pattern”, “crochet e-reader cozy”, and “handmade tablet sleeve pattern” in alt text and descriptions.