Crochet headbands are one of the easiest ways to stay warm without covering up your whole hairstyle, and that is exactly why they are such a favorite for fall and winter. They are practical, quick to make, and wonderfully stylish. A good headband adds that cozy handmade touch to everyday outfits while keeping ears warm on chilly mornings, windy afternoons, and frosty evenings. Best of all, tie-back foldable headbands are especially versatile because they can be adjusted for a comfortable fit and folded to create a more polished, layered look.
What makes crochet headbands so appealing is how much personality you can pack into a small project. A simple stitch pattern can look elegant and timeless, while a textured stitch can feel soft, warm, and richly detailed. You can make them in neutral colors for daily wear, or choose bold seasonal shades for a more fashion-forward accessory. Because they are smaller than larger garments, they are also perfect for using up yarn scraps, trying new stitches, and making thoughtful handmade gifts.
In this post, you will find five cozy crochet headband patterns that are all tie-back foldable designs. Each one includes a clear step-by-step guide, useful notes, and helpful tips to make the process smooth and enjoyable. Whether you want something delicate, textured, modern, or rustic, these headbands are designed to be comfortable, wearable, and beautiful enough to become favorites in your cold-weather wardrobe.
Quick Notes
Project type: Tie-back foldable crochet headbands
Best for: Fall and winter outfits, gifts, everyday wear, handmade markets, and stash-busting
Skill level: Beginner to intermediate
Hook size: Usually 3.5 mm to 5.5 mm, depending on yarn weight
Yarn weight: DK, worsted, or light bulky yarn
Best yarn choice: Soft wool blends, acrylic blends, or cotton blends for comfort and stretch
Finished size: Adjustable, typically 18 to 22 inches long before tying, depending on head size
Time to complete: About 30 minutes to a few hours per headband
Helpful stitches: Chain, slip stitch, single crochet, half double crochet, double crochet, shell stitch, waffle stitch, textured stitch repeats, increases, decreases
Common Materials
You can use the same basic supplies for all five headband styles.
- Yarn in your chosen colors
- Crochet hook matched to yarn weight
- Yarn needle
- Scissors
- Measuring tape
- Optional stitch markers
- Optional decorative button or embellishment, if desired
Because these are foldable tie-back headbands, the design depends on a long strip that can wrap comfortably around the head and tie at the back. That means your gauge should be flexible enough to create a soft, wearable band without making it too loose or too tight. Soft yarn with a little stretch will usually work best.
1. Crochet The Open Shell Stitch Headband Pattern
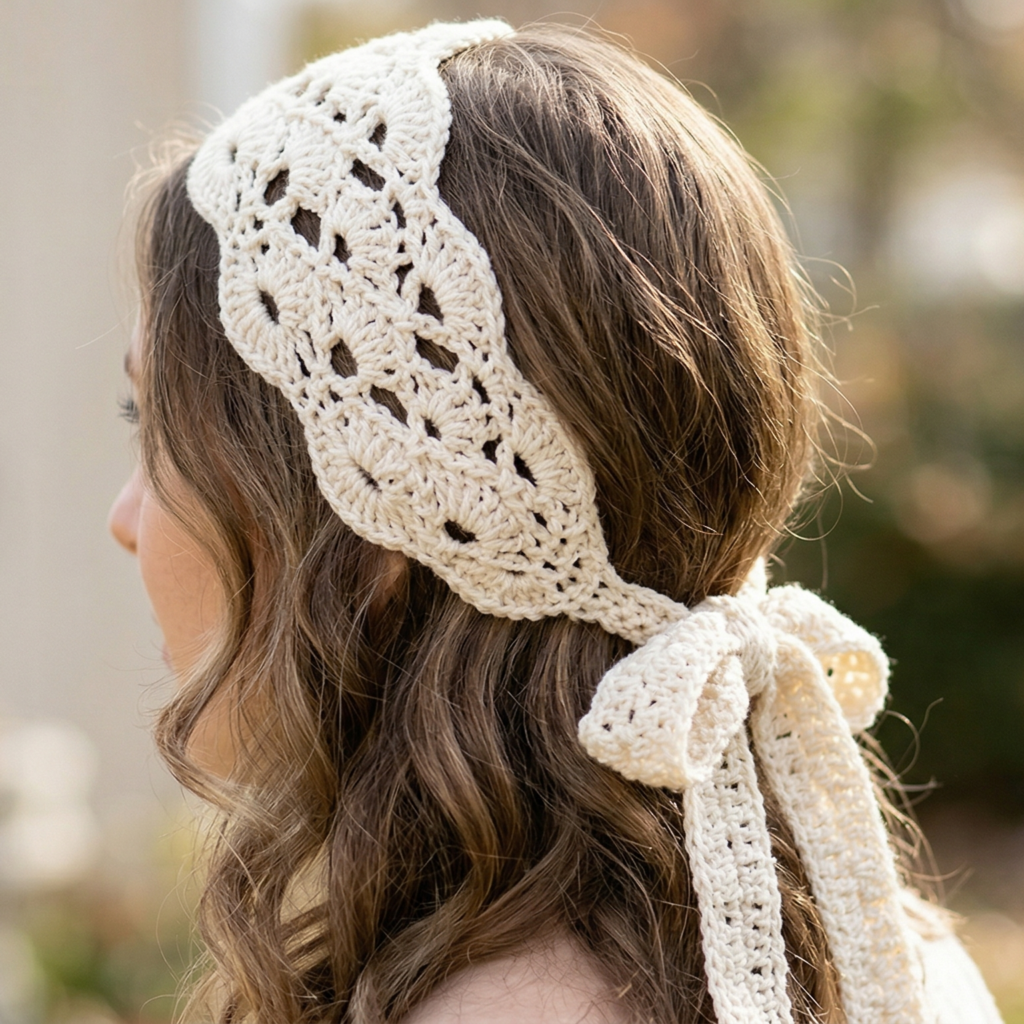
The open shell stitch headband is light, pretty, and softly textured. The openwork shell pattern gives the headband a graceful look while still keeping it warm enough for cool weather. Because it is a tie-back foldable design, it sits neatly on the head and ties comfortably at the back, making it easy to adjust for different fits.
Quick Notes
Skill level: Beginner to intermediate
Finished size: Long rectangular strip, usually 3 to 5 inches wide and long enough to tie
Style: Feminine, airy, elegant, cozy
Best colors: Cream, blush, dusty rose, sage, oatmeal, soft brown
Materials
- DK or worsted yarn
- Crochet hook suited to your yarn
- Yarn needle
- Scissors
- Measuring tape
Step-by-Step Guide
Step 1: Decide on the width of the headband
For a foldable tie-back headband, the width matters just as much as the length. A wider strip creates more coverage and feels extra cozy, while a slimmer strip gives a delicate look. For the open shell stitch, a medium width often works best because it lets the shell texture show clearly without feeling bulky.
A good starting width is around 3 to 5 inches.
Step 2: Chain your foundation
Make a foundation chain long enough to create the desired headband length, including the part that will tie at the back. Since this is a tie-back style, the strip should be long enough to wrap around the head comfortably and leave enough yarn for secure knots or bows.
It is better to make the band slightly longer than too short.
Step 3: Work the shell stitch pattern
The open shell stitch is created by working groups of stitches into the same space, then leaving small spaces between the shells. This creates a lovely scalloped, airy texture. Keep the stitch count even so the pattern stays balanced across the strip.
The shells should look soft and regular rather than crowded.
Step 4: Keep the edges neat
Because open shell stitches can make the sides look a little loose, it helps to finish each row with a clean edge stitch. A neat edge gives the headband a polished look and helps it fold more smoothly later.
This is especially important if you want the headband to drape well.
Step 5: Repeat until the strip is long enough
Continue working the shell rows until the strip reaches the correct length. Try the strip against your head as you go so you can check the fit. For a tie-back design, the center section should sit comfortably across the forehead and the ends should extend enough to tie securely.
Step 6: Add the foldable shape
Fold the finished strip gently if you want a layered front. Some makers like to create a soft fold at the center so the headband looks more styled. If you prefer, you can also leave it flat and simply tie it at the back. Both versions work beautifully.
Step 7: Finish and tie
Weave in the yarn ends and trim carefully. When worn, the headband should feel soft, lightweight, and secure. Tie it at the back into a simple knot or bow, depending on the look you prefer.
Helpful Tips
This design is especially lovely in soft natural colors because the shell detail looks delicate and elegant. If you want a more romantic style, choose blush or cream. If you want a cozy everyday look, go for a warm neutral like oatmeal or taupe.
2. Crochet Waterlily Waltz Headband Pattern
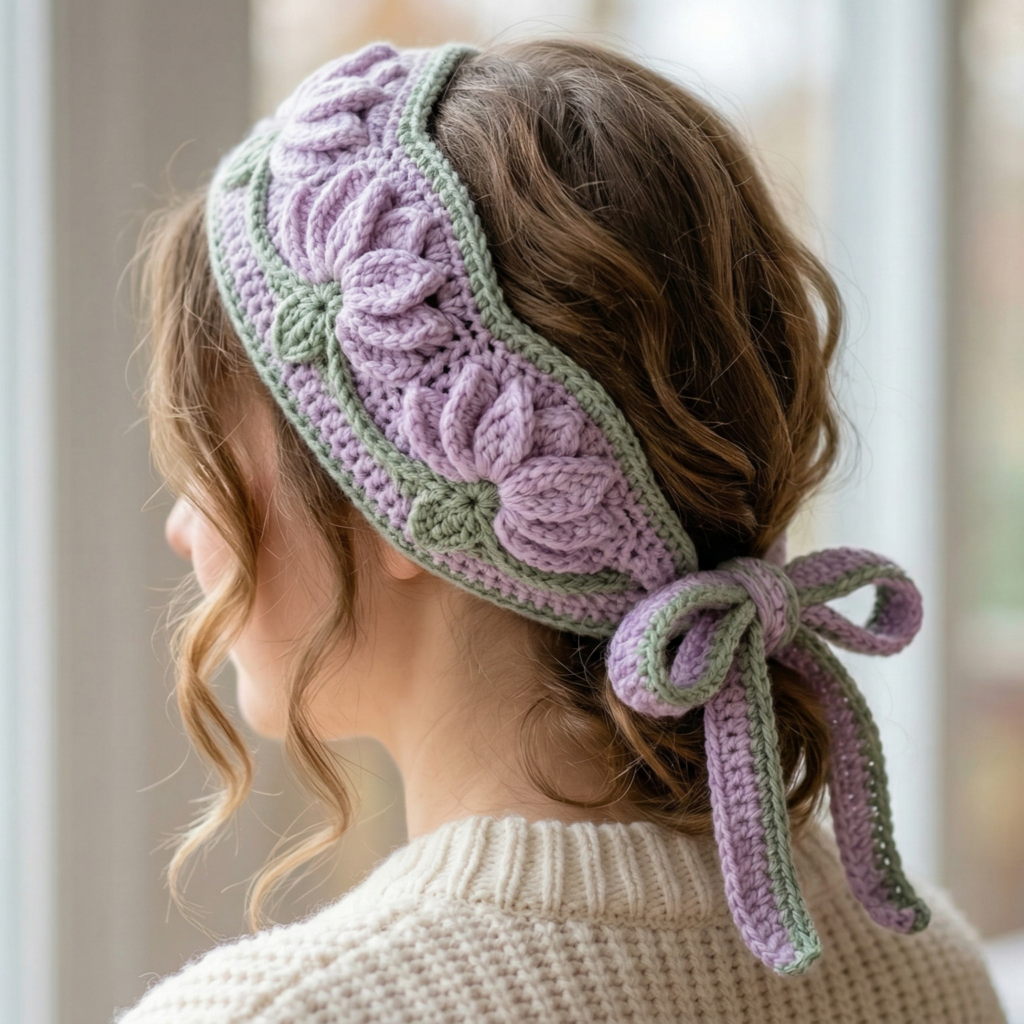
The Waterlily Waltz headband feels dreamy, textured, and just a little whimsical. It is a beautiful choice for crocheters who want something feminine and unique without making the project too complicated. The stitch pattern can be worked in soft repeating motifs that resemble petals or gentle ripples, making it a lovely option for fall and winter accessories.
Quick Notes
Skill level: Beginner to intermediate
Finished size: Long foldable strip with medium width
Style: Romantic, graceful, decorative, soft
Best colors: Lavender, pale blue, sage, ivory, mauve, rosewood
Materials
- Soft yarn with good stitch definition
- Crochet hook matched to yarn
- Yarn needle
- Scissors
- Measuring tape
- Optional stitch marker
Step-by-Step Guide
Step 1: Start with a flexible foundation
This headband begins with a foundation chain that allows the stitch pattern to open nicely without stretching too much. Because the design is meant to fold and tie, the foundation should be neat and even. Keep it loose enough to stay comfortable but not so loose that the headband loses structure.
A well-made foundation helps the texture stand out.
Step 2: Build the waterlily-style repeat
Work the stitch pattern in a way that creates small floral or petal-like shapes. This may involve clusters, shell-like elements, or textured spacing that gives the fabric a decorative surface. Keep the repeats consistent so the motif flows across the strip.
The look should feel soft and balanced, like ripples on water.
Step 3: Maintain even tension
Textured floral-inspired patterns can sometimes become uneven if your tension changes too much. Keep your stitches consistent so the headband lies flat and folds smoothly. This makes a big difference in the finished shape.
Even tension also helps the pattern look more refined.
Step 4: Create the proper length
Continue working until the strip is long enough to wrap around the head and tie at the back. It is helpful to check the fit as you go, especially if you are making the headband as a gift. The finished band should be snug enough to stay in place but soft enough to wear comfortably all day.
Step 5: Shape the fold
One of the best features of this design is the folded front. You can gently fold the headband at the center to create a layered look that highlights the stitch texture. This gives the headband a more finished and elegant appearance without needing extra decorations.
Step 6: Finish the edges cleanly
A neat edge helps the pattern remain visible and prevents the strip from curling. If needed, add a simple border or final row of tighter stitches to hold the shape. Clean edges make the headband easier to tie and more comfortable against the skin.
Step 7: Weave in ends and style
Once complete, weave in the ends securely and tie the headband at the back. The result should be soft, graceful, and wearable with coats, cardigans, and winter layers.
Helpful Tips
This is a beautiful pattern for soft, muted yarns. If you want a delicate handcrafted look, choose colors that feel natural and slightly faded. If you want a more playful look, try mixing two close shades for a subtle two-tone effect.
3. Crochet Tiny Pebbles Twisted Headband Pattern
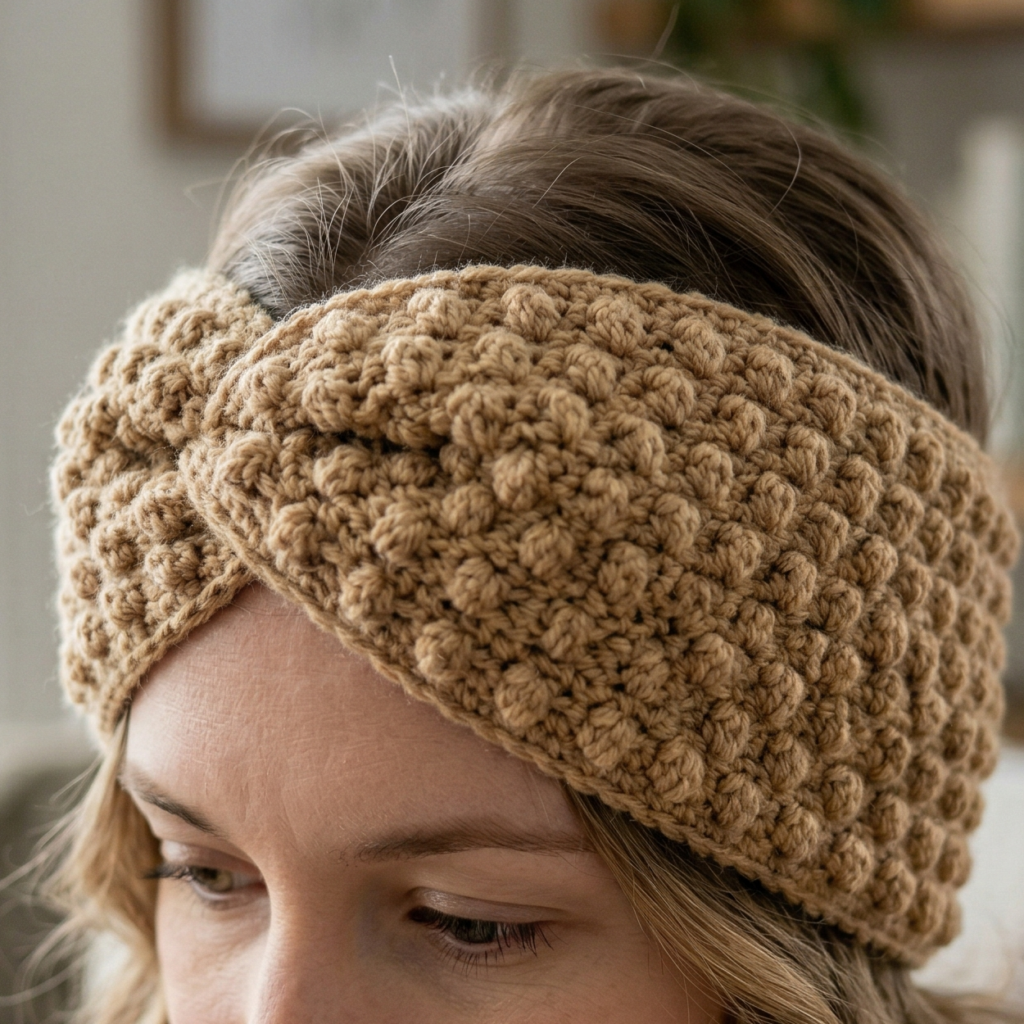
The Tiny Pebbles twisted headband has a cozy, textured feel that is perfect for cold weather. The pebble-like stitch surface gives the headband a charming raised texture, while the twist detail creates a polished, stylish finish. Because it is tie-back and foldable, it is easy to adjust and very comfortable to wear.
Quick Notes
Skill level: Beginner to intermediate
Finished size: Medium-width strip with twisted front detail
Style: Textured, modern, cozy, wearable
Best colors: Gray, charcoal, cream, camel, forest green, rust
Materials
- Medium-weight yarn
- Crochet hook suited to your yarn
- Yarn needle
- Scissors
- Measuring tape
Step-by-Step Guide
Step 1: Choose your texture
The pebble stitch effect can be created using a textured stitch repeat that forms small raised bumps. This gives the headband a cozy, tactile surface. It works especially well for winter because it feels warm and visually rich.
A pebble texture adds personality without needing a complicated shape.
Step 2: Chain the foundation
Start with a chain long enough for the full headband length, including the tie-back ends. Since this is a twist headband, the center section will be folded and crossed, so make sure the strip is wide enough to support that design.
The headband should have enough length to tie securely at the back.
Step 3: Work the pebble texture rows
Follow your textured stitch repeat carefully. The tiny raised bumps should stay even across the strip. This pattern is especially forgiving for everyday wear because the texture hides small irregularities and gives the headband a handmade charm.
Keep the rows neat so the surface looks intentional.
Step 4: Check the width
Because the twisted design will fold in the middle, the strip should not be too narrow. A medium width works best so the twist has enough fabric to hold its shape. If it is too thin, the twist may collapse; if it is too wide, the headband may feel bulky.
Aim for a balanced width that feels cozy and flattering.
Step 5: Create the twist
Fold the headband in the center and twist one side over the other before securing the back ends. This gives the design its signature shape. The twist should sit comfortably and create a soft knotted look at the front.
This step turns a simple strip into a stylish accessory.
Step 6: Secure the back ties
After forming the twist, finish the back ends neatly. If you want extra structure, you can use a few hidden stitches at the twist point before tying the ends. This helps the shape hold up during wear.
Step 7: Finish and try on
Weave in ends, adjust the twist if needed, and wear the headband to check the fit. The fabric should feel snug but not tight and should stay in place without sliding around.
Helpful Tips
This headband is a great option if you want a practical winter accessory with a little more visual interest than plain ribbing. The pebble texture looks especially nice in heathered yarns and earthy tones. It is a lovely everyday piece that pairs well with coats, scarves, and layered outfits.
4. Crochet Waffle Stitch Twisted Headband Pattern

The waffle stitch twisted headband is rich, cozy, and wonderfully textured. Waffle stitch has a thick, cushioned look that is perfect for chilly weather, and the twisted front gives the piece a stylish modern edge. This is the kind of headband that feels warm, substantial, and beautifully handmade.
Quick Notes
Skill level: Beginner to intermediate
Finished size: Thick, warm foldable headband with twist front
Style: Chunky, cozy, structured, fashionable
Best colors: Deep brown, oatmeal, dusty rose, mustard, navy, wine
Materials
- Worsted or light bulky yarn
- Crochet hook suited to yarn
- Yarn needle
- Scissors
- Measuring tape
- Optional stitch markers
Step-by-Step Guide
Step 1: Learn the waffle stitch rhythm
Waffle stitch creates a grid-like texture that looks bold and cozy. It usually uses front post and standard stitches to create a raised pattern. Before starting the headband, practice a small swatch so you understand the stitch flow.
Once you get the rhythm, the texture works up beautifully.
Step 2: Chain the foundation
Make a chain that is long enough for your head circumference, plus tie-back ends. Since waffle stitch fabric can be thick, make sure the foundation is not too tight or the headband may feel stiff.
A smooth chain makes the twisted finish sit better later on.
Step 3: Work the waffle stitch rows
Follow the stitch repeat to create the waffle texture. The raised squares should appear evenly across the strip. Keep your tension consistent so the headband stays neat and the texture remains soft rather than overly bulky.
The waffle texture is the star of this pattern.
Step 4: Make the strip the correct width
Because the fabric is thick, you do not need an overly wide band. A moderate width usually works best. This ensures the headband is warm without becoming too heavy around the forehead.
A balanced width helps the twist show clearly.
Step 5: Form the twist
Fold the strip at the center and twist the front section before attaching the back ends. Waffle stitch holds shape nicely, so the twist will feel secure and dimensional. Make sure the twist is centered and not too tight.
A neat twist creates a polished, boutique-style finish.
Step 6: Secure the ends
Use yarn and a needle to seam or tie the back ends. You can keep the closure simple or create long enough ends to tie into a bow. Either option works, but ties often make the headband more adjustable.
Step 7: Finish the edges
Weave in all ends and smooth the texture with your hands. If needed, lightly block the strip to help the stitch pattern relax and the twist settle into place.
Helpful Tips
Waffle stitch looks beautiful in solid colors because the texture itself is bold. If you want a more rustic winter style, choose warm neutrals or deep earth tones. If you want a trendy statement piece, try mustard, olive, or wine.
5. Crochet Harvest Stitch Headband Pattern
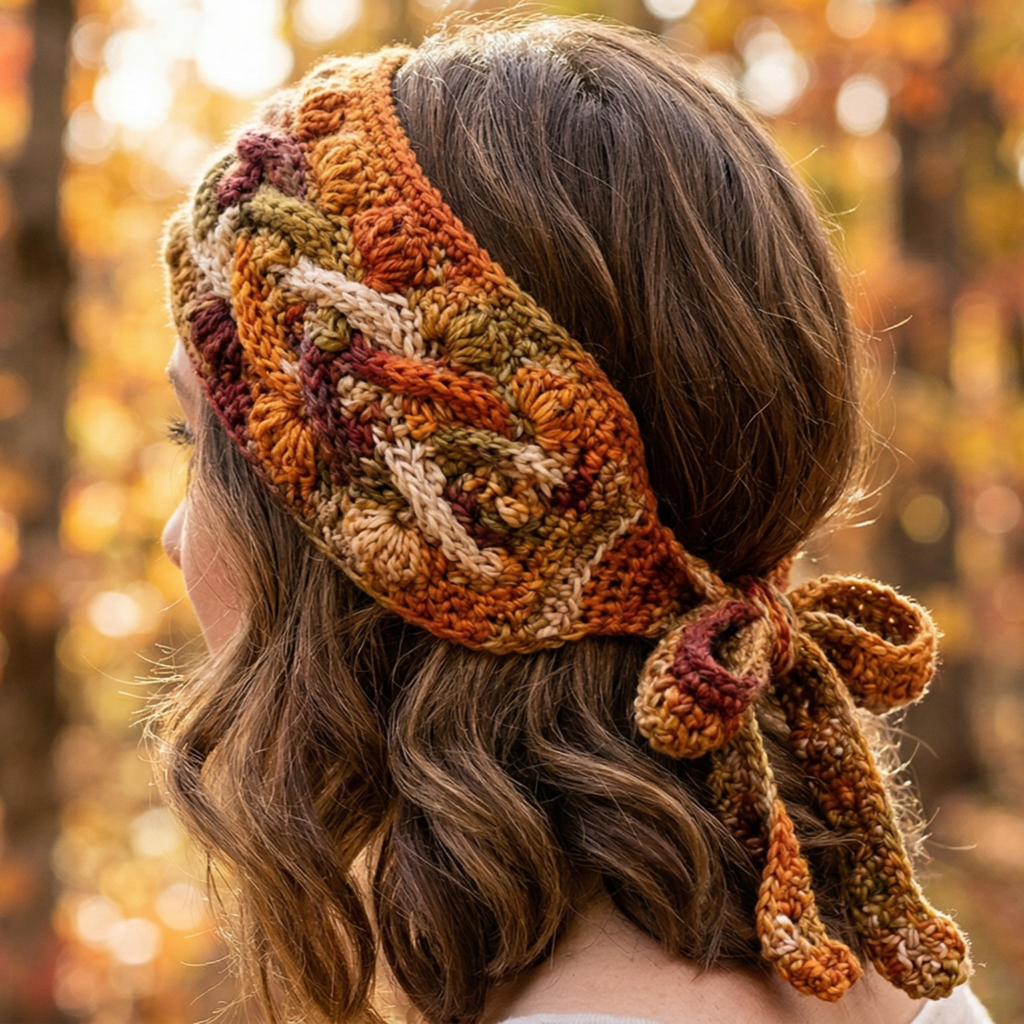
The Harvest Stitch headband is warm, textured, and perfect for fall and winter styling. It has that cozy seasonal feel that makes it a great match for scarves, sweaters, and layered outfits. The texture can be made to feel rustic and homey while still looking polished enough for everyday wear.
Quick Notes
Skill level: Beginner to intermediate
Finished size: Long foldable headband with cozy texture
Style: Seasonal, rustic, cozy, classic
Best colors: Autumn orange, golden brown, olive, cream, burgundy, caramel
Materials
- Medium-weight yarn
- Crochet hook suited to your yarn
- Yarn needle
- Scissors
- Measuring tape
Step-by-Step Guide
Step 1: Choose a seasonal color palette
The harvest look comes to life through color as much as texture. Choose warm autumn shades or soft winter neutrals. These tones help the headband feel seasonal and pair beautifully with cold-weather clothing.
A thoughtful color choice makes the headband feel more styled.
Step 2: Start the base chain
Begin with a long chain that fits around the head and leaves enough length for the tie-back ends. Make sure the foundation is smooth and even. Since this is a foldable headband, the base should be long enough to wrap and tie comfortably.
A well-measured foundation is essential for a good fit.
Step 3: Work the harvest stitch texture
Use the stitch repeat that gives the pattern its harvest-inspired texture. This may involve alternating stitch heights, subtle clusters, or a patterned repeat that feels full and cozy. Keep the stitches even so the surface looks intentional and warm.
The texture should feel rich without being too dense.
Step 4: Check the drape
Because this headband is designed to fold and tie, the strip should have enough softness to bend naturally. If it feels too stiff, use a slightly larger hook. If it feels too loose, tighten your tension a little.
The best headband is one that feels comfortable and holds shape.
Step 5: Create the foldable front
Fold the center of the headband to create a styled front section. This can be a gentle fold or a more noticeable layered effect. The fold adds visual interest and makes the headband look more finished.
This step gives the accessory its signature charm.
Step 6: Finish the tie-back ends
Make sure the ends are smooth and not bulky. Long tie-back ends can be left plain or finished with a simple border. The ties should be easy to knot and soft against the skin.
Step 7: Weave in ends and style
After weaving in all ends, try the headband on and adjust the fold if needed. It should feel warm, snug, and comfortable enough to wear with coats and scarves.
Helpful Tips
The Harvest Stitch headband is especially lovely in rich autumn shades and earthy winter tones. It is a great choice if you want a classic seasonal accessory that feels handmade and practical at the same time.
Conclusion
Tie-back foldable crochet headbands are one of the most rewarding small projects you can make for fall and winter. They are quick to finish, easy to customize, and comfortable enough to wear all day. Even better, they let you experiment with texture, color, and shaping without the commitment of a larger garment. That makes them ideal for gift-making, stash-busting, or simply adding a few cozy pieces to your own wardrobe.
These five patterns each bring a different kind of charm. The open shell stitch headband feels airy and elegant. The Waterlily Waltz design is soft and romantic. The Tiny Pebbles twisted headband gives you subtle texture and style. The Waffle Stitch twisted headband offers rich warmth and bold structure. The Harvest Stitch headband brings in that classic seasonal coziness that works beautifully through the colder months.
A good headband can do more than keep your ears warm. It can add personality to a simple outfit, make a handmade gift feel thoughtful, and give you the satisfaction of wearing something beautiful that you made yourself. With the right yarn, a comfortable fit, and a little finishing care, these headbands can become cold-weather favorites that you reach for again and again.