

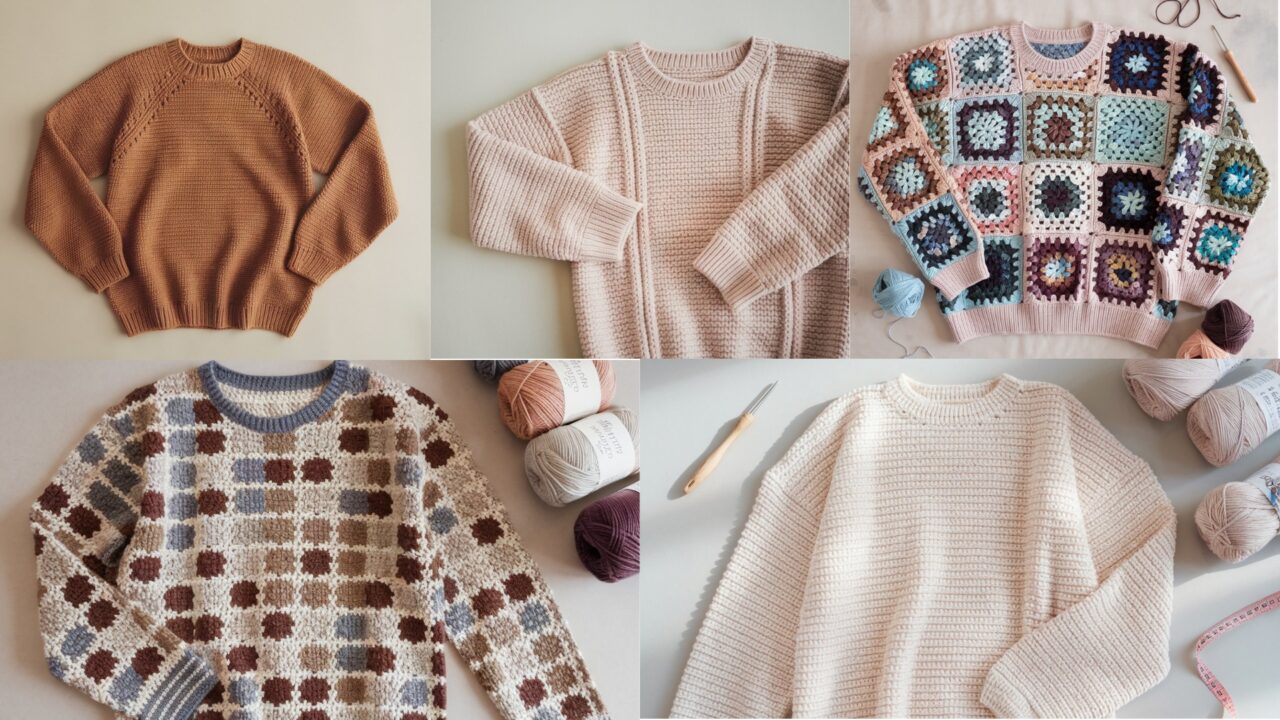
A handmade crochet sweater is the perfect blend of comfort, personal style, and slow-craft satisfaction. Whether you want a nostalgic granny-square cardigan, a streamlined pullover, a textured “groove” sweater, an easy oversized weekend staple, or a bold mosaic colorwork piece — this collection gives you five fully-worked, practical patterns you can make at home. Each pattern below includes:
- Skill level and suggested yarn/hook
- Recommended sizes and how to adjust (XS → XL guidance)
- Gauge and how to swatch properly
- Clear, step-by-step construction instructions (with options where useful)
- Finishing, blocking, and care notes
- Variations, style tips and troubleshooting
All patterns use US crochet terms. When a range or choice is possible I explain how to adapt the pattern rather than forcing one rigid size — that way you can make the sweater fit you.
Before you begin — general notes every crocheter should read
Yarn & fiber:
- For casual everyday sweaters, worsted-weight (medium / category 4) yarn in cotton blends, acrylic, or wool blends works well. Cotton blends give structure and drape; acrylic is easy-care; wool/wool blends give warmth. Choose yarn you like to wear next to skin.
- Check the yarn label for recommended hook size and care instructions.
Hook selection: Use the hook size recommended on the yarn label as a starting point, then swatch and adjust. For comfy sweaters many crocheters go up one hook size for a softer drape.
Gauge: Always make a gauge swatch in the stitch specified for the pattern. Measure after blocking the swatch the same way you’ll treat the finished sweater. I give example target gauges with each pattern; if your gauge differs, change hook size to match, or recalculate stitch counts.
Sizing: I give broad size guidance (XS, S, M, L, XL). For best fit measure the wearer’s bust circumference and arm length; allow 2–6 inches of positive ease for casual sweaters (2 in for a closer fit, 4–6 in for loose/oversized fit).
Finishing & blocking: Blocking evens stitches, opens lace, and can make joining much easier. Seam with mattress stitch or whipstitch; finish edges with a tidy border.
Notes about terminology & construction choices: I present two common construction methods where useful: top-down (no-seam shoulders) and seamed (panel) construction — pick the one you prefer.
1. Crochet Granny Square Sweater Pattern
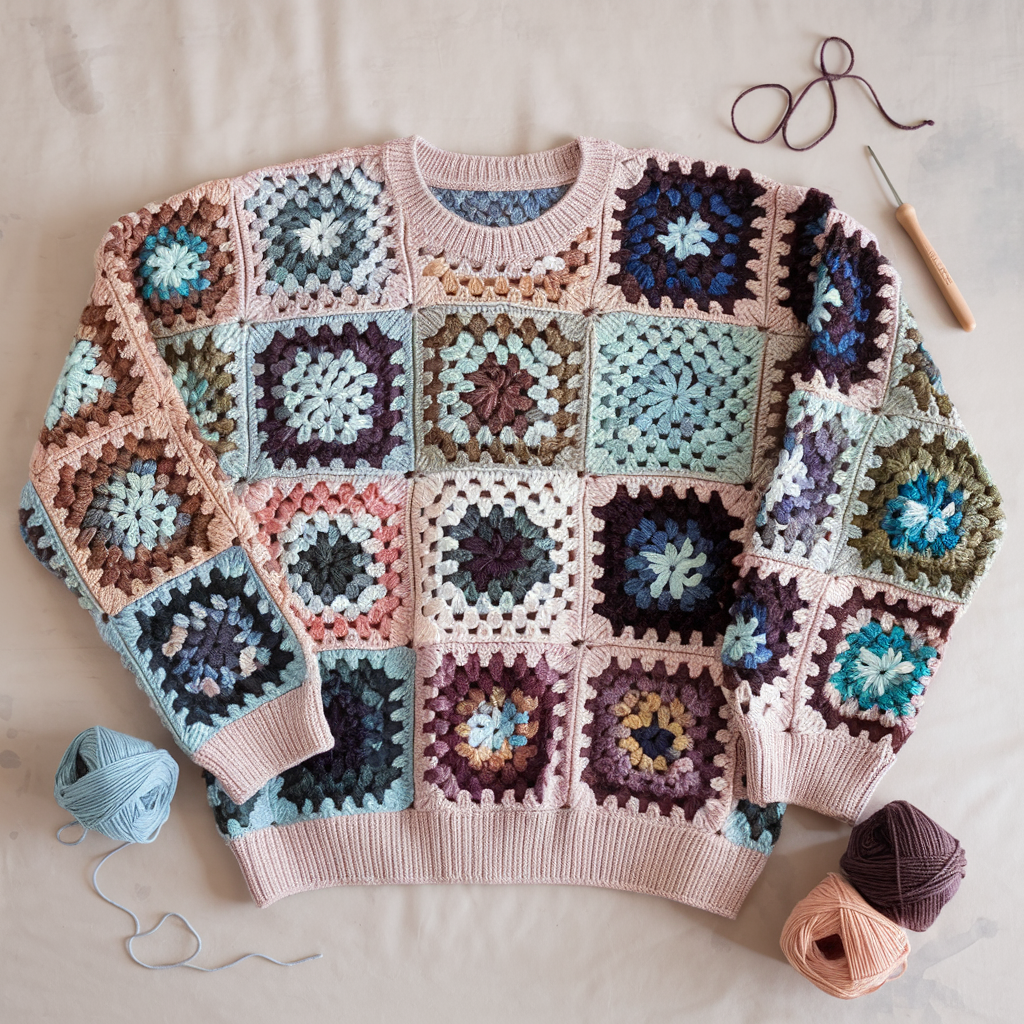
Skill level: Beginner → Confident beginner
Style: Vintage-meets-modern—granny squares joined into a wearable sweater. Great for using small skeins or scrap yarn.
Materials
- Worsted-weight yarn (category 4). Quantity depends on size and number of colors; sample throw-size cardigan uses 1200–2000 yards.
- Crochet hook: 4.0–5.0 mm (G–H) depending on yarn and gauge.
- Tapestry needle, stitch markers, sewing needle for sewing on button(s), optional small buttons.
- Felt and locking pinbacks if you turn a square into a brooch or patch.
Gauge & square size (example)
- Aim for granny square size ≈ 4 in (10 cm) per completed square (blocked).
- A typical 4″ granny square might be 4 rounds in the classic style worked with worsted yarn on a 4.5 mm hook. Your gauge will vary—measure your square and increase/decrease rounds or hook size to hit target size.
Finished sizing guideline
- Build the sweater from squares arranged in front/back/pieces; approximate squares needed (4″ squares):
- XS: ~8–10 squares for front, 8–10 for back, plus sleeves and shoulders
- S–M: add rows/columns accordingly
- (These are estimates — you’ll layout and count as you go.)
Construction overview
This pattern describes a seamed pullover constructed from granny squares joined in panels (front, back, two sleeves), then seamed and edged. You can also make this as a cardigan by adding button bands and a neck shaping.
Step-by-step
1) Make granny squares
- Choose one square pattern (classic four-round granny, floral granny, or variant). Make a prototype square and block it. Measure it carefully (width and height) — that is your module size.
- Calculate how many squares across (width) you need to match the desired chest measurement:
squares across × square width ≈ (bust + desired ease) ÷ 2for front panel. Round up to an integer. Example: for 20″ front half and 4″ squares → 5 squares across. - Make all squares for front, back, sleeves and optional shoulder panels. Typical layout: front = (columns × rows), back = same as front, sleeves = narrow panels (2–3 columns × rows depending on sleeve length).
2) Arrange and join squares into panels
- Lay out your squares flat on a clean surface and arrange colors/patterns until you’re happy with the composition.
- Join squares using one of these methods:
- Whipstitch (fast, invisible from RS): Place squares RS together and whipstitch through the outer loops.
- Join-as-you-go (JAYG): When finishing the final round of a square, join it to the square beside it using slip stitches—this avoids a lot of sewing later.
- Continuous join with SC border: Join squares with a single-crochet seam that leaves a neat ridge.
3) Form the sweater panels
- Sew/Join the squares to make: one front panel, one back panel, two sleeve panels. Each panel will be rectangular.
- Decide neckline and shoulder width. When joined, you’ll have a single rectangle for front/back or you may create two front halves for a cardigan.
4) Join front & back at shoulders, add sleeves
- With RS together, seam shoulder edges (stitch width equal to 1–2 rows of squares). Leave a neckline opening (measure to fit).
- Seam side edges from hem up to underarm, leaving armhole opening the height of your sleeve panel.
- Attach sleeves by seaming sleeve panels into tubes and sewing them into the armhole.
5) Neckline & edges
- Pick up stitches evenly around neckline and work several rounds of SC or HDC to form a neat band. For a softer band use HDC; for a dense band use SC.
- Hem and sleeve cuffs: Work 2–4 rounds of HDC or 4–6 rounds of HDC in BLO for a rib-like cuff. Optionally fold and seam for a turned cuff.
6) Blocking & final finishing
- Block the assembled sweater to shape and even the squares.
- Weave in all ends and trim. Add buttons if making cardigan.
Variations & tips
- Colorplay: Use a single color palette for a modern look, or scrappy colors for boho.
- Granny placement: Experiment with larger central motifs on the back and smaller squares on sleeves for visual interest.
- Sizing: If your squares are larger/smaller than planned, adjust columns and rows instead of remaking squares.
2. Crochet Pullover Sweater Pattern (Top-Down Raglan)

Skill level: Intermediate
Style: Clean, classic pullover worked top-down in the round with raglan increases — minimal seaming, very wearable.
Materials
- Worsted weight yarn, approx 1200–2000 yards (depending on size).
- Crochet hooks: 4.5 mm (G) and 5.5 mm (I) (suggestion for body drape — use two sizes to adjust gauge).
- Stitch markers, tapestry needle.
Target gauge (example)
- Gauge: 14 DC × 8 rows = 4 in (10 cm) in stockinette-style DC (worked in rounds). Swatch and adjust hook as needed.
Sizes & finished Bust (example with ease)
- XS: 32–34 in (bust) ⇒ finished 34–36 in
- S: 34–36 in ⇒ finished 36–38 in
- M: 38–40 in ⇒ finished 40–42 in
- L: 42–44 in ⇒ finished 44–46 in
- XL: 46–48 in ⇒ finished 48–50 in
(Decide desired ease — 2–6 in depending on fit.)
Construction overview
Worked top-down, in the round with raglan increases at the four raglan seams; body is worked to desired length then divided for sleeves and torso. Sleeves are worked in the round from the picked up stitches.
Step-by-step (top-down raglan pullover)
1) Gauge swatch & neck setup
- Make a swatch in DC to confirm gauge. Block swatch.
- Neck: Chain a small ring to make a neckband (or foundation chain for a wide neck), then join and work several rounds of HDC or DC to make neck yoke base. Example: for a medium raglan neck make a chain that fits comfortably over head (16–18 in finished circumference), join, then work 2–3 rounds of HDC to stabilize.
2) Raglan increases (yoke)
- Place 4 raglan markers evenly around the ring (these markers mark the 4 raglan seams). Typical raglan construction uses increases on each side of a marker each round.
- Round pattern example (worked in DC): (DC in each stitch to 1 stitch before marker, 2 DC in next stitch) — repeat around. In practice, the increase at each raglan seam is created by working 2 DC into the stitch immediately before and/or after the marker (so 8 increases per round total if you do 2 per seam). Another common and stable approach: DC to marker, DC inc, SL ST past marker, DC inc — pick a neat increase method and keep it consistent.
- Continue increasing rounds until yoke depth reaches desired (common yoke depth 8–10 in from neckline for adult medium). Alternatively stop raglan increases when total stitch count across body equals desired chest stitch number (calculated from gauge).
3) Divide for sleeves and body
- When yoke is deep enough, place sleeve stitches on hold: place the stitches for each sleeve onto stitch holders or scrap yarn (the sections between the raglan markers form the sleeve stitches). Join round and continue working body in rounds on the remaining torso stitches. The body will be in the round from here onward.
- Body length: Work straight until body measures desired length (e.g., 22 in from underarm for medium). Optionally shape waist with subtle decreases or leave straight for a boxier silhouette.
4) Sleeves
- Transfer sleeve stitches back to hook and join at underarm. Work in rounds decreasing slightly to shape arm (optional). Typical sleeve length: 16–18 in for long sleeves; for 3/4 sleeves stop earlier. Work HDC or DC rounds and finish cuff with 2–4 rounds HDC in BLO for a ribbed effect.
5) Hem & neckline finishing
- Add neckband if you want a folded collar — pick up and work several rounds of HDC or SC.
- Hem: Work 3–6 rounds of HDC around the body for a clean finish, or add ribbing using front/post stitches (see Groove Sweater for rib options).
6) Blocking & final touches
- Block to final measurements. Weave in ends and trim. Add any surface embroidery or pockets if desired.
Variations & tips
- V-neck: Instead of a circular neck starting ring, work half-rows and create a V shaping in the front when setting up the raglan.
- Texture: Add a yoke pattern (lace, shells) instead of plain DC to make the sweater more decorative.
- Length: Make as cropped or tunic length by changing body rounds.
3. Crochet Groove Sweater Pattern (Post-stitch Rib)

Skill level: Intermediate
Style: Textured vertical grooves using front post and back post stitches — modern and flattering, gives the sweater a “knit-like” rib effect.
Materials
- Bulky-light worsted yarn for a plush groove (or worsted for lighter texture).
- Recommended hooks: 5.5 mm (I) to 6.5 mm (K) depending on yarn desired drape.
- Stitch markers.
Gauge (example)
- Aim for 12–14 stitches × 10 rows = 4 in in HDC (worked in post-stitch pattern). Adjust hook to match.
Construction overview
Worked as a seamed pullover or top-down (either works). Main feature: vertical ribs created by alternating Front Post Double Crochet (FPDC) and Back Post Double Crochet (BPDC) or HDC versions for smaller ribs. The ribs run vertically on the body and sleeve.
Step-by-step (seamed construction, rectangular panels)
1) Make back panel
- Chain foundation for desired back width — example: for medium back width ~20 in, chain the number of stitches matching gauge (e.g., 50 ch if your gauge yields 2.5 ch per inch).
- Row 1: HDC across.
- Row 2: Work rib pattern: FPDC around the post of previous row’s stitch, BPDC around next post — alternate across row to form vertical ribs. Repeat until desired back length (e.g., 24 in). Fasten off.
2) Make front panel
- Work same as back panel but add neckline shaping: when you reach the row where neckline begins, divide work into two halves and shape the neck by leaving a center gap and working each side separately, decreasing 1–2 stitches at inner edge over several rows to round the neckline. Continue until same shoulder height as back.
3) Make sleeves (rectangular)
- Chain width that will make your upper sleeve circumference and work rib rows until sleeve length reached. You can taper by decreasing 1–2 sts every few inches for a slightly fitted sleeve.
4) Assembly
- Seam shoulders (RS together), sew in set sleeves or attach sleeves by seaming sides and inserting sleeve tube into armhole.
- Seam sides and sleeve seams.
5) Edging & cuffs
- Work several rounds of HDC or SC on cuff, or continue rib pattern for turned cuff.
- Neckband: Pick up stitches and work 4–6 rounds of rib (FPDC/BPDC) for a stretchy neckline.
Design notes
- The groove pattern is forgiving: FP/BP stitches are worked around posts of previous row, so tension must be even.
- Use a hook slightly larger than your regular gauge for more flexible ribs.
Variations & style tips
- Make a cropped groove sweater with a boxy silhouette and three-quarter sleeves.
- Add side slits—leave a few inches unseamed at hem sides for ease and modern shape.
4. Crochet Easy Oversized Sweater Pattern (Boxy Pullover)
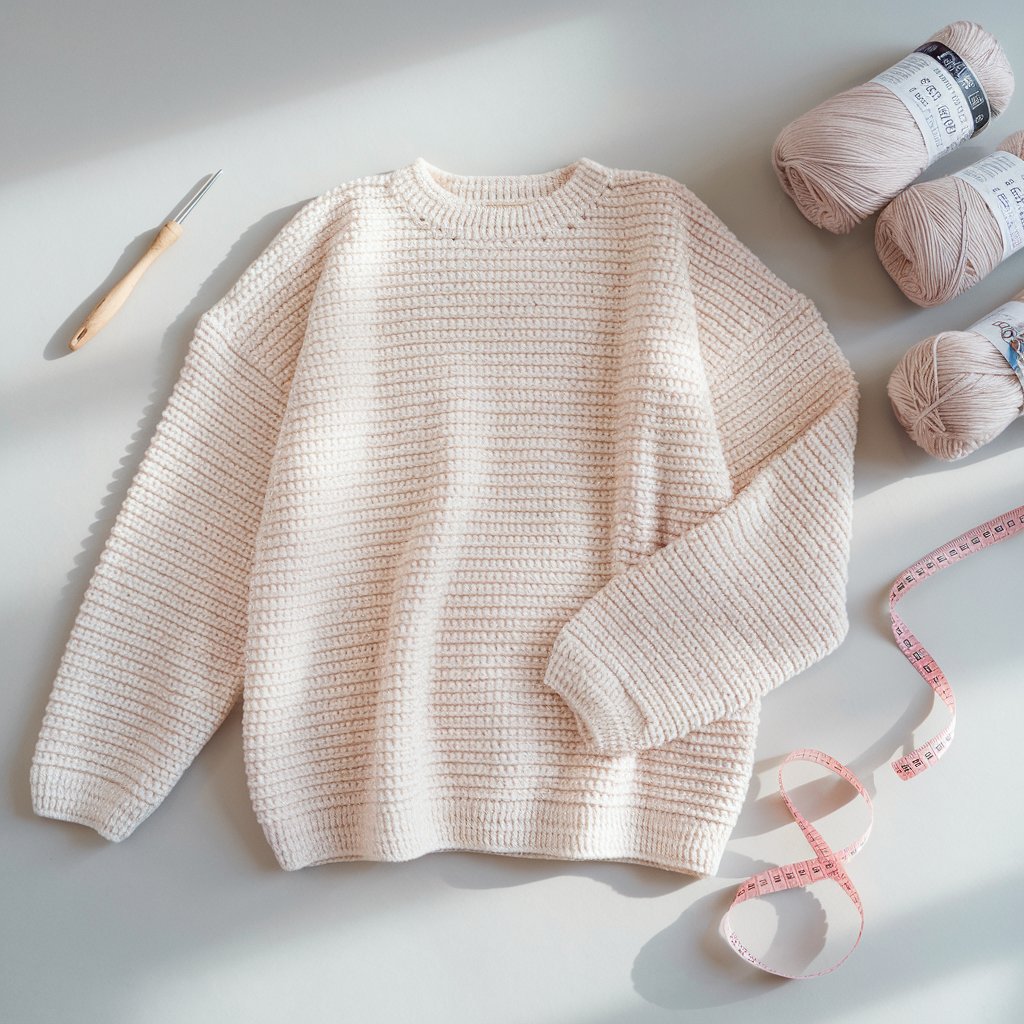
Skill level: Beginner → Confident beginner
Style: Minimal seams, oversized relaxed boxy sweater—easy to customize length and sleeve style.
Materials
- Bulky or worsted yarn depending on how fast/structured you want the garment. Bulky gives fast, cozy results.
- Hook: 6.5 mm (K) for worsted bulky look; adjust as needed.
- Measuring tape, tapestry needle.
Gauge (example for bulky yarn)
- 10 stitches × 8 rows = 4 in in HDC. Make a swatch.
Construction overview
A seamed boxy pullover made from four rectangles: front, back, and two sleeves (shorter rectangles join as cuffs). The front/back are identical rectangles; sleeves are narrower rectangles seamed on.
Step-by-step
1) Make front & back
- Decide finished body width: e.g., for an oversized Medium aim for finished chest 46–50 in. Divide by 2 -> 23–25 in per panel.
- Chain foundation to match desired width (using your gauge to calculate stitches). Work rows of HDC or DC until panel reaches desired body length (e.g., 22 in to hip, longer for tunic). Make a second panel identical.
2) Make sleeves
- Chain a width that fits comfortably around the upper arm (for roomy sleeve use 14–16 in), work to cuff length (e.g., 16–18 in) — this is a tube when seamed.
3) Assembly
- Lay panels RS together and seam shoulders for a comfortable seam width (1–2 inches).
- Seam sides from hem up to underarm, leaving armhole the length of sleeve panel.
- Sew sleeve rectangles into tubes and set into armholes, or wrap sleeve tube around armhole and seam.
4) Neckband & cuffs
- Neckband: Work a quick HDC round around neckline and add 2–3 rounds of HDC in BLO to create a foldable rib.
- Cuffs: Same method as neckband for a tidy finish.
Variation options
- Dropped-shoulder look: Simply seam panels leaving large armholes and attach shortened sleeve rectangles for a slouchy dropped-shoulder style.
- Hood: Add a hood by crocheting a long rectangular hood, tapering at top, and seaming to form a hood shape; sew onto neckline.
Tips
- Because the boxy sweater uses simple rectangles, you can easily size by changing chain counts and row numbers.
- Bulky yarn requires fewer stitches and makes an impressive sweater with minimal time.
5. Crochet Mosaic Sweater Pattern (Colorwork)
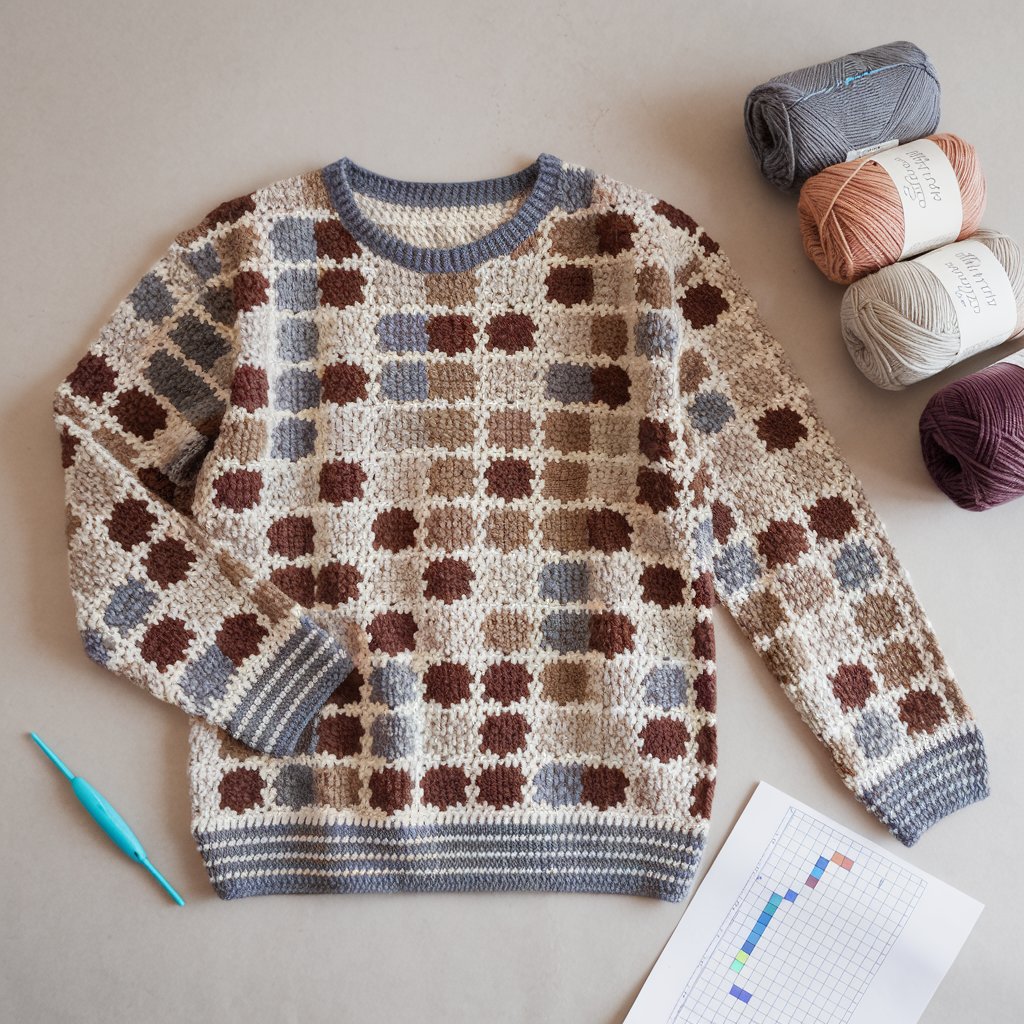
Skill level: Advanced-Intermediate (mosaic colorwork technique)
Style: Mosaic crochet uses slipped-stitch colorwork to create crisp geometric shapes with only one color worked per row — great for striking patterns with fewer carried floats.
Materials
- Two or three colors of worsted yarn (MC and CC), total yardage typical 1400–2200 yd depending on size.
- Hook: 4.5–5.5 mm.
- Graph paper or mosaic chart generator to design motif.
Mosaic basics
- Mosaic crochet typically alternates rows of color A and color B; on a color’s row you work DC in color and slip stitches in the other color where the pattern requires, creating a mosaic motif.
Construction overview
You can apply mosaic colorwork to a rectangular seamed pullover or to panels joined for a simple seamless result. For an easier approach, make front/back panels using mosaic chart and then seam.
Step-by-step (panel method)
1) Create a mosaic chart
- Design your motif on graph paper: each square = 1 stitch (DC) and you will alternate rows of MC and CC to build motif. Keep motif width to a multiple that fits your gauge or plan repeats.
2) Swatch & test colorwork
- Make a sample mosaic swatch: row with MC, row with CC; be sure to practice slipping and carrying yarn neatly. Block swatch and measure gauge.
3) Work front panel
- Chain foundation to match desired panel width (accounting for mosaic pattern multiples). Work rows following chart, alternating MC and CC rows exactly. Keep floats tidy by catching the unused color with slip stitches as you go (do not carry long floats—fasten off and rejoin if necessary).
- Repeat pattern until panel height reaches desired measurement.
4) Back panel & sleeves
- Work back panel same as front (copy pattern), sleeves may be worked in plain color or with a narrower mosaic band near the cuff.
5) Assembly
- Seam shoulders and sides. Add neckband using MC with a few rounds of HDC or SC. Finish cuffs and hem.
Finishing & care
- Mosaic pieces tend to be a bit denser — block carefully.
- Lining is optional; mosaic fabric is stable enough without batting.
- Sew a small felt patch behind button closures to reinforce if you add buttons.
Variations & tips
- For simpler colorwork try tapestry crochet (carry floats across wrong side) if comfortable with multiple color strands.
- Make bold geometric panels only on the front for a statement sweater and keep the back plain for contrast.
Final finishing, blocking & care (applies to all patterns)
- Blocking: Wet- or steam-block garments to measurements. Use pins and dry completely. Blocking evens stitches, especially for granny/motif-based garments.
- Seams: For invisible seams use mattress stitch; whipstitch is sturdy and easy. For bulky yarn consider slip-stitch seam so seam is thick enough to lie flat.
- Necklines & bands: Add several rounds of HDC or SC to stabilize edges. For ribbed effect use front-post/back-post stitches or HDC in BLO.
- Washing & care: Follow yarn label. Many worsted acrylics are machine-washable on gentle; cotton and wool may need hand wash or gentle cycle. Lay flat to dry.
- Stitch markers & measurement: Use stitch markers for raglan points and sleeve joins to keep shape consistent while working.
Conclusion
These five crochet sweater patterns give you a wide range of stylistic choices and technical practice: mosaic colorwork for bold graphic sweaters, top-down raglan for classic, comfortable pullovers, groove ribbing for knit-like texture, simple oversized rectangles for quick cozy staples, and a playful granny-square project perfect for scrap-busting and color experimentation. Each pattern is easily adapted — change yarn weight for speed or drape, alter length for cropped or tunic silhouettes, and add details (pockets, hoods, buttons) to personalize.
188v battery Sau khi điền xong các thông tin cần thiết, bạn cần kiểm tra lại để đảm bảo không có sai sót. Tiếp theo, bạn sẽ nhấn vào nút “Đăng ký” để hoàn tất quá trình. Một số trường hợp, hệ thống có thể yêu cầu xác minh qua mã OTP gửi về số điện thoại hoặc email để tăng cường bảo mật.
Hãy cùng chúng tôi khám phá 5+ yếu tố làm nên thương hiệu cá cược trực tuyến hàng đầu thị trường game 188v.
Thank you for your sharing. I am worried that I lack creative ideas. It is your article that makes me full of hope. Thank you. But, I have a question, can you help me?
Your article helped me a lot, is there any more related content? Thanks! https://www.binance.info/register?ref=IXBIAFVY