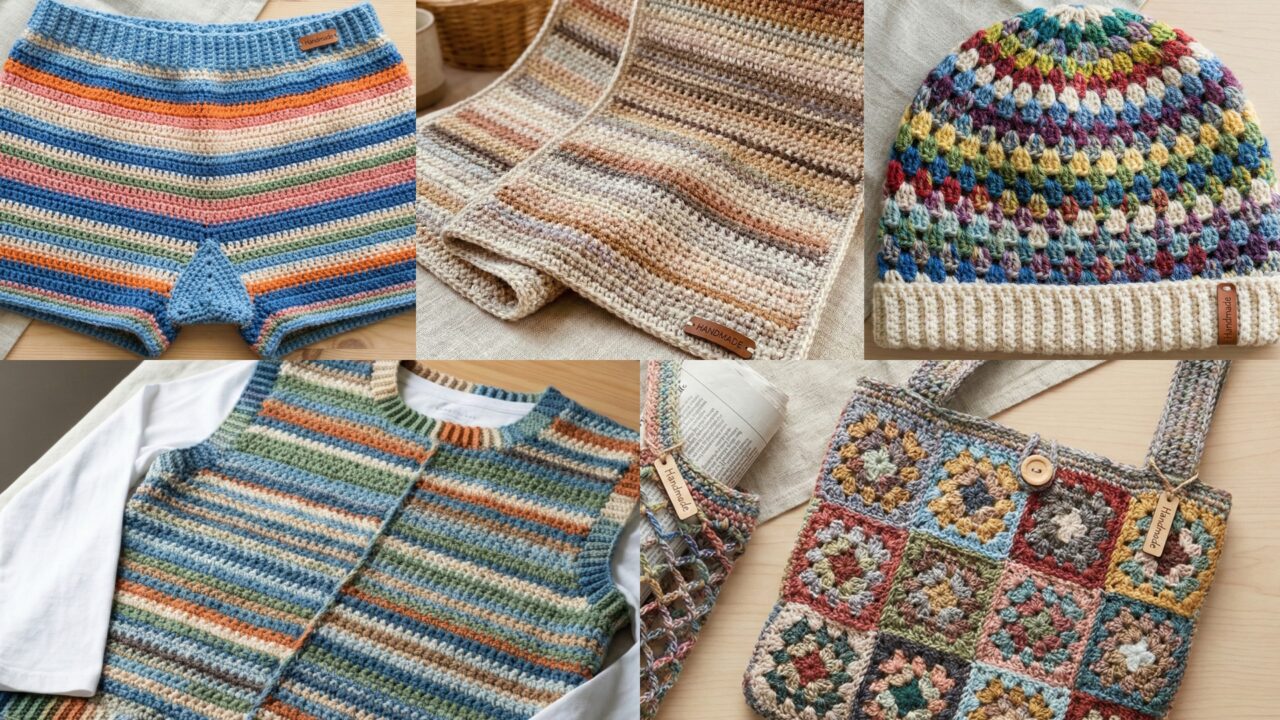
Using scrap yarn is one of the most joyful parts of crocheting: it saves money, turns tiny leftovers into useful items, and forces you to design with color and texture. Below you’ll find a complete, long-form post you can publish as a blog entry. It begins with a practical introduction that covers planning, yarn handling, and gauge math for scrap projects, then gives five detailed patterns with full step-by-step instructions, tips for scaling, variations, finishing and care.
planning, yarn handling, and working with scraps
Working with scraps feels free but benefits from just a little planning. Before you start:
Gather & sort
- Sort by color families. Create piles of neutrals, brights, pastels, darks. This makes it easy to design stripes and avoid accidental muddy mixes.
- Sort by approximate weight. Label skeins/tangles “DK/light worsted”, “worsted/bulky” etc. If you mix weights, you’ll either hold thin yarns together or use stitches that hide differences (cluster, moss/linen, granny).
- Estimate yardage. Wind small scraps into labeled balls. Use a small kitchen scale if you want to be precise (weight in grams × yarn label yards/gram ≈ yards left). For scrap projects you can also work until the item’s shape/size suits you — many scrap projects are “make-as-you-go.”
Tools & materials to keep handy
- A set of hooks (3.5 mm — 8 mm) so you can quickly change to match combined yarn weight.
- A tapestry needle and lots of patience for weaving ends (scrap projects often have many ends).
- Stitch markers, measuring tape, small elastic for waistbands, and (optionally) a bit of scrap fabric for linings.
Color & texture strategies
- Stripe rhythm: Repeating groups of 2–6 rows creates a pleasing rhythm and uses scraps predictably. Example: 4 rounds per color block makes a scarf or hat look cohesive.
- High contrast accents: Use one bold color for small motifs (dots, hearts) against a neutral striped body.
- Automatic transitions: Work each color for a fixed number of rows (e.g., 6 rows) then switch. This gives predictable shorten/length estimates without exact yardage.
Joining & ends
- Join method: When switching colors mid-row use the last yarn-over of the last stitch to pull through the new color (neat, minimal tails). For change-of-row joins, the Standing Stitch or invisible join is tidy.
- Weave-in strategy: Weave each tail back along the stitch direction for at least 2–3 inches. Use tapestry needle to thread the tail through multiple strands — frequent on scrap projects.
- Trim the ends last: If you plan to block heavily or need to compress the stitches, weave ends after blocking for the cleanest finish.
Handling mixed weights & gauges
- Hold yarns together: If you have a thin and a medium scrap, hold them double to make a consistent fabric.
- Choose forgiving stitches: Linen/moss, granny clusters, and half-double crochet (hdc) fabric hide differences well. Avoid tightly-constructed filet or very open lacy patterns unless all yarns are similar.
- Swatch & adjust: Make a small swatch in the stitch pattern you plan to use. If density varies, change hook size or hold strands double until gauge evens out.
1. Crochet Moss Stitch Scrap Yarn Scarf Pattern
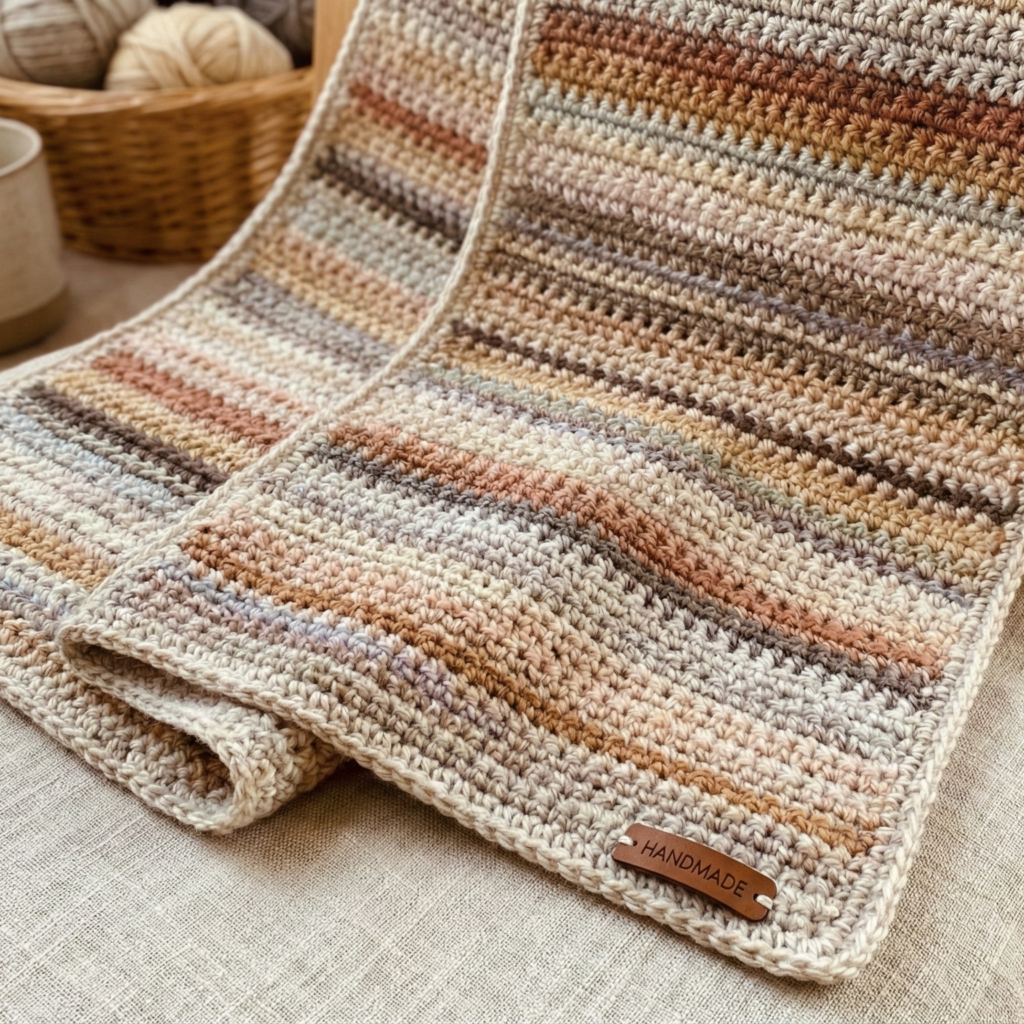
Skill level: beginner — excellent introduction to combining scraps
Vibe: woven, tile-like texture that’s reversible and comfy; perfect for long narrow scraps.
Materials (worked example — adult long scarf)
- Assorted scrap worsted/DK yarns (leftovers totaling ~250–400 yd depending on desired length).
- Hook: 4.0 mm (G) — adjust up/down to suit tension and combined yarn thickness.
- Tapestry needle, scissors.
Finished dimensions (example)
- Width: 7–8 in (standard scarf width); Length: 60–72 in (wrap-around scarf).
Gauge & chain math (practical method)
Moss stitch is worked in pairs and is reversible. It’s forgiving; the foundation chain is a multiple of 2 + 1.
- Make a small sample: with your chosen hook and your typical scrap pairing, chain 20 and work moss stitch for 4 inches. Measure stitches per inch (spi). If you get 4 sc/4 rows per inch, note that.
- Decide width: for 8 in width × 4 sc/in = 32 stitch width. Because moss stitch needs odd chain, foundation chain = (32 × 1) + 1 = 33 chains — but more simply use an odd number near that — e.g., ch 33.
Pattern notes — moss stitch refresher
- Multiple: any odd number (multiple of 2 + 1).
- Repeat: sc, ch1, skip 1 — then in next row sc into ch1 spaces.
Step-by-step (worked example)
- Color plan: choose an order of colors into a working stack (A → B → C → A …), or pick randomly for a scrappy stripe look. Keep blocks of 6–10 rows per color for nicer transitions.
- Foundation chain: ch 33 (odd number to reach ~7.5–8 in width in our example).
- Row 1 (RS): sc in 2nd ch from hook, ch 1, skip next ch, sc in next ch; rep across; end with sc in last ch. Turn.
- Row 2 (WS): ch 1, sc in the first ch-1 space, ch 1, sc in next ch-1 space across; end with sc in top of turning chain. Turn.
- Repeat Row 2 until scarf reaches desired length (e.g., 66 in). Change color at the end of a WS row for clean flips or in the middle for a laddered stripe look — both work in moss stitch.
Color joins & transitions
- Short rows (few yards): If a scrap is only a few yards, use it as a narrow stripe (2–4 rows) and then join a longer scrap.
- Neat join: At the end of a color row, do the last sc as usual; drop yarn, pick up new color and sc into the next sc — weave tails later.
- Blending: To avoid abrupt color jumps, use one or two rows of a neutral or marled mix (hold two scraps together for 1–2 rows) to braid colors together.
Edge & finishing
- Work 1 round sc around entire scarf in a neutral color to tidy edges. For a decorative edge, do a small picot every 8 sc or a shell border (sc row + shell row).
- Block the finished scarf gently (wet block or steam) to even stitches, preserving the woven look.
Variations
- Chevron moss: change the foundation to incorporate decreases & increases to create a chevron-moss hybrid.
- Fringe: add a multicolor fringe made from tiny tails at scarf ends for a boho finish.
- Holding: hold two contrasting scraps together for a space-dyed effect.
2. Crochet Multicolor Granny Scrap Beanie Pattern
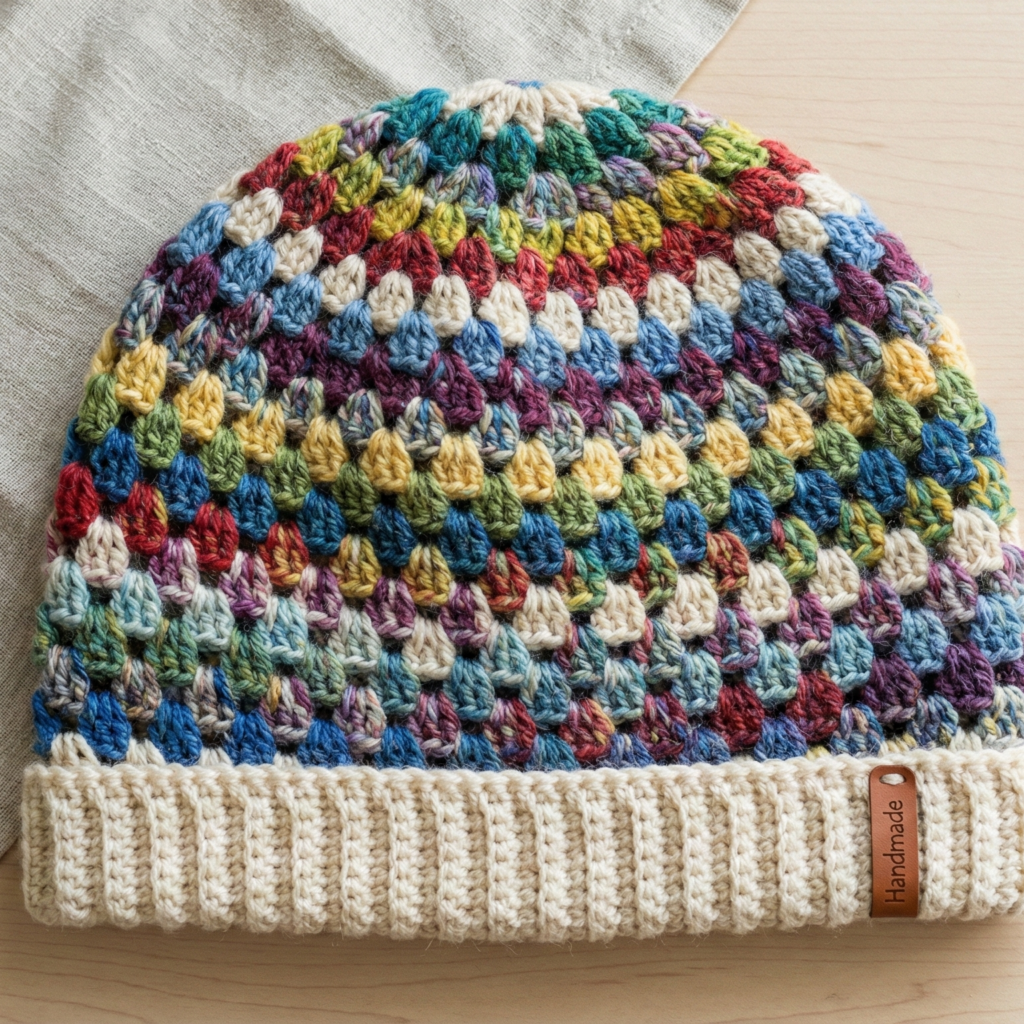
Skill level: confident beginner — classic granny clusters and color changes
Vibe: classic, scrappy, very forgiving — perfect to turn small scraps into a cozy hat.
Materials (adult medium worked example)
- Scraps of worsted weight yarn totaling ~180–250 yd.
- Hook: 5.0 mm (H).
- Tapestry needle, stitch marker.
Construction choices
You can work this beanie top-down in granny rounds, which is simple and uses short color bits well. Granny cluster rounds of 3 dc form the structure.
Gauge & target
- Granny cluster gauge varies. Use the crown-increase method for beanies: start with a magic ring 3–4 clusters wide and increase evenly until the diameter fits your head’s crown width. For an adult medium you’ll likely end the increase rounds at ~60–70 total clusters/stitches depending on cluster size.
Worked example (top-down granny clusters)
Crown
- Start: MR, ch 3, make 3 dc, ch 2, 3 dc in MR (one granny “block”) — this is Round 1 corner. Repeat so you have 3–4 corners (3 corners makes triangular motif; 4 corners makes a square foundation) — typical granny in-the-round beanies use 3 or 4 corners depending on cluster placement. For a circular hat, using 4 corners makes a square growth that you later shape — many crocheters prefer 3-corner rounds for roundness. Here we’ll use 4-corner increases for moderate slouch. For a rounder crown choose 3 corner variant.
- Round 1 (4-corner base): MR, [3 dc, ch 2, 3 dc] in MR rep 4 times, sl st to top of ch-3 to close. (You now have a small square with 4 corners.)
- Round 2 (increase): In each ch-2 space (corner) make [3 dc, ch 2, 3 dc] — this doubles corners and makes the square larger. Join with sl st.
- Round 3+ (transition to circular): After 3–4 rounds, start working granny clusters in the round but place two granny clusters in corner ch-2 spaces every other round to gradually smooth the square into a round. Another easier method: after your square is large enough, switch to cluster-round increases: [3 dc in next ch-space], ch 1 between clusters across the round and add increases by placing extra clusters spaced evenly. The goal is to grow the circle evenly.
Simpler, reproducible crown-increase method (decisive)
If you prefer a predictable numeric crown: make a magic ring and work 10 clusters (groupings of 3 dc) in the ring for 10 × 3 = 30 dc equivalent. Then use the same numeric increases described earlier (Round 2 inc in all sts → 20 clusters; Round 3 cluster, inc rep → 30 clusters; Round 4 cluster2, inc rep → 40 clusters; and so on) until you reach circumference target. Measuring the diameter as you go is the easiest path: stop increasing when the flat circle measures roughly 7–8 inches across (adult).
Body & color changes
5. Once crown diameter is right, stop increasing and work even granny rounds without extra increases. Change color as needed every 1–3 rounds. With small scraps, change color each round to use very short bits; carry color behind and crochet over float for 3–4 stitches max so floats don’t tangle.
Brim
6. To make a cuffed brim, finish with 6–10 rounds of hdc BLO (for a foldable edge) or sc BLO for denser folded cuff. Alternatively work ribbing with front-loop/back-loop hdc in alternating rounds for a stretchy band.
Color & joining tips
- Tiny scraps: Use them for single rounds — don’t try to join many ends in one area, distribute them evenly.
- Greener join: Use the Russian join, magic knot, or weave in method for very short scraps to avoid too many tails.
- Marled effect: If two scraps are too thin, hold them together until the beanie’s fabric looks consistent.
Finishing
- Weave in all tails; block lightly to even granny clusters; fold brim if using cuff.
Variations
- Earflap option: Work earflaps onto the sides before the brim by skipping a set of clusters and shaping triangular earflaps.
- Pullover slouch: Stop increasing sooner for fitted beanie; increase more for slouch.
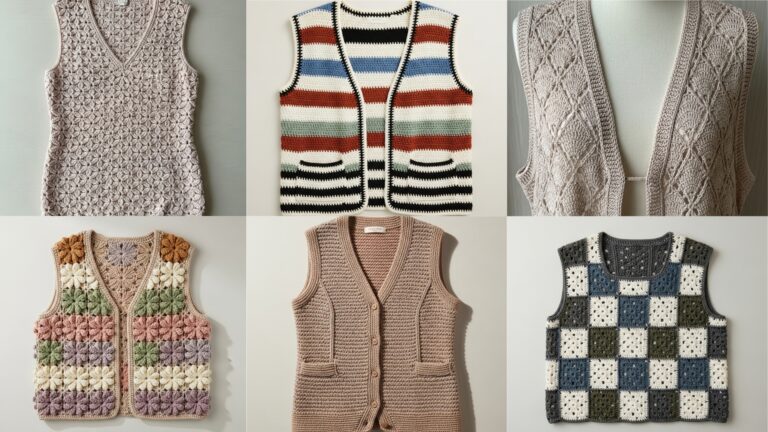
3. Crochet Scrap Yarn Simple Vest Pattern
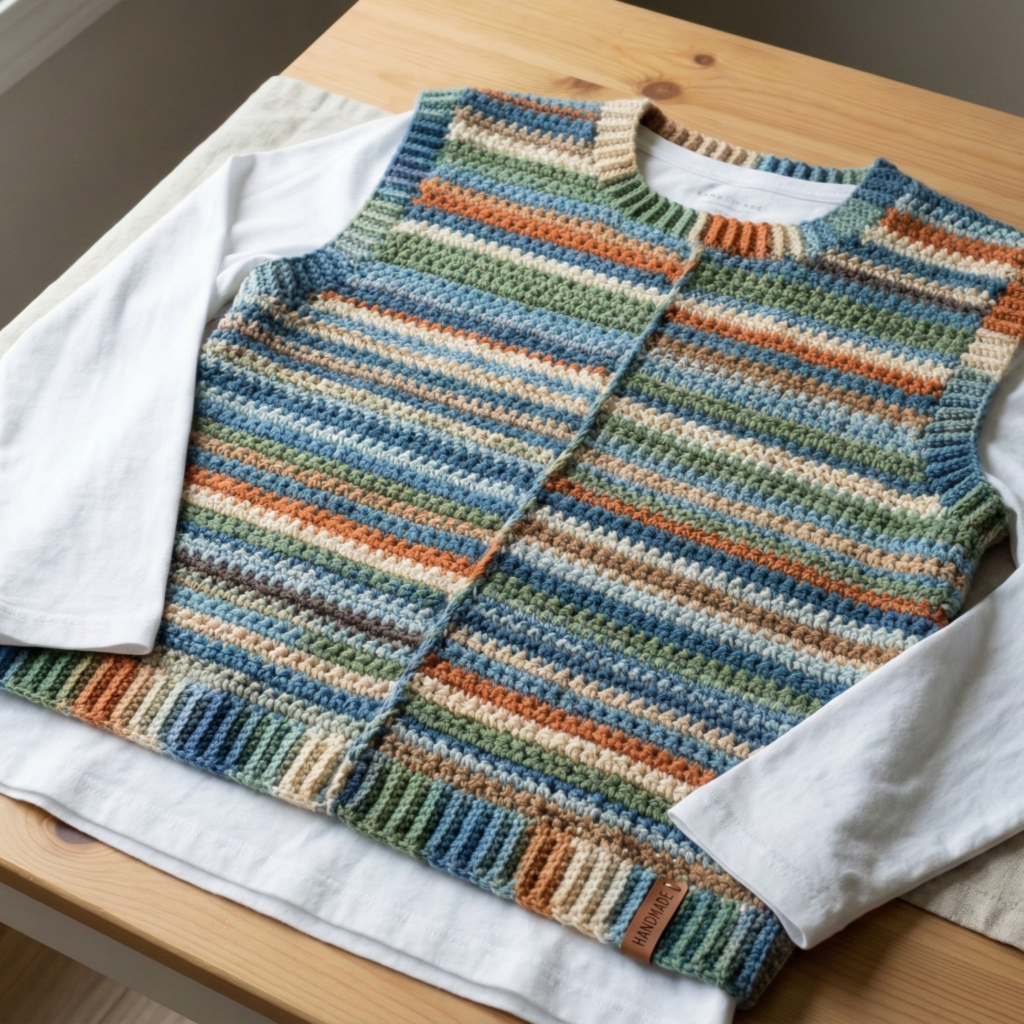
Skill level: intermediate — garment construction using rectangles; ideal for wearable scrap yarn stash-busting
Vibe: lightweight or chunky patchwork vest depending on yarn; great over tees or a long-sleeve shirt.
Construction concept
A very approachable vest is made from three rectangles (back + two front halves). You make rectangles to the right measurements, seam shoulders and side seams leaving armholes, and add optional collar/edge finishing. This is perfect for scrap yarn because you can stripe as you go.
Materials (adult medium example)
- Scraps of worsted-weight yarn, total ~800–1200 yd depending on length/sluoshiness and whether you add a lining.
- Hook: 5.0 mm or 5.5 mm.
- Tapestry needle, stitch markers, measuring tape, optional sewing machine for lining.
Sizing method (simple wearable math)
- Measure chest circumference (C). For example, if chest = 38 in, add desired ease (4 in for a relaxed fit) → target garment chest = 42 in.
- Each front panel is half the chest minus overlap for closure; if you want no button overlap, front panels are ~21 in each (42 ÷ 2). If you want a wrap or overlap add 1–2 in to one front.
- Decide vest length (L): e.g., 24 in from shoulder to hem.
- For each rectangle you need width (W) and length (L). If you plan to fold rib at the shoulder, account for that.
Stitch & gauge choice
- Use moss stitch or granny stripes for a forgiving fabric: both handle multiple yarns and look intentionally patchy. For a warmer vest use hdc in the round.
Step-by-step (worked example — moss stitch vest panels)
Swatch first to get stitches per inch. Suppose moss stitch gives 4 sc per inch on average with your scraps and 5.0 mm hook.
Panel widths
- Target front panel width: 21 in → 21 × 4 = 84 stitches (foundation chain). Because moss is worked on odd chains, make ch 85 (odd).
- Back panel width: 42 in total desired → ch 169 (odd) for 42 in / 4 = 168 + 1 = 169.
Back panel
- Ch 169. Row 1 (setup): sc in 2nd ch from hook, ch 1, skip 1 ch, sc in next ch across. Turn.
- Row 2: ch 1, sc in the first ch-1 space, ch 1, sc in next ch-1 space across. Turn.
- Repeat Row 2 until panel length = 24 in (measure as you go). Tie off.
Front panels (make 2)
4. Ch 85. Work same moss stitch rows until length = 24 in but stop sooner (e.g., 20 in) if you plan to shape armholes or necklines. For a simple vest without shaping, make both front panels same size as back and seam only shoulder and sides leaving armholes as openings.
Assembly
5. Block panels flat. With RS facing and using tapestry needle and matching yarn, seam at shoulders by mattress stitch leaving 8 in for armholes (4 in each side) OR seam 1–1.5 in at top for shoulders to create armholes of desired size. Example: for standard armhole depth, leave 8–10 in opening from the shoulder seam downward.
6. Seam sides from bottom up to the point where armholes begin (e.g., sew from hem up 16 in if your total length is 24 in).
Edge finishing
7. Pick up sts around armholes and work 2 rounds of sc for neat edge or 6 rounds of hdc BLO to make a foldable cuff.
8. Add a collar: pick up sts around neckline and work ribbing in hdc BLO or a subtle scallop.
Option: button band
9. If desired, add button bands to the front edges by picking up stitches 1–2 rows in from the edge and working a firm sc band; add buttonholes on the opposite side spaced 3 in apart.
Tips for scrap handling
- When a small scrap runs out, switch color at the end of a row to avoid floats in the middle of rows.
- If yarns differ heavier/lighter: hold thin yarn doubled until it matches the thicker yarn’s gauge.
Lining & reinforcement (optional)
- For a neater interior, sew a lightweight cotton lining into the vest after seaming. This hides tails and strengthens the garment if scraps are variable fiber types.
Variations
- Crochet granny vest: instead of moss rectangles, make many granny squares joined into panels for a boho vest.
- Textured vest: use waffle stitch for the back panel for more warmth.
4. Crochet Scrap Yarn Shorts Pattern
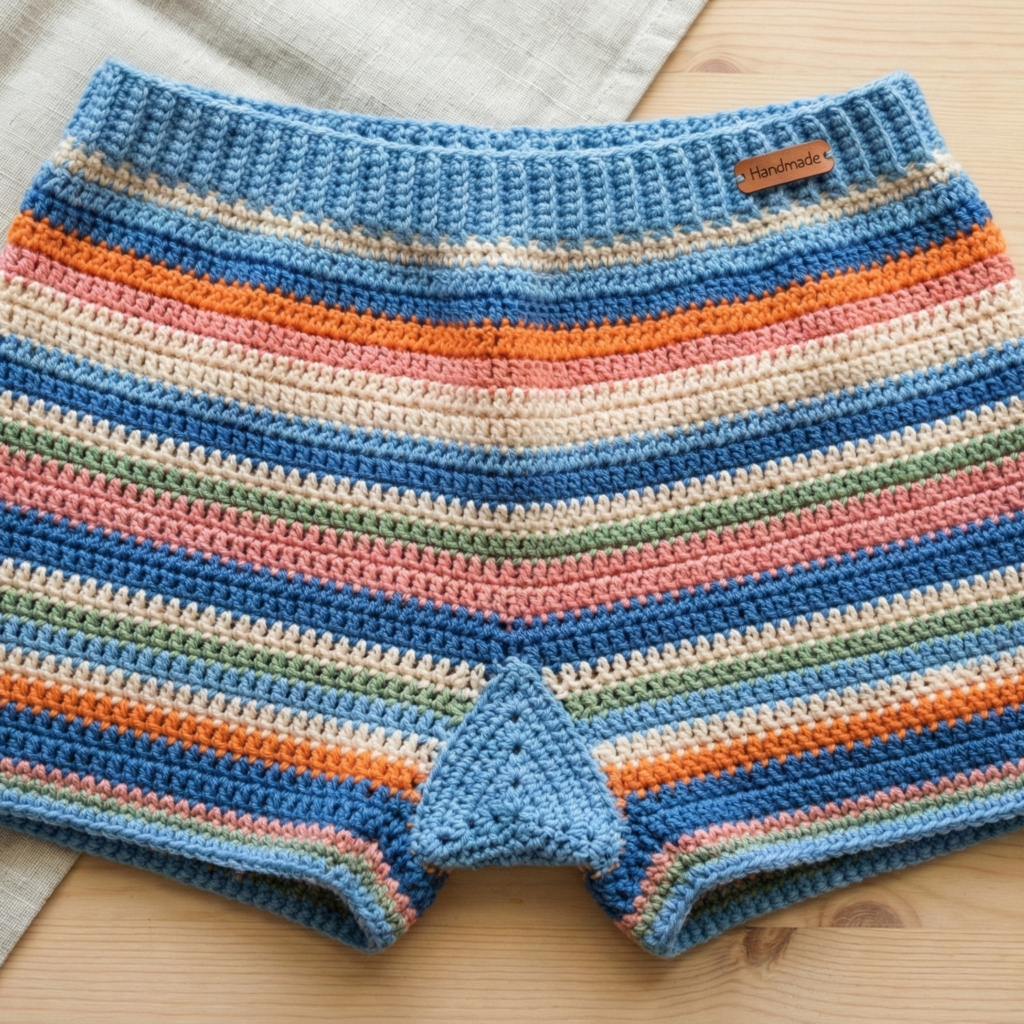
Skill level: intermediate — you’ll work shaping for hips and a waistband; great stash-buster for summer lounge shorts.
Vibe: casual, comfy, ideal as loungewear or festival shorts.
Construction overview
Shorts are built from two panels (front/back) + waistband + gusset. This pattern uses rectangles plus a central gusset to shape the crotch. Work in hdc or dc for quick fabric.
Materials (adult medium example)
- Scraps totaling ~700–900 yd (depends on coverage and thickness).
- Hook: 5.5 mm (I) or 6.0 mm for quicker fabric.
- 1 in elastic for waistband, drawstring optionally, tapestry needle.
Sizing reference & measurements
- Waist measurement (W). Suppose waist = 30 in, hip = 40 in.
- Decide ease: for loose shorts add 2–4 in ease at hip and waist depending on fit. Target hip circumference = 42 in. Each front or back panel should be half of that / 2 (back = 21 in, front = 21 in).
Step-by-step (worked example — bottom-up panel method)
Panels
- Make two identical rectangles for front and back using DC or HDC:
- If your dc gauge is 3 dc per inch, and target hip half = 21 in, then ch foundation = 21 × 3 = 63 ch + 2 turning = 65 ch. (If using multiple requirements, adjust to fulfill pattern repeat.)
- Work even rows in dc until panel height = desired rise from crotch to waistband — e.g., 12 in for front panel (shorts with mid-rise). For back panel make same height.
Gusset / crotch shaping
2. To make shorts comfortable, add a small triangle gusset for the crotch: cut a triangle of crochet or work in set-in gusset by picking up stitches along inner seam and working triangular increases. Simpler: work panels larger in inner seam and seam with overlap to create a small triangular pouch.
Assembly
3. Place panels RS together and seam from waistband down to crotch on each side leaving the central portion open for gusset. Insert elastic into waistband later.
4. Sew bottom seam between legs (crotch seam) and add gusset by crocheting an inserted triangle if needed — pick up stitches along inner leg opening and work increases until triangle fills gap smoothly.
Waistband
5. At the top edge, pick up stitches and work a ribbed band: ch to match circumference, then sc BLO for 6–8 rounds making a foldable casing. Fold inside and stitch leaving a 1 in opening to feed elastic.
6. Insert elastic (cut to waist minus 1–2 in for snugness, depending on comfort), stitch elastic ends together and close casing.
Hems
7. Finish leg openings with 3 rounds of sc or a small shell edge. For shorts, leaving a small split at sides with a decorative picot can look stylish.
Using scraps & color changes
- Alternate color rows every 2–4 rounds to create stripes. Place darker grounds at pockets and waistband for visual balance.
- If yarn weights differ, hold a thin yarn with another scrap to make fabric consistent.
Lining (optional)
- For very lightweight or lacy scrap shorts, line them with stretch fabric sewn in to make them wearable as shorts rather than coverups.
Variations
5. Crochet Scrap Yarn Bag Pattern
Skill level: beginner to intermediate, depending on bag complexity
Vibe: functional & colorful — makes a great market tote, purse, or patchwork bag from leftover yarn.
Construction options
- Mesh market bag — crocheted in the round with a sturdy base and netted body. Great for mixed yarns since mesh is flexible.
- Patchwork granny square bag — make granny squares and join into panels; sturdy and decorative.
I’ll give two full options: a mesh market tote (quick) and a granny square patch bag (modular).
A — Mesh Market Bag (quick & forgiving)
Materials
- Scraps totaling ~300–600 yd (heavier if you want a structured bag), held single or double depending on weight.
- Hook: 5.5 mm–7.0 mm (bigger for airy mesh).
- Optional lining fabric and sewing needle.
Base
- Start with a firm circular base — MR, ch 2, 10 hdc in MR, sl st to join (10 hdc).
- Round 2: inc in each st → 20 hdc.
- Round 3: hdc 1, inc rep around → 30 hdc.
- Continue even increase rounds adding a predictable number of increases to flatten a circle until base diameter = desired (e.g., 10 in). Example increases every round: add 10 sts per round by doing hdc X, inc. Stop when base diameter is right.
Body (mesh)
- Round after base: dc in back loop of each st to create a ridge to transition to mesh.
- Mesh round: ch 3, skip 2 sts, sc in next st around — this makes a net. Work mesh repeats for 18–22 rounds until bag height = 12–14 in.
- For sturdier mesh, use dc chains like ch 5, sc into next stitch or hdc mesh.
Handles
- For handles, either:
- Work two wide straps: measure desired strap length, start at top edge, ch long strap and attach with sl sts, then work 2–3 rows of sc along strap for strength; OR
- For short straps, work sc across, then attach and reinforce with extra sc rounds; if you plan heavy loads, insert a leather strap or make straps holding two or more strands of yarn tightly.
Lining
- Cut a cotton lining slightly smaller than bag interior and sew it in for carrying groceries without items poking through mesh or for more security. Use a sewing machine or hand-stitch with strong thread.
Finishing
- Work 2–3 rounds sc around top edge for stability. Weave in tails.
B — Patchwork Granny Square Bag
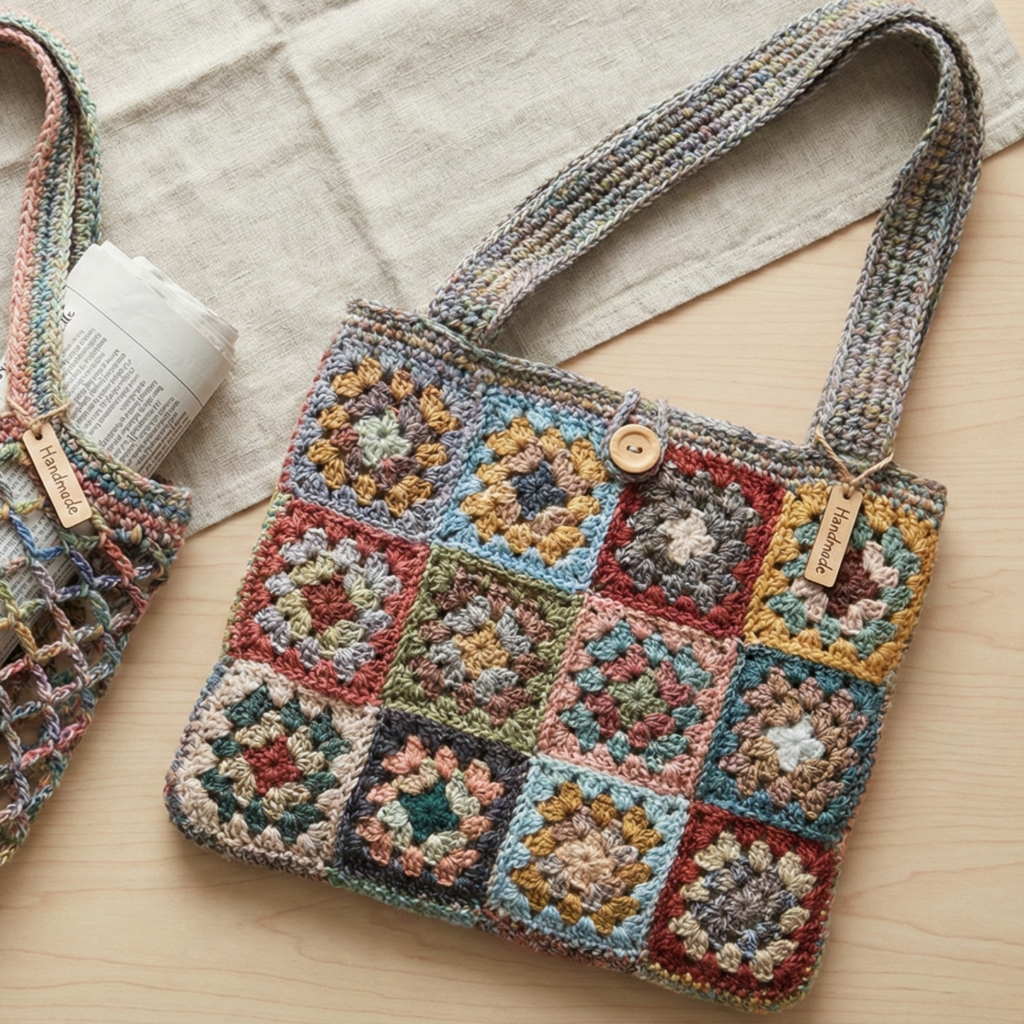
Materials
- Many scraps for colorful squares.
- Hook: 4.0–5.0 mm (depending on granny size).
- Fabric for lining optional, small magnetic snap or zipper optional.
Squares
- Decide square size: typical small square 3–4 in finished. For a 12 in wide bag you need 3–4 squares across. Make squares in a color plan: neutral + accent + scrap splash.
Classic small granny square (3-round)
- MR, ch 3, 2 dc, ch 2, 3 dc, ch 2 — repeat 3 more times and join = 4 little clusters.
- Round 2: join contrasting color, 3 dc, ch 2, 3 dc into each corner, and 3 dc into side spaces as desired to reach the square size you want. Block squares.
Assembly
- Layout squares as a rectangle for the front (3 across × 4 down) and another identical rectangle for the back. Make a strip for the base and sides or adjust by sewing side panels from squares too.
- Join squares with whipstitch or join-as-you-go for a flatter seam. For a tidy interior, seam RS together and then add lining.
Handles & top
- Add a reinforced strap made by crocheting a dense strap (sc in rows doubled) and sewing it to the top edges. Reinforce with extra stitching through multiple squares and the inner lining.
Lining & closure
- Cut lining and sew to shape of bag interior. Attach lining to top edges with small stitches; add magnetic snap or zipper before finishing lining so closure attaches cleanly.
Variations
- Make a small crossbody by attaching a long strap.
- Add a zipper top for security or a drawstring closure for a boho tote.
Final finishing, care and gifting tips
Weaving ends efficiently
- Use a blunt tapestry needle; weave tails through the “channels” of stitches rather than across the fabric surface. Consider joining and hiding several ends together into a single thicker tail for fringe or tassels.
Blocking & shaping
- Many scrap items benefit from light wet blocking to even stitches and open lace. For garments, pin pieces to correct measurements and allow to dry fully. For chunky items, steam-block gently.
Washing & fiber mixing
- Avoid mixing fibers with drastically different care (e.g., machine-washable acrylic with hand-wash-only wool) in garments that will be washed frequently. For decorative pieces or gifts where care matters, include a care note.
Gift presentation
- Fold neatly and pair with a small tag: list yarn types (approx), hook size, and care instructions. A brief “made with scraps” note adds charm.
Conclusion
Scrap yarn projects are perfect for creative play. The five designs above — moss stitch scarf, multicolor granny beanie, simple vest, comfy shorts, and two styles of bag — turn leftovers into meaningful, practical items without demanding precise yardage. The key habits to develop are sorting your scraps, swatching quickly, using forgiving stitches (moss, granny clusters, half-double crochet), and planning color blocks or consistent stripe widths so the final item looks intentional rather than accidental.
Start small if you’re nervous (a scarf or beanie), then step up to garments and bags once you’ve found your scrap rhythm. These projects are also brilliant gifts — handmade, colorful, and kinder to the planet.