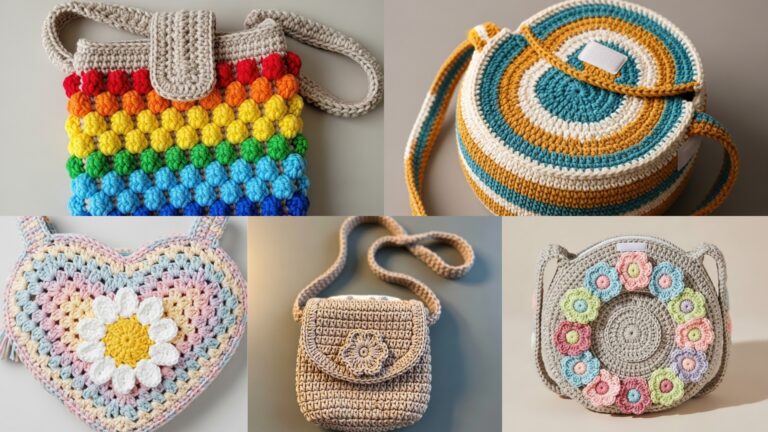
A crochet mini crossbody bag is one of those accessories that feels both practical and stylish at the same time. It is small enough to stay lightweight and easy to carry, but still roomy enough for the essentials you need on a sunny day out. That balance makes mini crossbody bags especially perfect for summer outfits, when you want something cute, comfortable, and handmade without the bulk of a larger bag.
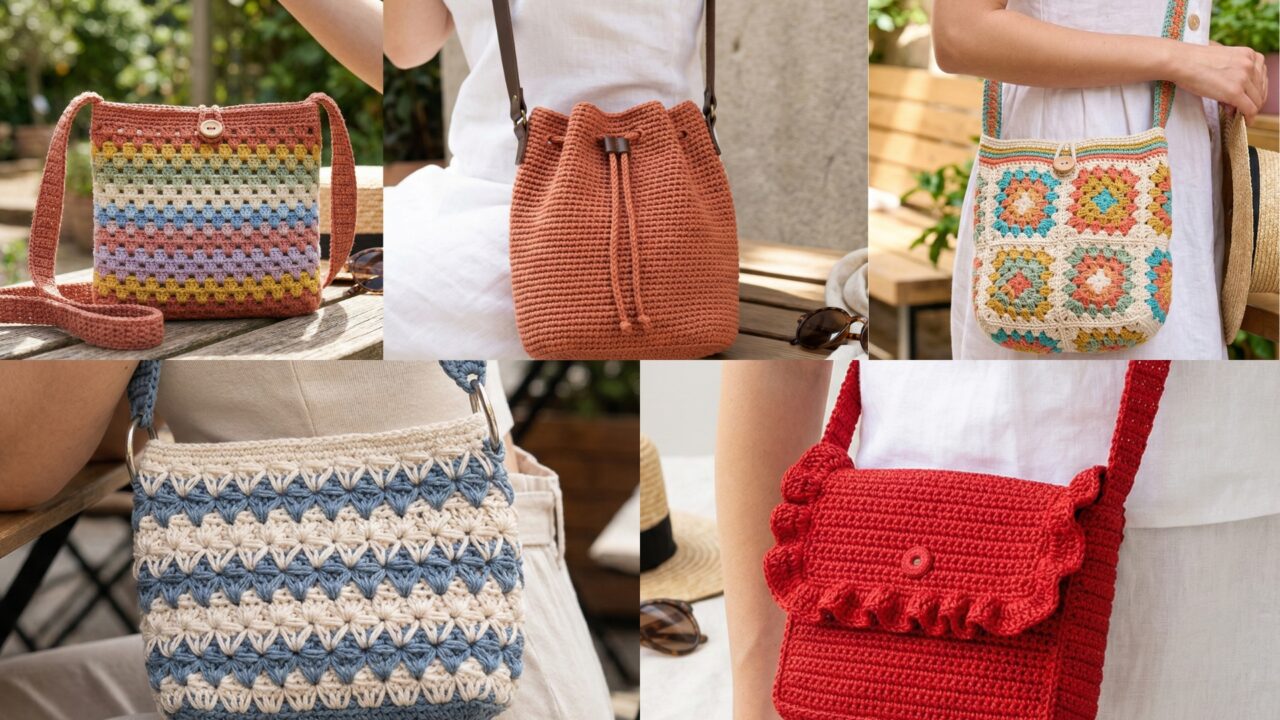
What makes crochet crossbody bags so appealing is how much personality you can build into a small project. A simple square motif can turn into a nostalgic granny square bag. A drawstring design can feel casual and effortless. A striped bag can add playful color to a summer wardrobe. A star motif stitch bag can bring texture and charm. A scarlet ruffle bag can feel bold, feminine, and eye-catching. Each one has its own character, but all of them are wearable, giftable, and easy to customize.
In this post, you will find five chic crochet mini crossbody bag ideas with detailed step-by-step guidance, helpful notes, and finishing tips. Each design is written to be practical, beginner-friendly where possible, and easy to adapt to your favorite colors and style. Whether you are crocheting for yourself, making a handmade gift, or creating content for your blog or shop, these bag ideas are a great place to start.
Quick Notes
Project type: Crochet mini crossbody bags
Best for: Summer outfits, everyday essentials, festivals, gifts, and handmade accessories
Skill level: Beginner to intermediate, depending on structure and stitch detail
Hook size: Usually 3.0 mm to 5.0 mm, depending on yarn weight
Yarn weight: Cotton, cotton blends, DK, or worsted weight yarn
Best yarn choice: Cotton or cotton blends for structure and durability
Finished size: Usually 5 to 8 inches wide, depending on design
Time to complete: Several hours to a few days depending on detail and construction
Helpful stitches: Chain, slip stitch, single crochet, half double crochet, double crochet, increase, decrease, shell stitch, granny clusters, color change, surface crochet, crochet join methods
Common Materials
Most crochet mini crossbody bags can be made with a similar set of supplies.
- Cotton yarn in one or more colors
- Crochet hook matched to your yarn
- Yarn needle
- Scissors
- Stitch markers
- Measuring tape
- Bag lining fabric, optional
- Magnetic snap, button, or zipper, optional
- Crossbody strap hardware or a crocheted strap
- Interfacing or bag stiffener, optional
For bags, yarn choice matters a lot because the finished piece needs to hold shape and handle daily use. Cotton yarn is often the best choice because it gives good structure and is strong enough for accessories. If you want a softer or slouchier bag, you can use a cotton blend or another yarn with a little more drape.
1. Crochet Granny Square Crossbody Bag Pattern
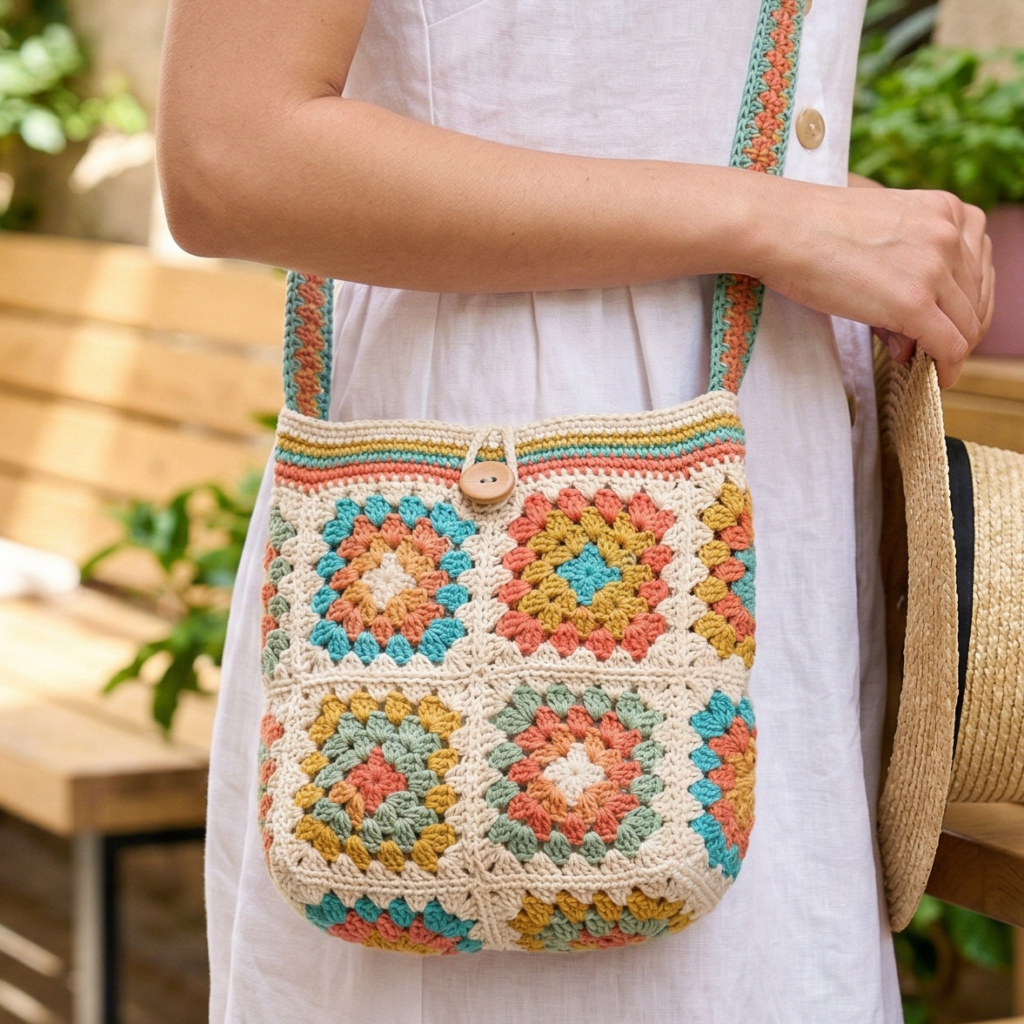
A granny square crossbody bag is a classic with endless style possibilities. It has a nostalgic handmade look that feels fresh again in modern fashion. This bag is great for summer because it is colorful, lightweight, and easy to customize depending on the yarn palette you choose.
Quick Notes
Skill level: Beginner to intermediate
Finished size: Usually small to medium mini crossbody size
Style: Retro, colorful, handmade, cheerful
Best colors: Bright summer shades, neutrals, pastels, or mixed palettes
Materials
- Cotton yarn in two or more colors
- Crochet hook suited to yarn weight
- Yarn needle
- Scissors
- Stitch markers
- Lining fabric, optional
- Strap yarn or strap hardware
Step-by-Step Guide
Step 1: Choose the granny square style
Decide whether you want traditional granny squares, solid granny squares, or a slightly modernized version. Traditional granny squares create a bold retro feel, while solid granny squares give the bag a cleaner and more structured look.
This choice will determine the overall personality of the bag.
Step 2: Crochet the squares
Make enough squares for the front and back panels of your bag. For a mini crossbody bag, you may only need a few medium-sized squares or a larger square folded into a bag shape. Keep the stitch tension even so all the squares match in size.
If the squares vary too much, the bag may not align properly when assembled.
Step 3: Join the squares
Once the squares are complete, join them together using your preferred method. You can whip stitch, slip stitch, or use a crochet join. A neat join gives the bag a polished finish and helps it feel more durable.
Take your time with this step because it affects the final shape.
Step 4: Shape the bag body
If you are using one large square, fold it and seam the sides to form the bag. If you are using multiple squares, arrange them to create the front and back panels, then join around the edges. Leave the top open.
The body should hold its shape while still being easy to open and close.
Step 5: Add a border
Work a border around the top opening and edges of the bag. A simple round of single crochet can clean up the shape, while a shell or picot border can add a decorative touch. The border also helps reinforce the top edge.
A neat border makes the bag feel complete.
Step 6: Add a closure
You can add a button, magnetic snap, drawstring, or small flap closure depending on the style you want. For a casual summer bag, a button or tie closure often works well. For a more polished look, a magnetic snap is a nice option.
Step 7: Make and attach the strap
Create a crocheted strap or attach a ready-made crossbody strap. If you crochet the strap, make it sturdy with tight stitches and a width that feels comfortable on the shoulder. Sew it securely to both sides of the bag.
Always test the strap length before finishing.
Helpful Tips
A granny square crossbody bag looks especially pretty in coordinated colors. You can use warm sunset shades for a boho look or soft neutrals for a more modern aesthetic. If you line the bag, it will feel sturdier and keep small items from slipping through the stitches.
2. Crochet Drawstring Crossbody Bag Pattern

A drawstring crossbody bag is casual, easy to use, and very practical for summer outings. The drawstring closure gives it a relaxed feel, while the small crossbody shape keeps it stylish and lightweight. This design is great if you want a bag that feels effortless but still handmade.
Quick Notes
Skill level: Beginner
Finished size: Small bucket-style or pouch-style mini bag
Style: Casual, relaxed, practical, summery
Best colors: Cream, tan, dusty pink, olive, terracotta, sky blue
Materials
- Cotton yarn or cotton blend yarn
- Crochet hook suited to your yarn
- Yarn needle
- Scissors
- Stitch markers
- Cord or yarn for drawstring
- Strap material or crocheted strap
Step-by-Step Guide
Step 1: Decide on the bag shape
Choose whether you want a rounded pouch or a small bucket shape. A pouch is easier for beginners, while a bucket shape feels a little more structured and trendy. Either shape works well for a drawstring design.
The shape should fit comfortably over the shoulder without being too bulky.
Step 2: Crochet the base
Start with a flat circular or oval base, depending on the bag shape you want. Work evenly around the base with increases until it reaches the desired width. This will become the bottom of the bag.
A strong base is important because it supports the rest of the bag.
Step 3: Build the sides
Once the base is finished, stop increasing and work in the round to build the sides upward. This creates the pouch structure. Keep the stitches even so the bag rises straight and holds its form.
The side height will determine how deep the bag feels.
Step 4: Create the drawstring channel
Near the top edge, work a row or round with chain spaces to create a channel for the drawstring. This can be done by alternating stitches and skipped spaces. The channel should be wide enough for the cord to move smoothly.
Make sure the openings are even so the drawstring pulls neatly.
Step 5: Add the drawstring
Thread the cord or crochet chain through the channel using a yarn needle. When pulled, it should close the bag securely. Tie the ends of the cord so they do not slip out of the channel.
A drawstring adds both function and charm.
Step 6: Add the strap
Attach a crocheted strap or a ready-made strap to the bag sides. A narrow but sturdy strap works well for this style. Position it so the bag sits comfortably at the hip when worn crossbody.
The strap length should feel natural for everyday wear.
Step 7: Reinforce the top edge
Because the drawstring opening gets repeated use, it helps to reinforce the top edge with a clean border. This makes the bag more durable and gives it a finished appearance.
Helpful Tips
A drawstring bag looks lovely in natural cotton shades, but it can also be fun in bright summer colors. If you want a more polished bag, line the inside with fabric. That helps keep the shape neat and protects smaller items inside.
3. Crochet Granny Striped Crossbody Bag Pattern

A granny striped crossbody bag blends retro charm with playful color. It uses the classic appeal of granny stitch and stretches it into a narrow striped design that feels perfect for summer. This bag is cheerful, lightweight, and easy to personalize with your favorite combinations.
Quick Notes
Skill level: Beginner to intermediate
Finished size: Mini shoulder or crossbody bag, usually rectangular
Style: Retro, colorful, fun, wearable
Best colors: Multicolor stripes, pastel blends, brights, or neutral stripes
Materials
- Yarn in multiple colors
- Crochet hook suited to yarn weight
- Yarn needle
- Scissors
- Stitch markers
- Strap yarn or hardware
- Optional lining fabric
Step-by-Step Guide
Step 1: Plan the stripe sequence
Decide how many colors you want and how wide each stripe should be. The stripe pattern can be bold and chunky or thin and delicate. Having a planned sequence helps the bag look balanced and intentional.
This is where the personality of the bag begins.
Step 2: Make the base panel
Start with a rectangular or square base in the first color. You can crochet the base in solid stitches for stability, then move into the granny stripe sections once the bag body begins. If you want a more open look, you can start the whole bag in granny stitch.
A stable base helps the bag keep its shape.
Step 3: Work the granny striped body
Begin alternating yarn colors as you work the body of the bag. Use the granny stitch repeat to create rows of clusters with chain spaces. Keep the stitch count consistent so the stripes look even and clean.
The stripe pattern should remain neat across the full width.
Step 4: Shape the bag panels
Crochet the front and back panels to the desired size. You can make them separate and seam them together, or you can crochet one long piece that folds in half. Either method works well, depending on how structured you want the final bag to be.
Separate panels often give a cleaner shape.
Step 5: Add a border
Add a border around the open edge and all sides to create a more finished look. A single crochet border works well, but a shell edge can add a cute handmade touch. This border also helps unify all the stripe changes.
Step 6: Seam the sides
Join the front and back panels together neatly. Keep your seams tight enough to feel sturdy but not so tight that they pull the fabric. Strong seams are important because bags get more handling than many other crochet projects.
Step 7: Attach the strap and closure
Add a strap that complements the bag colors. You can crochet a matching striped strap or use a solid color to keep the focus on the body. Finish with a button, snap, or flap if you want extra security.
Helpful Tips
A granny striped bag is a great way to use leftover yarn. You can make it bright and playful or calm and neutral depending on your style. It is especially nice as a summer accessory because it adds color without feeling heavy.
4. Crochet Star Motif Stitch Crossbody Bag Pattern
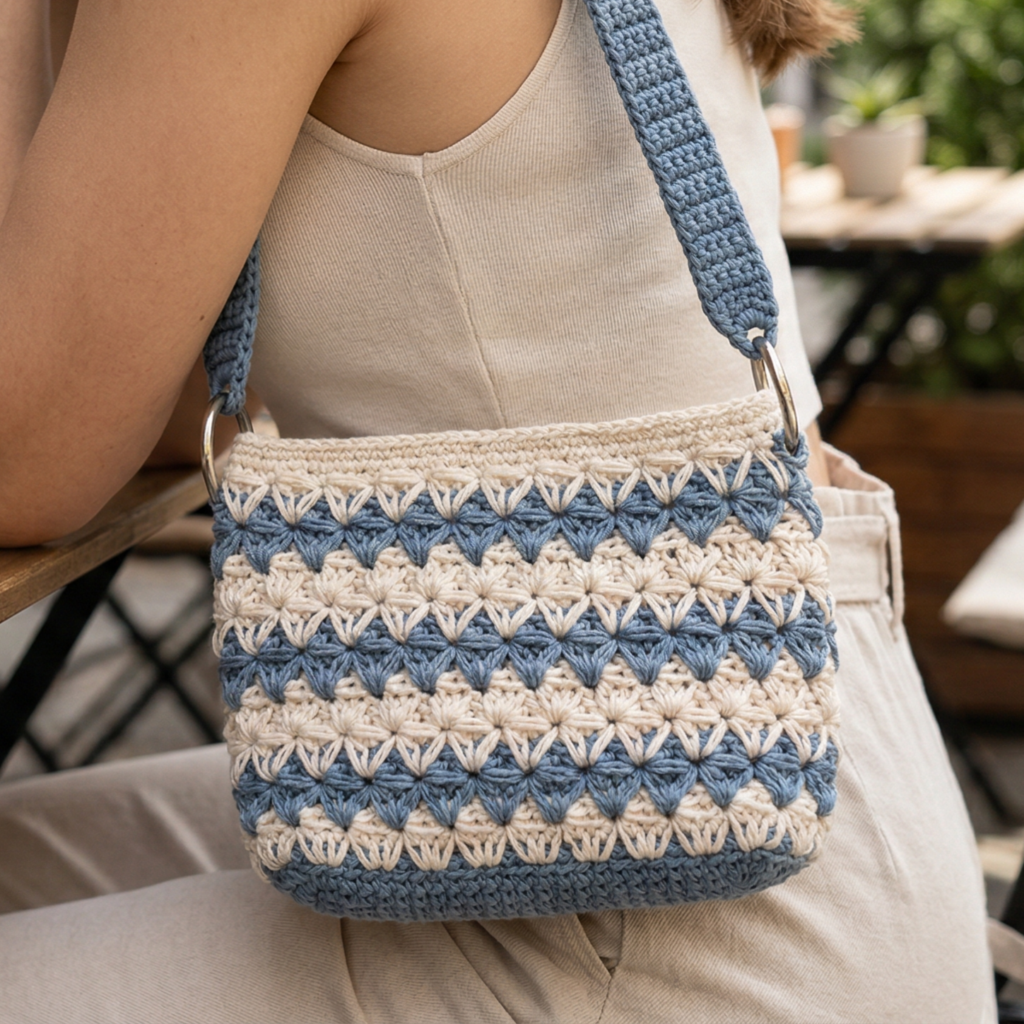
A star motif stitch crossbody bag feels playful and textured. The repeated star shapes create a beautiful surface that stands out without needing extra decoration. This design has a charming handmade quality and works especially well if you want a bag that feels a little more artistic.
Quick Notes
Skill level: Intermediate
Finished size: Mini crossbody, usually structured and textured
Style: Decorative, textured, whimsical, stylish
Best colors: Solid shades, two-tone combinations, or subtle ombré colors
Materials
- Cotton yarn with good stitch definition
- Crochet hook suited to yarn weight
- Yarn needle
- Scissors
- Stitch markers
- Strap material or yarn
- Optional lining and closure
Step-by-Step Guide
Step 1: Learn the star stitch rhythm
The star motif stitch has a distinct texture that resembles tiny stars or blossoms. Before making the full bag, practice the stitch on a swatch so you understand the repeat. It is important to keep the stitch count and tension even.
This stitch creates the signature surface of the bag.
Step 2: Create the bag base
Start with a flat base in simple stitches like single crochet or half double crochet. This gives the bag a strong foundation and helps the star stitch fabric hold its shape better. The base should be sturdy because textured stitches can be a little more flexible.
A firm base supports the decorative body.
Step 3: Work the star stitch body
Once the base is complete, begin the star motif repeat. Keep your rows consistent so the stars look even across the bag. This texture makes the bag feel rich and interesting without needing extra appliqués.
The texture is the main visual feature, so neat stitch placement matters.
Step 4: Maintain structure
Because the star stitch can be a little stretchy, keep your tension controlled. If the bag feels too soft, use a smaller hook or tighter stitches. You want the bag to hold its shape while still showing off the texture.
Structure is especially important for a crossbody bag.
Step 5: Shape the panels or body
You can make this design as separate front and back panels or as a single folded piece. Separate panels may give you more control over the size, while one folded piece can feel simpler to assemble.
Either method should leave enough space for a practical opening.
Step 6: Finish the edges
Work a clean border around the top opening and edges. This tidies up the shape and helps the motif fabric stay flat. A simple border often looks best here because the stitch texture already does so much of the work.
Step 7: Add strap and closure
Attach a strap that feels sturdy and comfortable. Since the bag has texture, a solid-colored strap often balances it well. Add a button, zipper, or snap closure to keep the contents secure.
Helpful Tips
A star stitch bag looks especially beautiful in one solid color because it lets the motif stand out clearly. A soft cream, muted rose, or deep forest green can make the texture look elegant. For a bolder look, try a bright summer shade or a two-tone combination.
5. Crochet Scarlet Ruffle Crossbody Bag Pattern
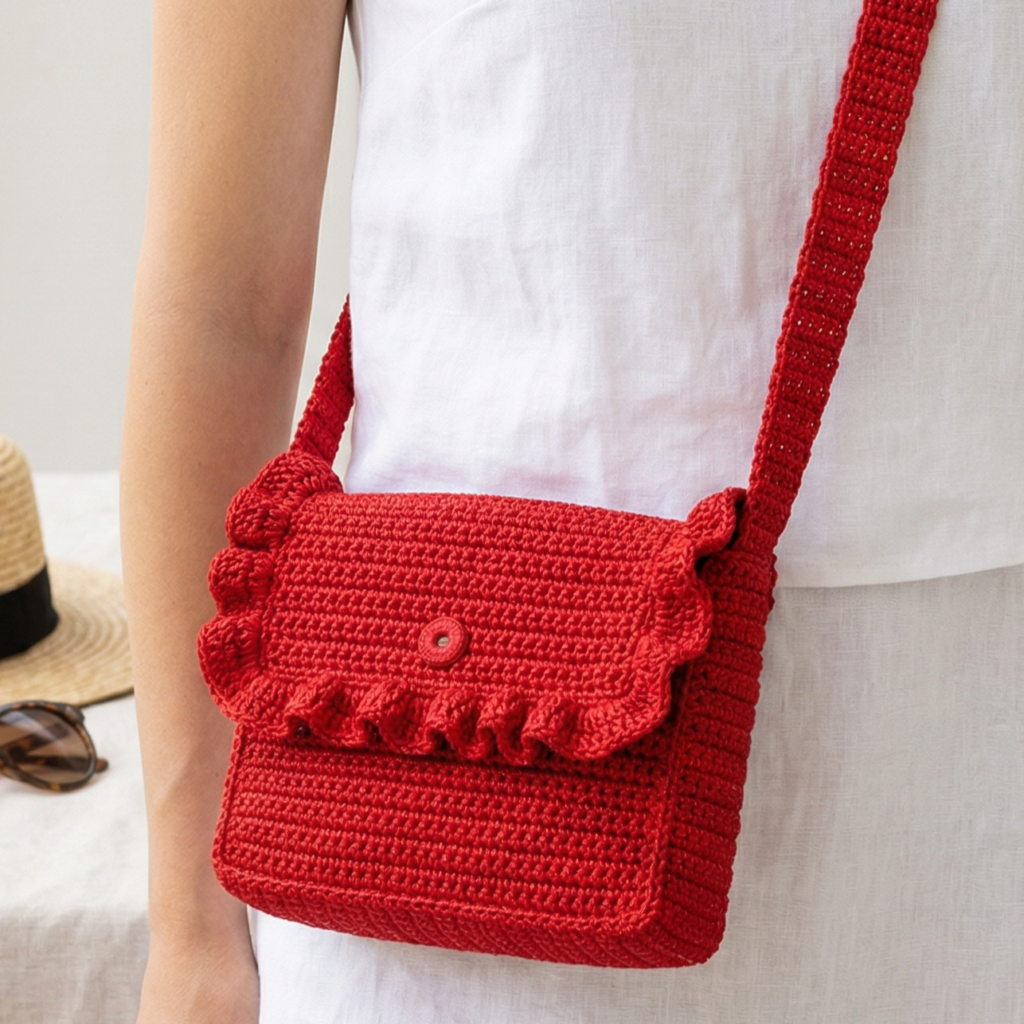
A scarlet ruffle crossbody bag is bold, romantic, and full of energy. The ruffle detail adds movement and femininity, while the bright color makes the bag feel like a statement piece. This design is perfect if you want an accessory that stands out and adds a strong pop of personality to summer outfits.
Quick Notes
Skill level: Beginner to intermediate
Finished size: Small to medium mini crossbody bag
Style: Bold, feminine, dramatic, fashionable
Best colors: Scarlet red, cherry, deep coral, rose red, or wine tones
Materials
- Scarlet or red cotton yarn
- Crochet hook suited to yarn weight
- Yarn needle
- Scissors
- Stitch markers
- Strap yarn or hardware
- Optional lining and closure
Step-by-Step Guide
Step 1: Decide how ruffly you want the bag to be
Ruffles can be subtle or dramatic. Decide whether you want a small decorative ruffle around the flap or a fuller ruffled body. A single ruffle accent keeps the bag easy to wear, while a more layered design feels bolder and more fashion-forward.
The amount of ruffle will define the whole mood of the bag.
Step 2: Crochet the bag base
Begin with a solid base and build the bag body in the round or in panels. Since ruffles add volume, the base should stay simple and supportive. A clean structure underneath helps the decorative shape stand out.
A stable base prevents the bag from becoming too floppy.
Step 3: Add the ruffle section
Create the ruffle by increasing stitches in a row or round, or by working extra stitches into chain spaces. This creates natural fullness that flares outward. The ruffle can be placed at the top opening, across the flap, or around the body of the bag.
Even a single ruffle can make the design feel much more dynamic.
Step 4: Keep the body balanced
Because the ruffle adds a lot of visual weight, the rest of the bag should stay relatively clean and simple. Avoid overcrowding the surface with too many extra details. Let the scarlet color and the ruffle do the main work.
Balance is what makes the bag feel chic rather than busy.
Step 5: Shape the flap or opening
If the bag has a flap, add a smooth shape that complements the ruffle. A rounded or scalloped flap can look lovely with this style. If the bag is open-top, finish the edge neatly so the ruffle effect remains tidy.
Step 6: Add strap and closure
Attach a secure crossbody strap and choose a closure that suits the style. A button or magnetic snap works well, especially if the bag is meant to feel polished. Make sure the closure does not interfere with the ruffle placement.
Step 7: Finish carefully
Weave in all ends and shape the ruffle with your fingers. If needed, lightly block the bag so the ruffle settles in a smooth, attractive line.
Helpful Tips
Scarlet is a powerful color for a summer accessory. It instantly creates a confident, fashion-forward look. This bag pairs especially well with white outfits, denim, neutral dresses, or simple summer basics when you want the bag to be the star.
Concusion
Crochet mini crossbody bags are a wonderful way to combine practicality and style in one handmade project. They are small enough to finish without feeling overwhelming, but detailed enough to feel special and creative. That makes them ideal for summer, when lightweight accessories and easy outfits work so well together.
These five crochet bag patterns offer a wide range of looks, from the nostalgic charm of a granny square bag to the casual ease of a drawstring style, the playful energy of striped designs, the texture of star stitch, and the bold femininity of a scarlet ruffle bag. Each one gives you a different way to express your style through yarn, shape, and color.
A handmade bag is more than just an accessory. It carries your choices, your effort, and your style in every stitch. That is what makes crochet bags so rewarding to make and so lovely to wear. Whether you are creating for yourself, for someone else, or for your audience, these mini crossbody bags prove that small projects can still make a big fashion impact.