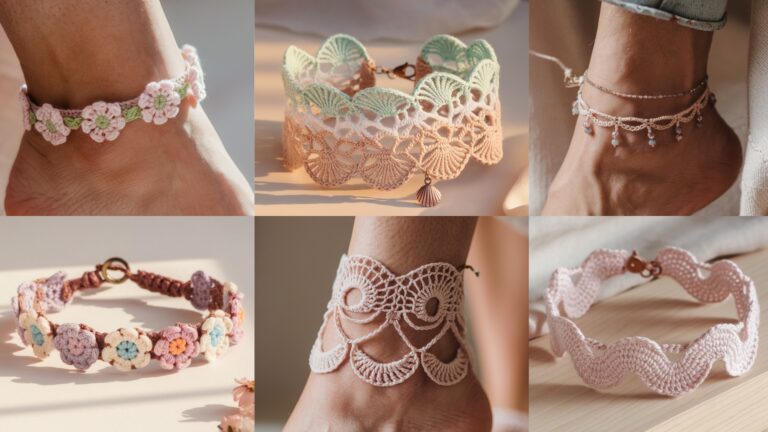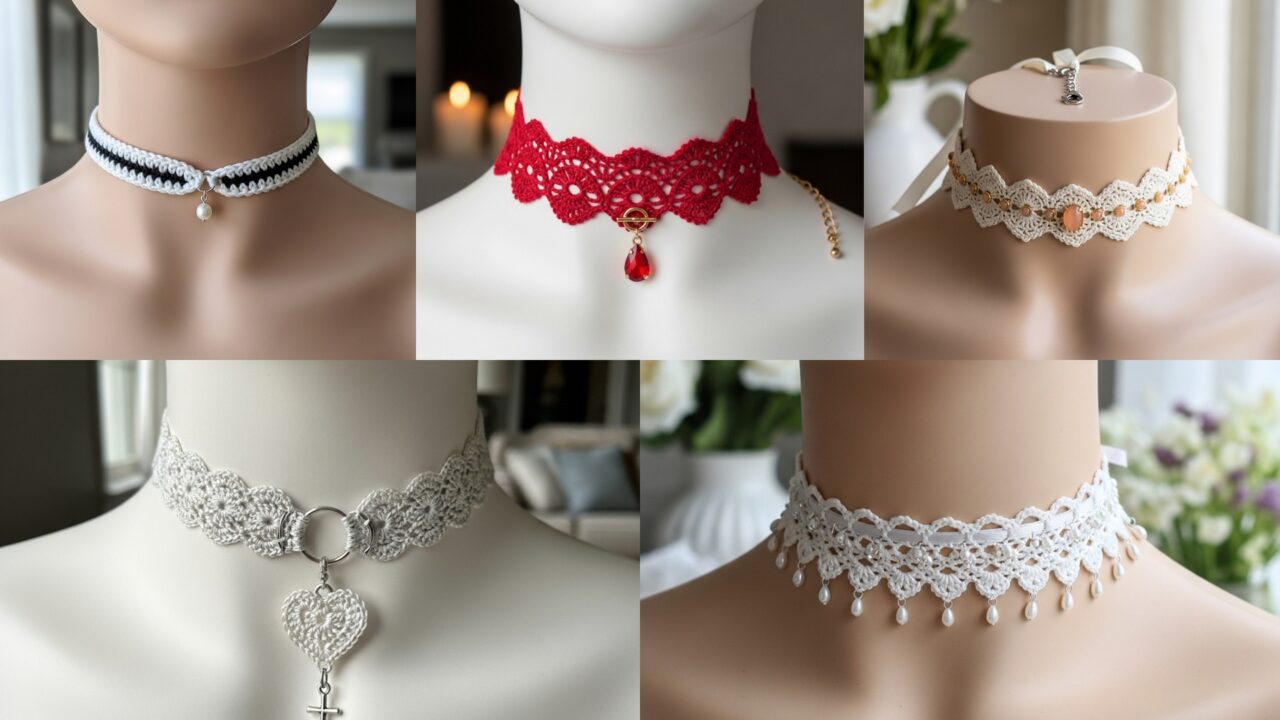
Chokers are the quickest wearable accessory to crochet — tiny canvases for lace, beads and pendants that finish in an hour or two. Below you’ll find a friendly introduction that covers tools, yarn/fiber choices, sizing and safety, followed by five full choker patterns with materials, exact step-by-step instructions, finishing tips and variations: Pearl Pendant, Lily of the Valley, Red Lace, Vintage Peach Stones, and Cross Heart Dangle Lace. Each pattern is written so you can make a finished choker that lies flat around the neck, feels comfortable, and looks polished.
Quick intro — tools, materials, measurements & safety
Tools & notions (short checklist)
- Crochet hooks: 1.75–3.5 mm depending on yarn/fiber.
- Yarn / cord: fingering, sport, cotton thread (#10 or #8), waxed nylon cord or jewelry cord for very delicate, rigid chokers.
- Jewelry findings: jump rings, small lobster clasp or toggle, 1–2 in extender chain (optional), small crimp beads (if using cord), head pins (for pendants/beads).
- Beads/pendants: freshwater pearls, glass/filigree pendants, seed beads, small gemstone chips.
- Needles/pliers: tapestry needle, beading needle (optional), flat-nose pliers, round-nose pliers, wire cutters.
- Measuring tools: soft tape measure, ruler.
- Optional: small piece of felt (for backing), thin chain (to mix metal with crochet).
Yarn & fiber choices
- Cotton (fingering/DK) — crisp stitch definition for lace chokers; easy care.
- Mercerized cotton or crochet thread (#8–#10) — classic lacy look; pairs with vintage pendants.
- Bamboo/silk blends — silky sheen for evening chokers.
- Waxed nylon cord or jewelry cord — super-slim, non-fraying, great for corded chokers with beads.
Pick a fiber that suits the pendant weight and wearer comfort. For sensitive skin, choose hypoallergenic metal findings (gold-filled, sterling, or surgical steel).
Measuring the neck & deciding fit
Measure the neck where the choker will sit (just above the collarbone or higher depending on style). Common choker lengths:
- Very snug (fashion choker): neck measurement (N) – 0.5 to 1 in.
- Classic choker: N (no ease) to N + 0.5 in.
- Comfort fit: N + 0.75–1.25 in (preferred if you want room for breathing or layering).
Example: if neck = 15 in and you want a classic fit, aim for 15 in finish (including closures). Because crochet stretches, compute foundation shorter by the stretch factor — test a 1-inch swatch to measure stitches-per-inch (spi) in the stitch you plan to use.
Gauge & calculation (simple method)
- Make a 1-in (or 4-in) swatch in your chosen stitch and measure stitches per inch (spi).
- Desired finished circumference = target length (e.g., 15 in).
- Required stitches = spi × target length. Round to nearest multiple required by stitch pattern (many lace patterns need multiples like 3, 6, or 8).
- If your stitch is very stretchy (rib or chain-lace), make the foundation slightly shorter (0.25–0.5 in) because the fabric will relax.
Closures & hardware
- Lobster clasp + jump ring + small chain — easiest and adjustable.
- Toggle/clasp — decorative and sturdy.
- Ribbon ties — classic for lace chokers; tie at back.
- Button & loop — pretty if the choker is handmade and needs a vintage look.
Safety & care
- Securely attach beads and pendants with head pins and closed loops (use pliers).
- Avoid very heavy pendants on delicate thread — they can deform the choker.
- For children or babies, avoid small beads or detachable elements. The user is a teen, but include this note for readers making gifts.
- Hand wash delicate lace chokers gently and air dry. Some cotton threads can be machine washed on gentle inside a mesh bag; test first.
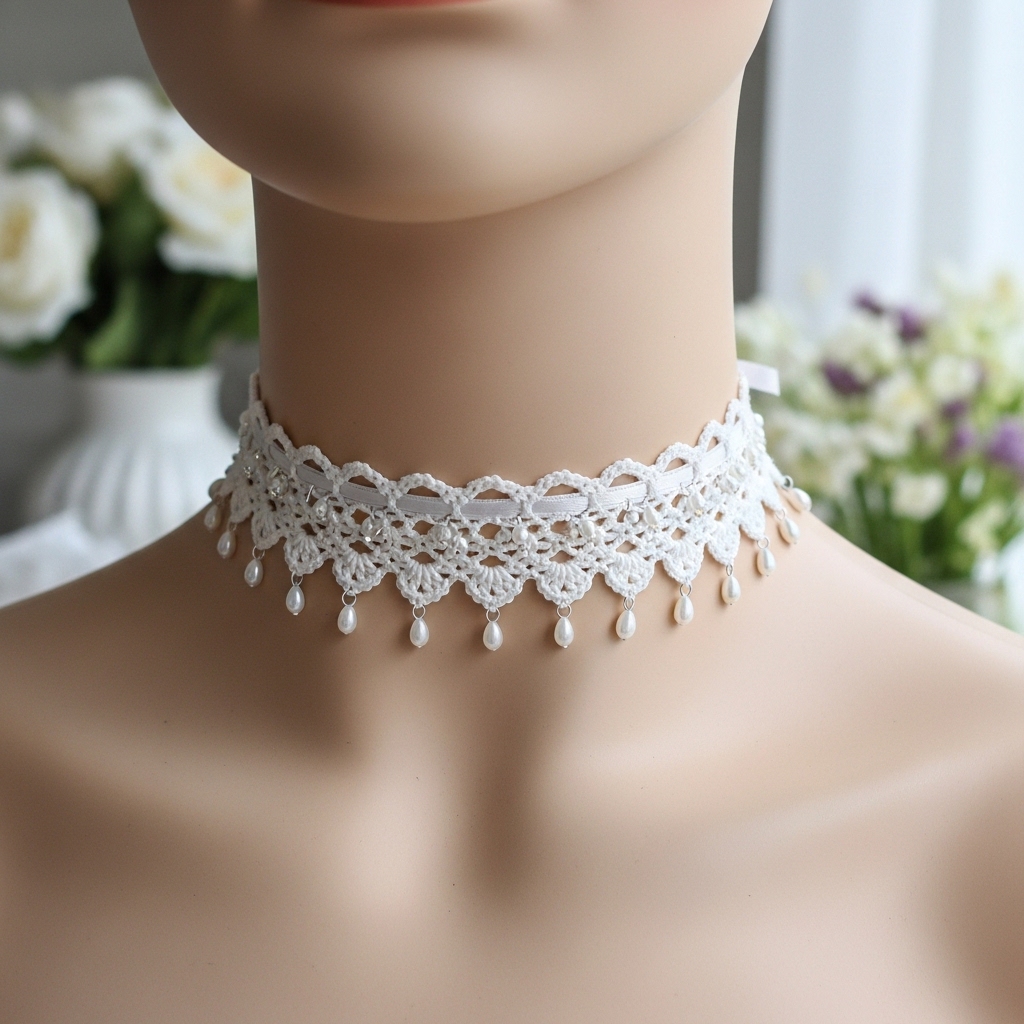
1. Crochet Choker Necklace with Pearl Pendant
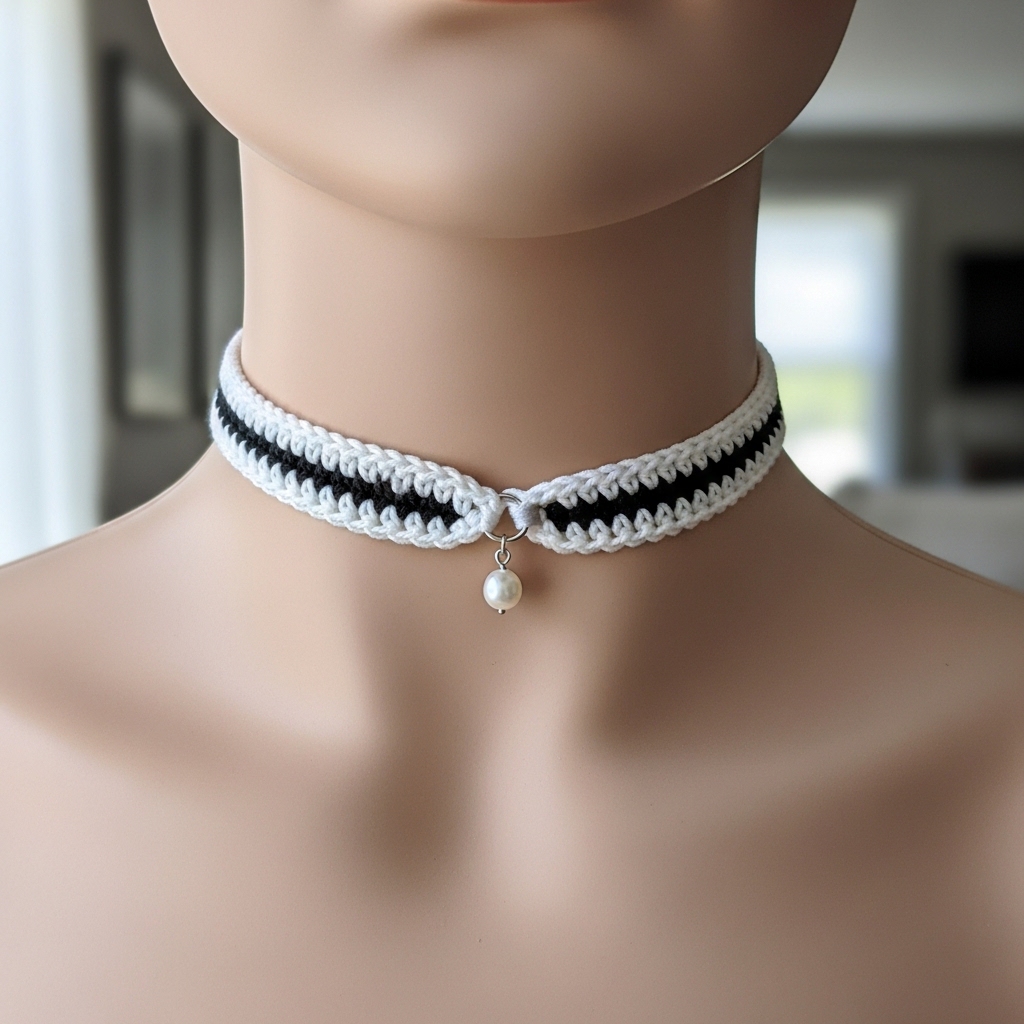
Classic, elegant — a narrow crocheted band with a tiny pearl pendant center.
Vibe: minimal + elegant
Skill level: confident beginner
Sample finished length: 15 in (adjust to neck measurement)
Materials
- Fingering cotton or sport — about 10–20 yd (or thread #8 with 1.5 mm hook).
- Hook: 2.25–3.25 mm (choose to get a firm fabric).
- 6–8 mm pearl (drilled or on head pin) or pearl pendant.
- 1 small jump ring, 1 lobster clasp, short extender chain (optional).
- Head pin, round-nose pliers, flat-nose pliers, tapestry needle.
Stitch idea
A narrow, slightly textured band made with single crochet or hdc worked in rounds for a seamless tube — or flat strip seamed — then attach pendant.
Step-by-step (tube-in-round method — seamless)
- Measure & compute: make a 1-inch swatch in single crochet rounds to find spi. Example: you get 8 sc = 1 in. For 15 in finish: 8 × 15 = 120 sc. If your stitch repeat is not restrictive you can use 120 as foundation.
- Foundation: ch 120, join carefully to avoid twist (or use foundation sc method and join after first round). Place marker.
- Body: Round 1–6: sc in each st around (6 rounds will give a band ~3/8–1/2 in tall depending on yarn). Try on and add/subtract rounds for desired height.
- Optional texture: For a little rib, work alternating rounds: Round A: sc; Round B: BLO sc — repeat.
- Pendant attachment (method 1 — head pin): Slide pearl onto head pin, form a small loop at top with round-nose pliers and trim excess wire; attach loop to a small jump ring. Sew or slip the jump ring to the center front of choker (attach to a single stitch by pulling jump ring through with tapestry needle and secure with a few stitches), or thread pendant onto a short chain that you sew into place.
- Finish edges: Work 1 round sl st or crab stitch (reverse sc) for a neat top edge. Fasten off leaving tail.
- Attach findings: Add lobster clasp: sew small jump rings into end stitches (or sew through the final stitch and attach jump ring). Alternatively add a short extender chain into final stitch with a jump ring.
- Secure & finish: Weave ends. Block lightly if needed (cotton benefits from light blocking to set shape).
Variations
- Use a small bezel pendant instead of a pearl.
- Make the band wider by increasing rounds and add two tiny pearls spaced symmetrically.
2. Crochet Lily of the Valley Choker Necklace
Delicate lace with tiny droplet beads emulating lily-of-the-valley blooms.
Vibe: very feminine, springtime, bridal friendly
Skill level: intermediate (lace + beadwork)
Sample finished length: 15–16 in (with small pearls dangling)
Materials
- Crochet thread #8 (or fingering cotton) — ~20–30 yd.
- Hook: 1.75–2.25 mm (thread) or 2.5–3.25 mm (fingering).
- Tiny pearl drop beads or 2–3 mm seed beads for bells.
- Small jump rings, lobster clasp, ribbon option.
- Beading needle (for seed beads) or pre-string beads on head pins.
Design concept
A narrow lace strip with evenly spaced picot loops; from each picot hang a tiny pearl bead to form the lily bells.
Step-by-step (flat lace strip then seam)
- Swatch & multiple: choose a lace repeat — for example: multiple of 6 + 2. Make swatch to get spi in the lace.
- Foundation chain: compute required stitches using spi × target length and adjust to lace repeat. Example: if spi = 6 sc/in and you want 15 in: 6 × 15 = 90; if repeat is 6, 90 is fine. Add 2 turning ch → ch 92.
- Row 1 (base): sc across, turn.
- Row 2 (eyelet row): ch 4, skip 2, sc in next across — this creates loops where bells will hang. Turn.
- Row 3 (lace row): sc across chaining into eyelets as needed to make a delicate mesh. Work 6–8 rows alternating mesh and solid rows until strip reaches about 3/8–1/2 in tall.
- Bead placement: On the last lace row, pick every nth eyelet to attach a bead. If using head pins: thread bead and make a tiny loop at the top, slip loop through the picot/eyelet and close loop. If using seed beads, sew a few beads into each picot with beading needle tying securely on wrong side.
- Edge finishing: Add a narrow scallop — sc, ch 3, sl st in next — to create refined top edge. Block strip flat.
- Seam & closures: Fold strip into loop and join ends invisibly (mattress stitch or whipstitch on wrong side). Attach jump rings to ends and add clasp. Optionally finish with a small satin ribbon threaded through top row for color contrast.
Variations & style notes
- For stronger bells, use tiny bell charms or enameled drops.
- Make it slightly longer and tie with ribbon at back for vintage bridal style.
3. Crochet Red Lace Choker Necklace
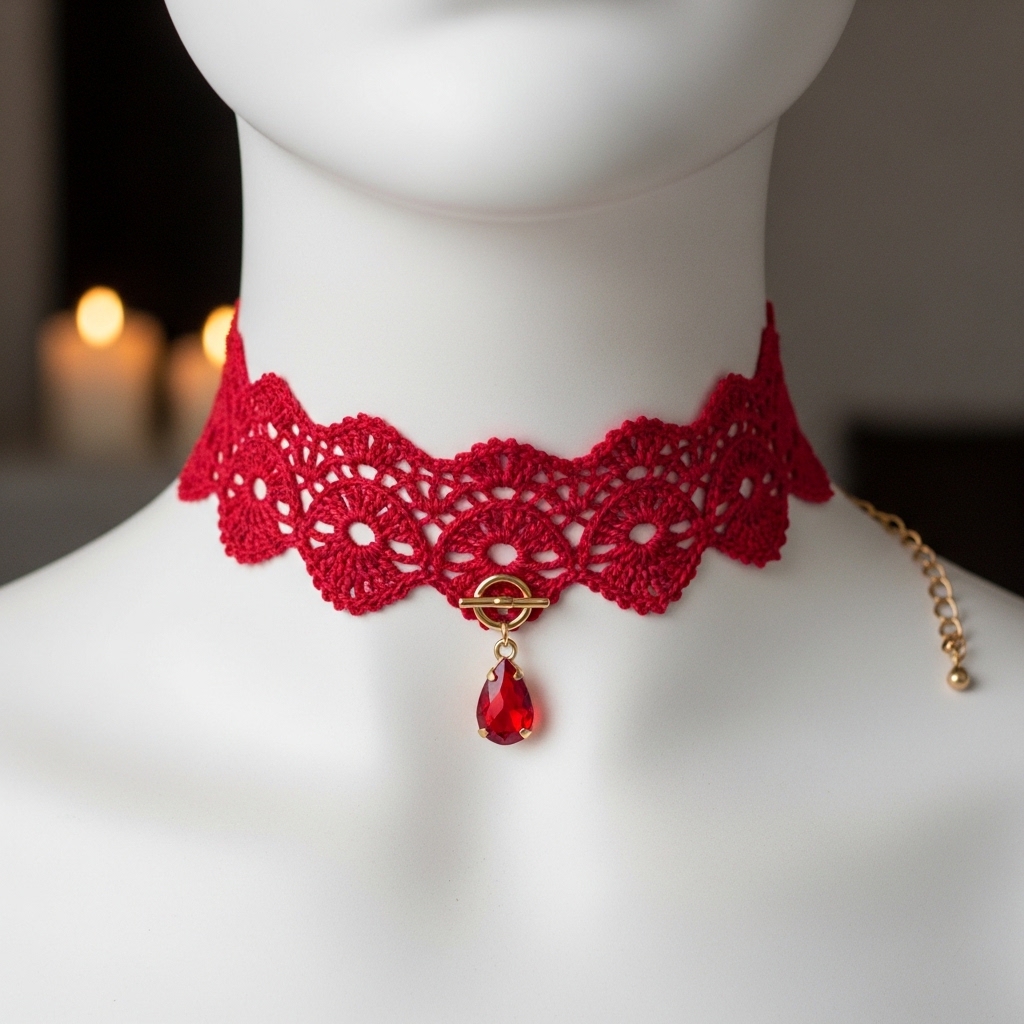
A bold, romantic lace choker in scarlet — dramatic evening piece.
Vibe: statement + romantic
Skill level: intermediate (lace stitch and shaping)
Sample finished length: 14–16 in (adjust to neck)
Materials
- Mercerized cotton thread or fingering cotton ~20–30 yd (red).
- Hook: 1.75–2.5 mm (thread) or 2.75–3.5 mm (fingering).
- 1 small toggle or lobster clasp.
- Optional: small red crystal teardrop for center.
Design concept
A wider lace band featuring a repeating leaf/arch motif (a common decorative choker look). The pattern is worked as a narrow rectangular lace panel then joined.
Step-by-step
- Pick or create motif: A simple arch motif: ch 5, sc in base, (5 dc shell) in next base, ch 3, sc — you can repeat across.
- Compute foundation: Swatch motif width; compute how many repeats fit across target circumference. Example motif = 0.75 in across; for 15 in you’ll need 20 motifs. Foundation chain must match motif multiple + edge.
- Work panel: Row 1: motif foundation row across the chain. Row 2: work shells into specified spaces, alternating with chain arches. Repeat pattern rows 4–8 times total to reach desired height (~1 in – 1.5 in). For extra drama, make band 1.75–2 in.
- Optional center drop: Make a little picot loop at center front and attach a red crystal teardrop with a head pin; sew securely to center motif.
- Block heavily: Lace must be pinned to open arches and set height.
- Seam & hardware: Join ends with small, neat seam; attach clasp and an extender chain if you want adjustable fit.
Tips
- Red dyes can bleed; wash gently and separately if needed.
- For evening wear, hold thread together with a thin metallic thread for subtle sparkle.
4. Crochet Vintage Choker Necklace with Peach Stones
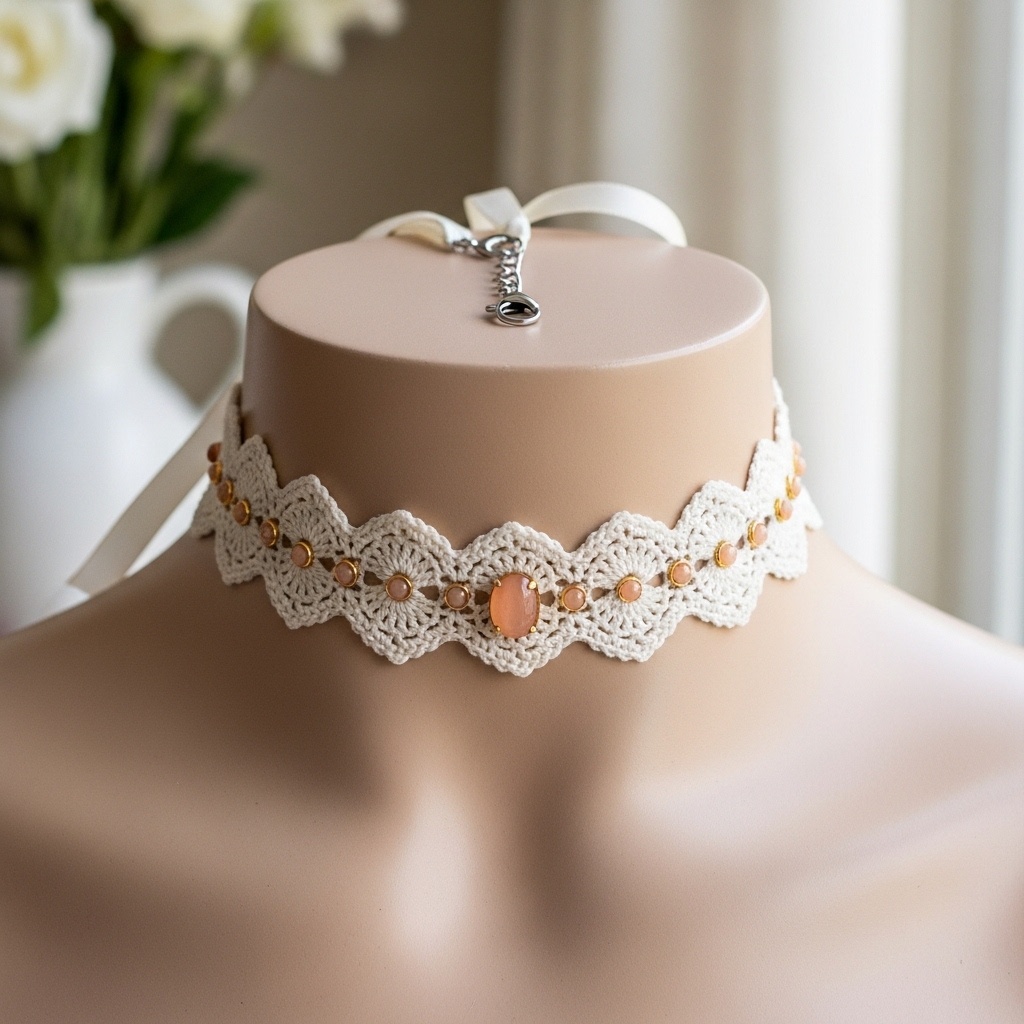
Soft, vintage look with peach-colored stones and a scalloped lace band.
Vibe: vintage romantic, heirloom feel
Skill level: intermediate (bead setting + lace)
Sample finished length: 15–16 in
Materials
- Crochet thread #8 or fine fingering ~25–35 yd (ivory or cream).
- Peach-colored flat-back stones or small cabochons (1–3) or drilled peach beads.
- Small prong-set bezels or sew-on settings OR use glued bezel if the choker is decorative (but sewing is more secure).
- Hook: 1.75–2.25 mm.
- Clasp, jump rings, optional satin ribbon.
Design concept
A scalloped lace band with small peach stones set at regular intervals or a single central stone. Use sew-on settings for stone security.
Step-by-step
- Compute foundation & motif: Choose scallop motif width. Swatch to determine motifs per circumference (as above). Example: scallop motif = 0.6 in, for 15 in you need ~25 motifs (round to nearest whole).
- Work scallop strip: Row pattern: sc row, shell row (5 dc in one st), picot finish. Make 6–8 rows to build texture and a scalloped edge.
- Stone attachment options:
- Sew-on stones: After choker is made, tack sew-on stones into picot troughs with strong nylon thread through holes on bezel; make 4–6 passes to secure.
- Drilled beads: Thread beads onto thin wire and weave into lace holes, then twist ends and tuck/wrap under band.
- Blocking: Pin scallops carefully for even symmetry and allow to dry.
- Finish & closure: Join ends invisibly and add clasp. For a vintage look add a narrow satin ribbon sewn behind center or tied into a tiny bow at back.
Variations
- Add a line of seed beads along center lace row for sparkle.
- Make a detachable central pendant with a lobster clasp so you can swap stones.
5. Crochet Cross Heart Dangle Lace Choker Necklace

Playful romantic blend — lacy band with a small cross and heart dangle at center.
Vibe: romantic + slightly gothic-cute
Skill level: intermediate (appliqué + dangle assembly)
Sample finished length: 14.5–15.5 in
Materials
- Crochet thread #8 or fingering cotton ~25 yd.
- Tiny metal cross charm + small heart charm (or crochet a tiny heart).
- 1 jump ring and short dangle connector (eyepin & small loop).
- Hook: 1.75–2.5 mm.
- Clasp and jump rings.
Design concept
A medium-width lace band with a central picot loop to attach a dangle composed of a small crocheted heart plus metal cross.
Step-by-step
- Band: Use a mesh lace pattern (example: ch 3, sc in next, then sc in ch-3 loops next row) repeating until band width ~1.25–1.5 in. Compute stitches to fit circumference as previously described.
- Center loop: At the front center of your choker (count stitches before joining to identify center), work a reinforced picot or a small chain loop (~ch 6) finished with a sl st into base. This will be the dangle anchor.
- Dangle assembly:
- Heart (crochet small): MR, 6 sc, flatten and shape into heart or tiny 5-stitch heart (ch 4, (3 dc in 2nd ch from hook) etc). Make 1.
- Cross metal charm: use small charm from craft supplier. If cross is flat, mount to eyepin or sew a tiny loop behind.
- Attach dangle: Place heart on an eyepin (or tiny jump ring). Add cross below/above or stack as preferred. Close loop with pliers. Slip the top loop onto the picot loop and close with jump ring or wrap with a tiny thread knot to secure.
- Finish: Join ends, add clasp, and sew jumps securely. Block to shape.
Styling suggestions
- Wear alone as subtle statement or layer with longer necklaces.
- Make variations with tiny tassels instead of cross for boho look.
Final finishing, packing & care notes
- Secure hardware carefully: when sewing jump rings through crochet fabric, pass a thread around the stitch and knot tightly before attaching metal findings — metal can cut yarn over time.
- Testing: tug lightly on pendants and beads to confirm solid attachment. If you use glue, pair with sewing for extra security.
- Care: hand wash lace or delicate chokers; lay flat to dry. Cotton/fingering chokers may tolerate gentle machine wash in a mesh bag — test first. Avoid ironing metal components.
- Gift packaging: present chokers on a small jewelry card (punch two tiny holes and loop the choker across) or in a velvet pouch. Include a care card (fiber, wash instructions, clasp type).
conclusion
Chokers are small, fast, and highly satisfying projects — perfect for gifting, retail, or quick handmade accessories to elevate an outfit. The five patterns above give you a range from minimal pearl elegance to playful lily-of-the-valley, dramatic red lace, vintage peach stones, and a romantic cross-heart dangle. Start by choosing a fiber and hook that matches your desired drape, measure the neck accurately, make a quick swatch to compute stitch counts, and pick secure hardware for pendants and closures.