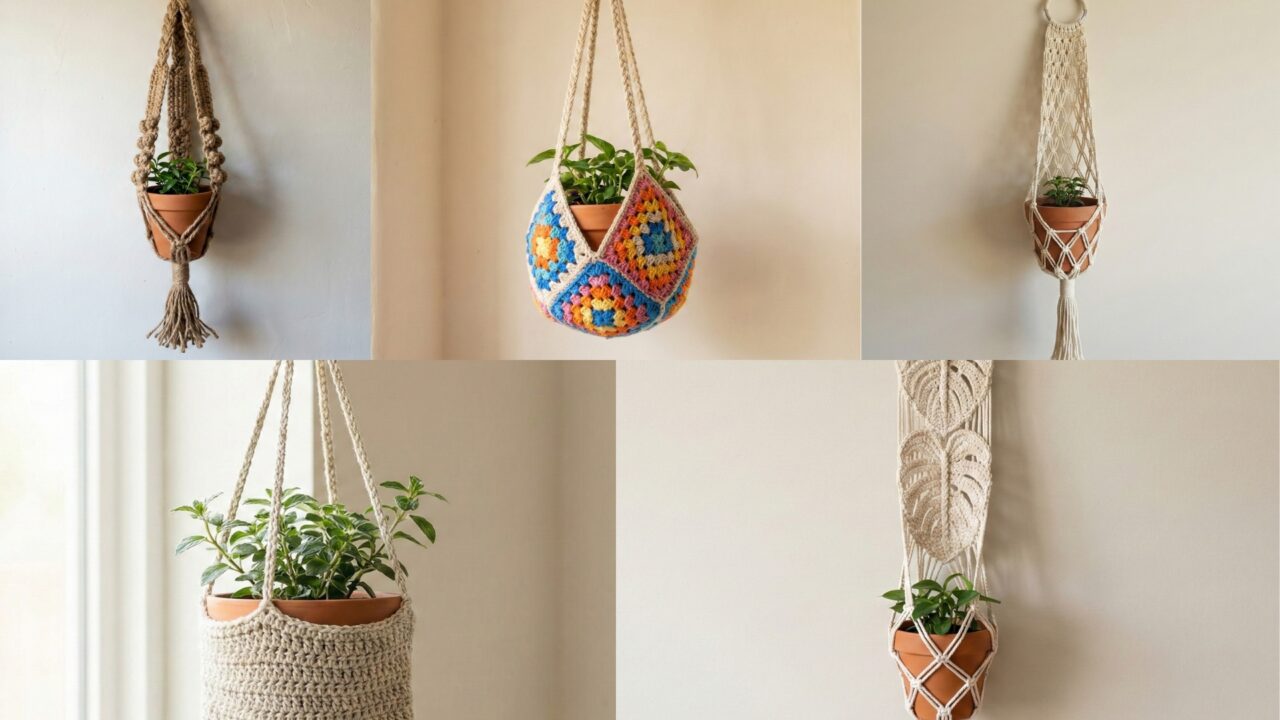
Crochet plant hangers are an easy way to add life, texture, and that effortless boho vibe to your home — they’re decorative, functional, and small projects that make big impact. Below you’ll find one practical introduction (materials, safety notes, basic stitches) followed by five fully expanded, step-by-step crochet plant hanger patterns. Each pattern includes: skill level, exact materials and tools, suggested finished dimensions and pot sizes, a stitch-by-stitch construction plan, finishing & hanging instructions, styling ideas, and variations.
Before you start — tools, materials, and safety
Common materials & tools
- Yarn/cord choices
- Cotton macramé cord or heavy cotton rope (3–6 mm) — great for durability and weight-bearing.
- T-shirt yarn or recycled cotton rope — bulky, casual boho look.
- Jute or hemp twine — rustic, outdoor friendly but somewhat rough on hands.
- Smooth cotton DK or worsted held double for a crocheted-but-soft hanger.
- Accessories
- Metal or wooden ring (1.5–3 in / 4–8 cm diameter) for top.
- Small wooden bead(s) (optional) to weight fringe or decorate.
- Stitch marker, tapestry needle, small scissors.
- Hooks
- For cord/rope: choose a large crochet hook appropriate to cord thickness (5.0–10.0 mm). For very thick macramé cord you may use an oversized hook or even make slip-stitch chains by hand.
- Optional
- Fabric lining for pots, small saucer to catch water if you plan to keep the plant in the hanger.
Basic stitches & techniques used (US terms)
- ch = chain
- sl st = slip stitch
- sc = single crochet
- hdc = half double crochet
- dc = double crochet
- fpdc / bpdc = front/back post double crochet (for texture)
- picot, puff, shell — as called out in patterns
- join-as-you-go, join with slip stitch or whipstitch to ring
Safety & practical notes
- Weight & pot size — Always test your hanger with the pot and plant you plan to use before permanently mounting it. Use a pot + soil + plant weight (wet soil is heavy) and hang near the intended hook to confirm strength.
- Drainage — If you’ll hang plants that require watering, either use a decorative outer pot with a drainage saucer inside (remove before watering) or use a waterproof liner to prevent dripping on floors.
- Mounting — Use a secure ceiling hook or beam screw and appropriate wall anchors. For heavy plants, use hardware rated for at least double the load.
- Outdoor durability — natural jute will weather; use synthetic or treated cord for outdoor hangers if you want longer life.
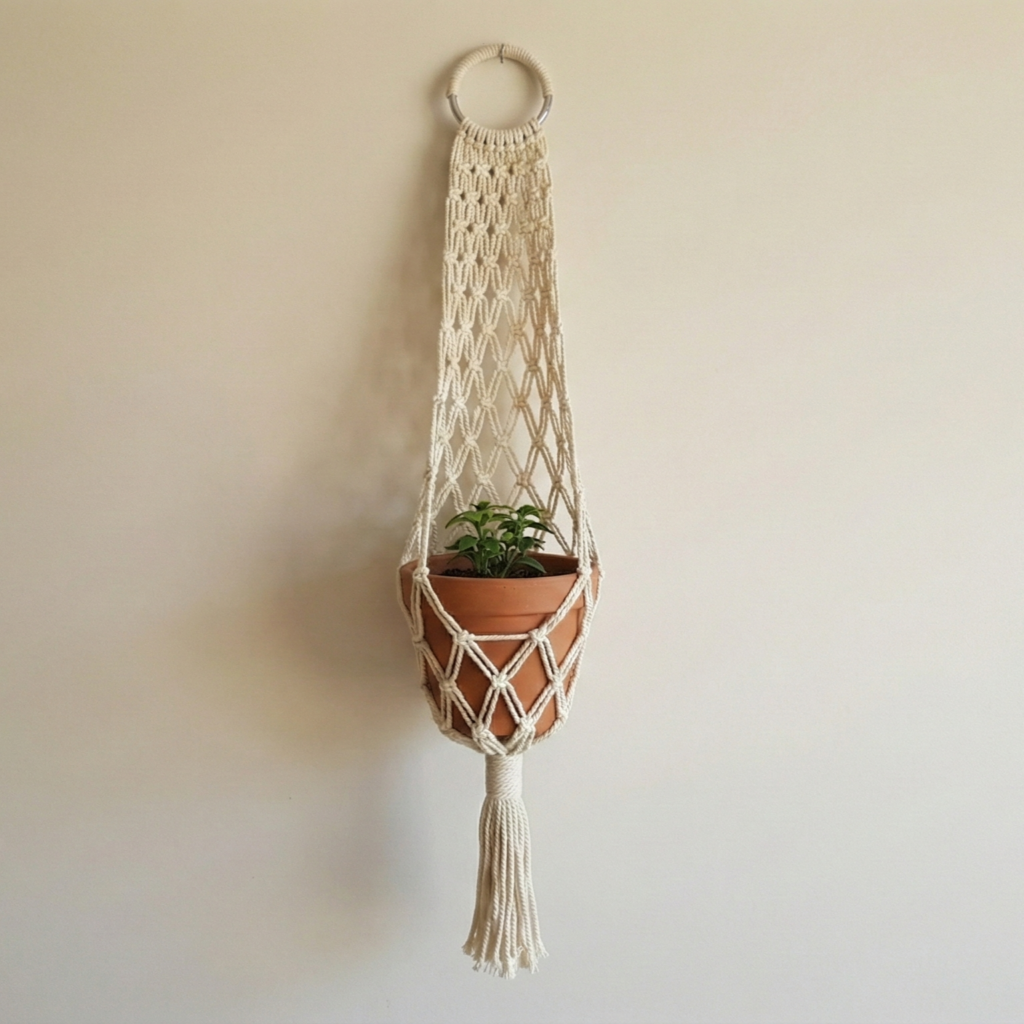
1. Crochet Monstera Plant Hanger Pattern
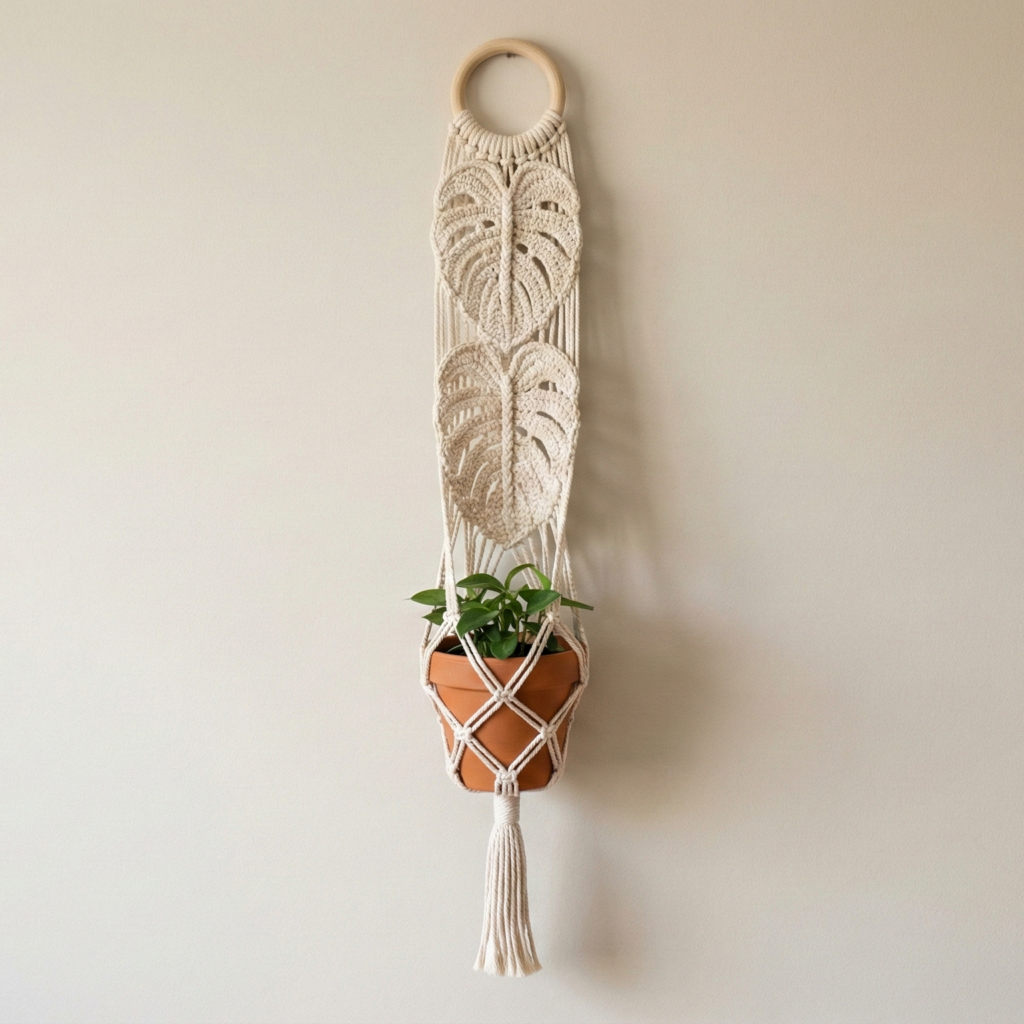
Style: Sculptural single-pot hanger with open leaf-inspired panels that echo Monstera silhouettes.
Skill level: Intermediate — pattern combines netting with worked flat leaf panels and textured stitches.
Materials
- 3 mm cotton cord (or worsted yarn held double) — ~120–180 yd depending on length and fringe.
- Crochet hook sized to cord (5–6.5 mm)
- Wooden ring 2 in diameter
- Tapestry needle, small stitch marker
Finished size & pot suggestion
- Hanger length (ring→base): ~26–30 in (adjustable)
- Suitable for pots 3–6 in diameter (small to medium) — measure pot lip to ensure net fits.
Construction overview
The Monstera hanger is worked in three sections:
- Top collar around the ring — a tightened round of stitches that secures the ring.
- Four decorative panels (worked flat as elongated leaf shapes and joined into the body) connected by mesh/net rounds.
- Net base & tassel — gathers and finishes under the pot.
Step-by-step
Top collar
- Fold ring in half, attach cord with sl st and work a round of sc to encase the ring: 24–32 sc around (depending on ring size); join with sl st. Work 2 more rounds of sc to build a sturdy collar. Fasten off or continue without breaking yarn.
Panel (make 4) — Monstera leaf motif
2. Make a chain 16 (example). Row 1: sc in 2nd ch from hook and across (15 sc). Turn.
3. Row 2–10: Work increasing profile to shape leaf: sc in next 2, hdc, dc 3–4 (for leaf body), hdc, sc in next 2, sc2tog at edge — repeat, shaping by increasing in early rows and decreasing toward tip. Add a central venation by working a column of post stitches down center on the RS for a rib. Block or steam lightly to shape.
Join panels to collar
4. Lay panels evenly around the collar (at 12, 3, 6, 9 o’clock). Join each panel bottom corners to the ring collar using sl st or whipstitch, leaving upper edge open to create decorative flaps.
Mesh body
5. From bottom of each panel, work netting in rounds to create hanging sections between panels: Round example — ch 6, sc in the next join point around so you have diamond openings. Repeat netting rounds down until you have ~6–10 rows (depending on pot height). For a snug net, use ch4 spacing; for open boho, ch6.
Base
6. When netting is deep enough to cradle pot, work a gathering round: ch2, sc in each chain-space around, then make an even round of sc over all net sts; finish with a round where you sc 2, dec pattern to reduce and gather. Pull tail through final loop and cinch, knot. Sew tail securely several times to the net.
Finishing
7. Add 4–8 long fringe strands beneath the base for a boho tassel (fold 6–10 strands of cord and pull through edge, secure, trim evenly). Optionally add a wooden bead over the tassel.
Styling & variations
- Make leaf panels in variegated or green yarn and the net body in neutral cotton for a subtle pop.
- To simplify for beginners, omit leaf panels and work an all-mesh version.
2. Crochet Easy Patons Plant Hanger Pattern
Style: Classic netted hanger inspired by vintage Patons booklets — quick, forgiving, and perfect for beginners.
Skill level: Beginner (repetitive mesh, very quick)
Materials
- T-shirt yarn or bulky cotton cord (5–8 mm) — ~100–200 yd depending on length
- Large crochet hook (8–12 mm)
- Metal ring 2–3 in diameter
- Tapestry needle
Finished size & pot suggestion
- Length about 24–32 in; fits pots 3–8 in in diameter depending on mesh size.
Construction overview
Simple collar + repeated chain-space mesh rounds that form a diamond net. This is the fastest way to make a classic boho hanger.
Step-by-step
Collar
- Fold ring and attach cord; work 20–28 sc evenly around to cover ring. Work 1–2 additional rounds of sc in BLO for a neat top band.
Round 1 — Mesh start
2. Join yarn and work: ch7, sc in next stitch around (example spacing). You’ll make 6–8 loops depending on ring st count. Join.
Round 2 onwards
3. Work in rounds: ch7 (or ch5 for tighter net), sc in next ch-space repeat — each round will offset the previous creating diamond net. Continue until the mesh measures slightly shorter than pot height.
Gather base
4. Work one or two rounds of sc around all loop anchors, then make a final round where you sc 3, dec around to reduce & gather snugly. Pull tail through loop and cinch; tie securely.
Finish
5. Trim ends or make tassel, sew in ends, and test fit with pot.
Tips
- For a looser drape, use longer chains; shorter chains give better support for heavier pots.
- This is a great scrap-friendly project — combine multiple t-shirt yarn colors in round bands.
3. Crochet Macramé Jute Plant Hanger Pattern
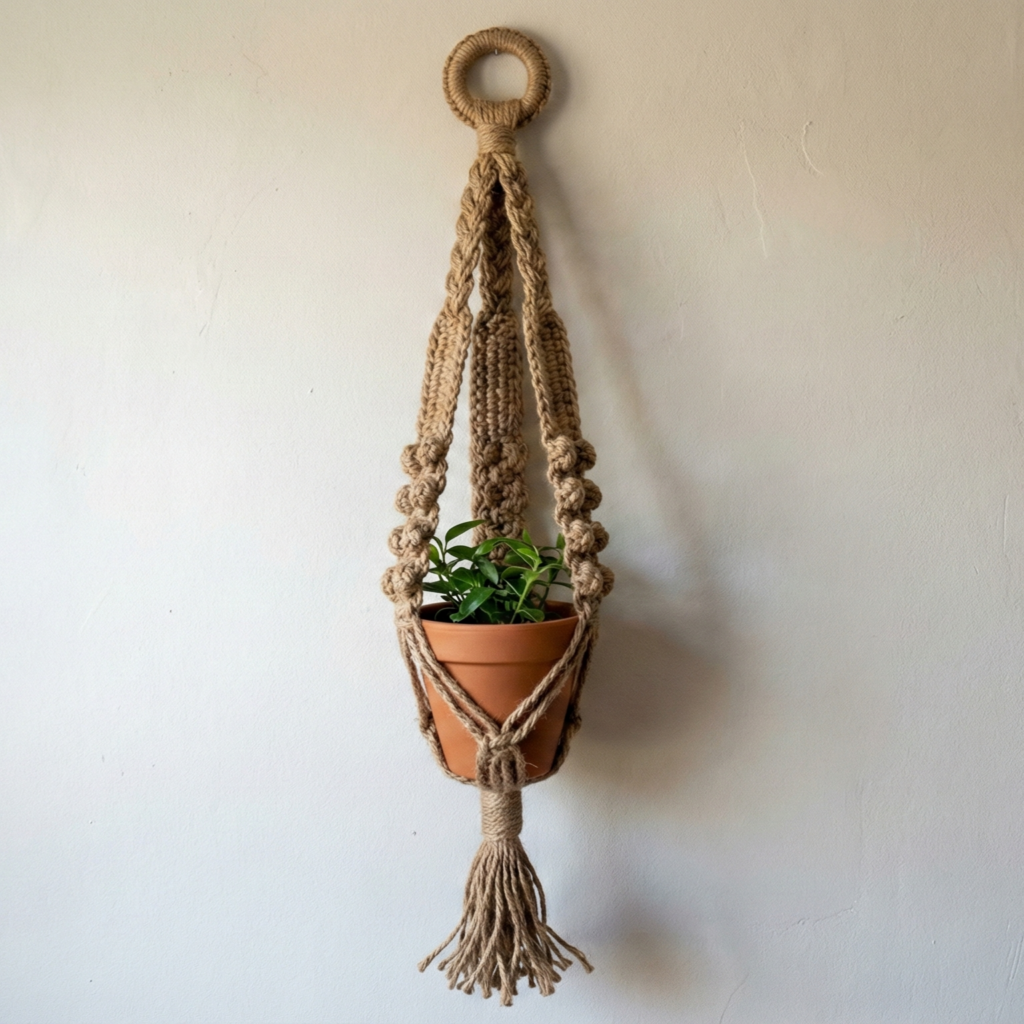
Style: Rustic macramé look achieved with crochet techniques — knotted appearance using jute and textured stitches.
Skill level: Intermediate (working with rough fiber, textured stitches, braided straps)
Materials
- Natural jute cord (3–4 mm) — ~80–150 yd (jute is inelastic so get extra)
- Hook: 6–8 mm (or as needed)
- Wooden ring 2–3 in diameter
- Optional: fabric gloves to protect hands when working jute
Finished size & pot suggestion
- Length 28–36 in; strong enough for medium heavy pots if properly doubled and reinforced.
Construction overview
Make a sturdy, braided top strap, a crocheted band, and textured knotted panels using faux-macramé stitches (crochet stitches that mimic macramé knots).
Step-by-step
Top braided strap
- Cut 6 long lengths of jute (three pairs). Braid them together for about 8–12 in to form a strong cord. Knot end and fold to create a loop over ring or directly stitch to ring collar.
Ring collar
2. Join jute around ring with sc or woven wrapping technique: wrap ring with continuous sc stitches until fully encased; work 2–3 rounds for security.
Faux-macramé panels
3. Use front post & back post stitches to imitate square/knot patterns: work groups of 3 fpdc (to form raised band), then row of sc to lock. Alternatively, make alternating blocks of shell stitches and sc to create a textured panel. Work 3–4 such panels around the circumference with small chain spaces between to mimic cords.
Connecting under pot
4. At body base, create adjustable gathering: slip stitch across rows to form slots, then work a round of sc to consolidate. Make a final gathering round with a long chain loop pulled through and tied (or weave a short length of jute as a drawstring).
Finishing
5. Dip the bottom tassel or raw cut edges in glue or trim cleanly to manage fray (jute frays naturally). Seal any cut jute ends with a light coat of clear glue for longevity.
Tips & care
- Jute is great outdoors but may not like prolonged wetness or freezing cycles — move indoors during harsh weather.
- Wear gloves if jute irritates your hands; keep a bowl of water nearby to dampen jute if it’s stiff while working.
4. Crochet Granny Square Plant Hanger Pattern
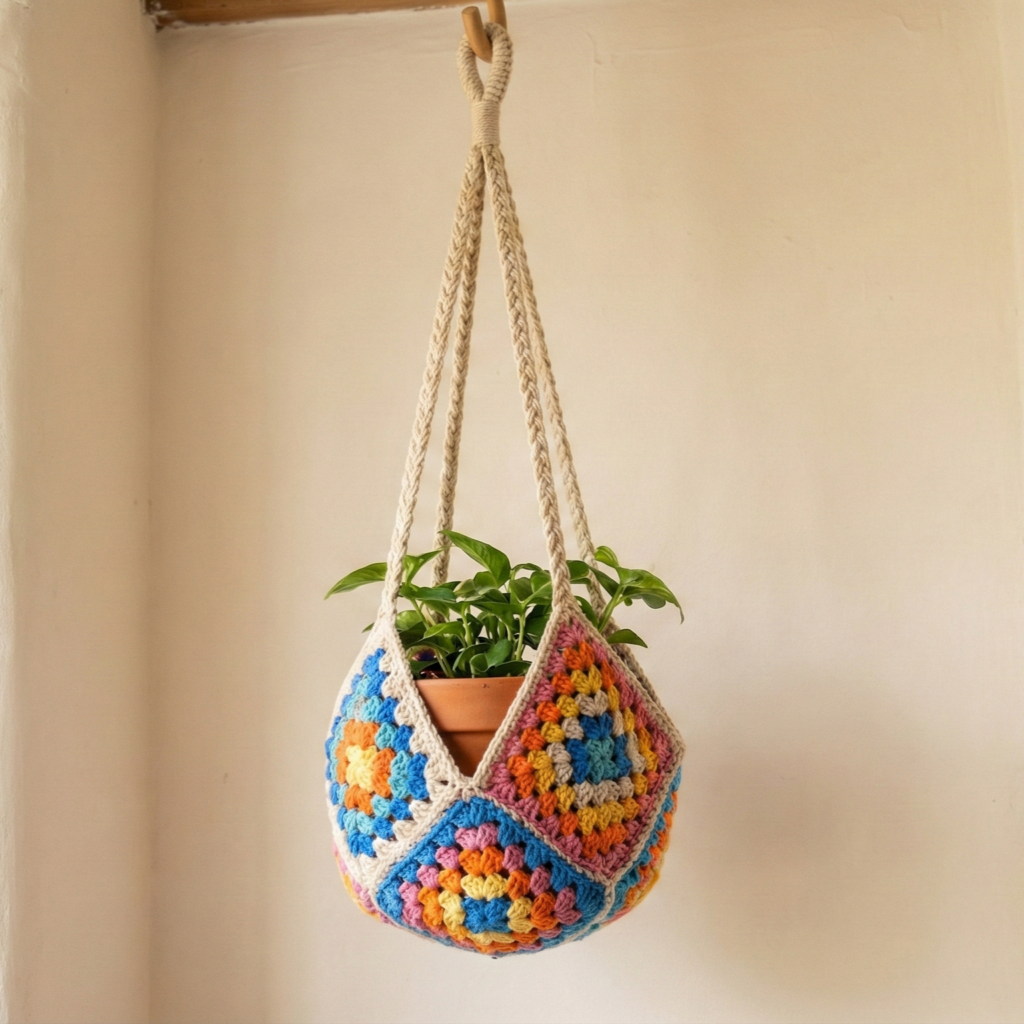
Style: Playful, colorful bag of granny squares — great for giving a vintage/boho patchwork vibe.
Skill level: Confident beginner (motifs + join + assembly)
Materials
- DK or worsted yarn in multiple colors — total ~150–300 yd
- Hook 4.0–5.0 mm
- Ring 2 in (optional) or simply tie straps together at top
- Tapestry needle
Finished size & pot suggestion
- Width variable depending on number & size of squares; e.g., 3 squares across × 4 down of 4″ squares → ~12″ width — good for medium decorative pot.
Construction overview
Make granny squares, join into a rectangular tube, close one end, add a collar and straps.
Step-by-step
Make granny squares
- Classic granny round: MR; Round 1: ch3, 2 dc, ch2, 3 dc, ch2 × 3, join. Round 2+: add rounds until square measures ~4–5 in. Make enough squares for a tube: for a small hanger, 8–12 squares; for larger one, more.
Layout & join
2. Lay squares into columns (e.g., three across) and join-as-you-go or whipstitch with matching yarn to form a long rectangular panel the height you want. Join short ends to make a tube (seam) using slip stitch or whipstitch.
Base
3. At bottom open edge, fold inside and seam to make a sachet base, or crochet a circular base: pick up stitches around bottom edge and work rounds of sc to close into a circular base.
Top collar & straps
4. At top, work 2–3 rounds of sc to create a sturdy rim; make 4 straps by chaining length needed and scing back into chains (or attach four short straps at corners and gather to ring). If you prefer a single strap, join top corners with rope/strap to form loop.
Finishing
5. Add tassels or pom-pom corners for extra boho charm.
Styling & variations
- Use a single color palette for a modern look or rainbow scrappy for retro fun.
- Line with fabric if you prefer to set soil directly in bag — otherwise use an inner pot.
5. Crochet Ivy Stitch Plant Hanger Pattern
Style: Elegant, textural hanger built using ivy stitch (also called linen or moss stitch) vertical panels that produce compact fabric with subtle diagonal texture.
Skill level: Intermediate (consistent tension recommended)
Materials
- Cotton DK held single or doubled for sturdiness — ~150–250 yd
- Hook: 4.0–5.5 mm depending on hold
- Ring 1.5–2.5 in diameter
Finished size & pot suggestion
- Length 24–34 in, suitable for small to medium pots 3–8 in diameter.
Construction overview
This hanger combines sturdy woven-feeling ivy panels with cords or braided straps for hanging — great when you want less open net and a more tailored look.
Step-by-step
Top ring & collar
- Cover the ring with sc (24–30 sc depending on ring). Add 2 rounds of sc to build a collar.
Ivy panel (make 4)
2. Chain 40 (adjust to desired panel height). Row 1: sc in 2nd ch from hook, ch1, skip1, sc in next, repeat to end (this sets up chain spaces). Turn.
3. Row 2: ch1, sc in ch-1 spaces across, continuing the pattern (this is the basic linen/ivy stitch). Repeat Row 2 until panel length is ~12–14 in (or pot height + 4 in allowance).
Assemble panels
4. Sew four panels to the collar at even intervals or leave small gaps between, depending on how many panels you have. The panels act like a box that wraps around the pot.
Base & gather
5. Join lower edges of panels with sc or whipstitch leaving a small opening if you plan to put the pot inside. Create a gathering stitch round as before and cinch.
Strap
6. Make 3 or 4 braided straps from leftover cord or long chain ropes, attach to collar, and gather at top with a knot or attach to ring.
Finishing
7. Tidy ends and block lightly to even texture.
Variations
- Make panels in alternating colors for a chequered effect.
- Add small ivy leaf appliqués crocheted separately sewn onto panels for extra detail.
Final finishing & hanging checklist
- Test strength: hang pot with soil/water in place before trusting permanent mount.
- Use proper ceiling or wall hardware rated for the intended load.
- For indoor plants sensitive to overwatering: keep drip trays inside pot and remove before watering if possible.
- Label your hanger with care instructions if gifting (fiber type; avoid prolonged wet exposure for natural fibers).
Conclusion
These five boho-style crochet plant hanger patterns give you a broad toolkit: from a sculptural Monstera and the classic quick Patons mesh, to a rustic Macramé jute look, playful granny-square patchwork, and the tailored Ivy stitch hanger. Pick the pattern that matches your décor, skill level, and the pot/plant you’ll hang. A few final practical reminders:
- Swatch & test: for heavy pots choose thicker cord and test weight-bearing before installing permanently.
- Mind drainage: consider liners or outer pots to prevent drips and soil loss.
- Adjust length: all patterns are easy to scale — simply add or remove net rows or panel height to match your ceiling and preferred display level.
- Style tip: mix textures (smooth cotton + jute fringe) and finishes (wooden ring, brass hook) to elevate the boho aesthetic.