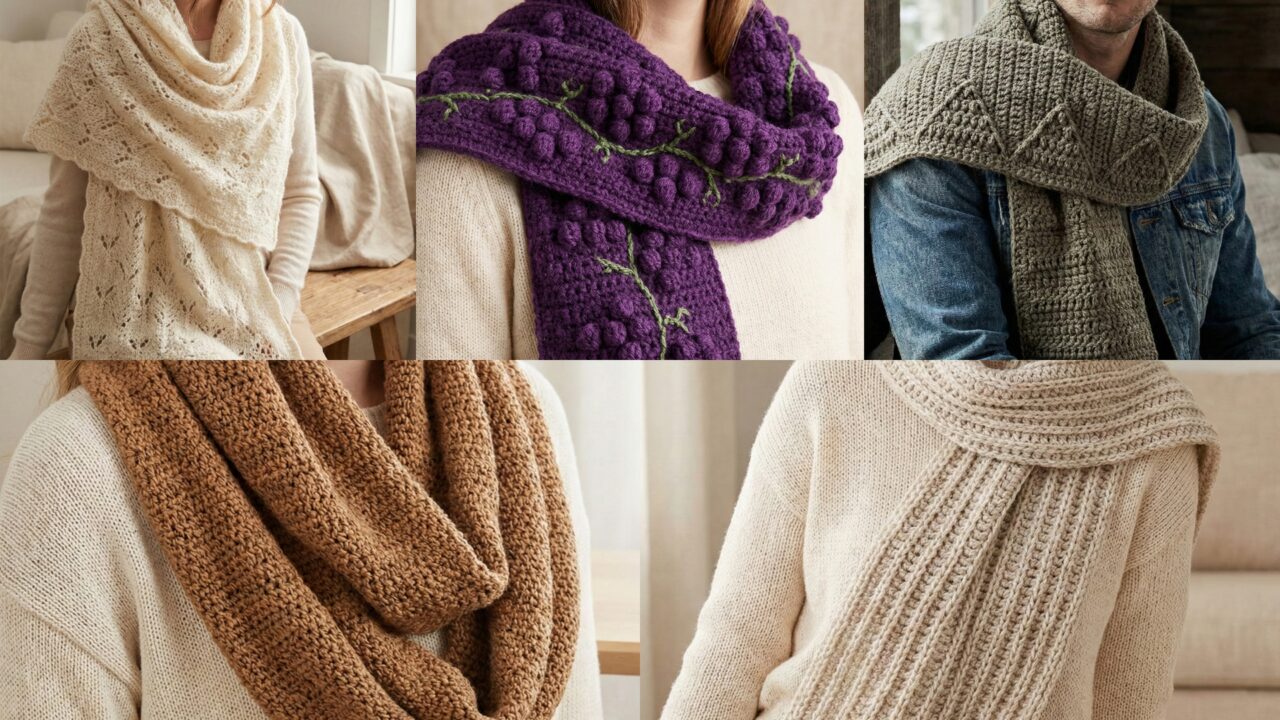
Scarves are the perfect first garment project: forgiving, portable, quick to finish, and hugely satisfying. Below you’ll find a single clear introduction covering tools, sizing, gauge and stitch abbreviations, followed by five long, detailed scarf patterns aimed at beginners. Each pattern includes skill level, materials, a worked example (adult-length scarf), step-by-step instructions you can follow straight through, helpful variations, finishing tips, and notes on blocking and care. Tone is professional and friendly — ready to copy into your blog.
Quick introduction — tools, yarn, gauge, sizing, and abbreviations
Tools & materials (general)
- Yarn: For beginner scarves use worsted weight (category 4) yarn — it’s forgiving and works up quickly. Cotton/wool blends or acrylics are both fine; acrylic is very beginner-friendly for washing.
- Hooks: 5.0 mm (H/8) is a great all-purpose size for worsted; use a 4.5 mm or 5.5 mm if you want slightly denser or looser fabric.
- Notions: tapestry needle for weaving ends, scissors, stitch markers (optional), measuring tape, blocking pins and mat for finishing.
Sizing & finished measurements (example)
A typical adult scarf measures roughly 7–8 inches wide by 60–72 inches long. For an infinity or cowl you’ll make the length shorter and join ends. In each pattern I’ll give a worked example that targets roughly 7.5 in × 65 in unless otherwise noted.
Gauge & how to use it
Always make a small swatch in the stitch pattern you’ll use. Example: if your swatch in the stitch equals 4 stitches per inch and you want a scarf 7.5 in wide, multiply 4 × 7.5 = 30 — so your working foundation should be about 30 stitches (adjust to the pattern’s multiple where necessary). (Do your own swatch with your yarn and hook — yarn brands and tension vary.)
Common abbreviations (US)
- ch = chain
- sl st = slip stitch
- sc = single crochet
- hdc = half double crochet
- dc = double crochet
- tr = treble (triple) crochet
- st(s) = stitch(es)
- sk = skip
- rep = repeat
- BLO / FLO = back loop only / front loop only
- RS / WS = right side / wrong side
Finishing basics
- Weave in ends with a tapestry needle, threading tails along stitch paths for at least 2–3 inches.
- Block scarves that use textured or lacy stitches: wet-block or steam lightly and pin to shape on a flat surface until dry.
1. Crochet Easy Textured Scarf Pattern
Skill level: Beginner — great first textured project.
Vibe: cozy, squishy texture that looks more complicated than it is.
Materials (worked example — one scarf)
- Worsted weight yarn: ~250–300 yd.
- Hook: 5.0 mm.
- Finished size target: ~7.5 in wide × 65 in long.
Stitch & repeat
This scarf uses a simple alternating hdc / fpdc-bpdc rib to create depth. The pattern multiple is odd; for our example we’ll make a foundation chain of 31 (this yields about 7.5 in at a sample gauge of 4 sts/in).
Step-by-step instructions
- Foundation: ch 31 (or chain the number that gives you the desired width using your swatch).
- Row 1 (setup): hdc in 2nd ch from hook and in each ch across. Turn.
- Row 2 (texture start): ch 2 (counts as hdc). fpdc around next st, bpdc around next st; hdc in next st. Rep from * to * across finishing with hdc in top of turning chain. Turn.
- Notes: fpdc = front post double crochet; bpdc = back post double crochet. These create raised rib columns. If you haven’t worked them before: yarn over, insert hook from front to back around the post of the stitch below, yarn over and complete a dc. For BPDC, insert from back to front around the post.
- Row 3: ch 2, hdc in each hdc across; for the post stitches work fpdc and bpdc into the corresponding previous row posts — in practice, repeat Row 2 to keep ribs aligned. Turn.
- Repeat Rows 2–3 until scarf reaches desired length (~65 in).
- Finish: Work 1 round of sc around both short ends (optional), or simply fasten off and weave ends neatly.
Helpful tips
- Keep tension consistent on post stitches — they can be tighter. If ribs feel too tight, go up 0.25 mm hook size.
- For a shorter cowl, make length ~22–26 in and seam ends together.
Variations
- Use bulky yarn and a larger hook for a faster, chunkier scarf.
- Work the same pattern in the round for an infinity loop (join ends and seam).
2. Crochet Brown Infinity Scarf Pattern
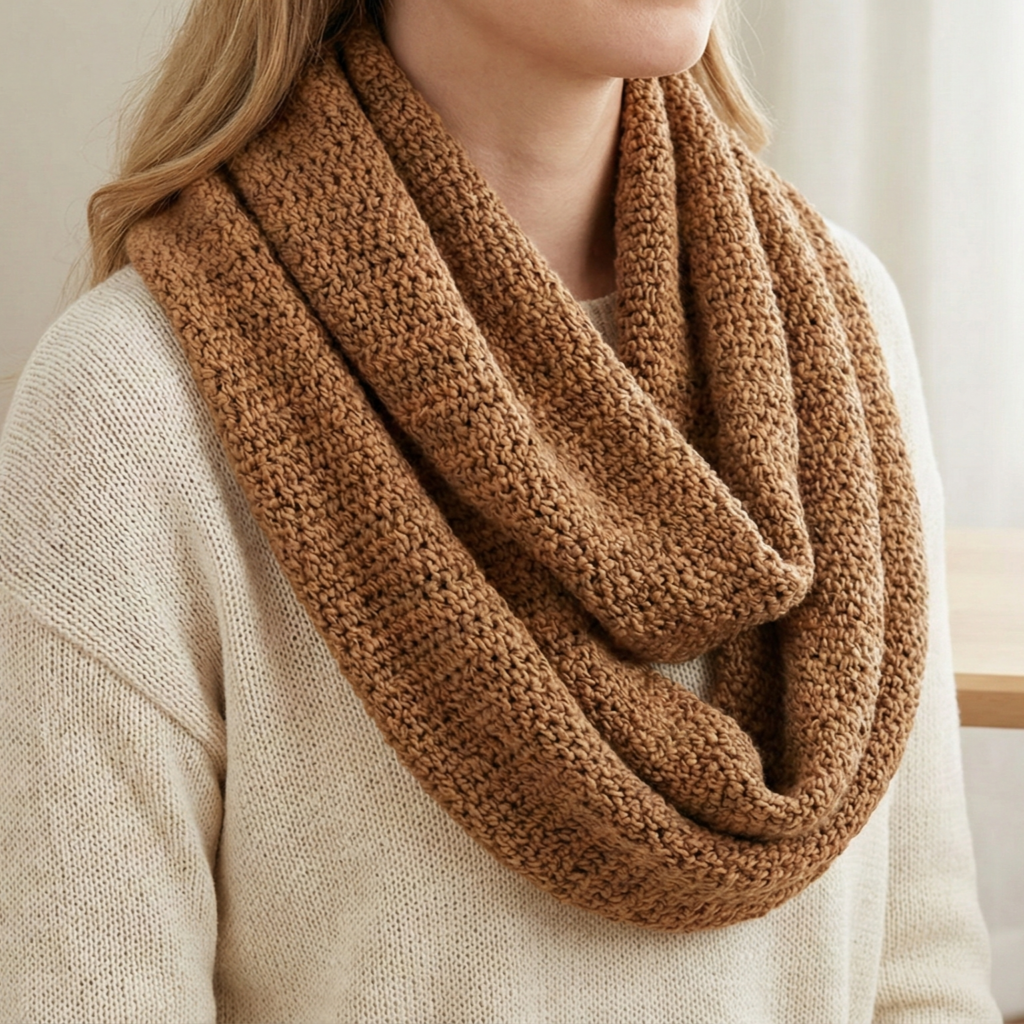
Skill level: Beginner — worked in the round, simple repeats.
Vibe: classic loop/cowl that’s warm and elegant in a solid brown or neutral blend.
Materials (one infinity scarf)
- Worsted weight yarn (brown): ~350 yd (since infinity is looped, you may need slightly more).
- Hook: 5.5 mm (I) for soft drape.
- Finished size target: circumference ~60–70 in (loop) × width ~8 in.
Stitch & repeat
We’ll use linen (moss) stitch which is highly reversible and looks woven. Multiple: odd number. For our width aim (8 in) and an example gauge of 4 sc/in, choose 8 × 4 = 32 sts; since moss needs odd chain, do ch 33 for the sample width.
Step-by-step instructions
- Foundation circle/chain: ch 33, join with sl st to form a loop (avoid twisting). Place marker for beginning of round.
- Round 1: ch 1, sc in same st, ch 1, skip next st, sc in next ch-1 space or chain 1 space — because we began joined, treat the chain foundation carefully: an easier method is to work a foundation row flat and join at the end. If you prefer to join a flat panel: ch 33, work linen stitch back and forth for 8 in, then seam short edges and continue working in the round.
- Round 2 (and all rounds): sc into the ch-1 space from previous round, ch 1, sc into next ch-1 space repeat around. This creates the moss pattern.
- Repeat until the cowl reaches desired width ~8 in (typically 12–16 rounds depending on yarn).
- Finish: Fasten off and weave in ends. If you worked a flat panel, sew the ends together flat and join seam neatly.
Helpful tips
- Working in the round avoids seams and is seamless to wear. If you get a spiral skew, you can add an occasional sl st to realign.
- For drape, use a slightly larger hook than recommended for the yarn.
Variations
- Make a double loop (longer circumference ~120 in) to wrap twice.
- Add a decorative tassel or fringe at the seam for a boho touch.
3. Crochet Heart Clouds Scarf Pattern
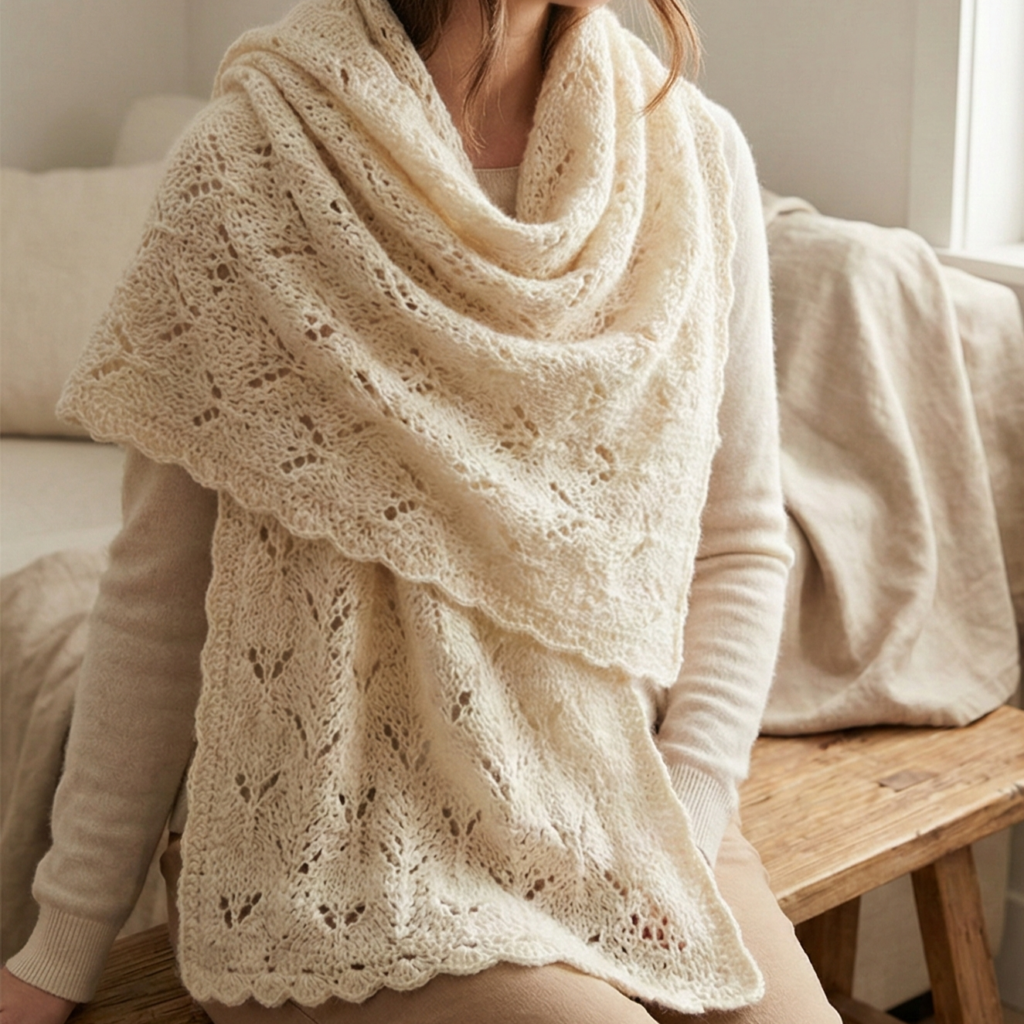
Skill level: Beginner with basic lace experience — includes a simple openwork heart motif repeat.
Vibe: romantic, light lace pattern with small heart-shaped eyelet motifs scattered across the scarf.
Materials (one scarf)
- DK or light-worsted weight yarn in a soft neutral (e.g., cream) ~300–350 yd.
- Hook: 4.5 mm (7).
- Finished size target: ~7.5 in × 65 in.
Stitch & repeat
The stitch pattern combines V-stitches and small cluster eyelets arranged into a motif that suggests tiny hearts. The pattern multiple is 6 + 1 for the example; for a 7.5 in width at 4 sts/in, 7.5 × 4 = 30 → nearest multiple is 31 (since 6×5=30 +1 = 31). So foundation ch 31 works well.
Step-by-step instructions
- Foundation: ch 31. Row 1: dc in 4th ch from hook and across (to make a base row). Turn.
- Row 2 (establish): ch 3 (counts as dc), ch 1, skip 1, dc in next st across to end. Turn.
- Row 3 (heart-cloud motif row): ch 3, V-stitch (dc, ch 1, dc) in next ch-1 space, sc in next ch-1 space — this alternates open V-stitches and small anchors creating soft lacy hearts. Turn.
- Row 4 (solid row): ch 3, dc in each dc and sc across — this grounds the lacy motifs. Turn.
- Repeat Rows 3–4 until length ~65 in.
- Edge finish: Work 1–2 rounds of sc along short ends and optionally add small scallops: sc, skip 1, 5 dc in next, skip 1, sc across.
Helpful tips
- Keep stitch count consistent each row; the alternation keeps width steady.
- If the lace looks too airy, use a slightly smaller hook.
Variations
- Knit a small heart appliqué and sew on randomly for a more literal heart look.
- Use variegated yarn for soft color shifts into the hearts.
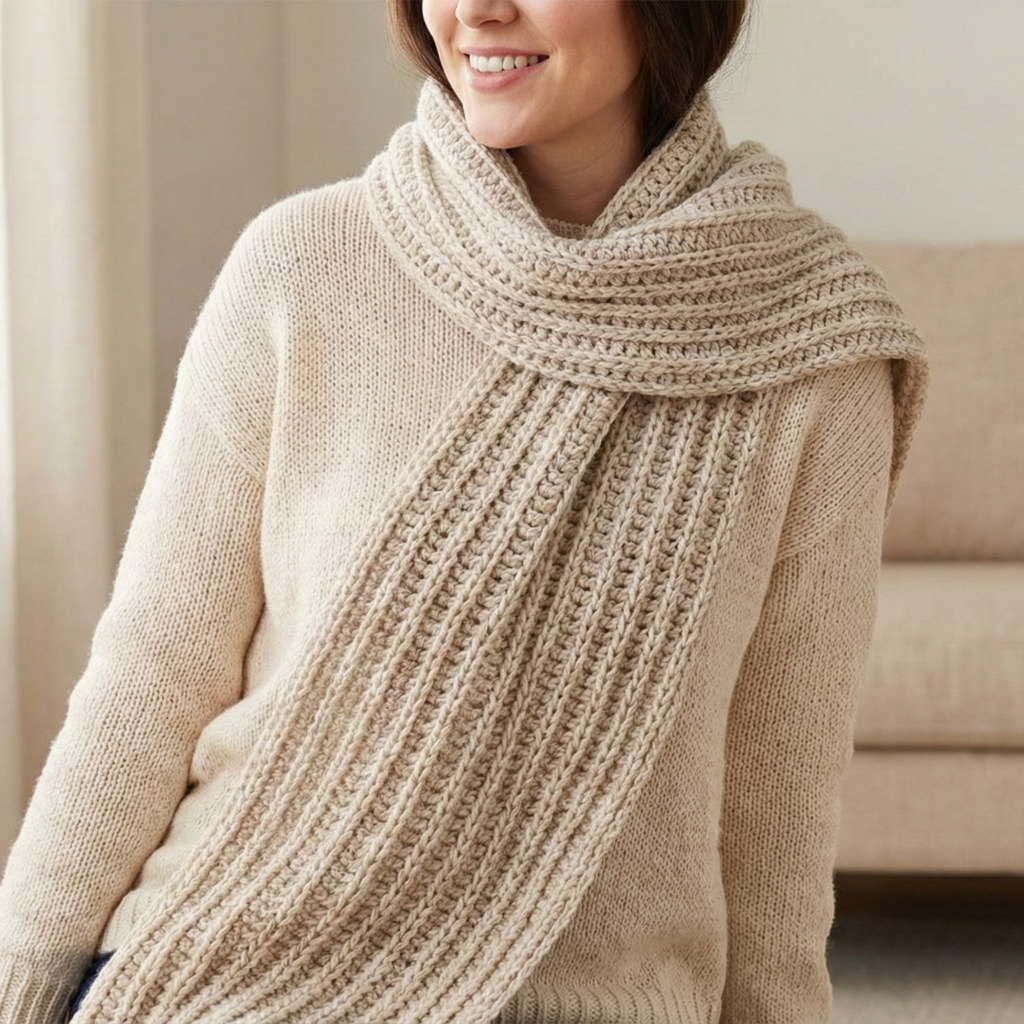
4. Crochet Mountain Ridge Scarf Pattern
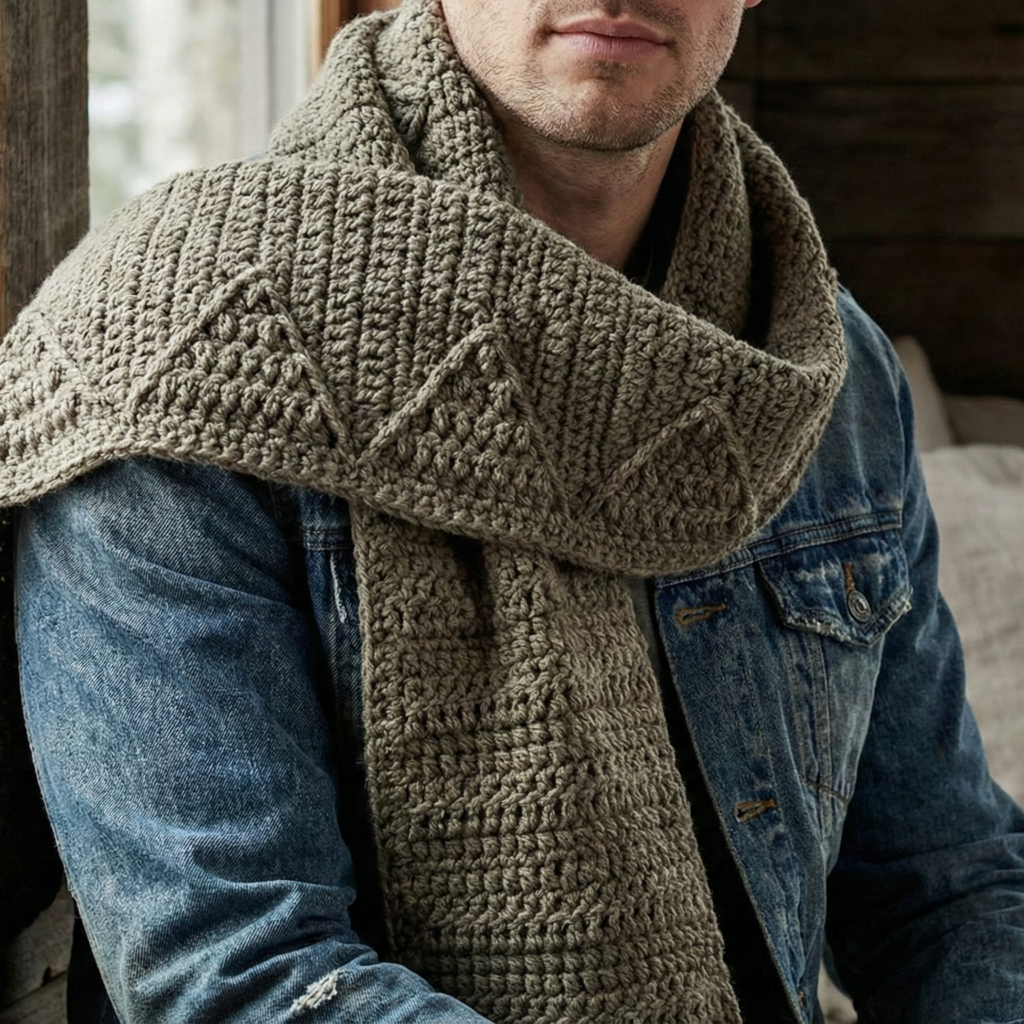
Skill level: Beginner → confident beginner (textured peaks created with cluster stitches)
Vibe: rustic and structured; the peaks suggest a mountain-ridge silhouette — great for men’s or unisex scarves.
Materials (one scarf)
- Worsted weight yarn in a neutral earth tone ~270–320 yd.
- Hook: 5.0 mm.
- Finished size target: 8 in × 66 in.
Stitch & repeat
Pattern uses cluster shells to make raised triangular peaks; repeat multiple = 12 for the example. For 8 in width at 4 st/in, foundation would be 8 × 4 = 32 sts; nearest multiple of 12 is 36; so ch 37 (multiple + 1) gives a good width.
Step-by-step instructions
- Foundation: ch 37. Row 1: dc in 4th ch from hook and across. Turn.
- Row 2 (base): ch 3, dc across. Turn.
- Row 3 (start ridge): ch 1, sc across until you reach the position for the first peak: make a 5-dc shell in the designated center stitch (5 dc in same st), skip 2 sts, sc across until next peak center — shells become the mountain tops. Turn.
- Row 4 (support row): ch 3, dc across to lock shells in place. Turn.
- Row 5 (peak shaping): ch 1, sc across; where shell exists, make a smaller shell or cluster to heighten the ridge (for a pointed peak work a decrease on top of the shell by dc3tog centered). Turn.
- Repeat Rounds 3–5 until scarf reaches desired length. This sequence builds repeated peaks and valleys.
- Finish: Work a tidy sc border around short ends.
Helpful tips
- Keep shell centers aligned to make neat peaks. Use a stitch marker on the first shell center and measure side spacing to repeat evenly.
- If cluster shaping is new, practice making clusters on scrap first.
Variations
- Make the peaks taller by adding one more dc to the shell (i.e., 7-dc shells) or using treble crochet for dramatic peaks.
- Add contrast color only to the shell row to make the ridges stand out.
5. Crochet Grape Jamboree Scarf Pattern
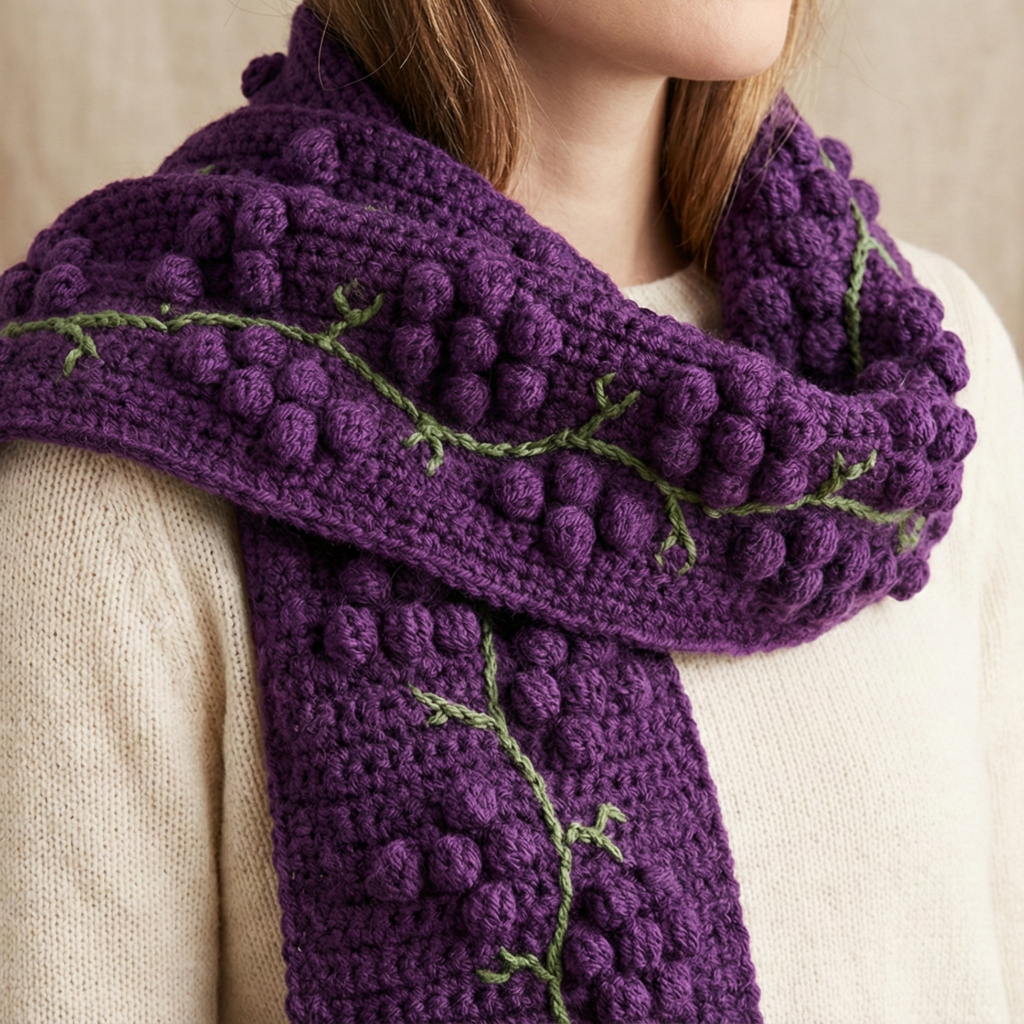
Skill level: Beginner — playful bobbles/dots and simple background stitches.
Vibe: textured dots reminiscent of grapes on a vine, playful and tactile; great as a gift scarf.
Materials (one scarf)
- Worsted weight yarn: main color ~250 yd (e.g., deep purple), contrasting vine/leaf color ~50 yd (green).
- Hook: 5.0 mm.
- Finished size target: 7–8 in × 66 in.
Stitch & repeat
Base worked in hdc with puff/bobble accents placed in a staggered grid to evoke grapes. The base multiple is flexible — use a chain giving you desired width (e.g., ch 32 + 1 = 33).
Step-by-step instructions
- Foundation: ch 33. Row 1: hdc in 2nd ch from hook and across. Turn.
- Row 2: ch 2, hdc across. Turn. (Establish solid base.)
- Row 3 (bobble row): ch 2, work hdc in next 3 sts, puff stitch in next st (see note) repeat across. Turn.
- Puff stitch (small bobble): yarn over, insert into stitch, pull up loop — repeat this 3 more times (4 loops on hook), then yarn over and pull through all loops, ch 1 to close the puff. For a smaller bobble use 3 loops instead of 4.
- Row 4: ch 2, hdc across, placing hdc into top of puff stitch to anchor. Turn.
- Row 5: repeat Row 3 but stagger the position of puff stitches so they sit between puffs of the previous puff row (creates a grape-cluster grid). Turn.
- Repeat Rows 3–5 until length ~66 in. End with 2 solid hdc rows for a tidy finish.
- Optional vine embroidery: Using green yarn and tapestry needle, embroider simple vines connecting clusters to resemble grape vines.
Helpful tips
- Keep puff stitches loose enough to be plush but not so loose they snag. Use slightly larger hook for puff loops if needed, then switch back for the body row.
- To disguise floats when changing colors for vines, embroider after weaving ends.
Variations
- Use seed stitch (alternating sc/dc) as the base and add bobbles more sparsely for a subtle dotted scarf.
- Make the bobbles in contrasting colors for confetti effect.
Final finishing, blocking, and care (applies to all five scarves)
Weaving in ends
- Thread tails into a tapestry needle and weave back and forth several inches through the same color area. Avoid weaving across open holes where pull could show. For bobble-heavy scarves stitch tails through the base fabric under the bobble rather than through the bobble itself.
Blocking
- Lacy scarves (Heart Clouds) benefit from wet-blocking to open stitches and set edges. Pin to desired width/length on a blocking mat and allow to dry fully. Textured scarves generally only need gentle steam blocking to relax stitches.
Care
- Follow yarn label. Acrylic/wool-blends often tolerate machine wash on gentle; cotton may shrink slightly so hand-washing and flat-drying is safest for first wash.
Gift presentation ideas
- Fold and tie with a ribbon, add a small tag with yarn/fiber info and care instructions. A short note like “handmade with comfortable worsted yarn” adds charm.
Conclusion
These five beginner-friendly scarf patterns give you a versatile set of options: from a squishy textured everyday scarf, through a cozy infinity loop, to more playful or romantic designs like the Heart Clouds and Grape Jamboree. Each pattern uses straightforward stitches but offers room to personalize — change yarn weight, hook size, color, or length to make a scarf that’s just right for you or the person you’re gifting.