Crochet amigurumi is one of the most rewarding kinds of crochet because it turns simple stitches into tiny, lovable characters and objects. Even if you are still new to shaping, stuffing, and working in the round, amigurumi can be a very satisfying place to start. The projects are usually small, the progress is easy to see, and the finished pieces feel cute enough to keep, gift, or display. That is part of the magic: you can start with a small ball of yarn and a hook, and end up with something that has personality and charm.
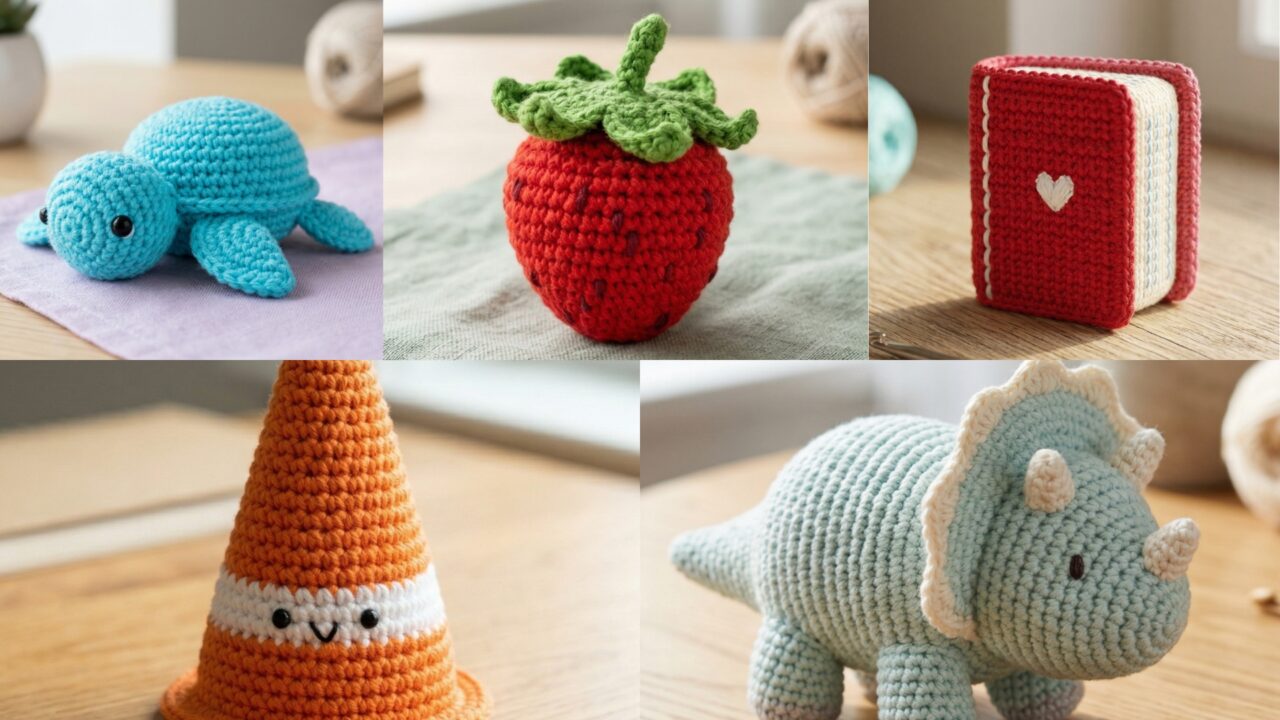
What makes beginner-friendly amigurumi especially appealing is that the best designs are often the simplest ones. You do not need complicated shaping or advanced techniques to create something adorable. A mini turtle can become a sweet desk buddy. A tiny strawberry can brighten a shelf or keyring. A little triceratops can feel playful and fun. A no-sew traffic cone can be quick and practical. A mini notebook can be quirky and creative. Each project is small enough to feel manageable, but still gives you a finished piece that feels truly handmade.
In this post, you will find five beginner-friendly crochet amigurumi patterns with clear step-by-step guidance, helpful notes, and practical finishing tips. These patterns are designed to be easy to understand and satisfying to make, even if you are still learning the basics of stuffing, shaping, and sewing. If you want amigurumi projects that are cute, simple, and actually enjoyable to finish, these ideas are a wonderful place to begin.
Quick Notes
Project type: Crochet amigurumi
Best for: Gifts, desk decor, keychains, shelf decor, beginner practice, and stash-busting
Skill level: Beginner to easy intermediate
Hook size: Usually 2.0 mm to 3.5 mm, depending on yarn weight and desired firmness
Yarn weight: Lightweight cotton, sport weight, or acrylic yarn
Best yarn choice: Cotton or cotton blend for crisp shape and easy stitch definition
Finished size: Usually small palm-sized pieces, customizable by yarn and hook
Time to complete: About 20 minutes to a few hours per piece
Helpful stitches: Magic ring, chain, single crochet, increase, decrease, slip stitch, embroidery, stuffing, sewing pieces together, color changes
Common Materials
Most amigurumi projects can be made with the same basic supplies.
- Yarn in your chosen colors
- Crochet hook matched to your yarn
- Yarn needle
- Scissors
- Stuffing
- Stitch marker
- Safety eyes, embroidery thread, or felt details
- Optional keychain rings or small attachments
For amigurumi, yarn choice matters a lot because the stitches need to stay tight so stuffing does not show through. Cotton yarn is especially helpful because it creates clear stitch definition and holds shape well. A smaller hook than the yarn label suggests is often useful, because firmer fabric usually makes the finished piece look cleaner and more polished.
1. Crochet Mini Turtle Pattern
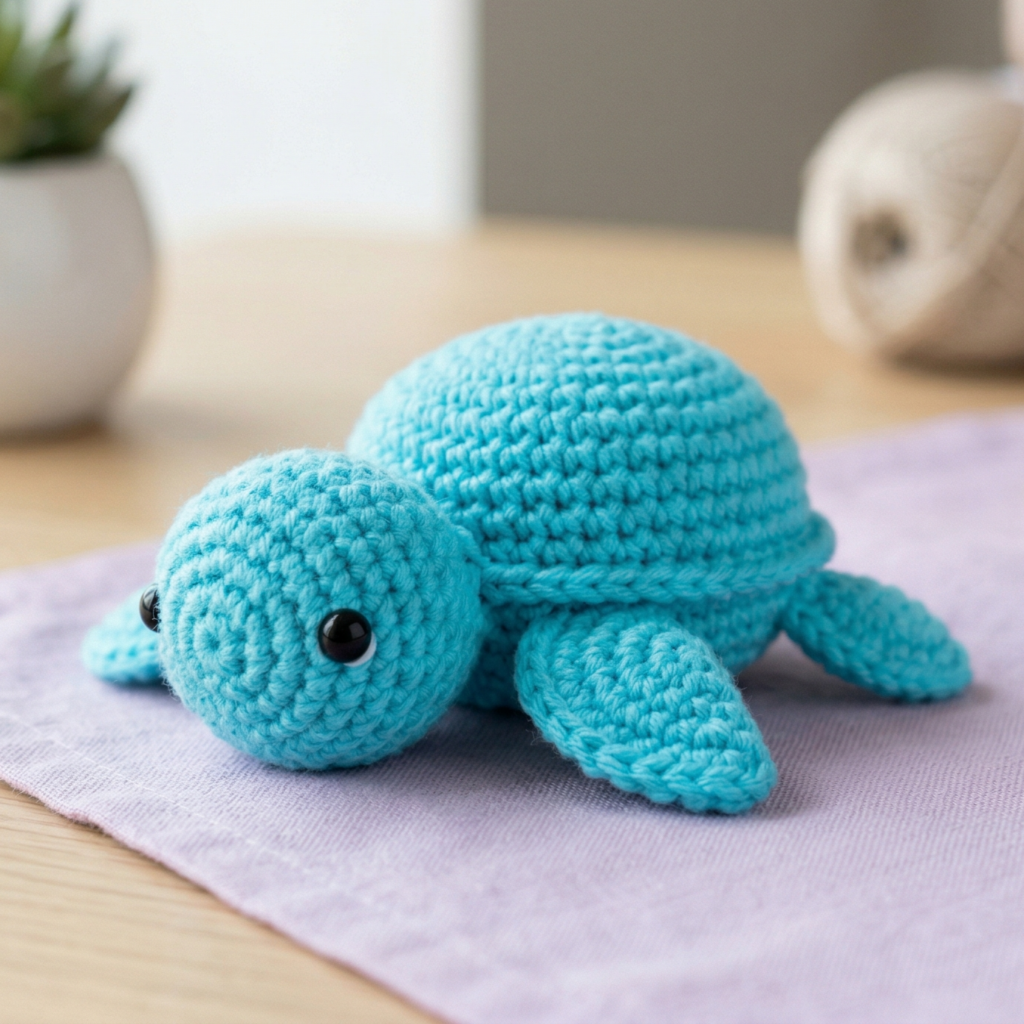
A mini turtle amigurumi is one of the sweetest beginner projects because it is small, rounded, and forgiving. The shell, head, and little flippers can all be made with basic shapes, which makes the project feel easy to understand while still giving you a cute finished result. It is a perfect first animal amigurumi if you want something that feels friendly and fun.
Step-by-step guide
Step 1: Start with the shell base
Begin with a magic ring and crochet a small flat circle for the turtle shell top. This will be the rounded part that gives the turtle its recognizable shape. Keep the stitches tight and even so the shell stays neat. If you want the shell to look a little more dimensional, choose a slightly darker or contrasting color.
The shell is the main visual feature of the turtle.
Step 2: Shape the shell into a dome
After the flat base is large enough, work a few rounds without increasing to let the shell curl upward. This creates a soft dome shape. If you want the shell to be more rounded, add a little stuffing later or let the shaping happen naturally through your stitch tension.
A gentle dome gives the turtle a more realistic and cute look.
Step 3: Crochet the body underside
Make a second small round or slightly oval piece for the turtle’s underside. This piece should be a little flatter than the shell top. It helps create the bottom of the turtle body and gives you a place to sew on the shell later.
The underside balances the shape of the turtle.
Step 4: Make the head
Crochet a tiny oval or cylinder for the turtle head. Keep it compact so it matches the mini size of the project. The head should be small enough to look cute and not so large that it overpowers the shell.
A small head helps the turtle feel well proportioned.
Step 5: Add the flippers
Make four tiny flippers using small oval or teardrop shapes. These do not need to be perfect, because tiny amigurumi pieces are often more charming when they are slightly soft and rounded. Sew two at the front and two at the back.
The flippers give the turtle its identity.
Step 6: Stuff the pieces lightly
Add stuffing to the shell, body, and head if needed. The turtle should feel firm enough to hold shape, but not so full that the stitches stretch. For tiny pieces, a little stuffing goes a long way.
Light stuffing keeps the turtle neat and durable.
Step 7: Assemble the turtle
Sew the head and flippers onto the body, then attach the shell on top. Position the shell carefully so it sits centered and balanced. Take your time with sewing because clean placement makes a huge difference in small amigurumi.
Proper assembly brings the turtle to life.
Step 8: Add the face
Use embroidery thread or safety eyes to create two small eyes and a tiny mouth if desired. Keep the face minimal so the turtle stays sweet and simple. Small facial features often work best for beginner amigurumi.
A tiny face adds personality without extra complexity.
Helpful tips
A mini turtle looks beautiful in earthy greens, browns, or soft pastel shades. If you want a more playful version, try a brighter shell and a contrasting body color. This is a great beginner project because the shape is simple and the final result always feels cute.
2. Crochet Mini Strawberry Pattern
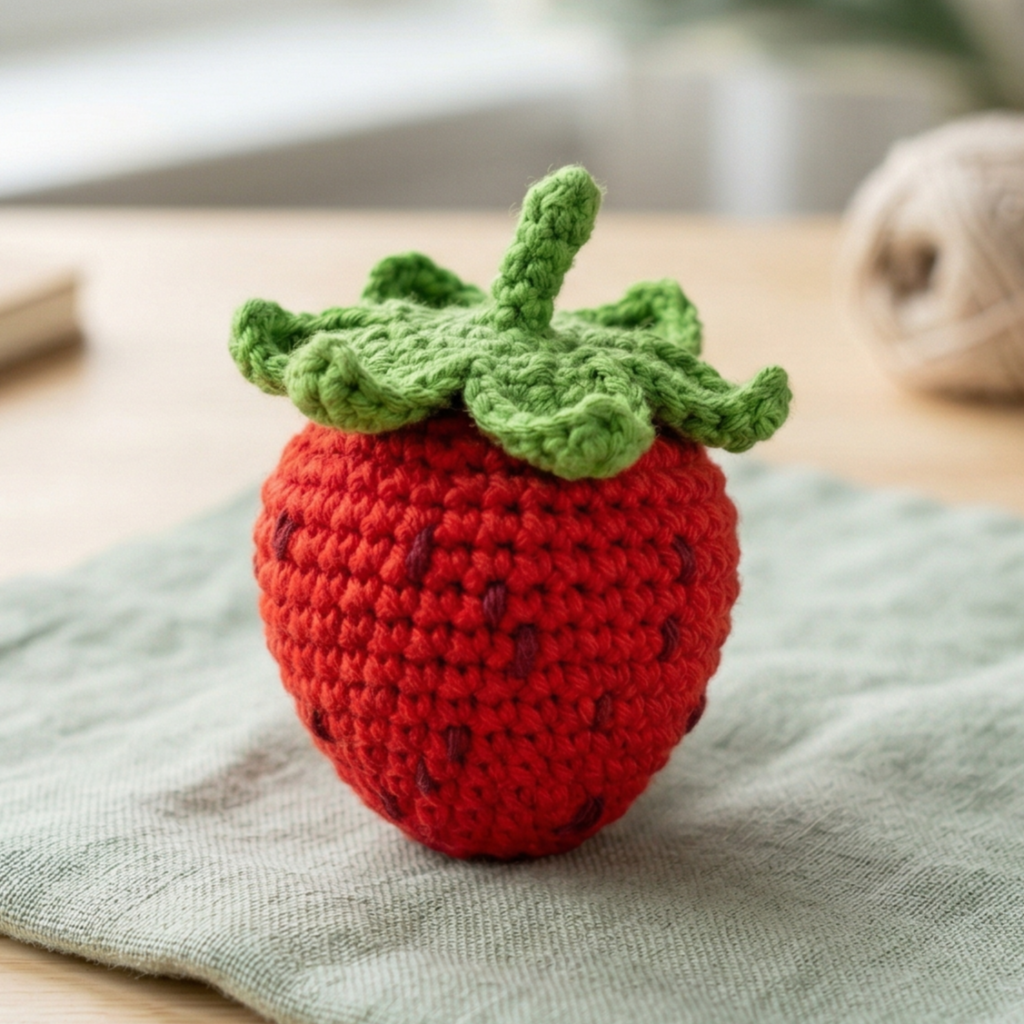
A mini strawberry amigurumi is bright, cheerful, and easy to make. It is a fantastic beginner project because the shape is simple and the details are minimal. Even without advanced shaping, a strawberry can look very polished and adorable. It is perfect for decorations, gifts, or small keychain-style items.
Step-by-step guide
Step 1: Begin the strawberry body
Start with a magic ring and crochet a small round or slightly pear-shaped base. This will form the main fruit body. Keep the stitches tight so the stuffing does not show through. The strawberry should taper slightly toward the top and bottom for a more natural look.
The body shape gives the strawberry its fruit-like appearance.
Step 2: Increase to shape the middle
As you work the rounds, add increases to widen the body slightly in the middle. Then begin reducing or maintaining stitches so the top narrows again. This gentle shaping gives the strawberry its familiar rounded cone form.
A tapered shape makes the design feel more realistic.
Step 3: Stuff lightly
Before closing the piece fully, add stuffing so the strawberry feels full and soft. It should be round enough to hold its shape but not overstuffed. A lightly stuffed strawberry looks neater and more balanced.
Even stuffing helps the strawberry look polished.
Step 4: Close the top
Close the top of the strawberry with decreases until the opening is small enough to finish neatly. Leave a small area at the top where the leafy cap will be attached later. The top should feel tidy and slightly pointed.
A clean top makes the shape look finished.
Step 5: Add the leafy cap
Use green yarn to crochet a small leafy crown for the top. This can be made with pointed petals or tiny leaf-like shapes around the opening. Sew it securely to the top of the strawberry. This is what makes the fruit instantly recognizable.
The leafy top is the signature strawberry detail.
Step 6: Embroider the seeds
Use black, dark brown, or a slightly deeper yarn color to embroider tiny seed marks over the front of the strawberry. Keep them small and evenly spaced. A few carefully placed seeds are all you need to give the piece character.
The seed details add charm without making the project complicated.
Step 7: Shape and finish
Gently shape the strawberry with your fingers and adjust the leafy top if needed. You can leave it as a standalone piece or add a loop if you want it to become a charm or keychain.
Helpful tips
Strawberries look especially cute in classic red with green leaves, but pink strawberries can also be fun and soft. This is a wonderful beginner-friendly project because it uses simple shaping and a very easy-to-recognize design.
3. Crochet Mini Triceratops Dinosaur Pattern
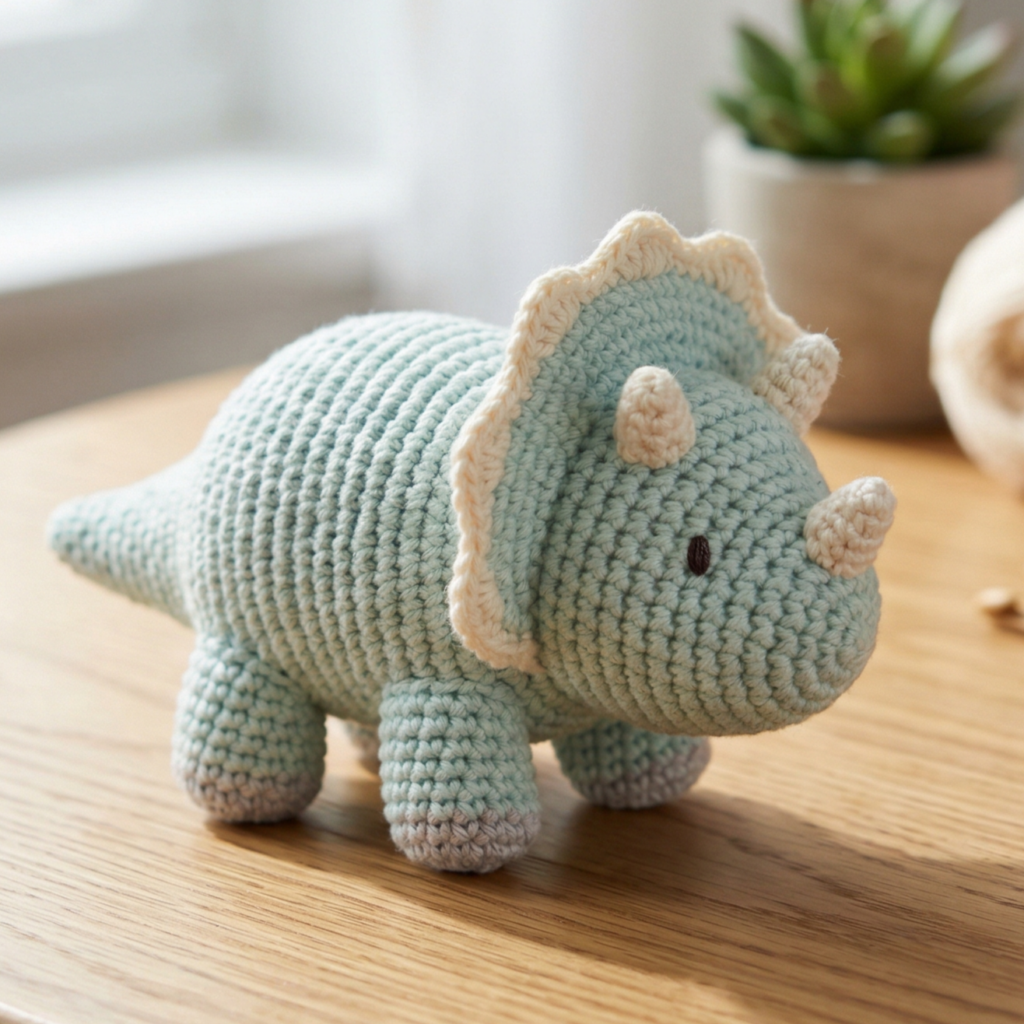
A mini triceratops amigurumi is playful, fun, and surprisingly approachable for beginners. The body can be made from simple rounded shapes, and the small horns and frill give it the dinosaur personality. If you want a project that feels a little more unique than a standard animal, this is a fantastic choice.
Step-by-step guide
Step 1: Crochet the main body
Start with a small oval or rounded body shape using a magic ring and regular increases. The body should be compact and stable. Since the triceratops is a squat dinosaur, a soft rounded body works well and keeps the project beginner-friendly.
The body sets the overall shape of the dinosaur.
Step 2: Shape the head
Make a slightly larger head or a rounded front section if you want the dinosaur to feel more stylized. The triceratops head should be noticeable but not too large. Keep the stitches tight and the shape smooth.
A rounded head gives the dinosaur its friendly look.
Step 3: Add the frill
Crochet a small frill shape for the back of the head. This can be made as a flat round or slightly curved piece with small points around the edge. It is one of the most recognizable triceratops features, so keep it neat and centered.
The frill makes the dinosaur instantly identifiable.
Step 4: Make the horns
Create three tiny horns using small cone-like shapes or simple embroidered points. They do not need to be large. Two small horns above the face and one on the nose are enough to give the triceratops its classic look.
The horns are a playful finishing detail.
Step 5: Crochet the legs
Make four tiny cylindrical or rounded legs. They can be short and simple because the mini size does not require much detail. Place them evenly beneath the body so the dinosaur sits properly.
The legs help the dinosaur stand or rest well.
Step 6: Add the tail
Create a tiny tail with a tapered end. This is usually a very small piece, but it helps complete the body shape. It does not need to be highly detailed.
The tail adds balance to the shape.
Step 7: Stuff and assemble
Stuff the body and head lightly so they hold shape. Then sew the frill, horns, legs, and tail onto the body. Arrange the pieces carefully so the triceratops looks balanced from the front and side.
Careful assembly is what makes the dinosaur cute.
Step 8: Add the face
Use embroidery or safety eyes for a tiny face. Keep it friendly and simple. A tiny smile or just two small eyes can be enough.
Helpful tips
A mini triceratops looks especially adorable in soft greens, blues, or pastel tones. If you want a more whimsical look, use bold colors or a multicolor body. This pattern is great for practicing small sewn parts without feeling too difficult.
4. Crochet Mini No Sew Traffic Cone Pattern
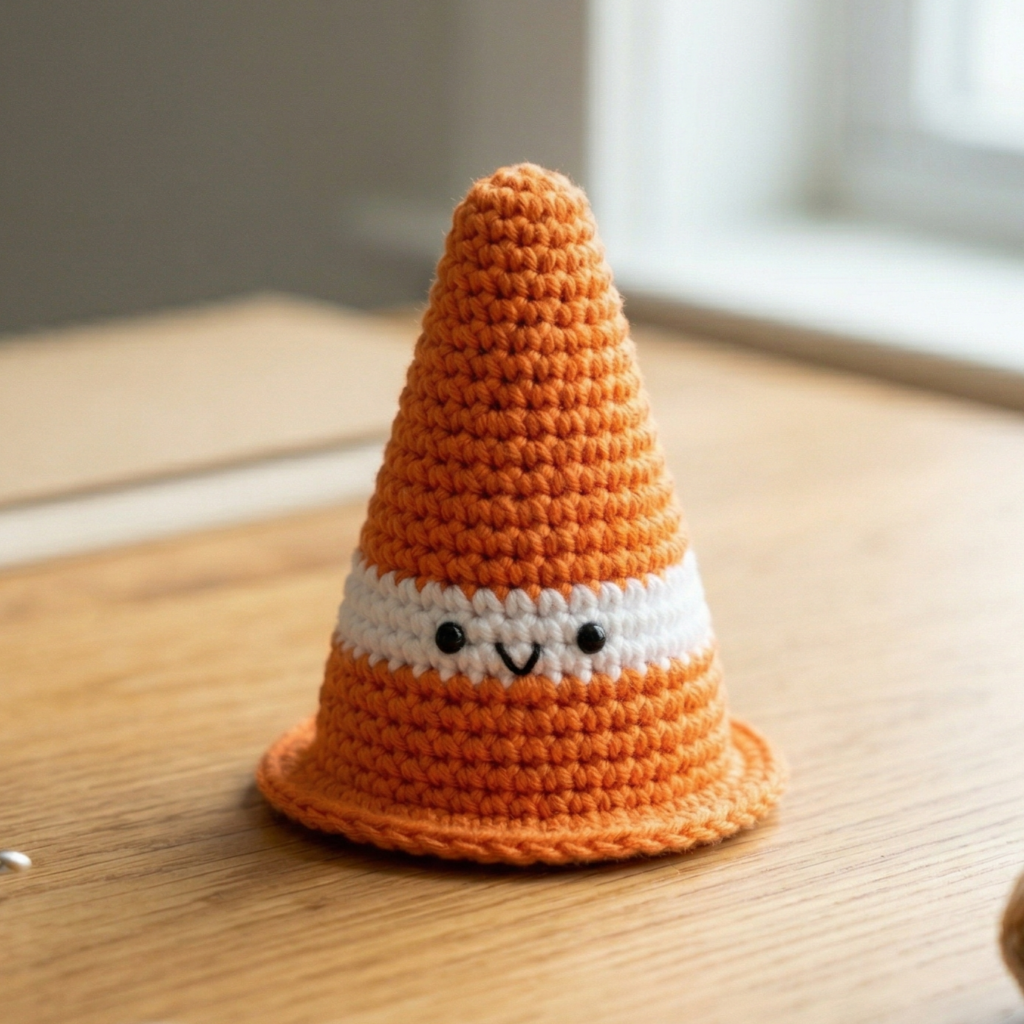
A mini no sew traffic cone is a clever and beginner-friendly amigurumi project because it is simple, quick, and satisfying. It is also a great choice if you want to practice working in the round without worrying about attaching many parts afterward. Since it is no sew, it is especially appealing for people who want a faster finish.
Step-by-step guide
Step 1: Start at the base
Begin with a magic ring and crochet a flat circular base. Since traffic cones are wider at the bottom, the base should be a little larger than a typical amigurumi start. Keep the circle flat and even.
A solid base gives the cone its shape.
Step 2: Increase to form the cone
After the base is complete, continue increasing gradually to create the sloping sides of the cone. The shape should widen at the bottom and narrow toward the top. This is what gives the cone its recognizable silhouette.
The sloped shape is the main feature.
Step 3: Build the body upward
Once the base width is established, work upward without increasing, or with very slight adjustments if needed. The goal is to create a small cone shape that rises evenly. Keep your stitches tight so the stuffing stays hidden.
A firm fabric helps the cone look clean.
Step 4: Add stripes, if desired
To make the traffic cone look more realistic, add a white stripe or two using color changes. This can be done as a simple band around the cone. A bright orange body with white bands creates the classic traffic cone look instantly.
The stripe detail makes the design recognizable.
Step 5: Stuff as you go
Because this is a no-sew pattern, stuff the cone gradually while you crochet. Add small amounts of stuffing at a time so the shape stays even and does not become lumpy.
Gentle stuffing helps the cone stay smooth.
Step 6: Close the top
When the cone is the right height, close the top by decreasing until the opening is small. Pull it shut neatly so the top point is clean and centered. Because there are no extra parts to sew, this closure is what finishes the form.
A neat top completes the cone shape.
Step 7: Shape and adjust
Use your fingers to smooth the sides and even out the stuffing. If the cone leans or becomes too flat, adjust the filling from the inside before fully closing the top. The finished piece should stand or sit with a clear cone silhouette.
Helpful tips
This is a great pattern for beginners who want a fast finish with minimal assembly. Classic orange and white is the most recognizable version, but you can also make it in fun colors for toy sets, desk decor, or playful mini collections.
5. Crochet Mini Note Book Pattern
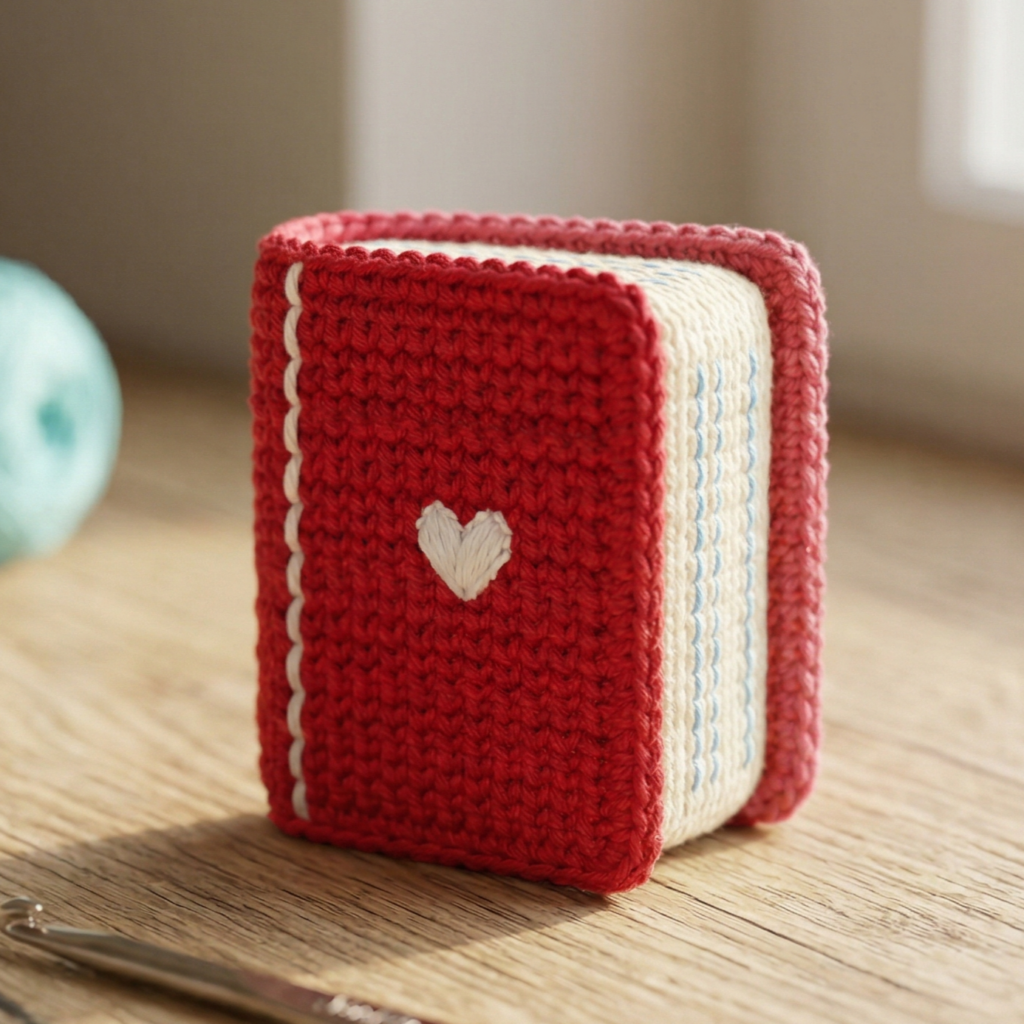
A mini notebook amigurumi is charming, creative, and a little unexpected in the best way. It is a lovely project for book lovers, stationery fans, or anyone who enjoys tiny novelty items. Because the shape is simple, this is also a great beginner amigurumi project with plenty of room for personality.
Step-by-step guide
Step 1: Crochet the notebook body
Start by making a small rectangular piece that will serve as the notebook cover. Use rows of single crochet or half double crochet to create a firm, flat surface. The piece should be tidy and compact, like a tiny book cover.
The rectangle is the foundation of the notebook.
Step 2: Crochet the back cover
Make a matching second rectangle for the back of the notebook. The front and back should be the same size so the tiny book looks balanced. If you want, you can make the front cover a different color than the back for a more realistic look.
Matching pieces help the notebook look neat.
Step 3: Add the spine
Create a narrow strip for the spine or use a color change to suggest the book binding. This small detail gives the notebook its realistic shape and makes it feel more like a tiny object than a plush toy.
The spine is what makes it read as a notebook.
Step 4: Add page details
You can embroider thin lines on the page edge to resemble notebook pages, or attach a small cream strip along one side. Keep the detail subtle so the project remains simple and clean. A few lines are enough to suggest paper pages.
The page edge detail adds charm.
Step 5: Assemble the notebook
Sew the front, back, and spine pieces together. If you want the notebook to feel slightly padded, add a very small amount of stuffing before closing. Otherwise, keep it flat for a cleaner notebook look.
Assembly turns the flat pieces into a recognizable object.
Step 6: Add decorative elements
You can embroider a tiny heart, star, initials, or simple line art onto the front cover. This gives the notebook personality and makes it feel like a custom miniature accessory. Keep the decoration small so it does not overwhelm the shape.
A tiny detail makes the notebook feel personal.
Step 7: Finish and shape
Weave in all ends and gently shape the mini notebook with your fingers. If needed, add a small loop so it can be used as a charm or decoration. The finished piece should feel neat, compact, and fun.
Helpful tips
Mini notebooks look especially cute in bright cover colors with lighter page sides. If you want it to feel more realistic, use dark blue, red, or green for the cover and cream for the pages. This is a great project for using small scraps and trying simple embroidery details.
Conclusion
Beginner-friendly amigurumi is one of the most satisfying ways to grow your crochet skills because it lets you practice shaping, stuffing, and finishing without overwhelming complexity. Small projects are especially encouraging because you can finish them quickly and actually see your progress right away. That makes them perfect for building confidence while still making something adorable and useful.
These five patterns each offer something different. The mini turtle feels soft and friendly. The mini strawberry is bright and cheerful. The mini triceratops brings a playful dinosaur theme. The no sew traffic cone is quick and clever. The mini notebook is quirky and creative. Together, they show how much variety you can create with simple stitches and small shapes.
A good amigurumi project does not need to be complicated to be enjoyable. With the right yarn, a snug stitch, a little stuffing, and some thoughtful finishing, even the smallest project can turn into something memorable. These patterns are a great place to start if you want amigurumi projects that are cute, beginner-friendly, and actually satisfying to complete.