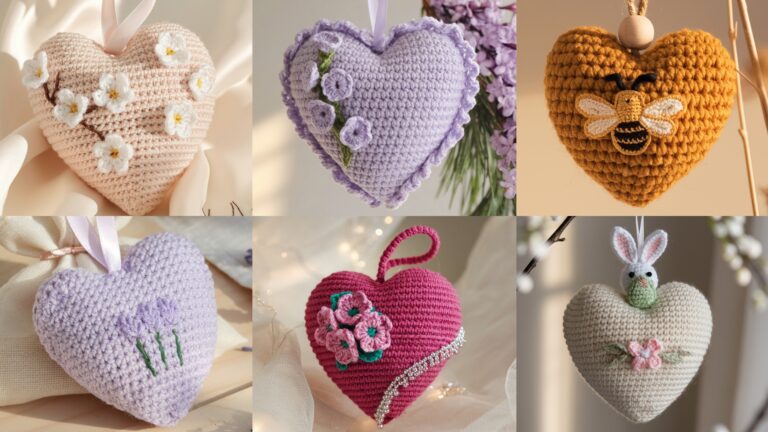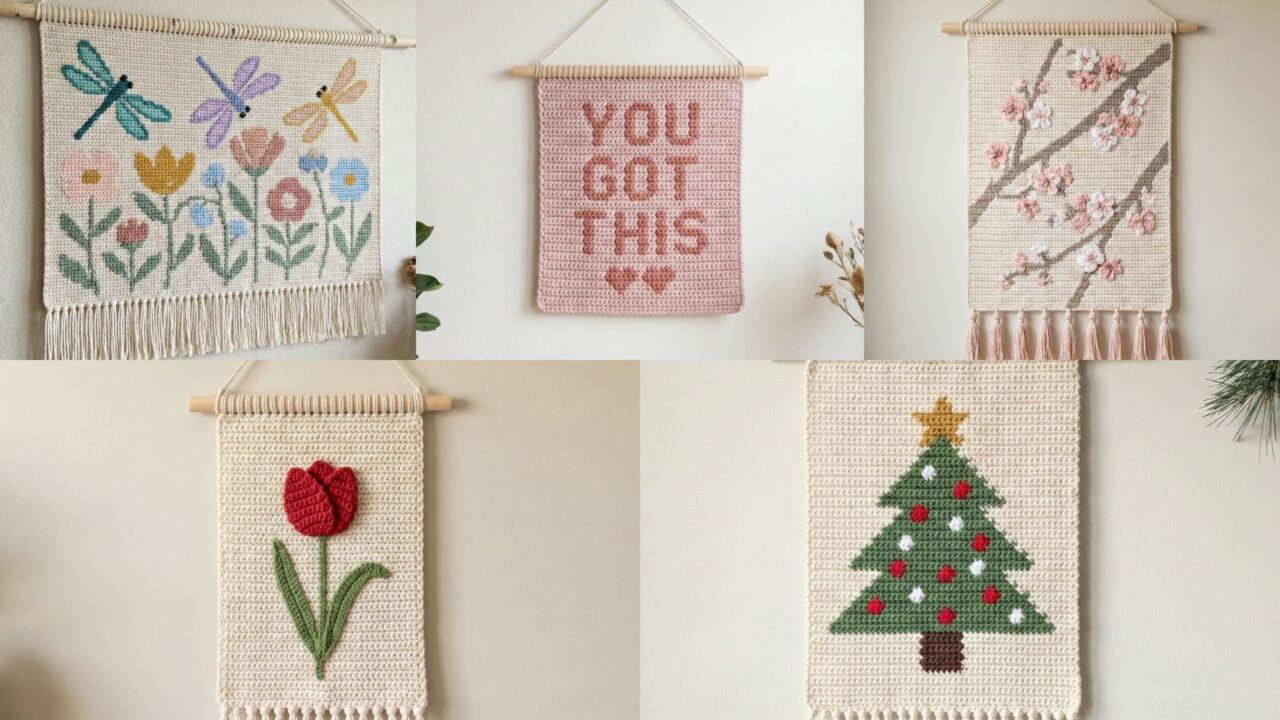
Crochet wall hangings are one of the quickest and most rewarding ways to add handmade character to any room. They let you mix texture, color, and composition without sewing or framing skills, and they’re perfect for using scraps, practicing colorwork, and testing new stitches. Below you’ll find a single, practical introduction covering materials, tools, sizing, mounting and finishing options — followed by five full, detailed pattern blueprints you can paste into a blog post: Motivational Tapestry (“You Got This” with two tiny hearts), Dragonfly Flower, Christmas Tree, Elegant Cherry Blossom, and Tulip. Each pattern includes skill level, materials, finished size guidance, step-by-step stitch instructions, finishing/assembly, variations, and styling tips.
materials, tools, sizing, mounting & abbreviations
Materials & yarn
- Yarn choices: For wall hangings you want good definition and a range of textures. Popular choices:
- Worsted / aran weight (acrylic or cotton): sturdy and inexpensive.
- Cotton DK / sport: crisp stitch definition for tapestry-style panels.
- Bulky / chunky: for dramatic texture and quick builds (great for fringes and tassels).
- Novelty yarns (eyelash, boucle): use sparingly as accents.
- Yarn weight planning: Use same-weight yarns within the main panel for consistent gauge, then add thicker or thinner yarns for contrast.
Tools & other supplies
- Crochet hooks: pick the hook that gives you a firm fabric — often 3.5–5.5 mm depending on yarn. For tapestry-style colorwork use a smaller hook for denser fabric.
- Dowel/rod: wooden dowel, driftwood, curtain rod, or metal bar to hang piece. Choose length slightly wider than finished piece.
- Tapestry needle for weaving in ends and sewing appliqués.
- Blocking tools: pins, blocking mat, spray bottle or steam iron on low.
- Small craft items: scissors, stitch markers, measuring tape.
- Optional: embroidery floss for fine text, hot glue for non-structural attachments (but sew structural joins).
Sizes & layout planning
- Typical wall hangings range from 10–40 in (25–100 cm) wide. For a living-room focal point use 24–40 in. For small spaces or doorways use 10–18 in.
- For tapestry-style hangings (text plus motif), plan a chart: width in stitches × height in rows. For example, a 48-stitch × 60-row panel at 4 sts/in and 5 rows/in = 12 in × 12 in (after blocking).
Construction approaches
- Tapestry crochet / colorwork: single-crochet tapestry where you carry colors across the back (dense, good for letters). Great for “You Got This” panel.
- Motif appliqué on background: make motifs (dragonflies, trees, blossoms) and sew them onto a crocheted base—good when motifs use different textures.
- Freeform / mixed texture: combine solid panels with macramé-like hanging fringes, looped roving, and tufting for boho style.
- Granny/fillet or filet crochet: use mesh and solid blocks for graphic shapes.
- Surface crochet / embroidery: add outlines and small details after the panel base is done.
Mounting & hanging
- A folded top with a casing for the dowel is neat: fold top back 1–1.5″ and slip-stitch to make a tube. For thicker dowels, make a larger casing or sew loops.
- Alternatively, tie string loops to the dowel ends or attach a row of loops along the top edge and thread dowel through.
- For a natural look, use driftwood or a brass rod and knot yarn ends for tassel hang.
Care & finishing
- Most hangings can be spot cleaned; if washable yarn is used, hand-wash gently and lay flat to dry. Avoid machine-washing heavy textured pieces that may distort.
- Lightly steam or spray-block to even edges and soften stitches.
Abbreviations (US)
- ch — chain
- sc — single crochet
- hdc — half double crochet
- dc — double crochet
- tr — treble crochet
- sl st — slip stitch
- st(s) — stitch(es)
- inc — increase (2 sc in same st)
- dec — decrease (sc2tog)
- MR — magic ring
- BLO / FLO — back/front loop only
1. Crochet Motivational Tapestry Wall Hanging Pattern
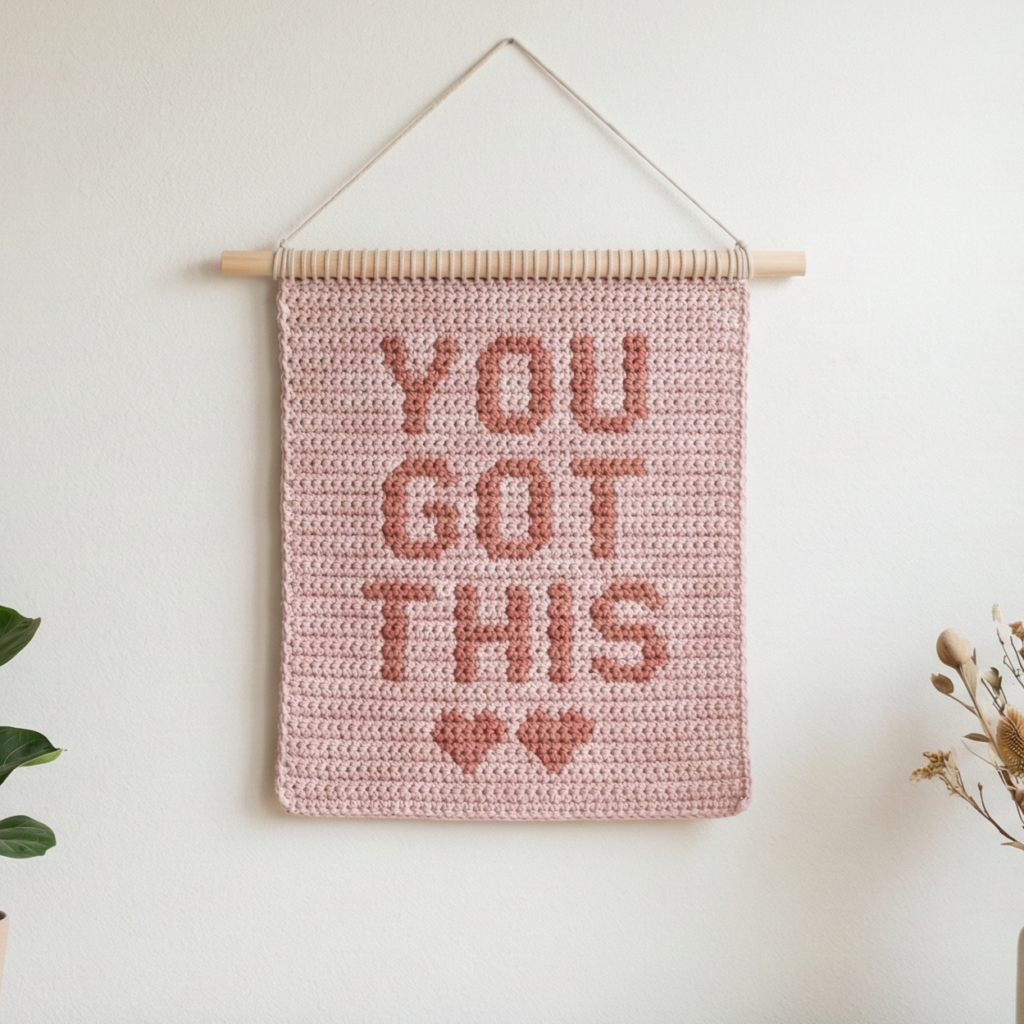
Title text: “You Got This” with two tiny hearts
Vibe: Clean, modern typography with soft hearts — good for entryways, bedrooms or home office.
Skill level: Intermediate (tapestry colorwork and lettering; basic chart reading)
Finished size (example): 12 in wide × 14 in tall panel mounted on a 14–16 in dowel (adjustable by stitch/row count)
Materials
- Main background yarn: DK cotton in neutral (e.g., warm cream) — ~150–200 yd.
- Contrasting yarn for text & hearts: DK cotton in bold color (e.g., navy or coral) — ~50–100 yd.
- Hook: 3.5 mm (for tight tapestry fabric)
- Wooden dowel 14–16 in, tapestry needle, stitch markers.
Planning & charting
- Decide final width in stitches and height in rows. A practical tapestry grid: 48 sts × 56 rows (this yields about 12 in × 14 in at 4 sts/in × 4 rows/in). Adjust to your gauge.
- Create or use a simple chart where each square = 1 sc of tapestry crochet. Plot the words “YOU GOT THIS” across rows (choose all-caps for simplicity) and two tiny hearts beneath or flanking the phrase. Several free online graphing tools or a spreadsheet can help create the chart. Keep letters thick (3–5 stitches wide per stroke) so they’re legible at the finished size.
Stitch technique – tapestry single crochet (color carry)
- Tapestry in sc: work in continuous rounds OR rows (I recommend rows for simpler edge control). Carry unused colors behind stitches, catching floats every 4–6 stitches to avoid long floats.
- Always work a consistent tension so the fabric doesn’t pucker. Keep floats snug but not tight.
Step-by-step
A. Make a small test swatch (8–10 sts × 8–10 rows) in tapestry sc using your chosen yarns and hook. Measure gauge (sts/in and rows/in). Recalculate chart dimensions if necessary.
B. Foundation chain: ch 49 (48 sts + 1 turning ch for sc). Row 1: sc in 2nd ch from hook and across (48 sc). Turn.
C. Tapestry rows:
- Row 2–56 (or desired height): sc across following your chart colors for each stitch. Carry colors along the back and catch floats every 4–5 sts with a loose overcast to avoid long floats. Keep stitch tension even. Use stitch markers at word boundaries if helpful.
D. Finishing the top edge: After completing final row, fasten off leaving ~6–8 in tail for weaving.
E. Create top casing: Fold the top edge down about 1.25–1.5 in (measure to fit dowel) and slip-stitch or sc across inside fold to make a tube/casing wide enough to slide the dowel through. Alternatively, work sc row across the front and back and leave two yarn loop openings to thread dowel.
F. Add the dowel and hanging cord: Slide dowel through casing or loops. Tie a length of yarn or subtle leather cord to each end of the dowel for hanging. Trim ends neatly.
Hearts detail
- Make hearts 6–10 stitches wide and 6–8 rows tall in the contrasting color; follow chart so they integrate visually with text. Small hearts should be symmetric and filled (not just outline).
Edging options
- A neat sc border around the panel (1 round sc in background color) frames the tapestry and hides uneven edges. Optionally add a narrow fringe along the bottom composed of 1–2 strands of the accent color for an extra pop.
Variations & tips
- Color inversion: Use a dark background with light text for high contrast.
- Different fonts: Use skinny or block letters depending on chart scale (block letters easier).
- Embroidery highlights: After tapestry, couch an embroidered outline around letters or hearts with contrasting crochet thread for emphasis.
Styling & photography
- Mount against a lightly painted wall or a textured plaster to show contrast; use natural light. Photograph close-up of the lettering and a full image including dowel/hanger.
2. Crochet Dragonfly Flower Wall Hanging Pattern
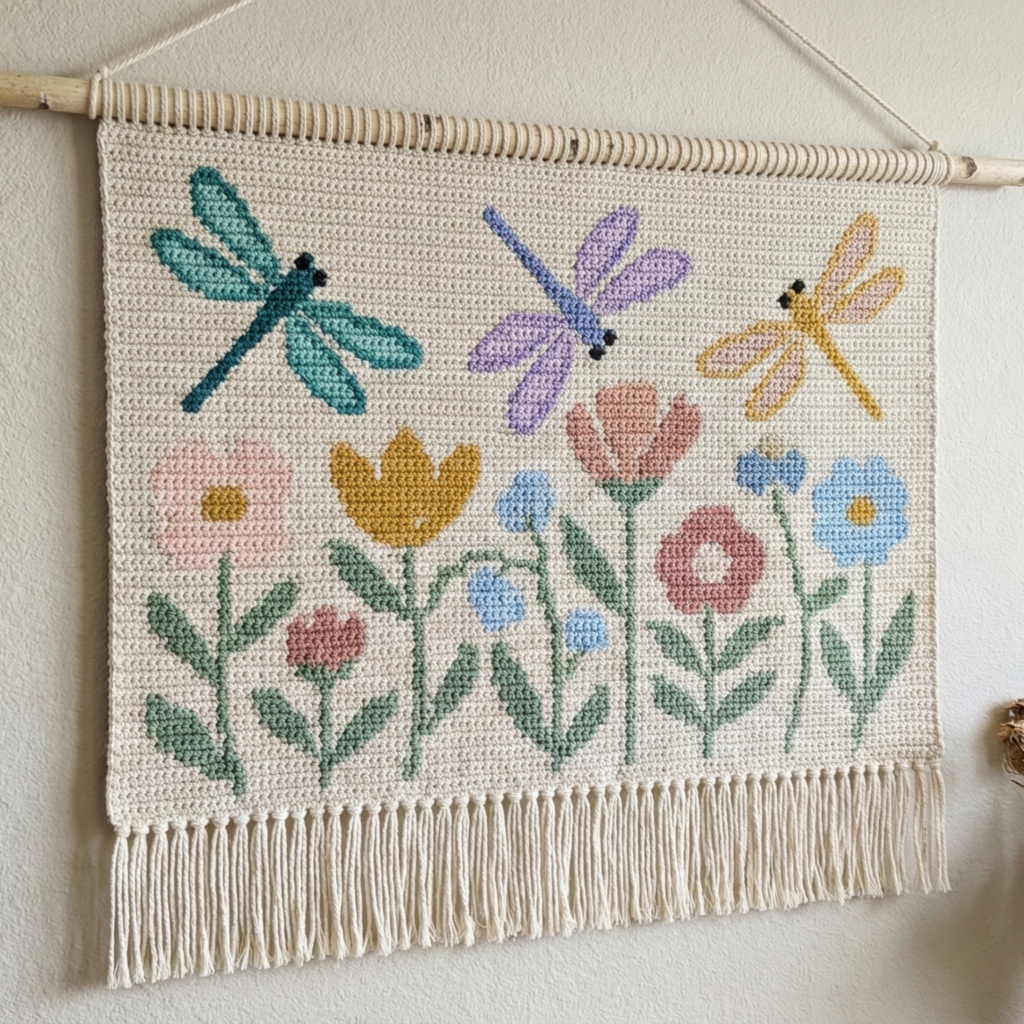
Vibe: Nature-inspired, whimsical — dragonflies hovering above stylized floral stems; textured wings and stitchwork create movement.
Skill level: Intermediate (appliqué motifs, surface crochet, basic shaping)
Finished size (example): panel 14 in wide × 20 in tall including fringe
Materials
- Background panel yarn: worsted cotton (neutral) — ~200–300 yd.
- Dragonfly body/wing yarn: DK or sport in metallic or bright color — ~50–100 yd.
- Flower/accent yarns: a few small skeins of various colors (petal, center, leaf) — ~50–120 yd total.
- Hook: 4.0 mm for panel; 3.5–4.0 mm for motifs.
- Dowel or birch stick ~16–18 in, tapestry needle, blocking pins.
Construction overview
- Create a simple rectangular background panel worked in hdc or dc in the round or rows (e.g., 14 in × 12 in).
- Crochet dragonflies (body + wings) as small appliqués using loop stitch, picot edges, and fine yarn for detail.
- Crochet flowers and leaves as small appliqués or use surface crochet for stems; arrange and sew motifs onto background in a pleasing composition.
- Add decorative bottom fringe and optional bead accents.
Step-by-step
A. Background panel (worked in rows)
- Decide width in stitches using your gauge: e.g., 56 sts × 48 rows for a 14 in × 12 in panel (4 sts/in × 4 rows/in). Chain 57 and Row 1: hdc in 2nd ch and across. Work in rows until desired height.
- Optional textured stitch: alternate rows of hdc and fpdc/bpdc to create vertical texture that suggests stems.
B. Dragonfly motif (make 2–3)
- Body (tiny tube): MR, 6 sc in MR (6). R2–R6: sc around 5 rounds to create a small body; fasten off leaving tail to sew.
- Wings (pair): With a lighter/colorful yarn, ch 6, sl st to base to create a small loop (wing). Alternatively, do: ch 5, (sl st, ch 2, 3 dc) into base to make a lacy wing. Use loop stitch or long picot loops for shimmering wing effect. Make 2 wings per side and attach to body center.
- Antennae & detail: With thin thread, embroider small antennae and lines on wings.
C. Flowers & leaves
- Simple flower (small): MR, ch1, 6 sc in MR; R2: ch 3, 3 dc in next st, sl st in next st repeat to form petals. Make 4–6 flowers in varied sizes and colors.
- Leaves: ch 6, sc back along chain, or small oval: MR, 6 sc, 2 rounds shaping.
D. Sizing & placement
- Lay out motifs on the blocked background to create a balanced composition: flowers clustered near lower third, dragonflies in the upper third as if flying.
E. Attaching motifs
- Use a tapestry needle and invisible mattress or whip stitch to sew motifs on; alternatively, use slip-stitch join: hold motif over background and sl st through both edges. For delicate wings, only tack the wing base so wings lift slightly away from background for 3D effect.
F. Stems & surface crochet
- For stems, use surface crochet: with tapestry needle and long contrasting yarn, chain a long line, then surface crochet along the desired path on the panel to simulate organic stems. You can also embroider stems using chain stitch.
G. Fringe & finishing
- Add a bottom fringe composed of mixed yarn textures and beads if desired. Tie fringe strands to a lower dowel or to bottom row loops. Trim evenly and lightly steam to shape.
Variations & tips
- Emphasize shimmer: use metallic or silk yarn for wings.
- Layering: stitch translucent tulle under wings for a gossamer effect.
- Modular design: make several small panels and hang staggered for a gallery look.
Mounting
- Make the top casing or add loops to hang from a driftwood stick. For a natural finish knot yarn to the dowel and wrap with leather for rustic charm.
3. Crochet Christmas Tree Wall Hanging Pattern
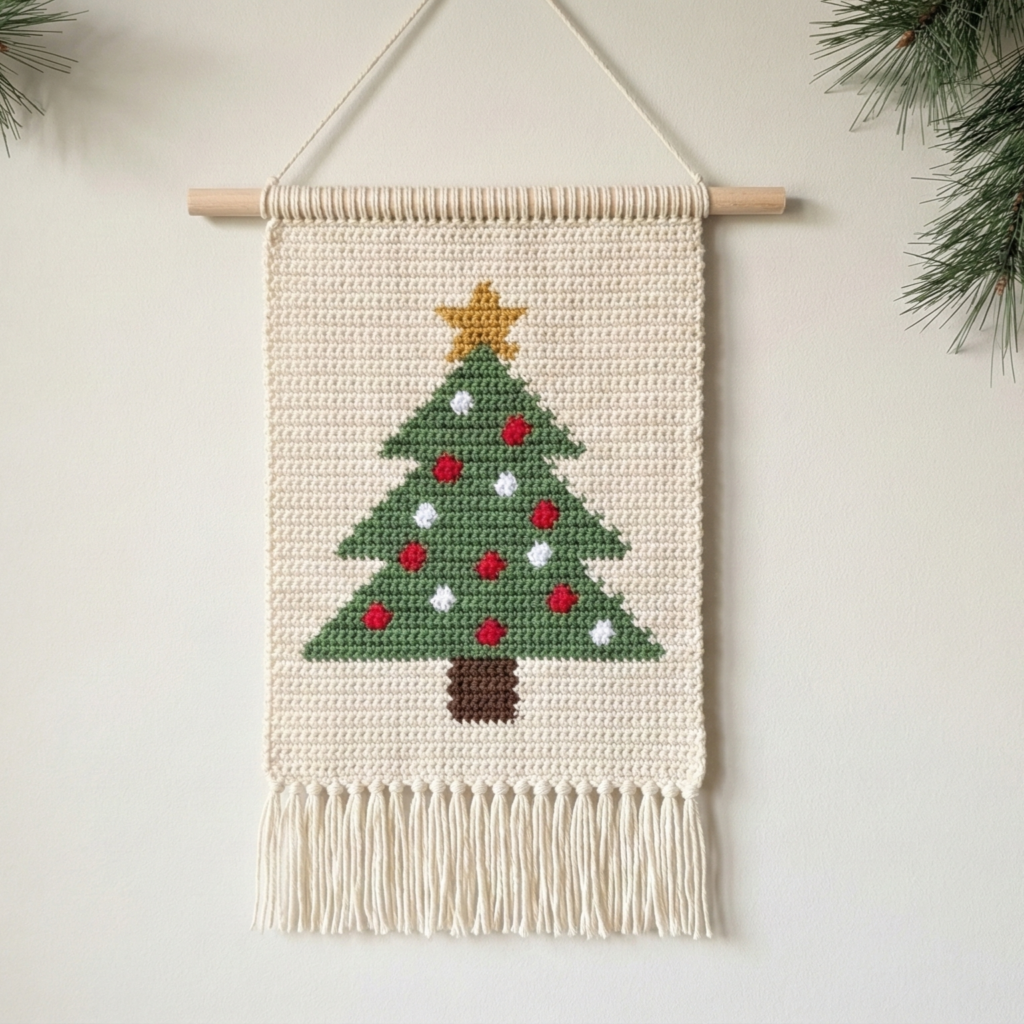
Vibe: Festive, Scandinavian-inspired — minimalist triangular tree with tiny ornaments and a star. Perfect for holiday rotation.
Skill level: Confident beginner (fillet or tapestry shaping; appliqués)
Finished size (example): 12 in wide × 18 in tall (including trunk and star)
Materials
- Background panel (optional) or work tree as a standalone triangular piece: worsted or DK yarn in green for tree, neutral for background — total ~200–300 yd.
- Accent yarns: gold/silver for star, red/white for ornaments — small amounts.
- Hook: 4.0 mm (or a hook for your yarn weight).
- Dowel or wooden branch ~16–18 in. Buttons or small beads for ornaments (sew on carefully).
Construction approaches (two options)
Option A — Tapestry triangle (solid tree on background)
- Use tapestry sc on a rectangular panel and chart a triangular Christmas tree silhouette. This is similar to the Motivational pattern but with a simple geometric tree.
Option B — Filet triangle or shaped piece
- Work a triangular piece directly: start with a small ch, increase at edges to form triangle (like shawl construction), and add rows until tree is large enough. Add rows of different colors/textures for garlands.
Step-by-step (Option B direct triangle)
A. Make tree body (triangle)
- Start: ch 3. Row 1: sc in 2nd ch from hook, sc in last ch (2 sts).
- Row 2: ch1, sc in first st, inc in next (sc 2 in same st), sc in last st — repeat increasing one stitch per row to build triangle. Continue until triangle reaches the desired width (e.g., 24–30 rows for ~12 in width depending on gauge).
- Work in flat rows so triangle grows symmetrically. Alternate stitches or rows with dc clusters to create texture for garlands.
B. Add star
- Small crochet star (flat): MR, ch1, 5 sc in MR (5). R2: ch3, sl st in next around to form points or follow a 5-point star chart. Sew star onto tree top with gold yarn or use a small wooden star ornament.
C. Add ornaments
- Crochet tiny circles (MR, 6 sc) in red and sew them across the tree for ornaments. Attach small beads / bells for sparkle — if the hanging is for children, sew beads on very securely or use embroidered dots instead.
D. Trunk & skirt
- Trunk: small rectangle in brown worked in sc for a few rows and sewn to triangle base.
- Optional skirt: crochet a small scalloped semicircle and sew under trunk.
E. Mounting
- Sew top edge of the triangle to a narrow casing or tie to dowel with loops at top corners. Drape a thin gold cord from the dowel for hanging.
Variations & tips
- Scandi minimal: use a neutral background and simple single-color tree with a gold star.
- Advent version: add numbered tiny pockets across tree to use as advent袋.
4. Crochet Elegant Cherry Blossom Wall Hanging Pattern
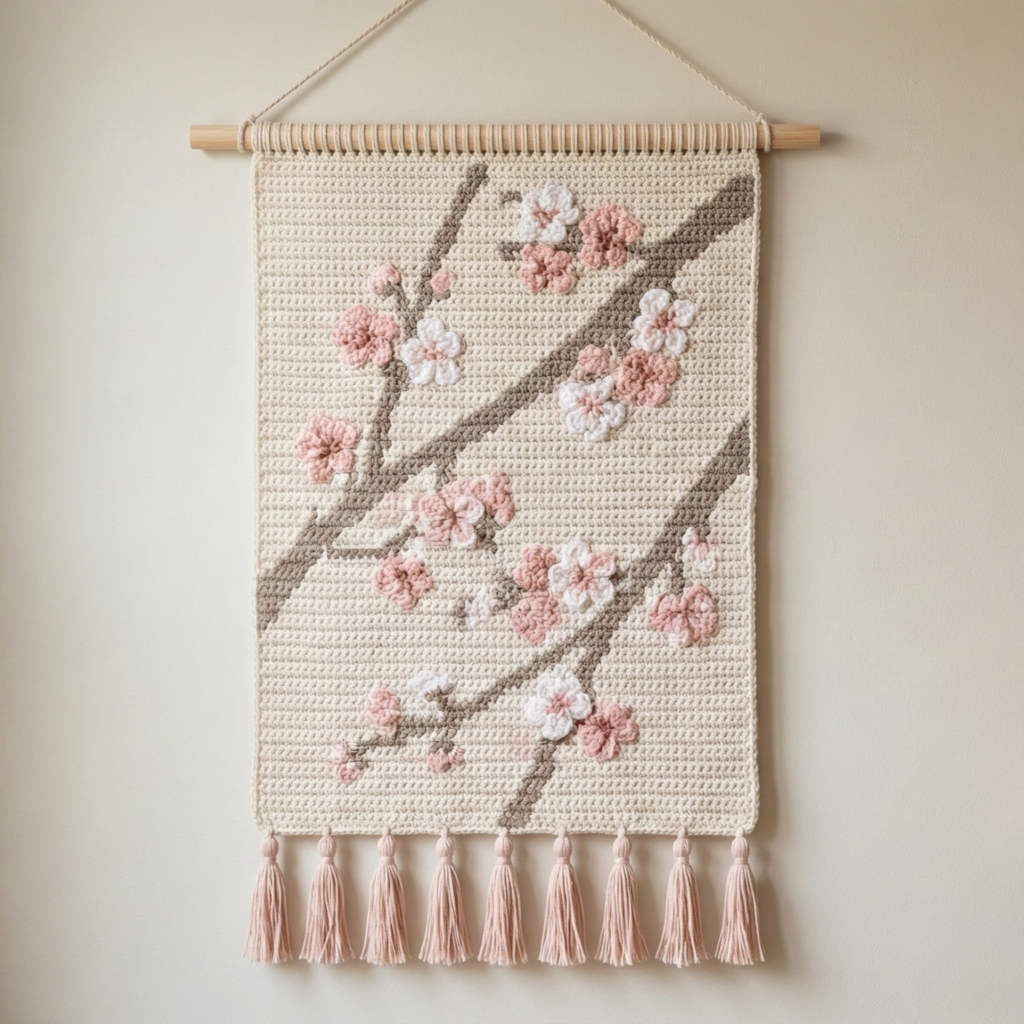
Vibe: Japanese-inspired, elegant; soft blossoms on branches with negative space. Great for tranquil spaces or nurseries.
Skill level: Intermediate (appliqué blossoms, fine branches, layering)
Finished size (example): 14 in wide × 20 in tall including dangling tassels
Materials
- Background panel: light cream or muted grey worsted yarn — ~200–300 yd.
- Branch yarn: brown or taupe worsted/aran — ~50–100 yd (use thicker yarn for textured branch).
- Blossom yarn: soft pinks and whites in DK or fingering to create delicate flowers — ~50–120 yd.
- Hook: background 4.0 mm; blossoms 3.0–3.5 mm.
- Dowel ~16–18 in, tapestry needle.
Design concept
Work a neutral rectangular background panel and overlay crocheted branches and clusters of small cherry blossoms arranged across a diagonal or an organic branch shape. Use layered blossoms for depth and negative space to let background show through.
Step-by-step
A. Background panel
- Make a rectangular panel (e.g., 56 sts × 80 rows) in hdc or dc in rows. Block flat.
B. Branches (freeform)
- Using thicker brown yarn, chain a long line for the main branch; secure onto the panel by sewing with large hidden stitches. Add smaller branches by chaining shorter lengths and sewing them on. For a raised branch look, work a chain stitch surface crochet or use post stitches (work through the fabric) so the branch sits on top of the background.
- To make branches textured, work a loose i-cord (crochet chain joined to form tube) and sew on.
C. Cherry blossoms (many small)
- Small blossom (make many): MR, ch1, 6 sc in MR; R2: ch3, 3 dc in next st, sl st in next st repeat 6 times → creates a small petal cluster. Make 20–40 blossoms in varying pink/white shades for full clusters.
- Layered blossom: make a small 5-petal flower and a slightly larger 5-petal flower and sew them offset to create depth.
D. Assembly
- Arrange blossoms along the branches in clusters. Sew blossoms on with light stitches; for a floating effect tack only the center so petals can lift.
- Add tiny french knots or small seed beads in blossom centers for sparkle — for kids’ rooms use embroidery rather than beads.
E. Negative space
- Leave background areas free of motifs to emphasize airy composition. Consider clustering blooms towards one side for a contemporary asymmetrical composition.
F. Finishing
- Add a delicate bottom fringe / tassel in matching blush shades; attach at different lengths for a poetic look.
Variations & tips
- Use a monotone scheme for a minimalist chic feel; or multiple pink hues for romantic bloom clusters.
- For extra dimension, needle-felt tiny wool centers into some blossoms.
5. Crochet Tulip Wall Hanging Pattern
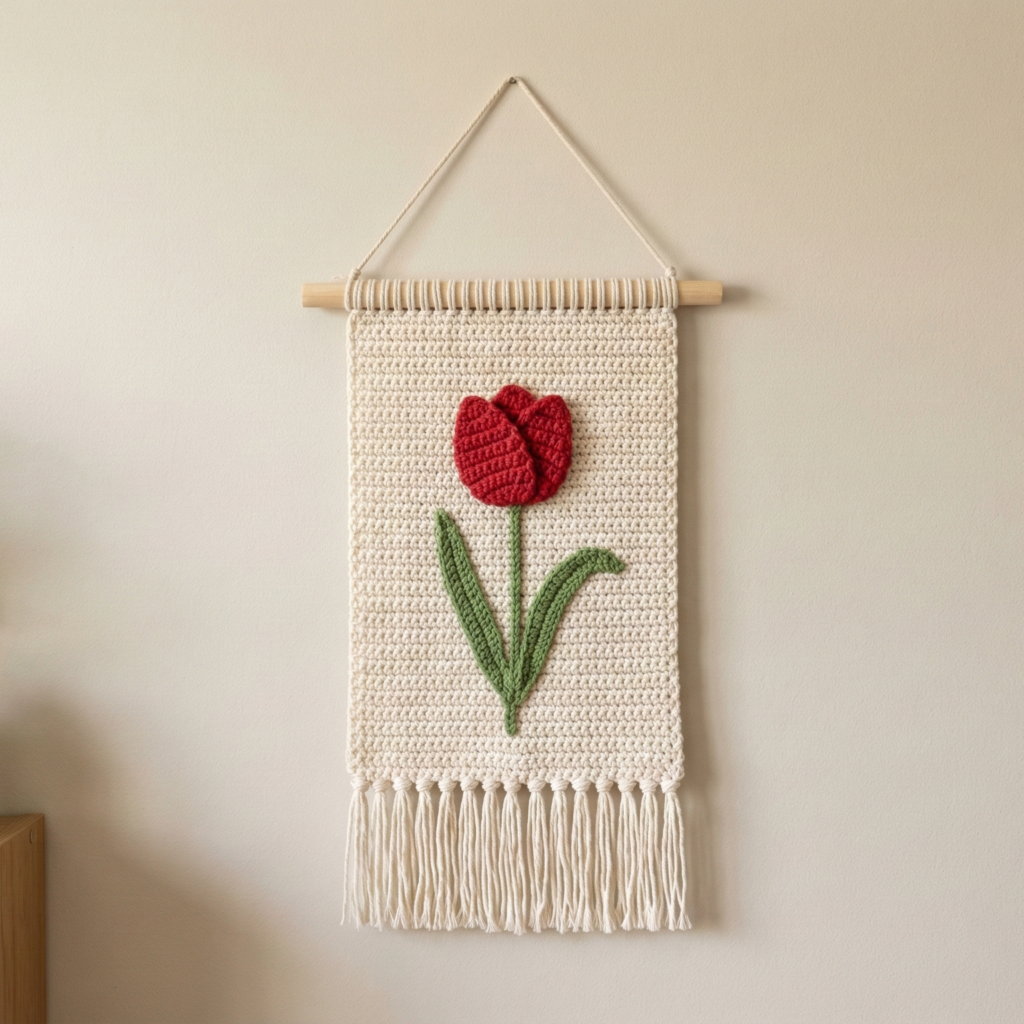
Vibe: Fresh, graphic floral — tulips in bold rows or staggered pattern with stylized leaves. Great for kitchens, children’s rooms or bright accents.
Skill level: Confident beginner (motif making and applique)
Finished size (example): 15 in wide × 18–24 in tall (depending on stem length)
Materials
- Background panel yarn: Aran/worsted neutral — ~250–350 yd.
- Tulip colors: bright DK yarns (red, yellow, orange, pink) — small skeins.
- Leaf and stem yarn: green DK — ~50–100 yd.
- Hook: 4.0 mm for background; 3.5–4.0 mm for motifs.
- Dowel ~16 in, tapestry needle.
Design approach
Make a background panel or vertical strip and crochet tulip motifs separately and attach in vertical columns. Use long stems that are surface-crocheted or embroidered onto the background.
Step-by-step
A. Background panel
- Make a rectangular background: chain enough for 15 in width and work rows of hdc or moss stitch for pleasant texture. Block.
B. Tulip motif (make several in contrasting colors)
- Tulip top (petal cluster): ch 6, sl st to form ring, Round 1: ch1, 6 sc into ring (6). Round 2: ch2, (3 dc, ch2, sl st) in next st repeat to make petal arches—or use this small fan method for 3 petal lobes. Fasten off leaving tail to sew.
- Base/bulb & leaves: make small leaf units: ch 6, sc back along chain to shape leaf. Make set of two leaves per tulip.
C. Stems
- Chain long lengths of green and either surface crochet them onto the background (pull chain through back and whip-stitch down) or stitch them using a darning needle and green yarn with stem stitch (embroidery).
D. Attach tulips
- Position tulip heads at top of stems and sew the base securely so it looks like a natural bloom. Stagger heights across columns for visual interest.
E. Border & hang
- Add a small scalloped border or leave a clean edge. Insert dowel into top casing or create loops.
Variations & tips
- Minimalist row: use three bold tulips evenly spaced and lots of negative space.
- Full garden: make many tulips in several colors and create overlapping petals for depth.
conclusion
Final finishing & quality checklist
- Weave in ends tightly inside fabric or motif backs. Tidy floats on tapestry pieces by catching them every few stitches.
- Reinforce attachments: sew motifs with multiple passes and hide knots inside body or behind motif.
- Block & shape: block panels flat and shape petals/loops before final mounting. Slight steam or spray-block can even out edges.
- Edge finishing: tidy top edge with a casing or neat reverse row; bottom edge can be decorative fringe, scallop, or a simple clean sc round.
Hanging & display ideas
- Use natural driftwood for boho pieces or brass rods for a modern minimalist vibe.
- Combine several small hangings across a wall as a salon-style gallery.
- For seasonal pieces (Christmas tree), store flat and re-hang year after year.
Photography & presentation tips for your blog
- Photograph each hanging both flat (to show details) and styled (on a wall or mannequin) so readers can imagine scale.
- Include a close-up of the stitches, an in-progress shot to demonstrate technique, and a full-length lifestyle shot.
- Use natural light and uncluttered backgrounds; consider a hand or ruler in one picture for scale.
Care instructions to include with each pattern
- Spot clean with a damp cloth for small marks.
- For washable yarns: hand wash gentle in cool water, lay flat to dry. Avoid twisting or machine drying textured fringes.
- Store seasonal hangings in a dry place and avoid direct prolonged sunlight to reduce fading.