Table runners are the quiet stars of a well-set table — they pull color, texture and style together and can change the whole feel of a room. Below you’ll find a friendly, practical introduction (materials, sizing, gauge and planning), then five full, detailed table-runner patterns with step-by-step instructions, stitch notes, finishing tips, and styling ideas: Leaf-ish Chunky Thread, Linen Stitch, Hexagons, Ripple Waves, and Pineapple Lace. Each pattern is written so you can follow it, scale it, and customize it for your table.
Quick planning: yarn, hooks, sizes, gauge & tools
Yarn & fiber choices
- Lace / crochet thread (size 10) — classic for delicate, heirloom runners; gives crisp lace, ideal for Pineapple and Hexagon runners.
- DK or sport cotton / linen blend — good balance of drape and durability for Linen and Ripple runners.
- Chunky cotton or cotton-twine (table runner weight) — great for rustic, chunky Leaf-ish runners (showcases texture).
- Tip: For everyday use pick washable cotton or a cotton/linen blend; for special-occasion lace, mercerized cotton (thread) looks stunning but may need gentle washing.
Hooks
- Threads: 1.5–2.5 mm (size 10 thread often 1.5–1.75 mm hook).
- DK / sport: 3.5–4.5 mm.
- Chunky cotton/twine: 6.0–8.0 mm or larger depending on yarn label.
Tools & notions
- Tapestry needle, blocking pins, blocking board or foam, scissors, measuring tape, stitch markers. Optional: small crochet hook for joining motifs, fabric backing (thin linen) if you want a non-slip backing.
Common sizes (use as targets)
- Small runner / buffet: 12–14 in wide × 36–48 in long.
- Medium dining runner: 14–18 in wide × 60–72 in long.
- Large / table centerpiece: 20–24 in wide × 72–90 in long.
Decide which size you want before you start so you can plan motif counts and yardage.
Gauge & how to compute foundation
Always make a small swatch in the stitch the pattern uses and block it as you will the final runner. Then measure stitches per inch (spi) and rows per inch (rpi). Example (digit-by-digit):
- Suppose your swatch shows 12 sc = 4 in. That means:
- 12 sc ÷ 4 in = 3 sc per 1 in.
- If you want a runner width of 14 in, compute: 3 sc/in × 14 in =
- (3 × 10) + (3 × 4) = 30 + 12 = 42 stitches foundation.
If a stitch pattern needs a multiple (for example multiples of 6 + 2), round your computed number to the nearest compatible multiple.
Yardage estimates (very approximate; gauge and pattern change these):
- Small runner (thread lace): 600–1,200 yd thread.
- Medium runner (DK cotton): 700–1,200 yd.
- Large runner (DK/worsted): 1,200–2,500 yd.
- Chunky runner: 400–1,000 yd of bulky yarn.
Always buy a little extra to avoid dye-lot issues.
Blocking & finishing
Blocking is essential for table runners — it opens lace, evens rows and makes motifs sit flat. Use stainless pins and pin to measurements on a foam or blocking board; spray lightly or mist, then let dry overnight. For durability, consider a thin linen fabric backing sewn on the wrong side (helps tabletop protection, keeps runner flat).
1. Crochet Leaf-ish Chunky Thread Table Runner Pattern
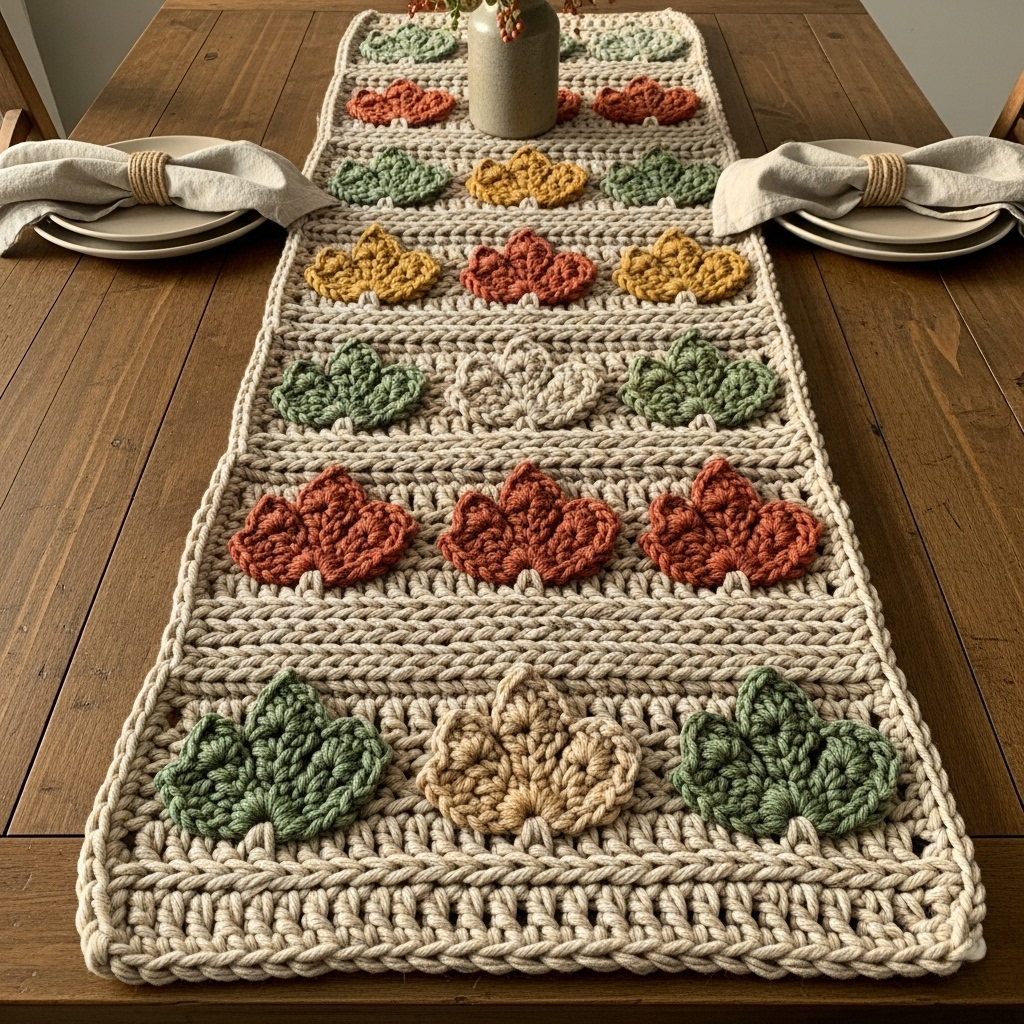
Vibe: rustic + modern — chunky leaf motifs and textured bands. Great for farmhouse tables.
Skill level: confident beginner → intermediate
Materials (sample runner ~14 × 60 in)
- Bulky cotton rope / t-shirt yarn: ~600–900 yd (depends on stitch density).
- Hook: 8.0 mm (or according to yarn label).
- Tapestry needle, measuring tape, blocking board (for light steam shaping).
Design overview
Worked as a wide central panel of repeated textured leaf motifs separated by rows of simple ribbing. This runner is quick because yarn is bulky — great for fast impact.
Stitches used (US)
sc, hdc, dc, fpdc/bpdc (front/back post double crochet) for ribbing, and special leaf cluster: a fan of dc clusters + picot edge for a leaf tip.
Step-by-step (central motif strip + borders)
A — Compute width & foundation
- Make a 4-in swatch in the leaf panel stitch to get stitches per inch. Example result: you get 3 sc-equivalent sts per inch. For a 14-in runner width: 3 × 14 = (3×10) + (3×4) = 30 + 12 = 42 stitches. You’ll want the motif repeat to divide into 42 — choose a repeat of 7 so 42 ÷ 7 = 6 repeats across.
B — Foundation row
2. Ch 44 (42 foundation + 2 turning ch). Row 1: sc across (42 sc). Turn.
C — Leaf motif (repeat across row)
3. Leaf motif (worked over 7 sts): Row A (base): sc across the 7 sts; Row B (leaf shaping): ch2, dc3 in next stitch, ch 1, (dc3) in next st to make a fan, sl st to base; Row C: sc across to anchor. Repeat across panel. After finishing Row C across, work an even row of hdc in back loop only to create a ribbed divider.
D — Repeat pattern
4. Work: [Leaf motif row + BLO rib row] × desired number of leaf rows to create vertical texture. Alternate the offset of leaf clusters every other leaf-row so leaves look staggered (i.e., shift motif start by 3 sts on alternate rows).
E — Edge & border
5. Once desired runner length is achieved (measure), add 3 rounds of sc around perimeter using smaller hook one size down to neaten edges. For a chunky scallop, add a final round of shells (5 dc in one st, skip 2 etc).
F — Finishing
6. Weave ends, block lightly by shaping on a table with towels to preserve bulk, or steam with an iron held above fabric (do not press directly onto bulky yarn). Optionally add a thin felt underlayer at center to protect the table.
Variations & styling
- Use two colors and alternate leaf colors for an autumn runner.
- Make narrower bands for a runner runner for a shelf or long sideboard.
2. Crochet Linen Stitch Table Runner Pattern

Vibe: minimal, woven-look linen stitch — modern and very flat (great under dishware).
Skill level: confident beginner
Materials (sample runner ~16 × 60 in)
- DK cotton or linen-blend yarn ~900–1,400 yd.
- Hook: 4.0–4.5 mm.
- Notions: tapestry needle, blocking pins.
Why linen stitch?
Linen/moss stitch looks like woven fabric, lies flat, and feels dense — perfect for table runners that host platters or vases.
Stitch concept (two-row repeat)
- Row 1: sc in next st, ch 1, skip next st repeat across.
- Row 2: sc in each ch-1 space and sc across — this “locks” the fabric and creates the woven look.
Step-by-step (rectangle method)
A — Gauge & foundation
- Swatch in linen stitch. Suppose you find 6 stitches = 1 in in linen stitch (this is an example). For a 16-in width: 6 × 16 = (6×10) + (6×6) = 60 + 36 = 96 stitches foundation. Linen stitch generally works best on an odd number of chains; if your computed number is even, add 1 ch to make an odd multiple if required by your version.
B — Foundation & Row 1
2. Ch 97 (96 + 1 turning ch). Row 1 (RS): sc in 2nd ch from hook, ch 1, skip next ch, sc in next ch across. Turn.
C — Row 2
3. Ch 1, sc in each ch-1 space and each sc across (this means you’ll sc into the small chain spaces plus the existing scs). Turn.
D — Repeat
4. Repeat Rows 1–2 until the runner length reaches ~60 in (or desired length). If your row gauge is e.g., 8 rows = 1 in, then for 60 in you’ll need 8 × 60 = 480 rows — but practically you’ll measure as you go.
E — Edge
5. Work 2–3 rounds of sc around the entire rectangle (fold edges neatly at corners with 3 sc in each corner for neatness). Use a slightly smaller hook for the last round for a crisp edge.
F — Blocking
6. Wet-block flat to set the woven look and keep straight edges.
Variations & styling
- Make in a natural linen color for a neutral minimalist table; add a narrow stripe of contrast yarn near each end for interest.
- Use border embroidery to coordinate with seasonal decor.
3. Crochet Hexagons Table Runner Pattern
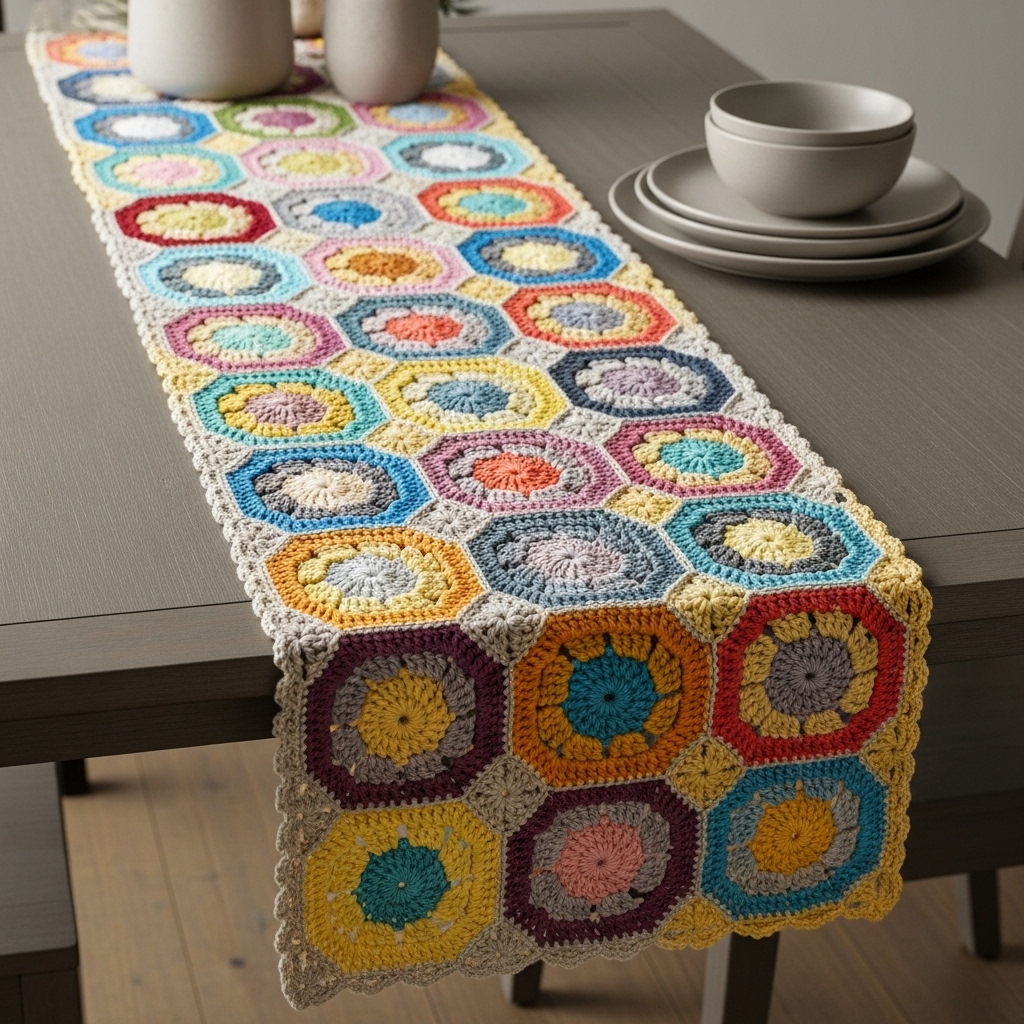
Vibe: retro/boho — joined hexagon motifs create a patchwork runner. Super for using scraps.
Skill level: intermediate (motif join-as-you-go or seam)
Materials (sample runner ~14 × 72 in)
- Sport or DK cotton scraps (many colors) ~1,200–1,800 yd total depending on size and number of hexagons.
- Hook: 3.5 mm.
- Tapestry needle, blocking board.
Design overview
Make uniform hexagon motifs and join them in rows to form a long runner. Hexagons are fun to arrange in color patterns (ombre, random, alternating).
Hexagon motif (classic granny/solid hybrid)
- Round 1: MR, ch 1, 6 sc in MR, sl st.
- Round 2: ch 3, 3 dc in same sp, ch 3, sl st in next st repeat to form 6 corners (this is one method).
- Or use 3-round solid hexagon pattern (increase evenly) for a fabric look.
Step-by-step
A — Size planning
- Decide hexagon finished diameter (flat-to-flat). For example each hexagon finished = 4 in across. For a 14-in wide runner you’d place 3 hexes across (3 × 4 = 12 in) plus small join gaps; to reach 14 in, use 4 hexes across if you want a little more overlap or add a narrow seam border.
B — Make motifs
2. Crochet hexagons in color combinations you like. Make enough to assemble the length: for a 72-in length with hexes 4 in each, you’ll need about 72 ÷ 4 = 18 hexes in a single row; if 3 across and 6 rows long you’d need 18 hexes total. Plan layout first.
C — Blocking hexagons
3. Block each hex to exact measurements so joins match perfectly.
D — Joining
4. Join-as-you-go method (recommended): on the final round of each hexagon, sl st into the adjacent hex’s edge points to join with neat seams. Alternatively, sew with invisible mattress stitch for a cleaner hand-sewn join.
E — Add border
5. Once assembled, work a single- or double-round sc border around the whole runner to tidy and even edges. Consider a scalloped picot edge for a vintage look.
F — Finishing
6. Block the entire runner pinned to shape after joining; this unifies motifs and flattens seams.
Variations & styling
- Use monochrome hexagons for a modern geometrical runner, or rainbow hexies for boho color.
- Insert narrow linen strip between hex rows for negative space.
4. Crochet Ripple Waves Table Runner Pattern
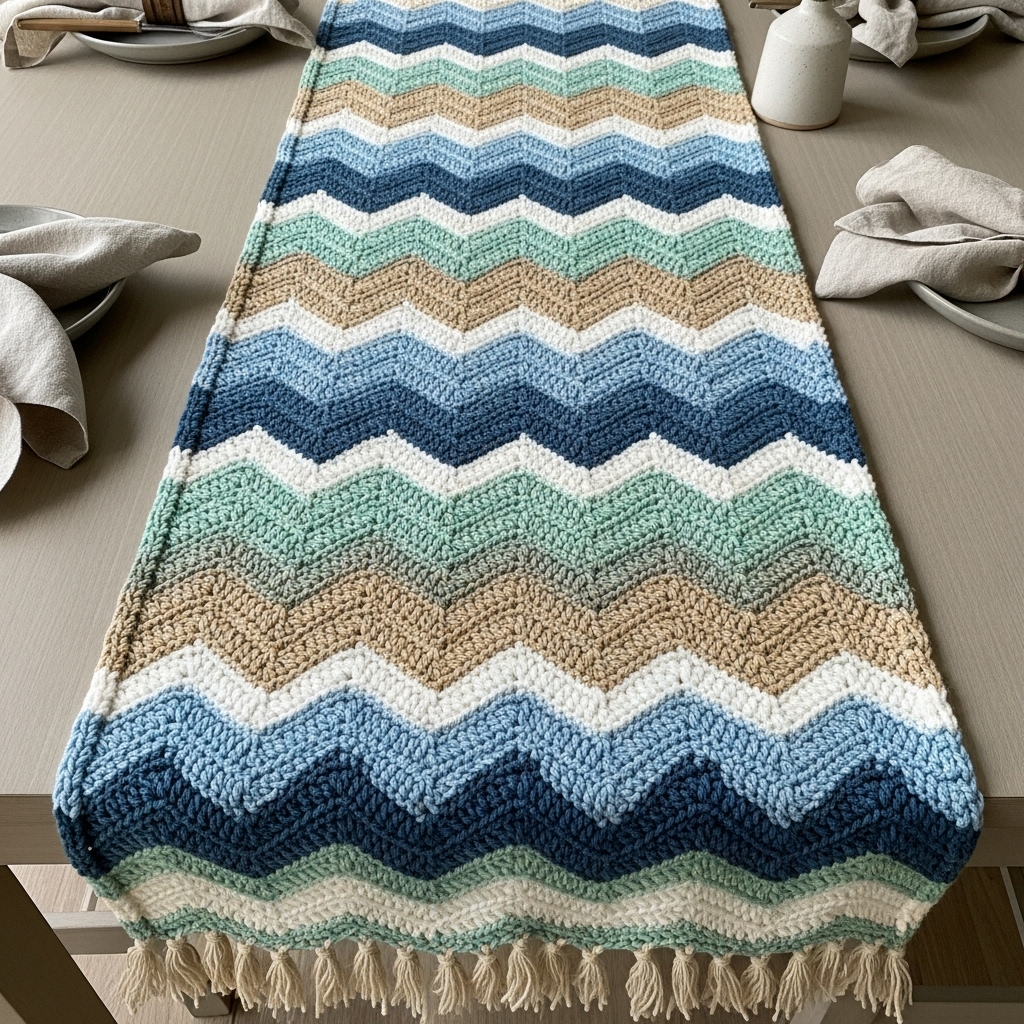
Vibe: coastal & relaxed — soothing waves in color repeats. Works well in variegated yarns or stripes.
Skill level: confident beginner
Materials (sample runner ~16 × 72 in)
- DK cotton or cotton-blend ~1,000–1,800 yd (depending on width/length).
- Hook: 4.0 mm.
- Optional: 3–4 colors for stripes.
Stitch pattern
Classic ripple (chevron) stitch using increases and decreases to create peaks and valleys.
Ripple math (digit-by-digit)
Ripple repeats are usually multiples of a number (e.g., 14 + 2 for edge sts). Example: suppose your ripple repeat is 14 sts and you want a runner 16 in wide, and your gauge is 4 sc/in (4 sts/in). Compute required repeats:
- First compute stitches per inch × width = foundation stitches: 4 × 16 = (4×10) + (4×6) = 40 + 24 = 64 stitches.
- Now determine how many 14-st repeats fit into 64 (plus edges). 14 × 4 = (14×4) = 56. 64 − 56 = 8 sts left. If your ripple needs two extra edge sts, you can adjust to 56 + 8 to get 4 repeats with larger edges, or increase repeats to 5 for 70 sts. Choose 70 if you want extra width. So pick foundation ch 70 + 1 turning ch.
Step-by-step
A — Foundation
- Ch 71 (70 foundation + 1 turning ch). Row 1: sc in 2nd ch from hook and across or start ripple pattern as the pattern requires.
B — Ripple row (example ripple repeat)
2. Standard chevron row (one row basis): dc2tog (decrease), dc in next 3, 2 dc in next 3 (increase), dc in next 3, dc2tog — adjust exact counts to create smooth peaks. Work across to end.
C — Color changes
3. Change color every few rows (2–6 rows per color band) for bold stripes or in every row for a variegated look. To keep neat color joins, change at the end of the row using the final yarn over technique.
D — Repeat
4. Continue ripple rows until runner reaches desired length. Because chevrons have directional bias, check that edges sit flat; minor blocking will even them.
E — Edge
5. Work a narrow sc border across edges — for ripple you may need to adjust border to follow peaks (3 sc in peak stitches for corners).
F — Blocking
6. Pin the dips and peaks to a flat rectangle to even the ripple profile and set length.
Variations & styling
- Use neutrals for a coastal table, or bright colors for summer tablescapes.
- Add a short fringe at two short ends for boho charm.
5. Crochet Pineapple Table Runner Pattern
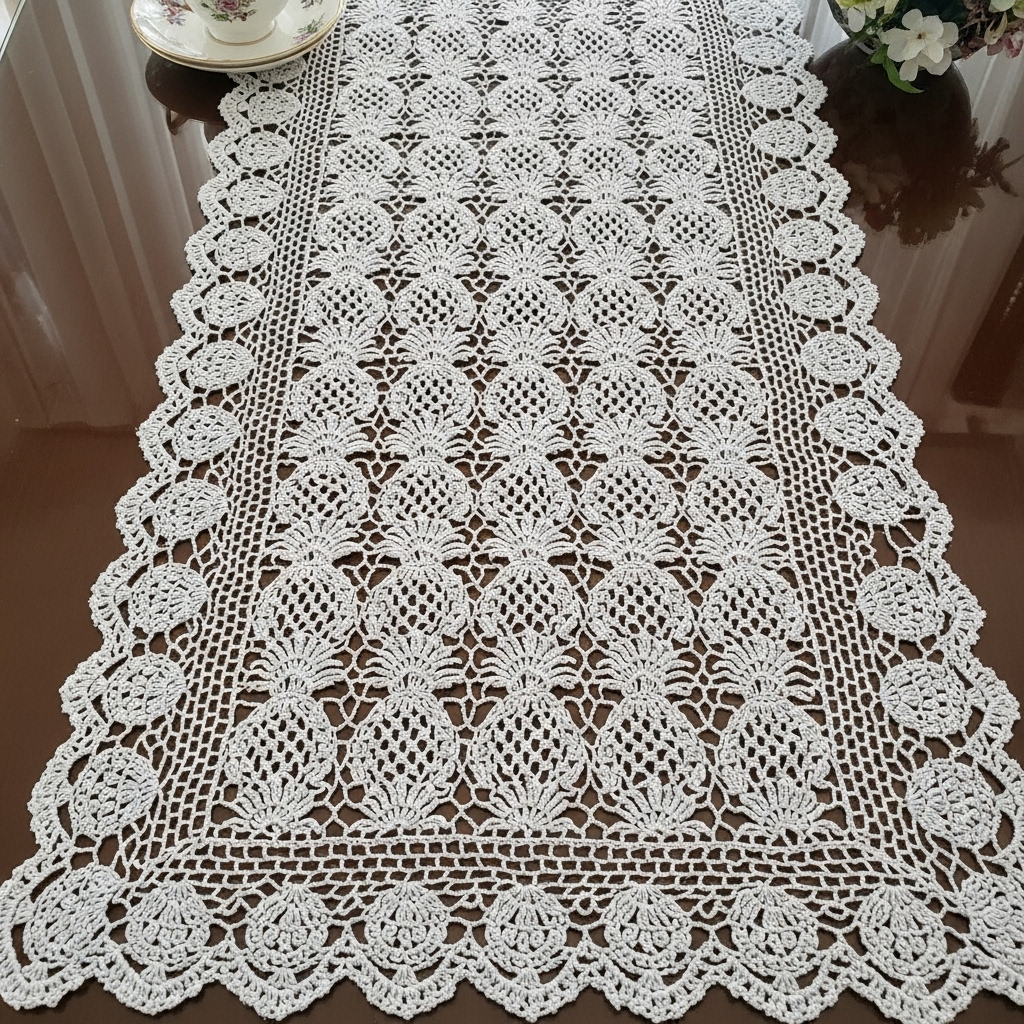
Vibe: classic vintage lace — elegant pineapple motifs make an heirloom runner.
Skill level: intermediate → advanced (lace shaping + blocking)
Materials (sample runner ~14 × 60 in)
- Size 10 crochet thread (white, ecru or color) ~1,000–1,600 yd depending on runner size and density.
- Hook: 1.5–1.75 mm (check thread label).
- Blocking pins & board — essential.
Why pineapple?
Pineapple lace is a staple of heirloom crochet — beautiful negative space, intricate look, and stunning when blocked.
Pattern concept
Pineapple motifs (vertical pineapple shells) are worked in panels and joined with mesh (chain + sc) stitches to form a long runner. A common approach is to work a wide central pineapple panel (repeating pineapple columns) with a scalloped pineapple edge on both sides.
Step-by-step (panel method)
A — Gauge & motif size
- Make a pineapple motif sample and block it. Suppose a single pineapple column after blocking measures 3 in wide. For a 14-in wide runner decide how many columns across: 14 ÷ 3 = approx 4 columns across (4 × 3 = 12 in plus mesh joins; this yields nice negative space). Plan for 4 columns and narrow mesh separators.
B — Work pineapple columns
2. Each pineapple column is a repeated multi-row shell that gradually fans out then narrows. A simplified column pattern (abbreviated) looks like:
- Base: chain foundation, mesh rows to raise height.
- Increase shell rows: clusters of (dc3 or tr3) separated by chains to create fan shapes.
- Narrow rows: reduce clusters and close with smaller shells.
Follow a detailed pineapple stitch chart — these are usually written row-by-row; be patient and mark rounds carefully.
C — Join columns
3. Join columns side-by-side with mesh rows— e.g., ch 5, sl st to anchor column, which leaves airy lace connecting columns. You can join-as-you-go or sew later.
D — Border
4. After joining required columns into a long panel, add a pineapple scallop border on both long edges by working shell rounds that form the dramatic scalloped look. The short ends can get a tidy picot or scallop finish.
E — Blocking (critical)
5. Pin the runner to exact final dimensions, stretching each shell evenly until the lace opens fully. Mist or wet with spray bottle and allow to dry completely. Proper blocking transforms the piece.
F — Lining (optional)
6. For everyday use you may want a thin fabric backing (plain linen or cotton) sewn to the wrong side to protect table surfaces and keep the lace flat. For formal use, leave it unlined to show lace.
Variations & styling
- Make the runner in a soft pastel for spring tables; keep white for classic dinner parties.
- Pineapple panels can be repeated to make a table-length runner or widened to a tablecloth.
Final finishing & care tips (applies to all runners)
- Blocking is non-negotiable for lace and motif runners — it sets the shape and opens stitches.
- Washing: Cotton/linen runners usually machine-washable on gentle; threads and delicate lace should be hand washed and laid flat. Always check yarn label and test a swatch for colorfastness.
- Backing: Consider a thin linen backing for everyday dining to protect the table and stabilize lace. Sew it on by machine or hand-stitch along edges, or make it removable with small snaps.
- Stain management: For precious lace, spot clean quickly; for stubborn stains pre-soak in gentle detergent before washing.
conclusion
Each of these five table runner patterns brings a different mood to the table: the Leaf-ish Chunky runner makes a bold, tactile statement for casual settings; the Linen Stitch runner is serene and modern; the Hexagons runner is playful and scrap-friendly; the Ripple Waves runner feels calm and beachy; and the Pineapple Lace runner is timeless and elegant. Start by swatching your chosen stitch, calculate your foundation using the step-by-step method above, then pick colors and blocking plans that match your home. Whether you make a quick chunky runner in an afternoon or slow down for an heirloom pineapple lace runner, a homemade runner is an easy, impactful way to refresh your table.