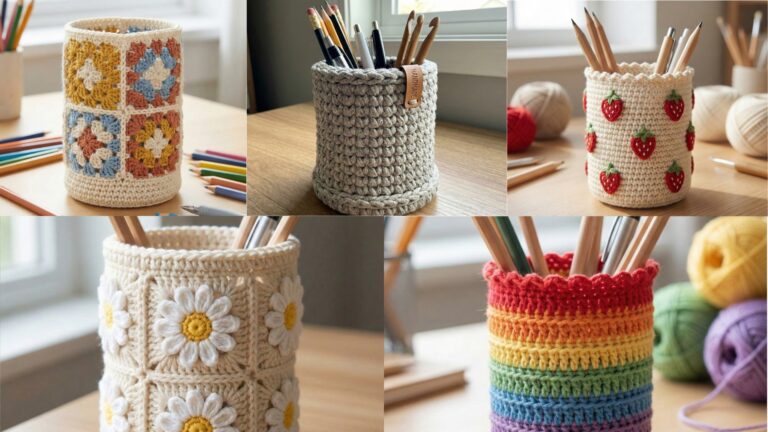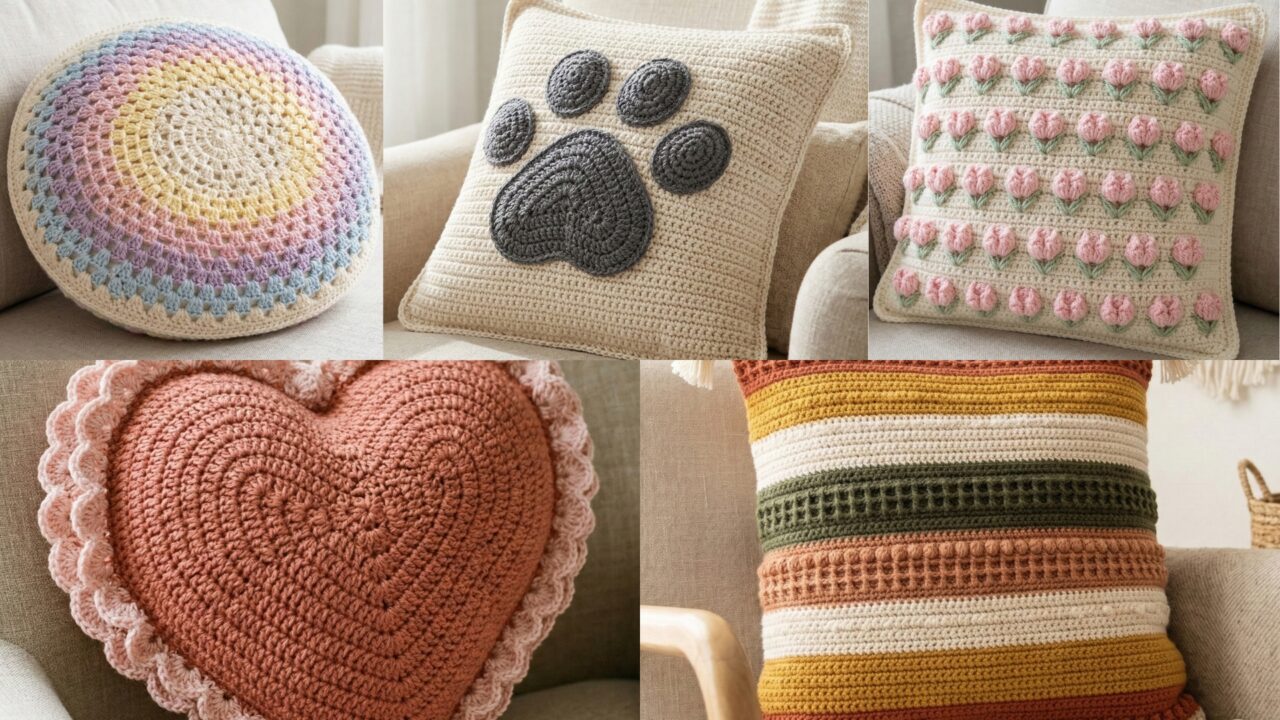
Handmade pillows instantly warm a room — they’re one of the fastest ways to add texture, color, and personality to sofas, beds, and reading nooks. Below are five fully detailed, gift-ready crochet pillow patterns: a classic Granny Stitch Round Cushion, a romantic Ruffle Heart Pillow, a textured Tulip Stitch Pillow, a playful Paw Print Pillow, and a modern Boho Striped Pillow. Each pattern contains: skill level, finished size, exact materials, stitch list/abbreviations, gauge notes, a step-by-step pattern (front, back, border/assembly), finishing/assembly instructions (linings, zippers, invisible seams), blocking and care, plus variations and gift ideas so you — or your readers — can make polished, durable pillows every time.
Quick universal notes before you begin
• For decorative pillows I usually recommend cotton or a cotton/acrylic blend for durability and ease of care, or an aran/worsted wool for cozy winter cushions. Use worsted/aran weight yarn (category 4) unless a pattern specifies lighter yarn.
• I include both options for using a pillow insert (store bought) or stuffing (polyfill) + an optional sewn lining (recommended to protect stuffing and for a neater finish).
• When joining panels, mattress stitch or whipstitch on the wrong side gives the neatest seam; sc-join gives a decorative ridge and added stability.
• Abbreviations below are US terms and repeated per pattern for reader convenience.
1. Crochet Granny Stitch Round Cushion Pillow Pattern
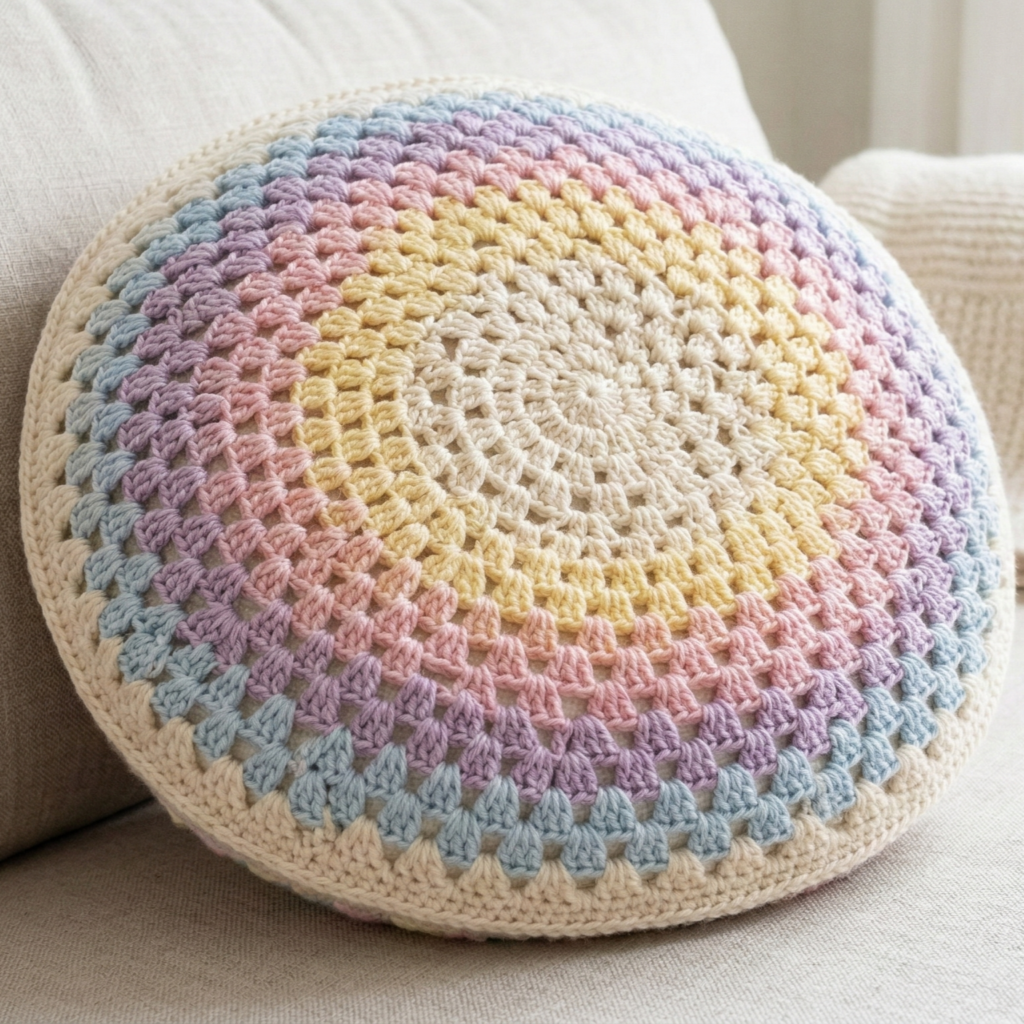
Skill level: Beginner–Intermediate (basic granny clusters, increasing in the round, joining, simple lining)
Finished size: ~15″ (38 cm) diameter (makes a generous round cushion). Adjust rounds to change size.
Yarn & hook: Worsted weight (aran) yarn — 400–600 yds total depending on colors; hook 5.0 mm (H) — use size that gives a fabric with slight drape but not floppy.
Materials
- Worsted weight yarn — main color + 2–3 accent colors (approximately 350–500 yds total)
- 5.0 mm hook (or preferred)
- Tapestry needle, stitch marker, scissors
- 15″ round pillow insert (preferred) OR polyfill stuffing (~300–500 g depending on plumpness)
- Lining fabric (cotton) circle 15½” diameter + 1″ seam allowance, sewing thread and needle or machine
- Optional zipper for hidden opening or buttons
Abbreviations
- ch = chain
- sl st = slip stitch
- sc = single crochet
- dc = double crochet
- tr = treble (if used)
- cl = cluster (granny cluster = 3 dc in same space traditionally)
- st(s) = stitch(es)
- MR = magic ring
Gauge (informal)
- Granny rounds are forgiving. Aim for 10–12 dc clusters across ~4″ in your chosen yarn/hook combo. If your rounds curl or are floppy, go down a hook size; if fabric is too stiff, go up.
Pattern overview
Make two identical round granny panels (front and back) worked in classic concentric granny rounds; sew or join panels, insert pillow or stuffing, and finish with a lining or zipper.
Step-by-step
A — Front panel (make 1)
- Center: MR, ch3 (counts as first dc), work 2 dc into MR, ch2 (corner space), 3 dc into MR three times. Join to top of ch3 with sl st. (4 clusters, 4 ch-2 corner spaces)
- Round 2: Sl st into next ch-2 corner. Ch3, 2 dc in same ch-2, ch2, 3 dc in same ch-2 (first corner made). Ch1, (3 dc, ch2, 3 dc) in next corner space — repeat around. Join. (You have 4 corners separated by ch-1 spaces.)
- Round 3: Ch3, 2 dc into same space, ch2, 3 dc (corner). Then ch1, 3 dc in next ch-1 space, ch1, (3 dc, ch2, 3 dc) in next corner repeat. You are now increasing sides by placing 3-dc groups into ch-1 spaces. Join.
- Subsequent Rounds: Continue same granny logic: corners = (3 dc, ch2, 3 dc), sides = place 3-dc in every ch-1 space created on previous round separated by ch-1. Keep working until the flat square/round reaches approx 15″ across measured diagonally — because a granny in square shape becomes a softened circle as you work, usually 7–10 rounds beyond the starter square depending on yarn. If you prefer a more circular look, skip one ch-1 space placement every now and then to smooth corners — but the traditional granny look is lovely.
- Fasten off and weave in ends. Block lightly if desired.
Tip: For visual interest, change color every round or every 2 rounds. When changing color, fasten new color in starting space (sl st join then ch3).
B — Back panel (make 1)
Make identical panel. Optionally make the back in one solid color for contrast.
C — Optional border/rim (for linking & seam allowance)
- With RS together, join yarn to outside edge and work 1 round sc evenly around both panels to give a tidy edge and extra fabric for seaming/joining. If you will insert a zipper later, leave the bottom 6″ unsewn to insert zipper before final seaming.
D — Lining & insertion (recommended)
- Cut lining fabric: two circles 15½” with 1″ seam allowance. Sew right sides together leaving a 4–5″ opening for turning, press, and turn right side out. Insert the pillow insert into the lining. Sew opening closed. Place the lined insert into the crocheted shell and hand stitch the lining to the crocheted edge from the inside for a secure finish — this hides the raw edges and prevents stuffing migration. If using polyfill, use the lining as a separate inner cushion and fill it, then close opening.
E — Joining panels
Two main joining options:
- Invisible mattress stitch (preferred) — Place RS of both panels facing out. Use yarn and tapestry needle to mattress stitch around the inside edge through the back loops only to make join invisible from RS.
- Sc-join: With RS together, sc through both loops of both panels to join with a decorative ridge. Useful if you want a visible border. Work until 1″ remains; insert lining/insert, then finish join.
Finishing & blocking
- Block the finished cushion lightly on a mat to even rounds and soften the fabric.
- Weave in ends and if you used color changes, secure tails beneath sc border for a clean interior.
Care & gift ideas
- Care: Machine-washable if your yarn allows; put pillow cover (without insert) in a mesh bag and wash on gentle cycle; reshape and dry flat. Use a removable lining for easier washing.
- Gift set: Make a trio of small 12″ round cushions in coordinating colors and present in a fabric box with a care card.
Variations
- Turn granny into an oversized floor cushion by increasing rounds and using super-bulky yarn for warm, cozy seating.
- Add a pom-pom fringe or tassels around edge for boho style.
2. Crochet Ruffle Heart Shaped Pillow Pattern
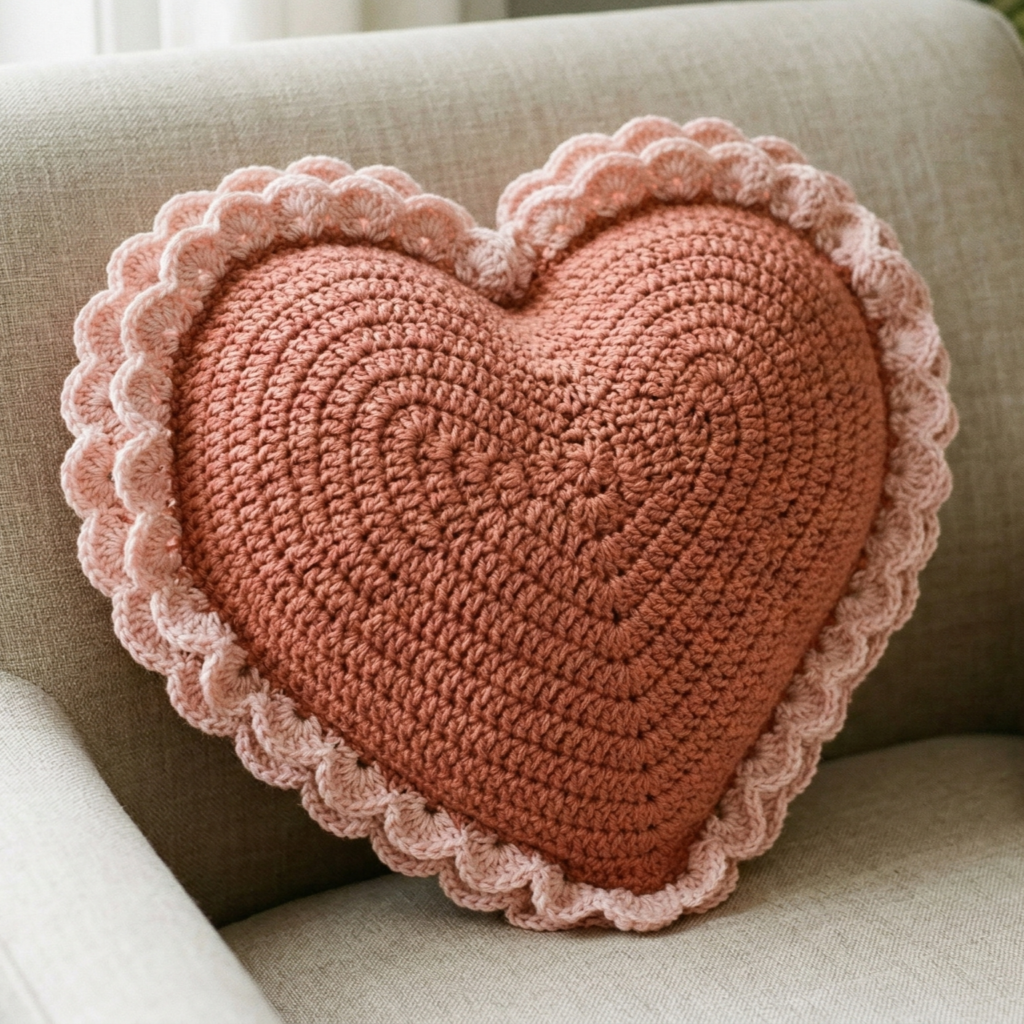
Skill level: Intermediate (shaping, working increases/decreases for heart curves, ruffle layering, applique)
Finished size: ~14″ × 12″ heart (35 × 30 cm) — the flat heart pillow is generously sized for couches. Adjust scale by changing hook/yarn.
Yarn & hook: Worsted/aran weight yarn; 300–450 yds total depending on ruffles; hook 5.0 mm recommended.
Materials
- Yarn main color for heart body + contrasting color for ruffle(s) — cotton/acrylic blend recommended
- 5.0 mm hook, tapestry needle, stitch markers
- 14″ heart-shaped pillow form OR polyfill stuffing (~500–800 g)
- Lining fabric optional (cut to heart shape + seam allowance)
- Sewing pins and fabric chalk for lining
Abbreviations
- ch, sc, hdc, dc, tr, inc (2 sc/dc in same stitch), dec (sc2tog), sl st
- sp = space
Concept & structure
The heart is made as one flat piece worked from the center outward as two rounds that form the two lobes and then a tapered lower point. Ruffles are worked as layered shells along the edge for a soft, romantic silhouette. Make two identical heart panels (front with ruffles attached; back plain or lightly ruffled), join, insert filling/lining, then close.
Step-by-step
A — Heart base (pattern for one panel)
This uses a worked heart chart approach; many crocheters prefer to follow a written heart worked flat. Here’s a reliable method using two semicircle lobes and a triangular point joined.
- Create two semicircle lobes (A & B) — each made as half a circle:
- MR, ch2, work 12 dc into MR; pull tight and sl st to close. (12 dc)
- Round 2 (increase): ch2, [dc, inc] around = increase evenly to create a larger semicircle (work only half of rounds for each lobe). Practically, to make a semicircle you may instead work an oval: ch 13, work 3 dc in second ch from hook, dc in next 9, 3 dc in last ch, then continue along opposite chain to make a full oval; for a heart base you’ll make 2 ovals and join them along a central seam. (If you prefer a simpler method, follow an established “flat heart pattern 14″ and adjust rounds until you have two identical lobes 6–7” across.)
- Join lobes: Lay lobes side by side and join them by working sc across adjacent edges to connect into the top heart shape. This creates a neat top rounded shape.
- Form the lower point: From the joined lobes, pick up stitches along bottom edge and work a triangular tapering section: decrease each row at both edges (sc, dec cross) until you form the pointed bottom. Example: Row 1 (start bottom): pick up 36 sts along bottom edge; Row 2: ch1, sc across; Row 3: ch1, sc2tog at beginning and end = reduce 2 sts; repeat until ~6 sts remain; fasten off and weave.
Because hearts have many variations, you may want to test this shaping on scrap yarn to ensure symmetrical lobes and a proportionate point. Another simple route: use a heart-shaped template (cardboard): single crochet around the template edge by working sc into a chain laid around the shape to create a perfect heart outline; then fill in with sc rows.
B — Ruffle layer(s) (make for front panel)
- Attach ruffle color along the edge of front heart with 1 round of sc to create a tidy base.
- Ruffle round: 5 dc in next st (shell), skip 2, sl st in next — repeat all around to get pronounced ruffles. For softer frills use hdc clusters (3–4 hdc) with ch1 between shells.
- For layered ruffles, add another ruffle row worked into the spaces between shells: attach yarn to top of shells and work (sc, hdc, dc, hdc, sc) into the center of preceding shells for a second tier.
C — Back panel
Make an identical flat heart without ruffles or with a single neat edge. Use same stitch count as front.
D — Lining & assembly
- Cut two lining heart pieces from cotton to match dimensions plus ½” seam allowance. Sew them together leaving a 3″ opening; turn right side out. If using an insert: slip insert into lining and place inside crocheted shell. If using polyfill: stuff the lining evenly before closing seam.
- Place lined insert into crocheted pillow shell. Hand-sew the lining to the crocheted shell with small whipstitches inside the sc border so the lining is anchored — this prevents shifting when you wash.
- Join crochet panels with mattress stitch for invisible join, leaving 3–4″ opening to insert lining if not already inside; finish join and weave ends.
E — Optional finishing touch
- Add a tiny crocheted bow, pearl bead, or embroidered initials to one lobe for personalization.
Blocking & care
- Block heart gently to set ruffles and shape. Use fabric-covered pins to maintain curves.
- Care: machine wash on gentle if yarn allows; use low heat or air dry to maintain ruffle shape.
Gift ideas
- Make small matching heart pillows as sachets: instead of lining with pillow insert, fill with dried lavender and sew closed. Add a hanging loop to use on a doorknob.
3. Crochet Tulip Stitch Pillow Pattern
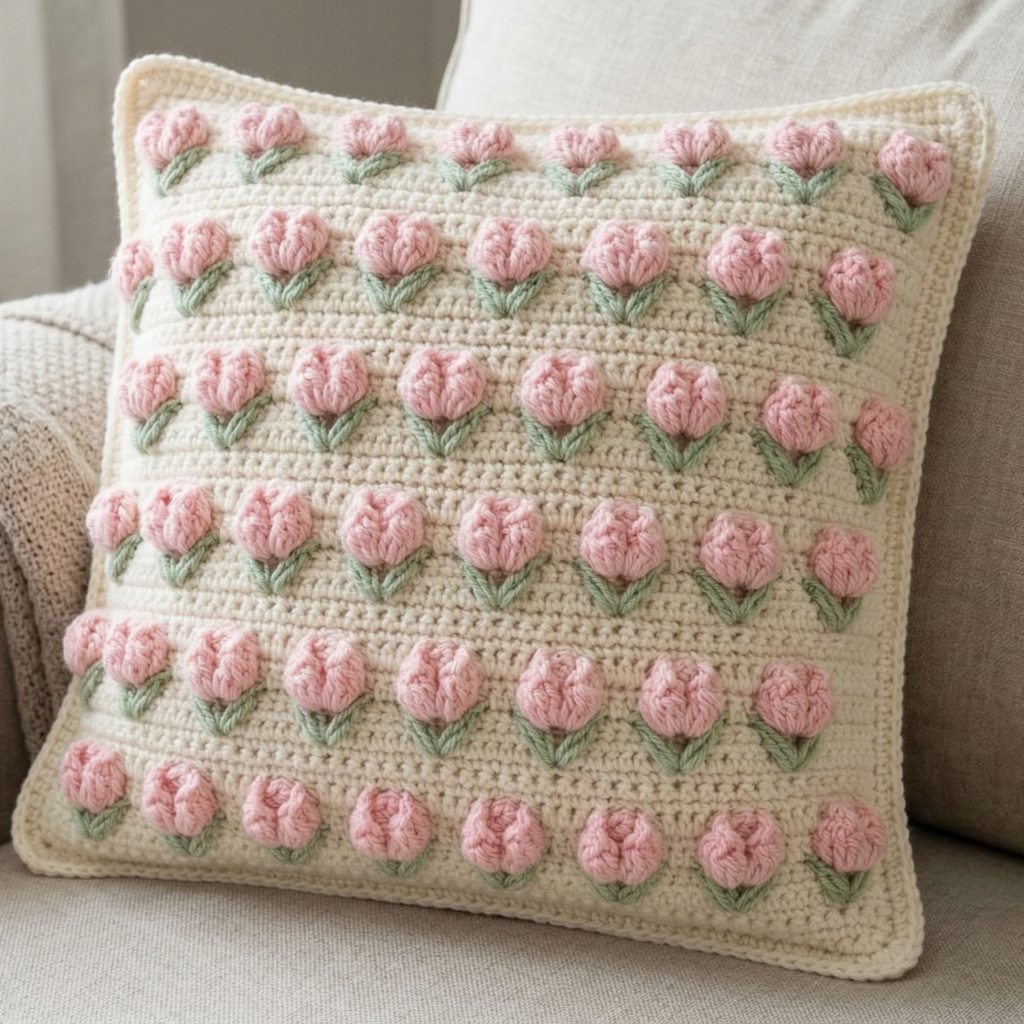
Skill level: Intermediate (textured tulip stitch, worked in rows, shaping a square/rectangle cushion)
Finished size: 16″ × 16″ (40 × 40 cm) pillow cover (standard throw size). Modify repeats for other sizes.
Yarn & hook: DK to worsted depending on stitch definition — worsted gives bold tulip texture; hook 4.0–5.0 mm.
Materials
- Worsted weight yarn 400–600 yds (main color + contrast for tulips if desired)
- 4.5 mm hook, tapestry needle, stitch markers
- 16″ square pillow insert OR polyfill
- Lining fabric (optional), zipper (16″) or buttons & loop for closure
Abbreviations
- ch, sc, hdc, dc, tr, sl st, tulip stitch (defined below).
The Tulip Stitch (brief)
There are a few “tulip stitch” variations. A common, textured tulip stitch is a layered cluster that looks like rows of tulip buds: typically made by working clusters of dc/ch between rows of sc to create raised petal shapes. Below is one accessible tulip-like repeat:
Tulip motif (one unit): in Row A create base loops (ch spaces) to anchor clusters; Row B work clusters into ch-spaces: sc, ch2, cluster (3 dc or puff), ch2, sc — repeat producing row of tulip buds. The next row anchors with sc across cluster tops.
Pattern — cover construction (front panel with tulip stitch; back panel plain or reverse tulips)
A — Front panel (worked flat in rows)
- Foundation chain: Chain a multiple of 6 + 2 for a 16″ width depending on gauge. Example: ch 64 for a 16″ width (test gauge first). Turn.
- Row 1 (base): sc in 2nd ch from hook and across. Turn.
- Row 2 (setup): ch2, sc across to set base for tulip anchors. Turn.
- Row 3 (tulip row): sc in next 2 sts, ch3, skip 3, sc in next 2 — repeat across to create ch-3 loop anchors. Turn.
- Row 4 (cluster row): Into each ch-3 loop: work (sc, hdc, dc, hdc, sc) (a petal cluster). Turn.
- Row 5 (anchor row): ch1, sc across in tops to stabilize clusters. Turn.
- Repeat Rows 3–5 to desired length (approx 16″ height). End with anchor row for neat top edge. Fasten off.
Adjust cluster height and density by using puff stitches for dramatic tulip bobs, or smaller hdc clusters for subtle texture.
B — Back panel
- Option A: Make a matching panel in reverse tulip (for symmetrical look).
- Option B: Make a simple sc panel (dense) with same stitch count for a clean back and easier assembly.
C — Edging & closure
- Work 1–2 rounds of sc around front panel edge. If you plan to install a hidden zipper: seam 3 sides with mattress stitch leaving top open for zipper insertion; use slipstitch or whipstitch to attach zipper to inside edges and conceal within border.
- For buttoned closure: crochet a 2″ band (sc rows) sewn to one edge and add 3 evenly spaced buttons on opposite panel.
D — Lining & assembly
- Insert lining before final join: slip in pillow insert (if using) and maneuver so tulip fronts align. Join final edge with mattress stitch and weave ends. For a plump finish, consider inserting a thin backing board or even a circle of interfacing to resist sagging over time.
Blocking & care
- Block panels to even stitch height — tulip clusters respond well to light steam blocking.
- Care: hand or machine wash gentle based on yarn; dry flat.
Variations & styling
- Make tulip stripes by using alternate colors for cluster rounds.
- Add tufted buttons sewn through the pillow for a tufted look that complements tulip rows.
4. Crochet Paw Print Pillow Pattern
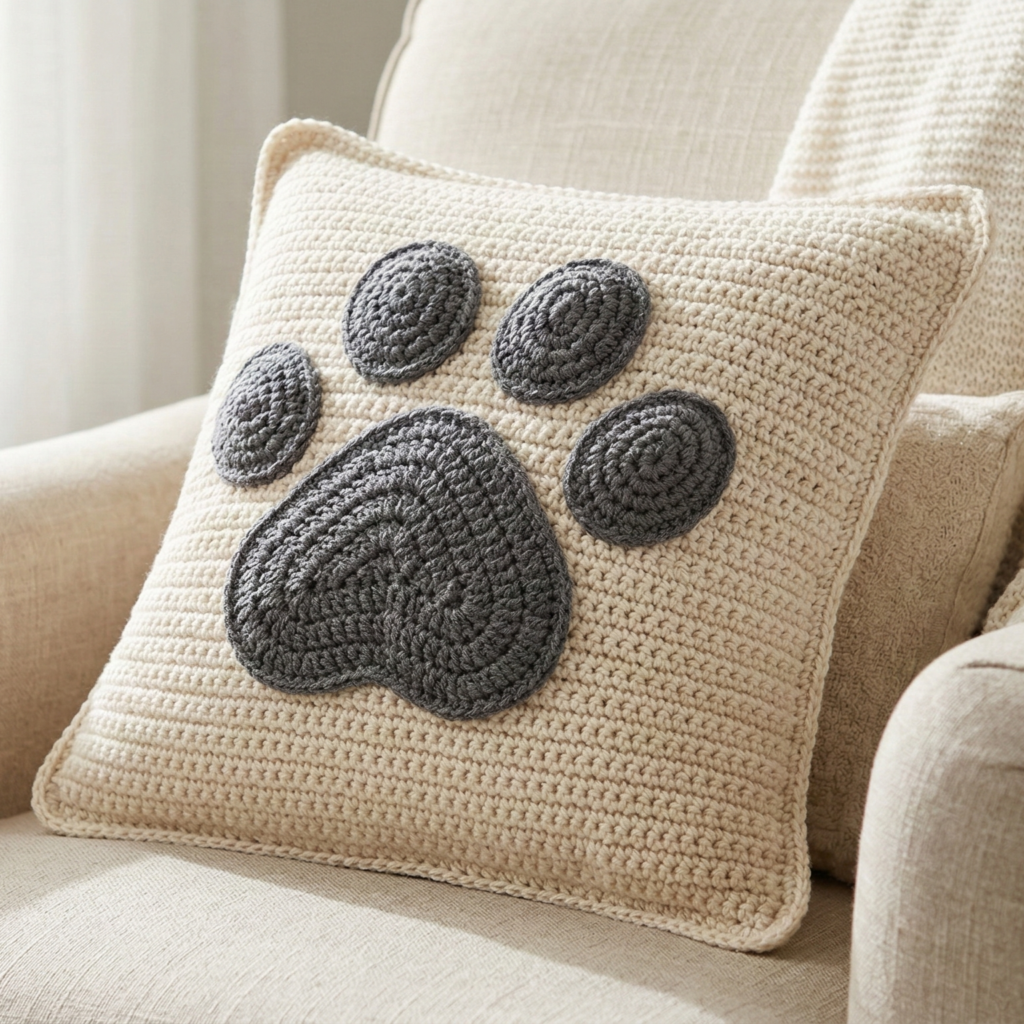
Skill level: Beginner–Intermediate (surface applique + colorwork)
Finished size: 14″ × 14″ (35 × 35 cm) square cushion — ideal for pet lovers.
Yarn & hook: Worsted weight yarn; hook 5.0 mm. Use machine-washable acrylic or washable cotton if it will live in a pet household.
Materials
- Main background yarn ~350–450 yds (neutral or accent)
- Contrast yarn for paw print (black/charcoal or coordinating color) small amount ~50–100 yds
- 14″ pillow insert OR polyfill ~400–600 g
- Tapestry needle, stitch markers, scissors
- Optional lining fabric and zipper
Abbreviations
- ch, sc, hdc, dc, sl st, MR, FLO/BLO
Concept
Make a square front panel in sc or hdc and add a paw-print applique using surface crochet, intarsia-like color blocks, or separate appliques (pads + toes) sewn on — appliqué method is easiest and very striking.
Pattern — panel & applique (easiest method: appliqués sewn on)
A — Square panel (front)
- Foundation chain: ch 36 (or multiple to reach 14″; test gauge). Row 1: sc in 2nd ch from hook and across. Turn.
- Rows 2–28 (adjust height): ch1, sc across. Aim for 14″ square (adjust row count). Fasten off and weave ends.
B — Paw pad appliqué (make 1 large pad + 4 toes)
Large pad (palm):
- MR, ch1, 8 sc into MR. Pull tight. (8)
- Inc in each st around → 16.
- (sc, inc) ×8 → 24.
- (2 sc, inc) ×8 → 32. — Adjust rounds until pad is ~3.5–4″ wide. Fasten off leaving tail.
Toe pads (make 4):
- MR, 5 sc. (5)
- inc around → 10.
- sc around 1 round, fasten off leaving tail. Size should be ~1–1.25″ each.
C — Attach appliqués
- Arrange large pad and 4 toes on the front panel in paw configuration (big pad centered slightly lower, four toes arcing above it). Pin into place.
- Using matching contrast yarn and tapestry needle, whipstitch applique edges to panel using small, even stitches. For very secure hold (washability), go around twice. Weave ends carefully into backing.
- Option: for a cleaner edge, sc around applique edge through both applique and panel to join (this creates a raised outline).
D — Back panel & assembly
- Make a back panel same as front (solid color). Insert zipper along one side or leave a centered opening for envelope-style closure: make two back halves that overlap in center by 6″ (envelope) — simple and no zipper required.
- Place RS together and mattress stitch sides leaving opening for insert; insert pillow; finish seam.
Alternative method (surface crochet)
- Work the entire panel in background color and then do surface sl st or surface crochet to outline and fill paw shapes — this gives a flatter, graphic result without extra sewing.
Finishing & care
- For pet homes, choose durable washable yarn; consider a removable cover (zipper) for frequent washing.
- For gift sets to new pet owners, pair with a small matching toy or a bag of treats.
5. Crochet Boho Striped Pillow Pattern
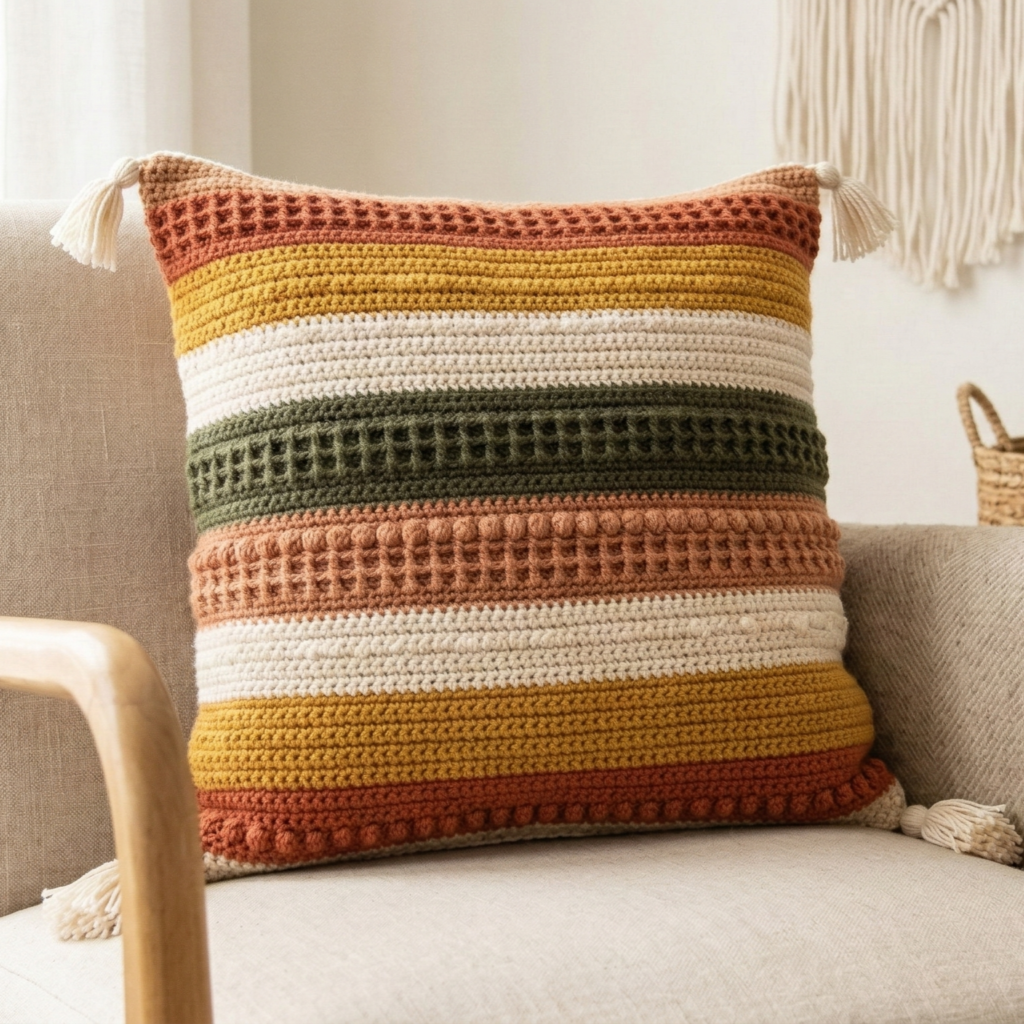
Skill level: Beginner (striping, color changes, simple seaming)
Finished size: 18″ × 18″ (45 × 45 cm) boho throw pillow — scaleable.
Yarn & hook: Worsted weight yarn in 4–6 coordinating colors (earthy boho palette); 6–8 colors works nicely; hook 5.0 mm.
Materials
- 450–800 yds worsted yarn across colors depending on size and stripe width
- 5.0 mm hook, tapestry needle
- 18″ square pillow insert OR polyfill ~600–900 g
- Optional fringe yarn for tassels or macramé cord for boho accents
- Zipper or button closure supplies
Abbreviations
- ch, sc, hdc, dc, sl st, FLO, BLO — used for texture rows if desired.
Concept & structure
This design uses bold horizontal stripes and optional textured rows (bobble, waffle, or herringbone) to give that boho artisanal feel. Work two equal square panels in stripes, join, add tassel corners or fringe, and insert pillow.
Step-by-step
A — Decide stripe pattern
- Choose colors A, B, C, D, etc. Plan stripe widths: wide stripe (6 rows), narrow stripe (2–3 rows), textured stripe (4 rows of waffle or bobble). Example repeat: A6, B3, C6, D3, A4 textured, repeat.
B — Front panel
- Foundation chain: ch 72 (or multiple to reach about 18″ width at your gauge). Row 1: sc in 2nd ch from hook and across. Turn.
- Work rows of chosen stitch for stripe counts. Change color at end of row: to change color, finish last yarn-over with new color and ch1 to maintain neat join; carry yarn up edge if color bands are short or weave ends if long.
- For textured rows: add bobble row (bobble stitch clusters), or waffle stitch rows (uses fpdc/bpdc) for 3–4 rows to create interest. Example waffle repeat: Row: fpdc around next st, dc in next across.
- Continue stripes until piece is square (18″ height). Fasten off.
C — Back panel
- Make identical or tonal back panel. For variety, make back in solid neutral color or envelope overlap (two panels that overlap).
D — Tassels / fringe (optional)
- Make 4 tassels (approx 5–6″ long finished) for corners. Fold yarn strands over a 6″ cardboard; tie top, trim ends evenly. Attach by threading tied loop through corner and cinching with a few stitches.
E — Join & insert
- Add a neat border: 1–2 rounds of sc around front panel to give a solid edge. If using zipper: attach zipper before final join by machine or hand-sewing zipper tape to edges. For envelope: overlap back panels by ~6″.
- Join panels with mattress stitch or sc-join leaving one side open if not using zipper; insert pillow and finish seam.
Finishing touches & styling
- Add a few macramé hanging cords or sewn-on pom-poms for extra boho flare.
- For high-end finish, bind edges with narrow fabric tape sewn on inside seam.
Care
- Removable covers are easiest to launder. Machine wash on gentle if yarn allows; reshape and dry flat.
Conclusion
These five pillow patterns give a full spectrum of style — classic granny charm (round cushion), romantic drama (ruffle heart), springlike texture (tulip stitch), playful personalization (paw print), and modern boho stripes. Each pattern can be scaled and customized: change yarn fibers for seasonal use (cotton for summer, wool for winter), alter color palettes to match decor, and choose closures (zipper, envelope, buttons) for care convenience.
Final practical tips (applies to all pillows)
- Measure before you commit: Work a small gauge swatch in the main stitch pattern to estimate finished size and adjust chain counts.
- Use a lining: A sewn lining stabilizes the pillow interior and prevents stuffing migration/wear from washing. It also makes adding a zipper straightforward.
- Seam methods: Mattress stitch for invisible joins; sc-join for rugged, decorative seams. Reinforce corners and stress points with extra passes.
- Stuffing advice: For super-plush pillows, buy a slightly oversized insert (e.g., 1–2″ larger than cover) for a plump finish. For crochet-filled pillows, stuff densely for structure.
- Label & care: If gifting, include fiber content and care instructions (wash temp, dry flat vs tumble dry) on a small card.