Crochet Mother’s Day gifts have a special kind of warmth that store-bought presents simply cannot match. They take time, thought, and care, which makes them feel personal in a way that is especially meaningful for such a heartfelt occasion. Whether you are making something decorative, practical, cozy, or a little bit of all three, a handmade gift tells your mom that you chose to create something just for her.
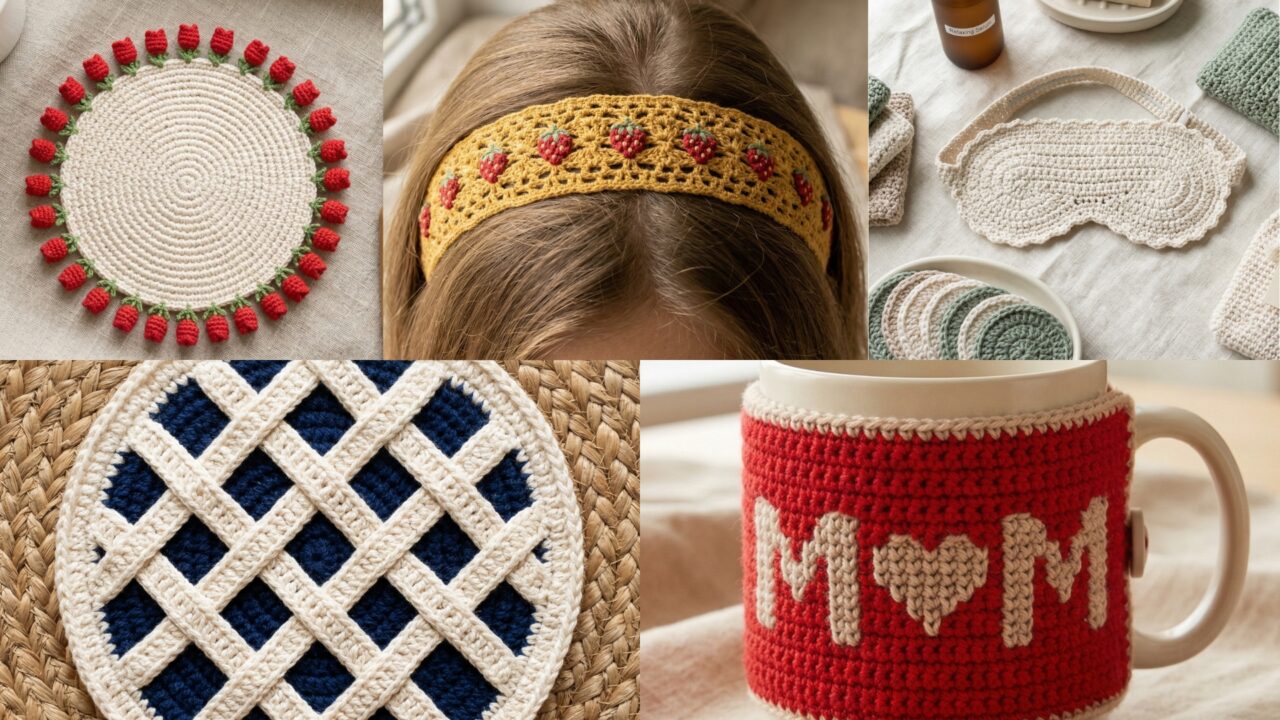
What makes crochet gifts especially lovely for Mother’s Day is how versatile they can be. A tulip coaster bouquet can brighten a table or desk. A lacy strawberry stitch headband adds a soft, feminine touch. A spa set brings relaxation and comfort. A blueberry pie potholder feels both playful and useful. A “MOM” tapestry mug cozy is sweet, practical, and full of sentiment. Each project is different, but all of them can become keepsakes that carry a little love in every stitch.
In this post, you will find five beautiful crochet Mother’s Day gift patterns with detailed step-by-step guidance, helpful tips, and finishing ideas to make each one feel extra special. These designs are written to be approachable and easy to follow while still giving you enough detail to create a polished, meaningful handmade gift. If you want a present that feels thoughtful, useful, and genuinely memorable, these crochet ideas are a wonderful place to begin.
Quick Notes
Project type: Mother’s Day crochet gifts
Best for: Gifts, keepsakes, home use, pampering sets, and meaningful handmade presents
Skill level: Beginner to intermediate, depending on stitch detail and shaping
Hook size: Usually 2.5 mm to 5.0 mm depending on yarn and item
Yarn weight: Cotton, cotton blends, DK, or lightweight worsted yarn
Best yarn choice: Cotton for practical items like coasters, potholders, and mug cozies; soft cotton or acrylic blends for wearables
Finished size: Varies by project
Time to complete: A few hours to a couple of days depending on the item
Helpful stitches: Chain, slip stitch, single crochet, half double crochet, double crochet, shell stitch, tapestry crochet, picot, color changes, increasing, decreasing, seaming, appliqué
Common Materials
Most Mother’s Day gifts can be made with a similar set of supplies.
- Yarn in your chosen colors
- Crochet hook suited to the yarn
- Yarn needle
- Scissors
- Stitch markers
- Optional buttons, beads, ribbon, or embellishments
- Optional fabric stiffener for decorative pieces
- Optional gift wrapping supplies
For gifts, yarn choice matters because the finished piece should feel beautiful and practical. Cotton yarn is especially useful for items that need to be washed or used often, like coasters, potholders, and mug cozies. For decorative or wearable gifts, soft cotton blends or acrylic yarn can add comfort and polish.
1. Crochet Red Tulip Bouquet Coaster Pattern
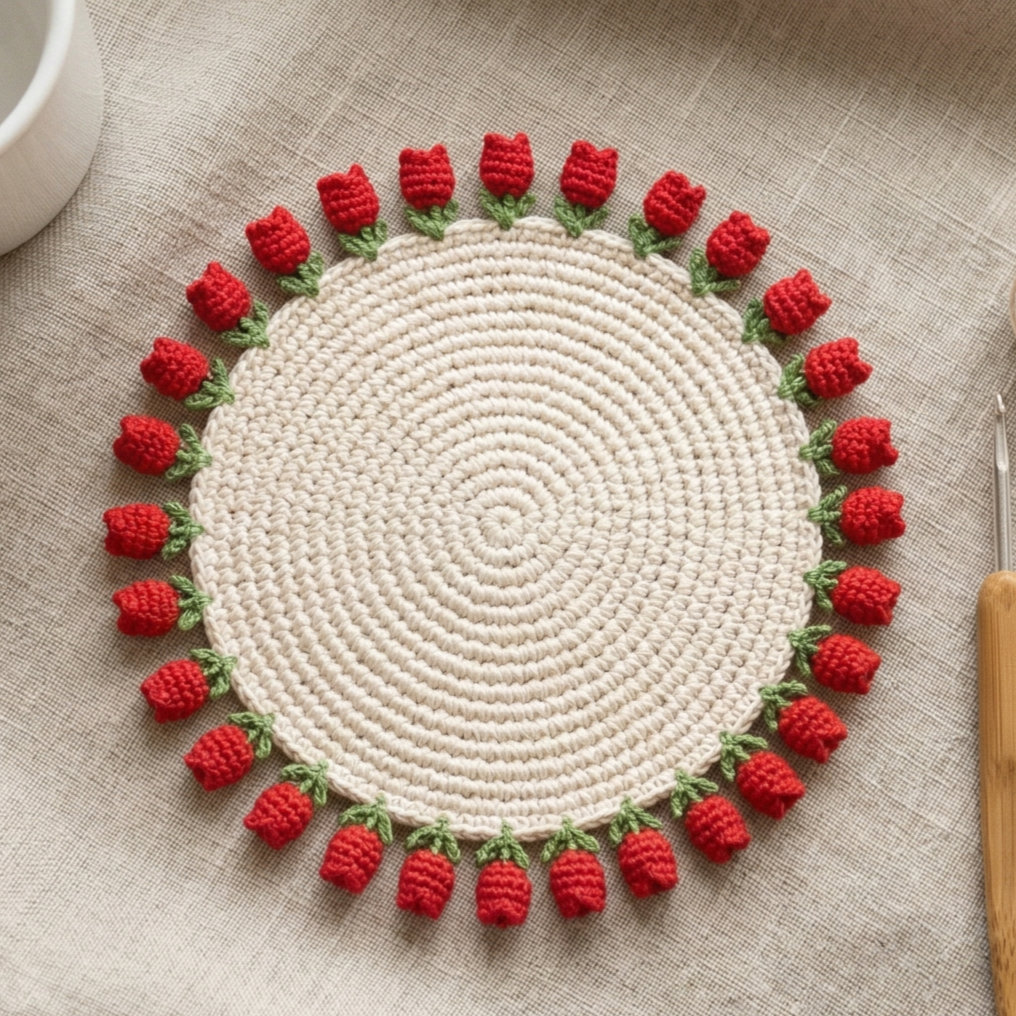
A red tulip bouquet coaster is a lovely Mother’s Day gift because it feels fresh, cheerful, and full of spring energy. The tulip motif adds a floral touch that is elegant without being too complicated. This project is ideal if you want something small but meaningful that can brighten a table, desk, or coffee corner.
Step-by-step guide
Step 1: Choose your tulip colors
Start by selecting a bright red for the tulip blooms and green for the stems and leaves. You can also add a soft neutral background if you want the flowers to stand out more. The contrast between red and green gives the coaster a classic floral look that feels very springlike.
The colors set the bouquet mood.
Step 2: Decide on the coaster shape
A tulip bouquet coaster can be round, slightly oval, or arranged as a cluster of flower motifs. Choose the shape that best suits your style. A round coaster feels simple and functional, while a bouquet-style layout feels more decorative and gift-like.
The shape helps define how floral the coaster feels.
Step 3: Crochet the coaster base
Begin with a flat round or oval base using single crochet or double crochet. Keep the stitches even so the coaster lays flat on a table. Since this is a coaster, a sturdy and tidy base is important for everyday use.
A flat base makes the coaster practical.
Step 4: Crochet the tulip motifs
Make small tulip flowers separately or as appliqué pieces. Each tulip should have a simple bloom and a short green stem. Keep the motifs small enough to fit neatly on the coaster without making it bulky. The flower shapes should feel sweet and balanced.
The tulips are the star of the design.
Step 5: Arrange the bouquet
Place the tulip motifs on the coaster before sewing them down. Decide whether you want a single tulip, a small trio, or a little bouquet arrangement. A trio often looks especially elegant and giftable.
A thoughtful layout makes the bouquet feel intentional.
Step 6: Attach the flowers securely
Use a yarn needle and matching yarn to sew the tulips onto the coaster base. Make sure the stitches are hidden as much as possible so the front looks neat. Secure each flower firmly, especially if the coaster will be used often.
Strong attachment keeps the coaster durable.
Step 7: Add leaves and finishing touches
Crochet or embroider small leaves around the flowers to give the bouquet more dimension. If desired, add a tiny border around the coaster to frame the floral design. A neat border can help the coaster feel complete and polished.
Step 8: Block the coaster
If the coaster curls slightly, lightly block it so it lies flat. This is especially helpful for floral designs because it helps the tulips sit neatly and makes the overall shape more refined.
Helpful tips
This coaster makes a beautiful gift when paired with a mug, a tea bag set, or a small candle. If you want a softer Mother’s Day look, use pink tulips instead of red. Red, however, gives the bouquet a bold and cheerful appearance that feels very special.
2. Crochet Strawberry Stitch Lacy Headband Pattern
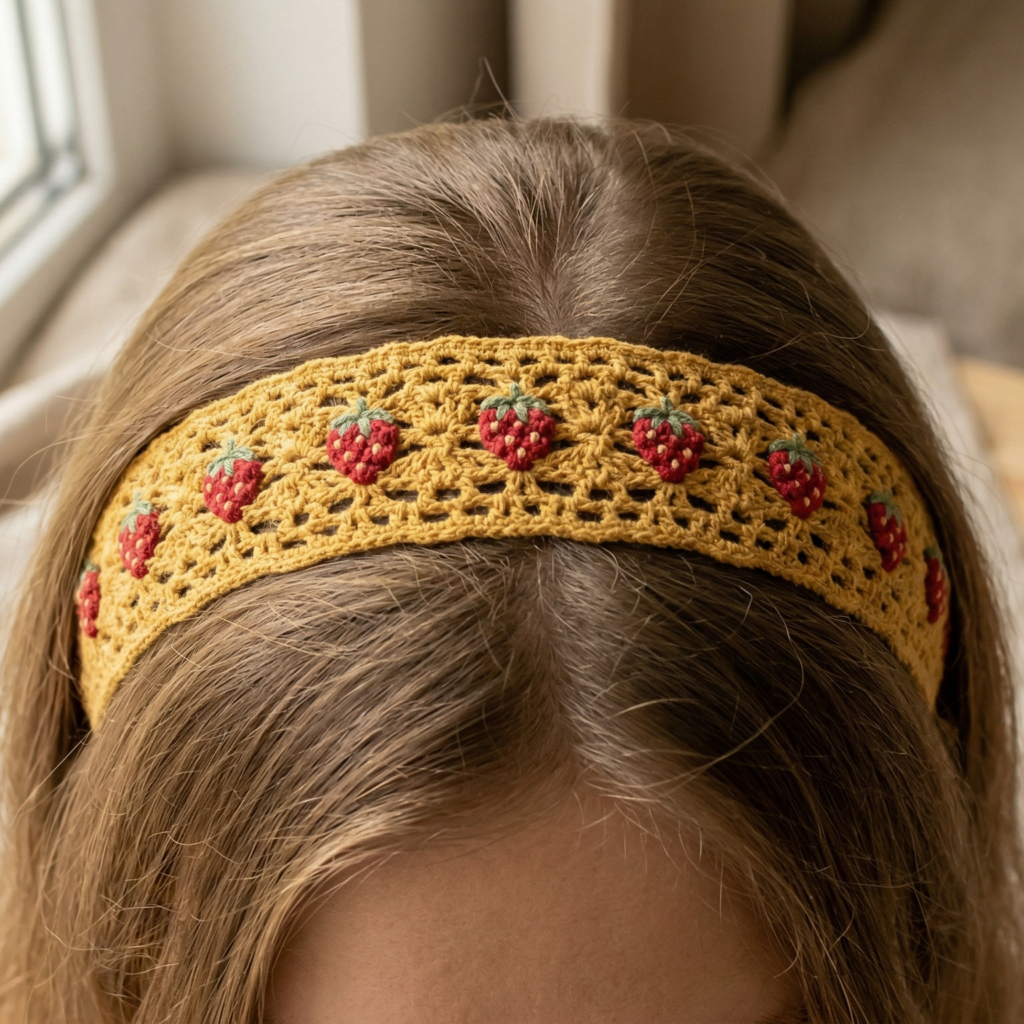
A strawberry stitch lacy headband is sweet, feminine, and perfect for a Mother’s Day gift that feels both pretty and wearable. The lace adds softness, while the strawberry stitch texture gives it an interesting handmade look. This is a lovely project if you want something practical that still feels delicate and stylish.
Step-by-step guide
Step 1: Choose soft feminine colors
Pick colors that feel sweet and gentle. Pink, blush, cream, strawberry red, or soft green can all work beautifully. A soft palette gives the headband a romantic and spring-inspired mood that is ideal for Mother’s Day.
The color choice sets the style of the headband.
Step 2: Measure the headband length
Measure around the head where the band will sit. This will help you make a headband that feels snug but comfortable. A good fit is important because this is a wearable gift, and comfort matters just as much as appearance.
A well-sized headband is more enjoyable to wear.
Step 3: Crochet the base band
Begin with a foundation row using a stitch that creates a comfortable stretch. Single crochet, half double crochet, or a ribbed base can work nicely. The band should feel soft against the skin and stay in place without squeezing.
The base provides structure and comfort.
Step 4: Work the strawberry stitch section
Begin the strawberry stitch pattern along the headband. This textured stitch creates a lovely raised surface that feels pretty and delicate. Keep the rows even so the texture remains balanced from one end to the other.
The strawberry stitch gives the band its charm.
Step 5: Add a lacy edge
To make the headband feel more delicate, add a small lacy border or openwork section along one or both edges. This softens the look and gives the headband a more feminine finish. Keep the lace subtle so it complements the main texture rather than competing with it.
The lace makes the design feel light and elegant.
Step 6: Shape the headband ends
Make sure the ends are neat and aligned so the headband can be joined comfortably at the back. If you want the fit to be adjustable, you can leave room for a small button closure or a tie-back section.
A clean finish makes the headband easier to wear.
Step 7: Join the ends securely
Sew or crochet the ends together firmly using matching yarn. Make the seam soft so it will not feel uncomfortable against the back of the head. A neat join will make the headband look more finished and polished.
Step 8: Block lightly if needed
If the lace or texture curls slightly, give the headband a gentle block. This helps the stitches sit neatly and improves the overall shape.
Helpful tips
This headband pairs beautifully with spring dresses, casual outfits, or lounging looks. If you want it to feel more festive, try a strawberry red body with soft cream lace accents. For a more everyday version, blush and ivory are beautiful together.
3. Crochet Spa Set Pattern
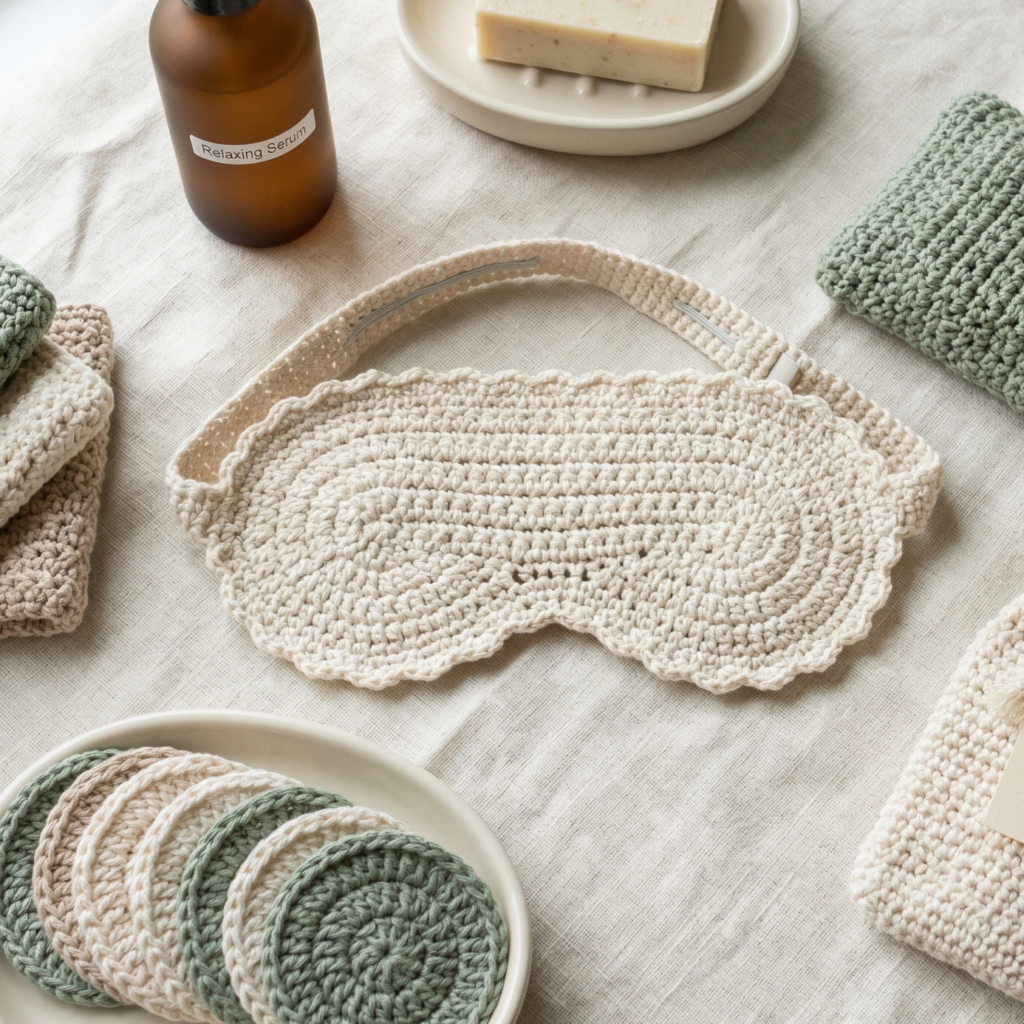
A crochet spa set is a thoughtful and luxurious Mother’s Day gift because it feels like a little package of relaxation. This can include washcloths, facial rounds, a headband, and even a small basket or pouch to hold everything together. It is a practical gift that still feels indulgent and heartfelt.
Step-by-step guide
Step 1: Plan the spa set items
Decide what pieces you want to include in your spa set. A simple set might include two washcloths and a face scrubber, while a fuller set could include a headband, washcloths, a soap saver, and a small storage pouch. Planning ahead helps you keep the colors and sizes coordinated.
A clear set plan makes the gift feel complete.
Step 2: Choose soft calming colors
Pick soothing colors such as cream, sage, blush, lavender, seafoam, or dusty blue. Spa sets often feel best in calming, natural tones that suggest relaxation and care. A coordinated palette will make the set feel like a well-thought-out gift.
The colors should feel peaceful and clean.
Step 3: Crochet the washcloths
Start with simple square or rectangular washcloths using a durable cotton yarn. A texture stitch like moss stitch, seed stitch, or simple single crochet can work beautifully. Keep the stitches neat so the cloths feel soft but sturdy.
Washcloths are the most practical part of the set.
Step 4: Make matching spa accessories
Add a matching face scrubbie, headband, or soap saver if you want a fuller set. These smaller pieces can use the same stitch or color scheme so everything feels coordinated. A headband can be especially nice for a spa feel because it makes the set feel more complete.
The matching pieces create a gift bundle.
Step 5: Crochet a small storage pouch or basket
A small pouch or mini basket is perfect for keeping the spa items together. This makes the gift feel more polished and useful. It also gives the receiver a way to store everything neatly in the bathroom or bedroom.
The container ties the whole gift together.
Step 6: Add a simple border or decorative detail
You can add a delicate border to the washcloths or a tiny ribbon tie to the pouch. Keep the embellishment minimal so the set stays clean and relaxing in style. Spa gifts usually feel most luxurious when they are simple and well-made.
Step 7: Finish and package neatly
Weave in all ends securely and arrange the items together as a set. You can wrap them in tissue paper, tie them with ribbon, or place them in a basket for a more gift-ready presentation.
Step 8: Add a personal note
A spa set becomes even more meaningful when paired with a handwritten note or a small card. The handmade pieces already say a lot, and a personal message makes the gift feel even more thoughtful.
Helpful tips
A spa set is one of the easiest Mother’s Day gifts to personalize. Choose colors you know your mom loves, and keep the set soft, practical, and comforting. This is a wonderful choice if you want something she can actually use and enjoy every day.
4. Crochet Blueberry Pie Potholder Pattern
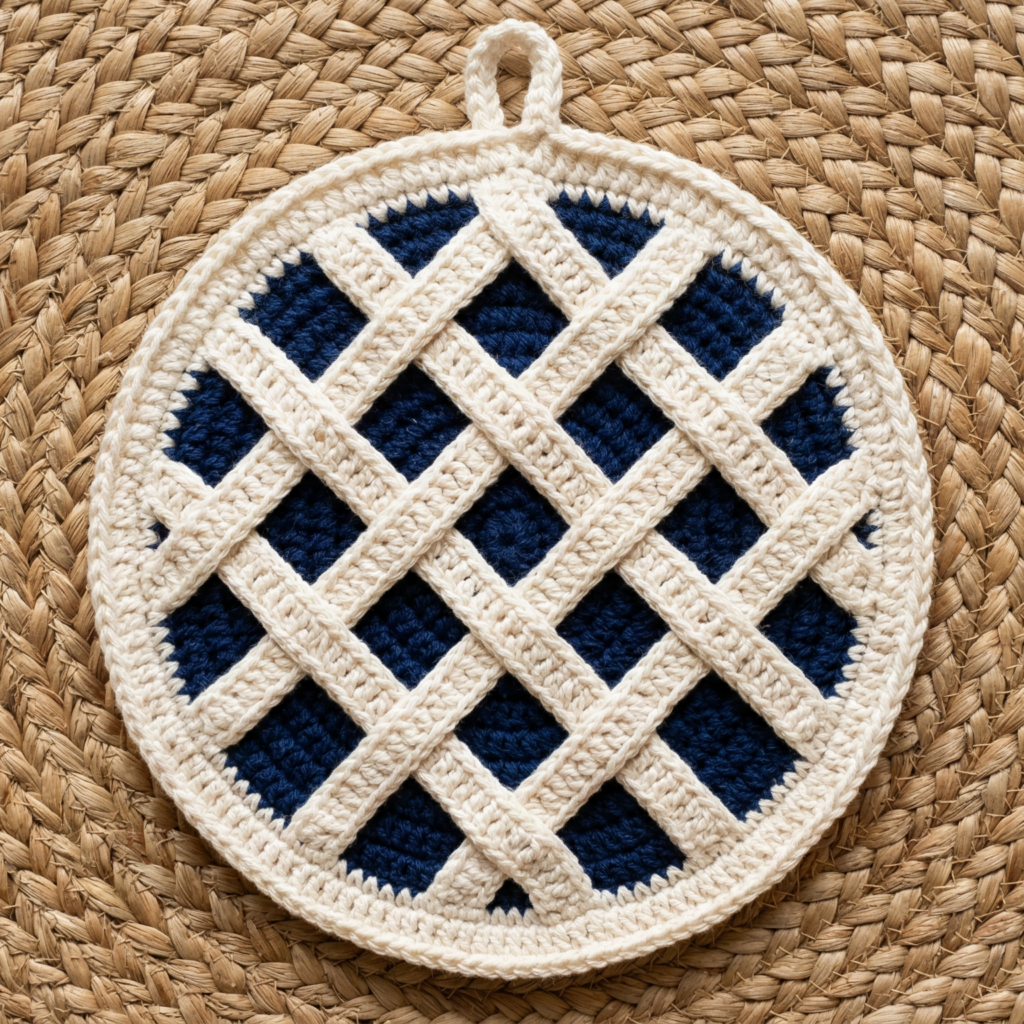
A blueberry pie potholder is a fun and playful Mother’s Day gift that also happens to be practical. It brings a little kitchen charm to the celebration and is a lovely way to combine usefulness with a homemade dessert-inspired design. It is especially nice for moms who love cooking, baking, or simply charming kitchen decor.
Step-by-step guide
Step 1: Pick the blueberry and crust colors
Choose rich blueberry tones such as deep blue, purple-blue, or indigo, along with a crust color like cream, tan, or light brown. The contrast between the filling and crust gives the potholder its dessert-like appearance.
The colors make the pie theme come alive.
Step 2: Decide on the potholder shape
You can make the potholder round, oval, or pie-slice shaped depending on the design you want. A round shape feels classic, while a pie-slice version makes the theme instantly recognizable. Pick the shape that best fits your skill level and style.
The shape sets the mood of the pattern.
Step 3: Crochet the base layer
Start with a flat circle, oval, or wedge that will form the main body of the potholder. Keep the stitches dense enough to protect hands from heat. Since this is a functional kitchen item, it needs to be sturdy and durable.
The base is what makes the potholder useful.
Step 4: Add the blueberry filling detail
Use blue or purple yarn to create the “filling” area. This can be done with a solid center or with small textured rounds to suggest berries. Keep the filling section slightly raised or visually distinct so it looks like fruit filling inside a pie.
The filling gives the potholder its dessert character.
Step 5: Crochet the crust edge
Use your crust color to make a border or scalloped edge around the outer edge of the potholder. A slightly textured or braided edge can resemble a pie crust and make the design feel more realistic.
The crust detail is what gives the potholder its name.
Step 6: Add decorative blueberry accents
You can embroider tiny blueberry-like circles or add small surface details across the filling section. Keep them spaced naturally so the design stays neat and readable. A few small accents are usually enough to suggest a baked blueberry pie.
Step 7: Add a hanging loop
Since potholders are useful in the kitchen, add a loop at the top so it can be hung when not in use. Make sure the loop is secure and large enough to hang easily on a hook.
Step 8: Check thickness and finish
Test the potholder for thickness and make sure the stitches are tight enough to offer protection. Weave in all ends carefully and lightly block if needed so it lies flat and looks polished.
Helpful tips
This potholder makes a wonderful gift when paired with a wooden spoon, baking mix, or a handwritten recipe card. If your mom loves baking, this one will feel especially personal and thoughtful. You can also adjust the fruit color to make other pie flavors later.
5. Crochet MOM Tapestry Mug Cozy Pattern

A “MOM” tapestry mug cozy is a heartfelt and practical gift that feels both personal and useful. It is a wonderful way to turn a simple mug into a keepsake and remind your mom of your love every time she reaches for her tea or coffee. The tapestry technique allows the letters to stand out clearly while keeping the cozy compact and stylish.
Step-by-step guide
Step 1: Plan the letter layout
Before you begin, sketch out the word “MOM” so you can decide where each letter will go. Keep the letters bold and simple so they are easy to read on the small mug cozy surface. Good spacing will help the tapestry design stay clear.
A planned layout makes the letters more legible.
Step 2: Choose your colors
Pick one color for the background and another for the letters. A soft neutral background with a bold letter color works especially well. For a Mother’s Day gift, cream, pink, red, or soft gray are all lovely options.
The color contrast helps the word stand out.
Step 3: Crochet the base strip
Start with a rectangular strip that wraps around the mug. Use a firm stitch like single crochet so the cozy holds its shape. The strip should fit snugly around the mug but still be easy to remove if needed.
The base strip is the structure of the cozy.
Step 4: Add the tapestry letters
Using tapestry crochet or color changes, create the letters M, O, and M across the surface. Keep the stitches neat and count carefully so the letters stay clear and centered. Even though the project is small, the lettering should be easy to recognize.
The letters are the heart of the design.
Step 5: Keep the cozy flat and snug
As you work, check that the cozy remains flat and does not become too loose. Mug cozies should wrap securely around the mug without slipping. A snug fit also helps the tapestry letters stay visually neat.
The fit is just as important as the lettering.
Step 6: Add a closure
Attach a button, loop, or small tie at the back so the cozy can open and close. A button closure is especially nice because it keeps the cozy adjustable and easy to remove. Choose a button that matches the style of the cozy.
Step 7: Finish the edges
Add a small border if needed to clean up the edges and frame the design. Weave in all ends carefully so the cozy feels smooth and comfortable to hold. The final piece should feel tidy and gift-ready.
Step 8: Personalize if desired
You can add a tiny heart, flower, or accent stitch beside the word MOM if you want to make it even more special. A simple embellishment can make the cozy feel extra thoughtful without overwhelming the design.
Helpful tips
This is one of the most meaningful gift ideas in the set because it is both useful and sentimental. If you want a softer version, use pastel lettering. If you want a bolder version, use red or deep pink letters against a light background. It pairs beautifully with a mug, coffee gift card, or tea blend.
Conclusion
Crochet Mother’s Day gifts are beautiful because they feel personal, thoughtful, and full of care. A handmade present carries time and intention in every stitch, which makes it especially meaningful for such a special occasion. Whether you are creating something decorative, wearable, or practical, a crochet gift can become a keepsake your mom will treasure and use with joy.
These five patterns each offer a different kind of Mother’s Day charm. The tulip bouquet coaster feels fresh and floral. The strawberry stitch lacy headband is soft and pretty. The spa set is relaxing and practical. The blueberry pie potholder is playful and kitchen-friendly. The MOM tapestry mug cozy is heartfelt and personal. Together, they show that a handmade gift can be both beautiful and useful at the same time.
If you want to give your mom something more meaningful than a store-bought item, these crochet ideas are a lovely place to begin. With a little yarn, some thoughtful color choices, and a bit of time, you can create a gift that feels warm, special, and full of love.