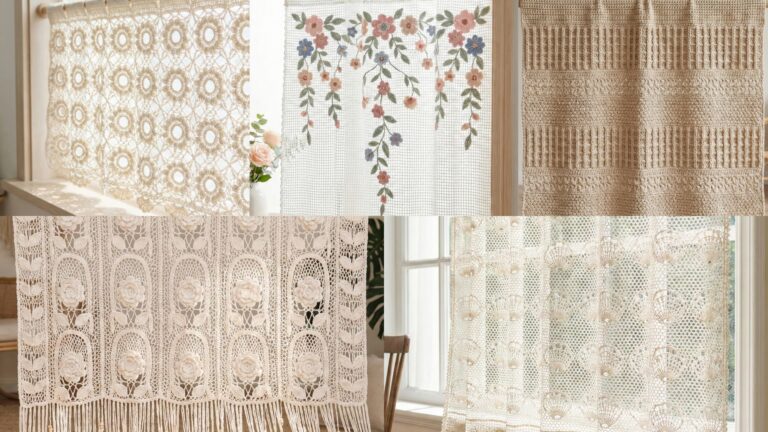
Granny squares are the happiest little building blocks in crochet — endlessly adaptable, wonderfully stash-busting, and beautifully nostalgic. In this post you’ll get five full granny-square patterns (with variations, materials, step-by-step instructions, finishing tips, and ideas for what to make with each square). Whether you want a bold sunflower focal square, a sculpted fountain-flower motif, a long rectangular granny for scarves and runners, a classic solid granny, or a tiny floral mini-granny for trims and accessories — there’s a pattern here you can start today.
Below each pattern you’ll find: materials & gauge, skill level, finished size guide, a round-by-round step-by-step pattern written in standard crochet shorthand plus plain-English guidance, blocking/finishing tips, and creative ways to use the squares.
Abbreviations & quick notes (read first)
- ch = chain
- sl st = slip stitch
- sc = single crochet
- hdc = half double crochet
- dc = double crochet
- tr = treble (UK = triple) crochet
- sk = skip
- st(s) = stitch(es)
- rep = repeat
- MR = magic ring (magic circle)
- ch-sp = chain space
- “( )” indicates a group worked into the same stitch or space
Gauge and hook suggestions are flexible for most granny projects; adjust hook size if you want denser fabric (smaller hook) or drapier fabric (larger hook). Always make a gauge square if you plan to join many motifs into a large blanket.
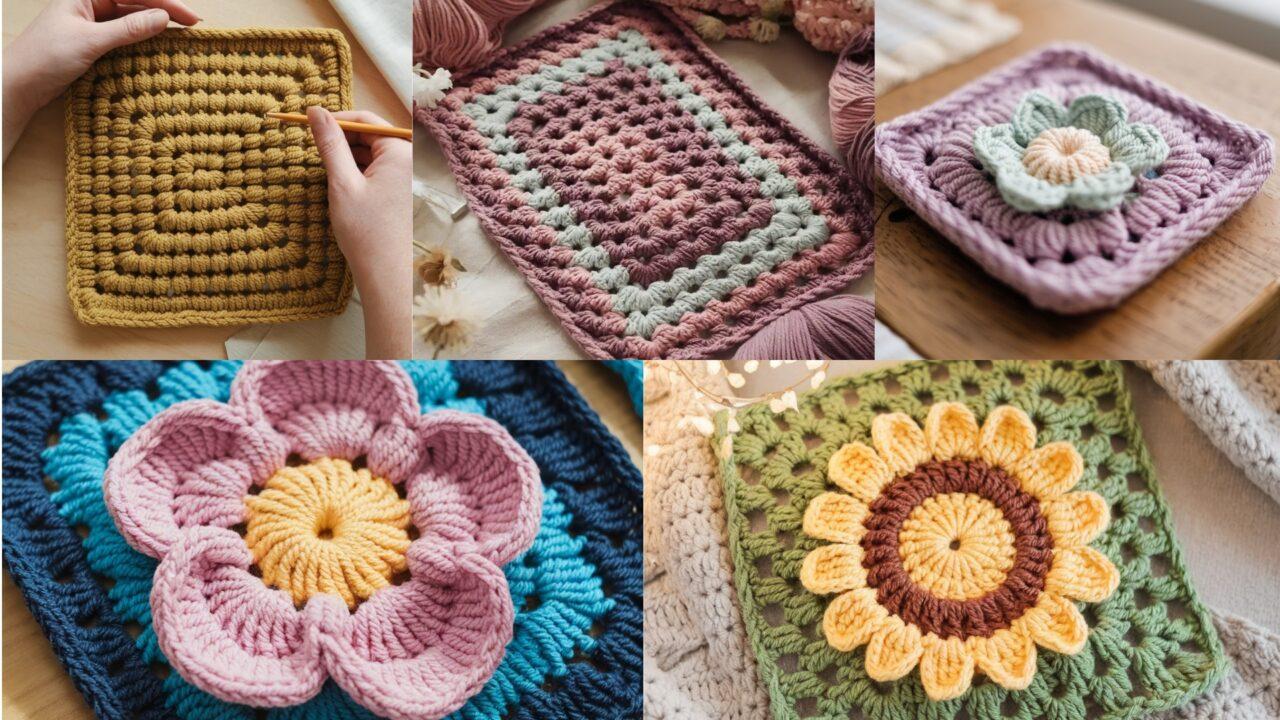
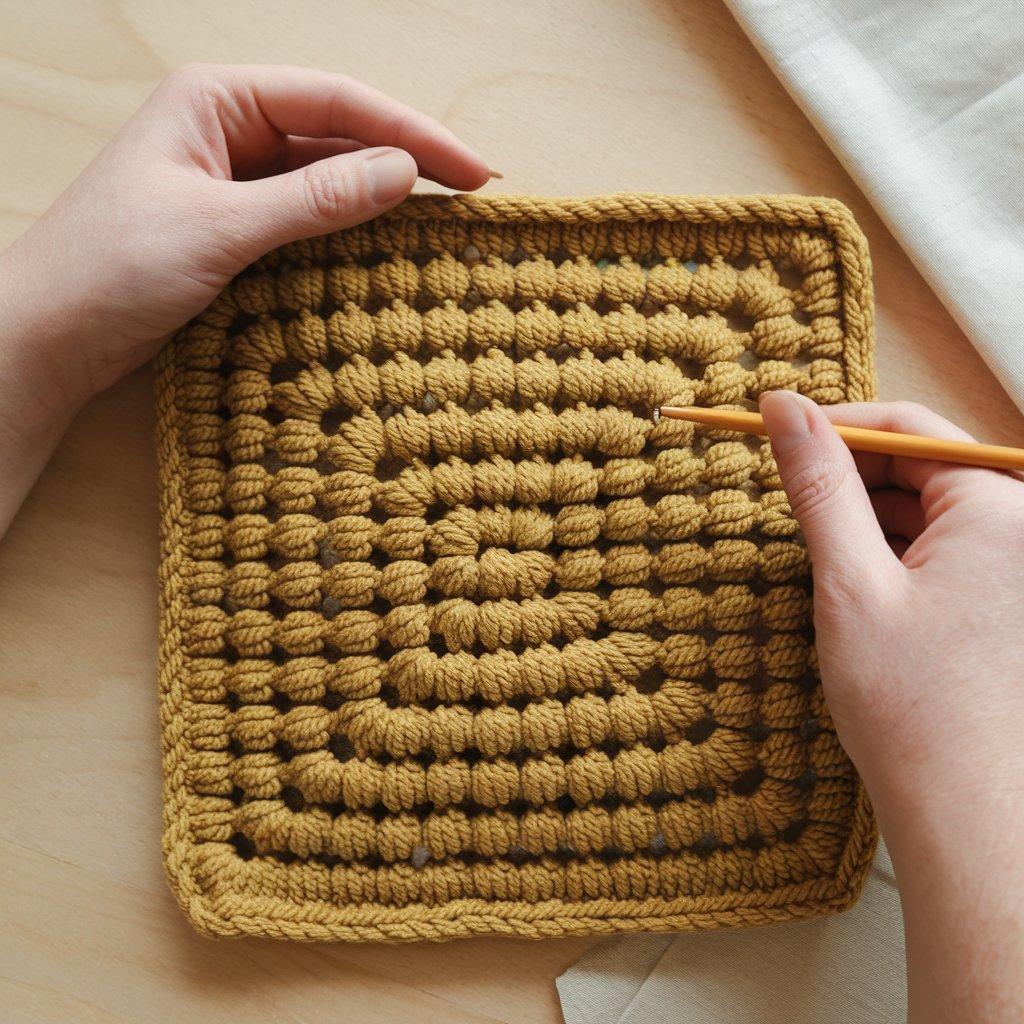
1. Crochet Sunflower Granny Square Pattern

A bright sunflower at the center makes a gorgeous focal square — perfect for throws, cushions, tote fronts, or a sunny blanket. This square mixes a round floral center with classic granny rounds to form a neat square.
Skill level: Intermediate (simple flower shaping + granny rounds)
Finished size: ~6½–7″ square using worsted weight yarn and 4.5 mm (G/7) hook (adjust by yarn/hook)
Materials:
- Worsted/Aran yarn: yellow (center/petals), brown (seed ring), green or background color(s). ~60–120 yards per square depending on rounds.
- Hook: 4.5 mm (or size to get your tension)
- Tapestry needle, scissors, stitch marker (optional)
Stitch vocabulary for this pattern
- Petal cluster = (dc, tr, dc) worked into same space for a tall petal
- Corner = (3 dc, ch 2, 3 dc) when forming granny corners
Step-by-step (worked in rounds)
Center — seed disk
- MR; ch 2 (counts as first dc), work 11 dc into MR. Pull ring tight and join with sl st to top of ch-2. (12 dc)
- Join brown: ch 1, sc in same st and in each dc around to make a tidy seed circle. Join with sl st. Fasten off brown.
Petal foundation
3. Join petal color (yellow) to any stitch. Ch 4, sl st in next st — repeat around to make 12 ch-4 loops sitting on the seed ring. Join and fasten off.
Petal formation
4. Into each ch-4 loop: join yarn, sl st to base, ch 1, (dc, tr, dc) into the loop. Fasten off and weave in tail. You now have 12 sunlit petals.
Create flat canvas for granny rounds
5. Join background/leaf color at the base between two petals. Work 1 round of sc around entire flower to create an even circular canvas. Place extra sc where needed to keep the round flat.
Round 1 — begin square shaping
6. Ch 3 (counts as dc). Position first corner cluster: work 2 more dc into same stitch (3 dc total), ch 2 (corner). Move along the circle and find the quadrant positions (roughly every 1/4 of the circumference) and create the next corner cluster there: (3 dc, ch 2, 3 dc). You’ll place four corner clusters to start turning the circle into a square. Join.
Round 2 — classic granny growth
7. Ch 3, dc twice in same corner space (3 dc corner cluster), ch 1; along each side work (3 dc, ch 1) in side spaces as needed; at corners work (3 dc, ch 2, 3 dc). Repeat around until you reach desired square size. Join rounds with sl st.
Finishing
8. Add a tidy last round: sc around or crab-stitch (reverse single crochet) for a neat, slightly corded edge. Block square: pin corners to exact dimensions and steam- or wet-block according to yarn fiber.
Variations & tips
- For a textured seed center use bobble or popcorn stitches.
- Gradient petals (light → deep yellow) add depth.
- Make a throw of 5×5 or 7×7 sunflower squares alternated with neutral solids.
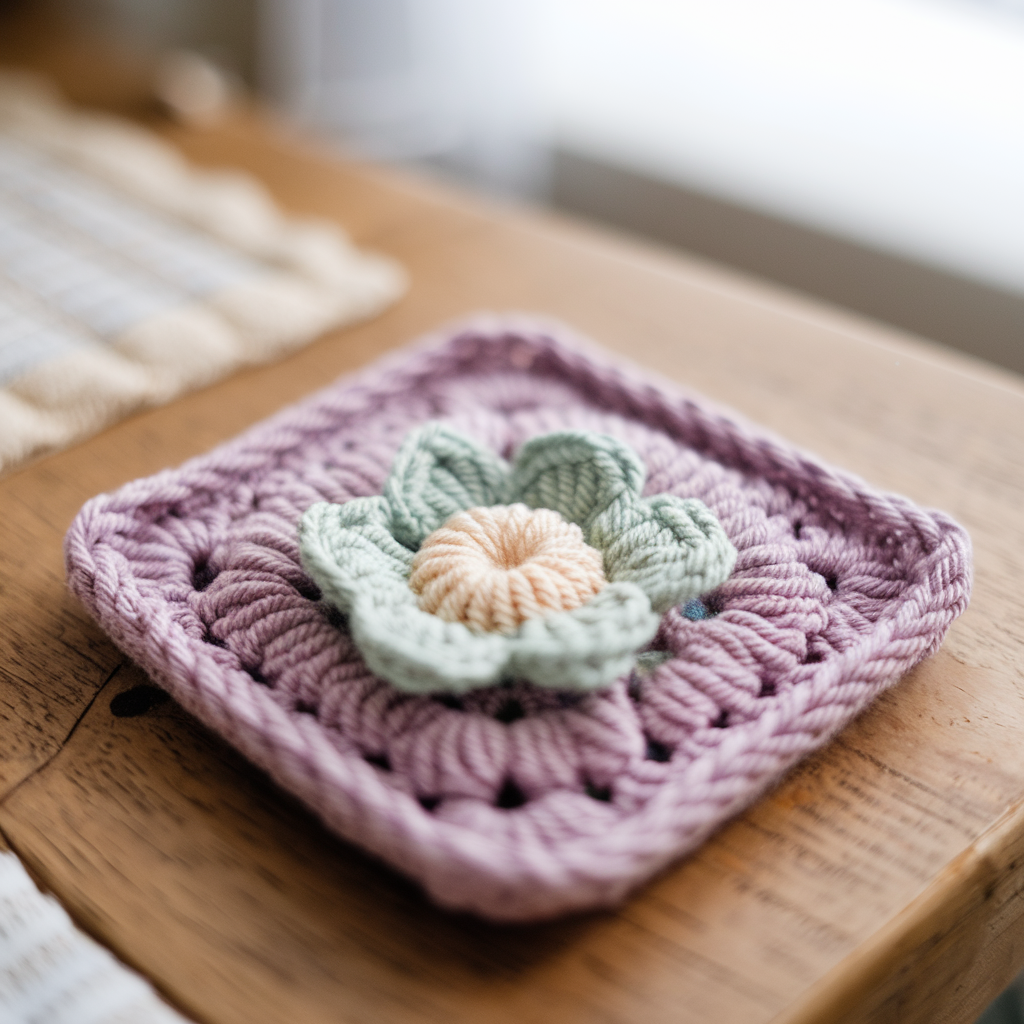
2. Crochet Fountain Flower Granny Square Pattern
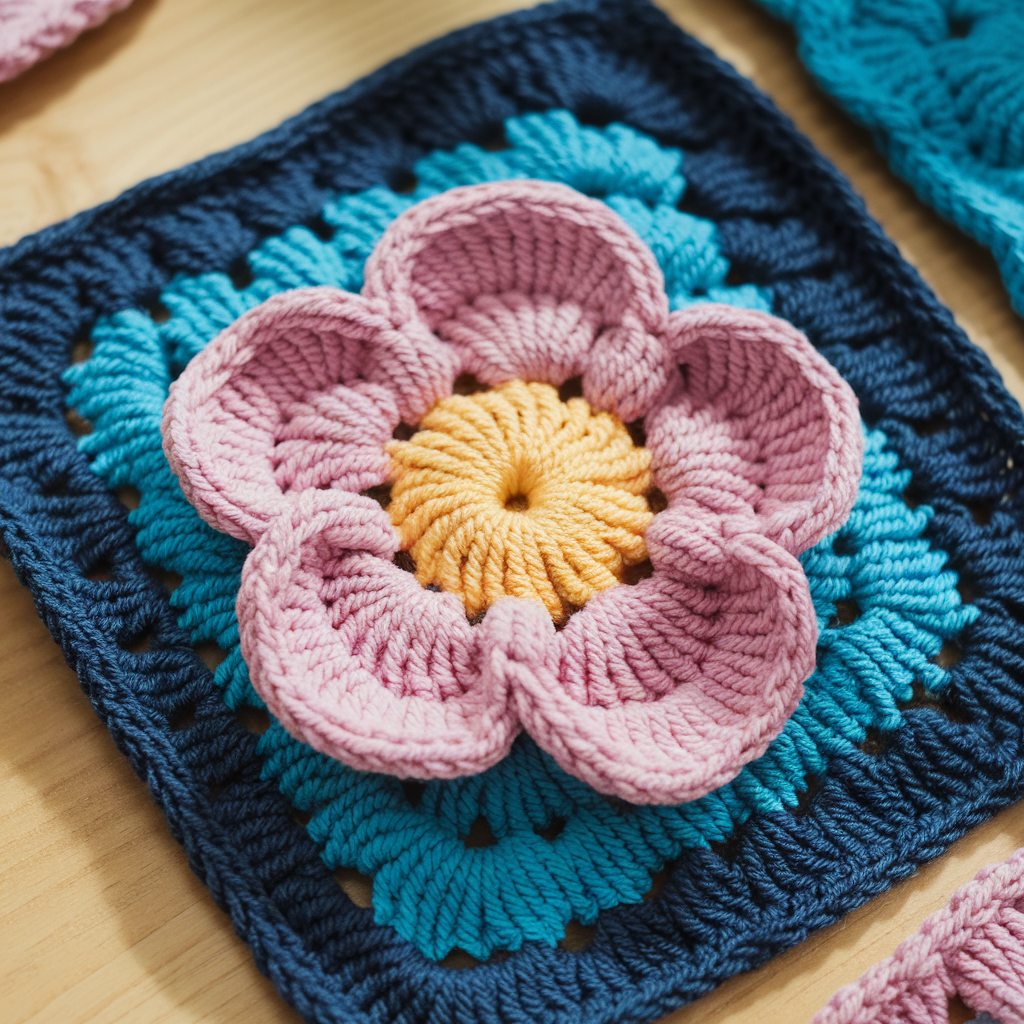
This pattern uses puff or cluster stitches to create a raised “fountain” center and sculpted petals — a great square if you love texture and drama.
Skill level: Intermediate (puff stitches + careful placement)
Finished size: ~6″ square with DK/worsted weight + 4.0–4.5 mm hook
Materials: three contrasting yarns (center, petals, background), hook, tapestry needle
Special stitch: puff (example)
- Puff: yarn over, insert hook, pull up loop — repeat 3–5 times, yarn over and pull through all loops, ch 1 to secure. Each puff = one tall textured stitch.
Step-by-step
Center fountain
- MR; ch 1, make 8 puff stitches into MR. After each puff you can ch 1 or sl st to separate slightly. Pull ring tight and join. This makes a dense, raised core.
Petal loops
2. Join petal color and make 8–12 chain-loops around the puff center depending on your puff spacing: ch 6, sl st into next base repeat around. Join.
Puff-petal clusters
3. Into each chain loop work 3 puff stitches clustered close together — these form the raised petals. Sl st to next chain loop and repeat. When finished, you have textured, raised petals.
Prepare for square shaping
4. Join background and work a sc round around the flower to even out the base. Add extra sc in wider gaps so the round stays flat.
Square growth
5. Create corner clusters at four evenly spaced spots to form a square: (3 dc, ch 2, 3 dc) in each corner spacing, and (3 dc) across sides. Continue granny rounds until the square is desired size.
Finishing
6. Block carefully — pin gently and wet/steam-block. Needle-fluff the puff stitches after dry if needed to restore roundness.
Tips & uses
- Use a halo yarn (mohair) for petals to create a soft, feathery look.
- Alternate fountain flower squares with flat grannies for a tactile blanket.
3. Crochet Granny Rectangle Pattern
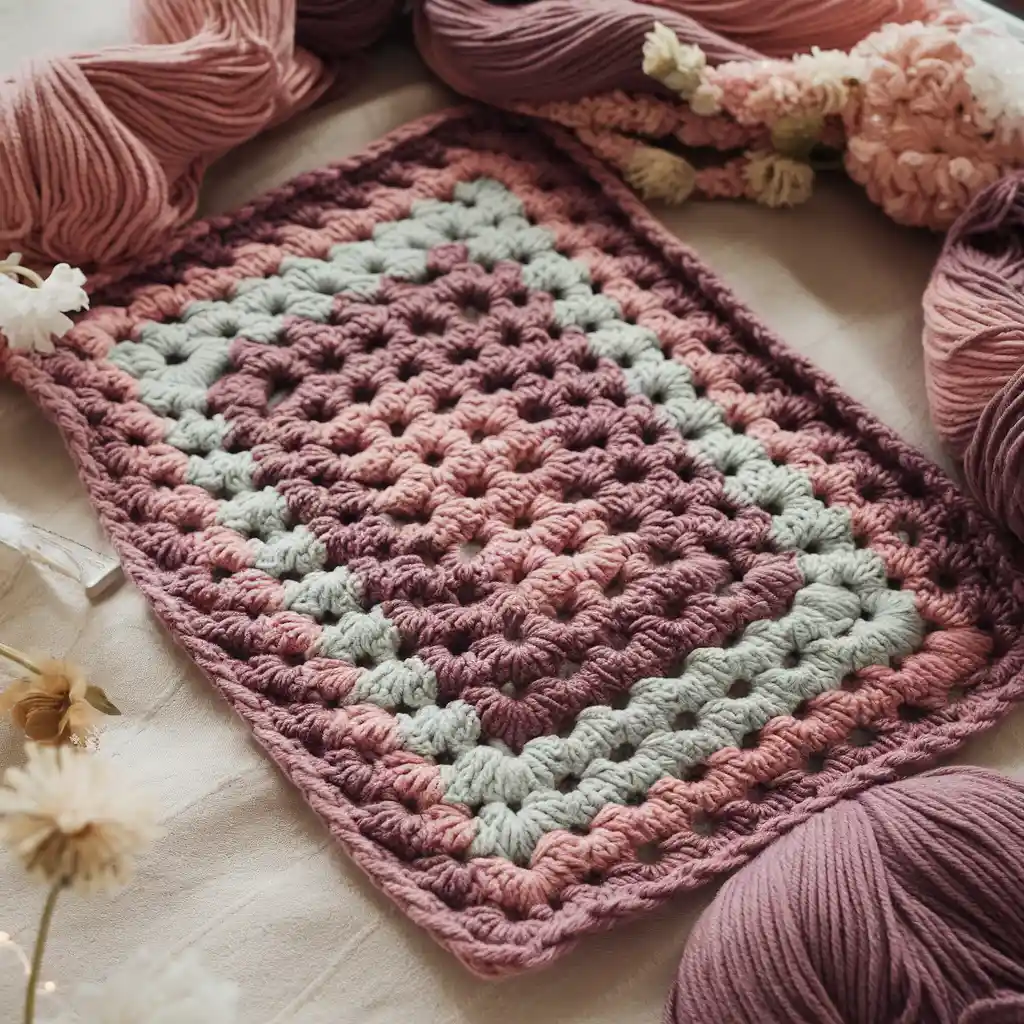
A rectangular granny is perfect for scarves, table runners, or long panels — use the flexible granny logic to create any length or width.
Skill level: Beginner → Intermediate
Finished size: variable — example: 10″ × 20″ with worsted yarn & 5.5 mm hook after 12 rounds
Materials: worsted yarn, 5.5 mm hook, tapestry needle
Concept
You can make a granny rectangle by working rows back-and-forth (row method) or by working rounds and increasing on only two opposing sides (round method). Below is a simple row method — fast and easy for beginners.
Row-method step-by-step
Foundation
- Ch a multiple of 3 + 1. Example: ch 61 for a medium runner width. Add 3 extra if you prefer a ch-3 start.
Row 1
2. Dc in 4th ch from hook (counts as first dc), ch 1, skip 2 ch, (3 dc) in next ch — repeat across until end; finish with dc in final chain as needed. Turn.
Row 2 onward
3. Ch 3 (counts as dc), then 3 dc cluster in each ch-1 space across, with ch 1 between clusters. At the row ends, if you want rounded short edges, keep things simple; if you want square corners, work (3 dc, ch 1, 3 dc) at the ends periodically — but for a rectangle, working consistent side clusters will keep straight edges. Turn.
Repeat
4. Repeat Row 2 until piece reaches desired length (scarf length: 50–70″; runner: 36–56″). Finish with a tidy sc border all around.
Alternative: Round method (start square and increase only on two sides)
- Start with a small square and, on each round, only increase (work corner increases) on two opposite sides to elongate the piece into a rectangle. This method creates decorative angled joins.
Edging & finishing
- Add fringe on short ends for scarves, or a scallop edge for runners. For a polished finish, work one round of sc around, placing 3 sc in corners.
4. Crochet Solid Granny Square Pattern
This solid granny uses tighter clustering to produce a dense fabric with minimal holes — ideal for bags, garments, and kids’ blankets.
Skill level: Beginner → Intermediate
Finished size: ~6–8″ with worsted yarn & 5.0 mm hook
Materials: worsted yarn, 5.0 mm hook
Technique
Work clustered dc rounds and minimize chain spaces; use sc or hdc rounds as stabilizing edges to make the fabric solid.
Step-by-step (solid granny)
Round 1 — center disk
- MR; ch 2 (counts as hdc or dc depending), work 10 hdc into MR. Pull ring tight and join. This gives a compact center.
Round 2 — convert to a flat disc
2. Ch 1, sc around to create a tidy base. Join and change color (optional).
Round 3 — start filling
3. Work rounds of dc clusters: in each side work dc into every stitch across; at corners work (3 dc, ch 1, 3 dc) to maintain square shape. Minimizing ch-1 spaces creates denser fill.
Round 4+ — grow square
4. Continue rounds of dc: each round work 3-dc clusters across sides, and corner clusters as (3 dc, ch 1, 3 dc). When the square is large enough, finish with a round of sc to stabilize.
Variation: Linen / moss solid look
- Work alternating rows/rounds of sc and dc (moss/linen stitch) for a textured solid fabric with a woven look.
Uses & tips
- Use smaller hook to make stiffer fabric for bags and baskets.
- If making a garment, block squares flat to accurate measurements to ease joining.
5. Crochet Small Flower Granny Square Pattern
A tiny floral granny combines a small daisy or blossom center with two rounds of granny shaping — perfect for trims, coasters, bunting, appliqués, or a delicate floral blanket. This pattern is intentionally compact and fast.
Skill level: Beginner → Intermediate
Finished size: ~2–3″ square with DK/fingering yarn & 3.5–4.5 mm hook (adjust yarn/hook for size)
Materials: small scraps of yarn in 2–3 colors (center, petal, background), 3.5–4.5 mm hook, tapestry needle
Stitch ideas used
- Simple petal (dc clusters or picot loops)
- Classic granny corner placement to square off the floral center
Step-by-step (3–4 rounds total)
Round 1 — petite flower center (daisy-style)
- MR; ch 1. Work 8 sc into MR. Pull tight and join (8 sc). This is the center base.
- Switch to petal color. In each sc around work: (sl st, ch 3, dc, ch 3, sl st into same sc) — repeat across making 8 small looped petals (or simpler: ch 3, 3 dc, ch 3, sl st into same sc for fuller petals). Join and fasten off petal color.
Round 2 — secure petals & create round base
3. Join background color at any petal base. Work one round of sc across petal bases (insert under petals where they attach) around the whole flower. This flattens and secures petals and produces an even circular base for granny transitions. Join.
Round 3 — first granny round / corner formation
4. Ch 3 (counts as first dc), work 2 dc into same space to complete a 3-dc cluster, ch 1 (side spacing), find roughly the next quarter space between petals and work (3 dc, ch 2, 3 dc) to create the first corner. Because the motif is small, you’ll place four corners equally spaced — estimate positions at 12, 3, 6, 9 o’clock around the circle. If your sc-round has a known number of sts, you can count and place corners evenly. Join.
Round 4 — grow square
5. Ch 3, dc twice into same corner space (complete corner cluster), ch 1; along each side work (3 dc, ch 1) across the side spaces; at each corner work (3 dc, ch 2, 3 dc). Repeat and join. If the square is still small, add one more round of granny clusters to reach desired dimension (~2–3″).
Optional Round 5 — tidy edge
6. Work a round of sc or crab-stitch around the square in background or contrast color to define the edge.
Finishing & tips
- Blocking: pin tiny square to precise size and steam-block lightly to open petals and set corners. Because the piece is small, blocking gives a professional finish.
- Color play: make centers white/cream, petals in soft pastels and use a contrasting background for pop.
- Joining: these mini floral squares are delightful joined with join-as-you-go or whipstitched into a floral panel. Use a ladder or slip-stitch join for an almost invisible seam.
Uses & project ideas
- Make dozens and join into a baby blanket or lightweight shawl.
- Add a loop in a corner and use as a small ornament or gift tag.
- Sew several onto a plain tote for a cottage-core update.
Blocking, Joining & Finishing (applies to all granny projects)
Blocking
- Pin squares to the exact dimensions on a blocking mat using rust-proof pins. Lightly mist or wet depending on fiber; allow to dry fully. Blocking evens stitches and opens motifs, especially floral details.
Joining methods
- Whip stitch (invisible join) — mattress stitch along backs for neat joins.
- Slip-stitch join — quick and decorative on the front side.
- Single crochet join — creates a raised ridge (contrasting color option).
- Join-as-you-go (JAYG) — efficient when making many squares; join on the last round of each new square.
Weaving ends
- Weave tails through back loops and along seam lines for 2–3 inches to secure. For halo yarns, bury ends into the halo.
Troubleshooting & Tips
- Square is curling: work a sc round to stabilize edges, or block more aggressively. Adjust tension.
- Square is lopsided: recount clusters and ensure corners are placed evenly each round.
- Puff textures flatten: use fewer loops per puff, and needle-fluff after blocking or use yarn with better memory.
- Different square sizes: make a gauge square and adjust hook size if you need squares to match for a multi-square project.
Project ideas & color inspiration
- Sunflower Throw: 5×5 sunflower squares alternated with cream solids for a sunny throw.
- Textured Cushion: 9 fountain-flower squares for a statement cushion front.
- Runner/Scarf: Granny rectangles joined end-to-end with fringe for a modern runner or scarf.
- Solid Blanket: Solid granny squares in tonal ombré using three shades for a cozy, structured duvet throw.
- Mini-Motif Bunting: String 30 small flower granny squares on ribbon for party decor or a nursery garland.
Strong Conclusion
Granny squares are a brilliant toolkit for crochet creativity — each square is a small, satisfying project that scales into beautiful, practical finished pieces. The five patterns here progress from bold focal motifs (sunflower, fountain-flower) to utilitarian shapes (rectangle, solid) and end with a tiny floral motif perfect for delicate projects. Pick a square to practice corner logic, try texture with puff stitches, and play with color contrasts to make your signature look.