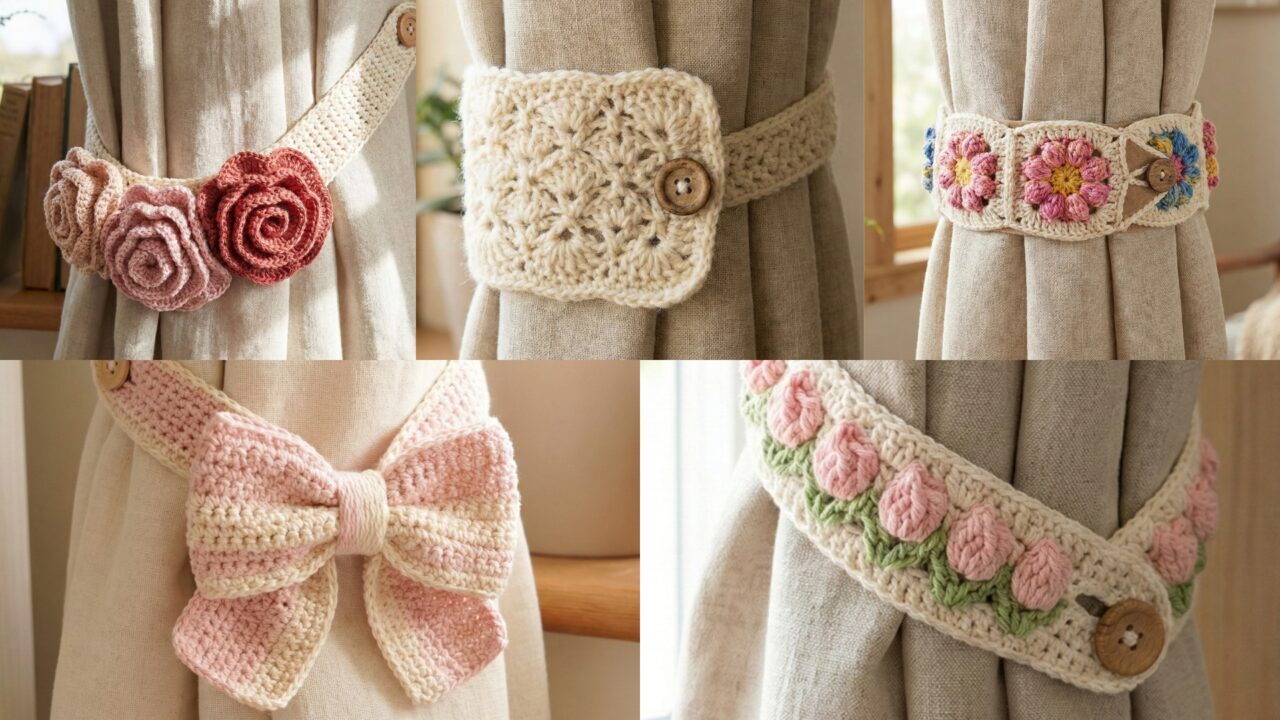
Curtain tiebacks are tiny details that make a room feel finished. They’re fast to make, let you use small yarn scraps, and add texture and personality to any window — from a breezy kitchen curtain to a dramatic living-room drape. Below you’ll find a friendly introduction (materials, measurements, mounting, safety), then five full tie-back patterns with complete step-by-step instructions, stitch notes, gauge guidance, finishing and care, plus variations to match any decor: Crochet Rose, Lace Wool, Cute Bow, Aesthetic Tulips, and Flower Granny Square.
Everything is written to be easy to read and follow. If you want printable PDFs or photo tutorials for any single pattern afterward, say which one and I’ll convert it.
Before you start — essentials (materials, tools, measurements, and mounting)
Materials & yarn choices
- Cotton / cotton blend (DK / worsted): best for crisp shapes (roses, bows) and easy care.
- Wool or wool blends: warm, textured look (great for rustic or cozy rooms). Avoid using wool for humid rooms unless you’re fine with extra care.
- Acrylic: budget-friendly and washable; good for bright colors.
- Fancy yarns: metallic, boucle or eyelash yarns look great for accent tassels but can be messy for small motifs.
Choose yarn weight according to the look:
- Delicate lace tiebacks → fingering / sport.
- Classic textural tiebacks → DK or worsted.
- Chunky, statement tiebacks → aran / bulky.
Hooks & notions
- Crochet hook sized for yarn (1.75 mm – 6.5 mm depending on yarn).
- Tapestry needle, scissors, stitch markers.
- Small amounts of stuffing (for puffy motifs).
- Felt circles (for backing), strong sewing thread or upholstery thread for reinforcement.
- Hardware: ribbon or elastic, small hook or loop, curtain tieback hooks or wrap-around cord, small snap/button or magnetic snap if you want a removable tieback.
- Optional: small wooden beads, metal rings or D-rings for adjustable strap, hot glue for quick tacking (but always finish by stitching).
Measurements & fit
- Measure circumference of your curtain where it will be tied (position depends on style: mid-height, high, low). Example: if the curtain is 30″ across and you want the tieback to pull it to 10″ from edge, measure the loop length when curtain is pulled and add 2–3″ for overlap/tension.
- A quick rule: measure on the curtain in the desired tied position and then add 1–2″ for ease. Make a prototype with a scrap chain to confirm length before finishing.
Mounting options
- Wrap and tie: a flexible strap or long rope that wraps around the curtain and fastens with a button, snap, or bow. Works without wall hardware.
- Loop + hook: make a loop on the tieback; attach a small wall hook where the loop hangs. Good for heavy curtains.
- Fixed loop + magnetic snap: sew a magnetic snap to the back of the tieback so the finished tieback closes neatly without visible knots.
- Clip / ring method: sew the motif to a small metal ring or clip that hooks to an existing curtain hook or rod ring.
Safety & durability
- Reinforce stitch areas that will take weight (especially if curtain is heavy). Sew through felt backing and yarn with sturdy thread multiple times.
- If using glue for a quick hold, always finish with needle stitches — glue alone can fail.
- For toddlers’ rooms avoid long dangling cords — use short decorative tiebacks or those that attach to the wall at child height.
1. Crochet Rose Curtain Tie Back Pattern
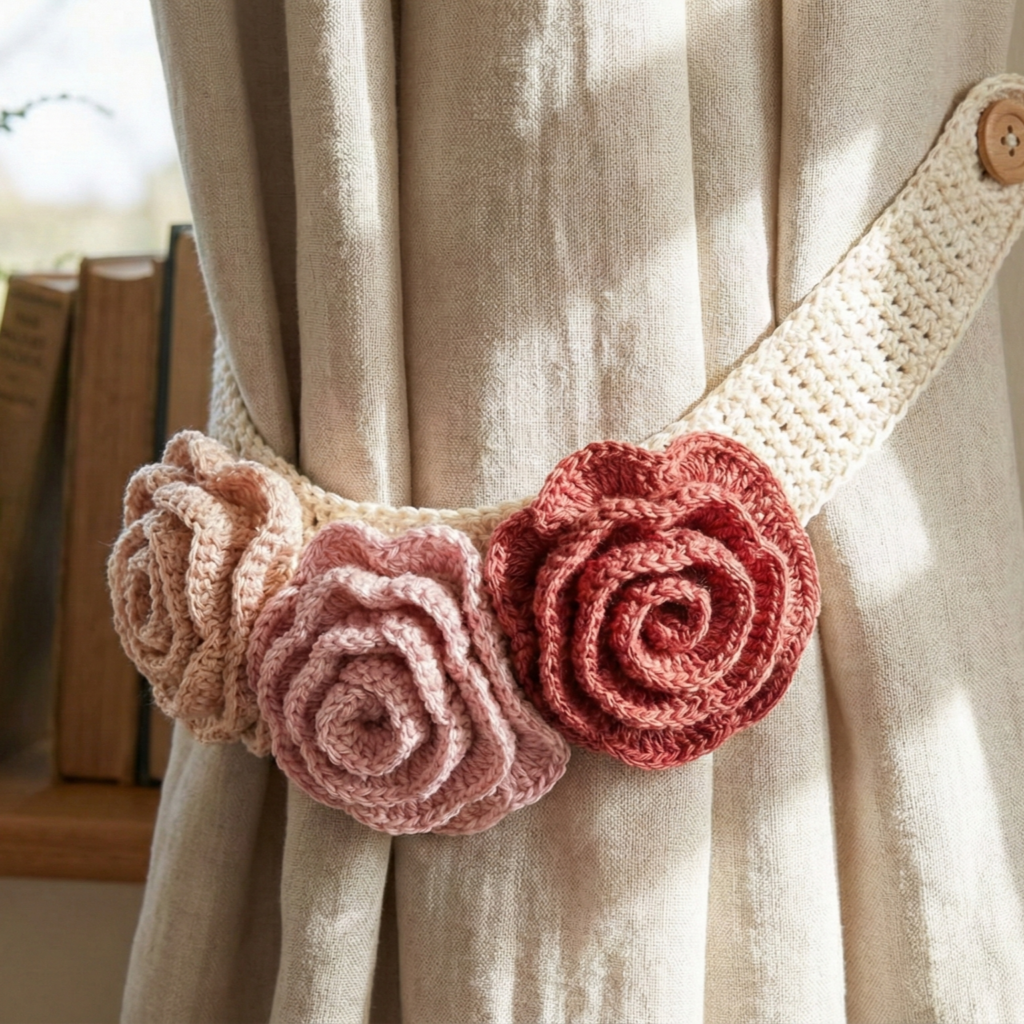
A romantic, elegant tieback built around a sculpted rose motif plus a neat cord or strap. Great for bedrooms and living rooms.
Vibe
Classic, feminine — looks lovely in cotton or mercerized cotton for sheen and definition.
Materials & finished size (example)
- DK cotton main color — ~30–60 yd for a medium rose plus strap.
- Hook: 3.0–3.5 mm.
- Strap: crocheted cord (I-cord / chain with sc) long enough to wrap curtain; sample length 24–40″ depending on curtain.
- Felt circle (~2″), strong sewing thread, button or snap, small stuffing (optional), tapestry needle.
Stitches used
ch, sc, hdc, dc, tr, sl st; shell (5 dc).
Construction overview
Make a spiral rose (classic ruffled rose), back it with felt, attach to a long cord strap and finish with a button or snap closure.
Step-by-step
A — Rose spiral (ruffled)
- Ch 60 (adjust to desired rose fullness — longer chain = larger rose).
- Row 1: sc in 2nd ch from hook and across (59 sc). Turn.
- Row 2 (ruffle row): ch3, 5 dc in next st, ch3, sl st in next st across OR do: 2 dc in next st, 3 dc in next; repeat to create abundant ruffles. Another classic method: row of dc, 3 dc in same st, dc in next to make petals. Work until strip is used up. Fasten off leaving long tail.
- Gently roll the strip from one end, spiraling and sewing the bottom edge together with the long tail to create a rose. Stitch through layers as you roll, catching all layers so it’s sturdy. Add a little stuffing in the center if you want a puffed look. Sew small vertical stitches through the base to secure.
B — Backing & reinforcement
5. Cut a felt circle slightly smaller than rose diameter. Sew the rose to the felt through multiple passes to anchor it. This felt disk will be the attachment platform.
C — Strap / cord
6. Make a strap: either chain a length equal to desired wrap length + 2″ and sc back for a thin strap, or make a sturdier i-cord: ch (desired length × stitches per inch), then sc rows to make a ½–1″ band. For example, for 30″ strap and gauge 4 ch/in → ch 30 × 4 = 120 ch; adjust for comfort and knotting.
- Attach one strap end to the felt backing with strong stitches. The other end gets a button (sew button to felt or sew a small loop at strap end to fasten over a button). Alternatively sew a magnetic snap so the strap loops and fastens invisibly.
D — Final assembly
8. Stitch felt to the back of the rose with several passes. Reinforce strap-to-rose joins by sewing through both felt and rose base multiple times.
E — Mounting / use
9. Wrap strap around curtain and button/snap on the other end, or make the strap long and tie a bow. To use with a wall hook, make a small loop on the strap and hang it on the hook.
Variations & tips
- Make two small roses on each side and a central knot for more vintage look.
- For large heavy curtains, make two roses and join with a wide strap and a D-ring closure for extra strength.
- Use mercerized cotton for sheen, or soft cotton for a matte cottage look.
2. Crochet Lace Wool Curtain Tie Back Pattern
A cozy, textured tieback using wool or wool-blend yarn with a lacy motif and sturdy strap — perfect for a snug, rustic aesthetic.
Vibe
Warm, textural, slightly vintage — great for country or cottage interiors; wool gives structure and soft warmth.
Materials & finished size (example)
- Aran / worsted wool or wool blend — ~50–100 yd depending on lacy pattern and strap length.
- Hook: 4.0–5.0 mm.
- Strong sewing thread, felt backing, optional leather tab for strap anchor, magnetic snap or D-ring hardware.
Stitches used
ch, sc, dc, shell, picot, puff (optional), BLO or FLO to create ridges.
Construction overview
Work a lacy floral or fan panel into a decorative centerpiece; create a sturdy strap with double-stranded wool or woven cord; reinforce with felt and optional leather.
Step-by-step
A — Make the lacy centerpiece (example fan cluster)
- Decide center width: ~3–4″. Ch 20 (or desired width). Row 1: sc in 2nd ch and across.
- Row 2–6: alternate shell rows and solid rows to create lace: e.g. Row A (mesh): dc, ch1, skip 1; Row B (shell): sc, 5 dc in next st, sc at spacing. Repeat to get a rectangular lacy panel ~2–3″ tall.
- Work one or two rows of picot or small scallops to finish edges. Block the lace to open the pattern and hold the shape.
B — Make the strap
4. For strength, make a double-strand strap: hold two strands of wool together and crochet a tight sc cord to desired length, or crochet a flat band (hdc rows) and fold/ seam to create a 3/8–1″ strap. Wool is sturdy but may stretch — if stretching is a concern, crochet around a cotton cord core.
C — Reinforce & assemble
5. Back the lace with felt (trim close so felt not visible). Sew the strap ends to the felt backing and add a leather tab if desired (stitch through leather with heavy thread). Add a D-ring or slider if you want an adjustable strap.
D — Closure
6. Sew a magnetic snap or add a sewn loop + button closure. For a neutral look, use a wood button on the strap that fits into a loop on the felt back.
Variations & tips
- Add a fringe of wool at bottom of lace for a boho touch.
- Use a wool blend for less itch if the tieback may touch skin.
3. Crochet Cute Bow Curtain Tie Back Pattern
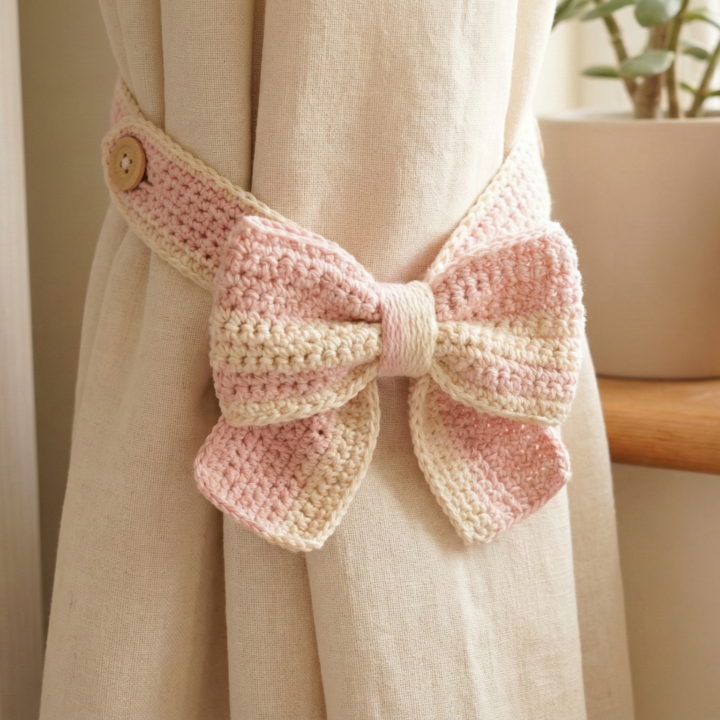
Simple, fast, and charming — a bow style tieback that’s feminine and easy to make in multiple sizes and colors.
Vibe
Playful, sweet — great for children’s rooms, nurseries, or any girlish corner.
Materials & finished size (example)
- DK cotton or acrylic for the bow (~20–40 yd).
- Hook: 3.0–4.0 mm.
- Clip / felt / strap / button or small snap for closure.
- Optional: small stiffener (light fusible interfacing) for crisp bow.
Stitches used
ch, sc, hdc, dc; simple rectangle shaping.
Construction overview
Crochet a bow rectangle, fold and cinch into a bow with a wrap band; attach to a strap or clip. Optionally add a second, smaller bow layered on top for contrast.
Step-by-step
A — Bow body
- Decide finished bow width: sample 5″. Swatch to determine stitches/inch. Chain accordingly (e.g., ch 20 for ~5″). Row 1: sc in 2nd ch and across. Row 2–6 (or until desired height): sc across to make a rectangular strip (e.g., 4–6 rows for a flat bow).
- Finish the rectangle and block lightly to even edges.
B — Form bow & center wrap
3. Fold rectangle accordion-style or simply gather tightly in the center and bind with yarn to make bow loops. For a neat center, crochet a narrow band (ch10, sc rows 3–4) and wrap around the cinched center, sewing ends at the back.
C — Attach strap / clip
4. Back with a felt circle/rectangle and stitch to preferred strap or sew onto an alligator clip if you want the bow to clip over the curtain edge. For a wrap strap, attach one end of strap to felt and make the other end a loop or button closure.
D — Variations
- Make layered bows (one large bow, one small bow center) in contrasting colors.
- Add lace trim: pick up stitches along bow edge and work simple shell or picot.
Tips
- For crisp bows, lightly fuse interfacing to a fabric backing and sew to felt before sewing onto strap.
- For very large curtains, make a double bow (two bows sewn together) to balance the weight.
4. Crochet Aesthetic Tulips Curtain Tie Back Pattern
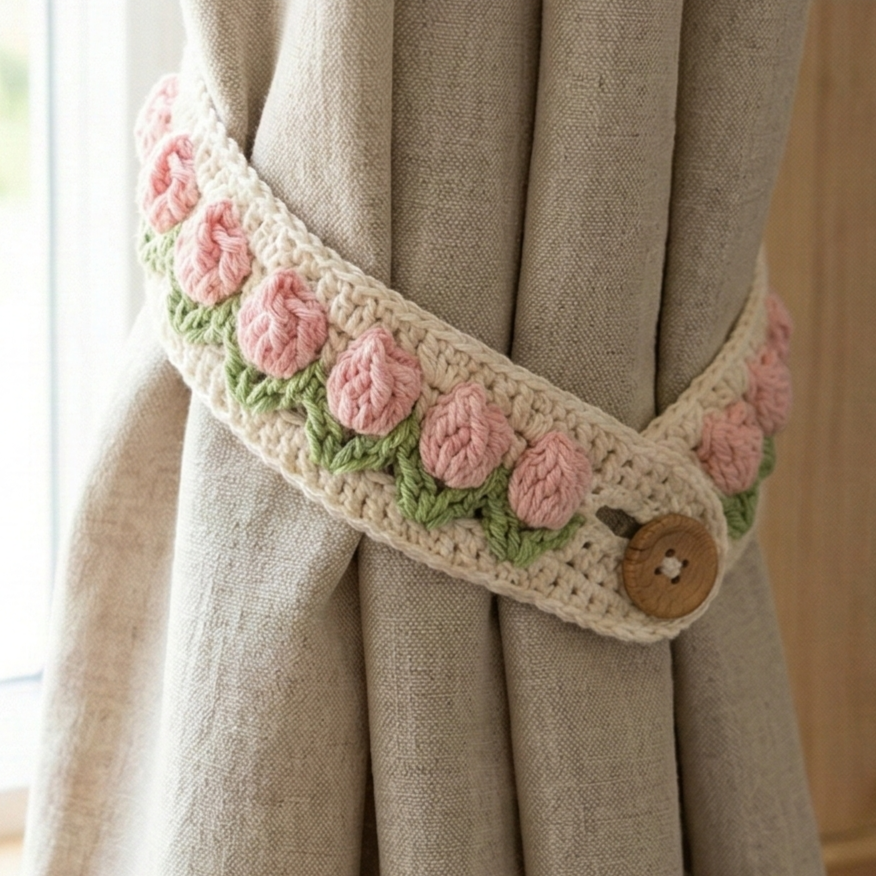
A charming string of tulip motifs linked or clustered on a cord — great for cottagecore or spring decor.
Vibe
Fresh, floral, and versatile — tulip clusters can be spaced along a cord or made into a single cluster tieback.
Materials & finished size (example)
- DK cotton in tulip colors + green (~50–80 yd).
- Hook: 3.0–3.5 mm.
- Cord for strap, felt backing, strong thread.
Stitches used
MR, sc, hdc, dc, shell, ch, sl st.
Construction overview
Crochet several small tulip motifs (petal + stem), attach them to a cord either as a loose garland or fixed cluster, then secure with a felt backing and hook/loop strap.
Step-by-step
A — Simple tulip motif
- Seed / cup: MR, ch1, 6 sc in ring. (6)
- Join red (petal color) at top: ch4, (dc, hdc, sc, hdc, dc) in the same st to create a petal; repeat 3 times to make 3 petals. Fasten off leaving tail.
- Stem & leaf: join green to base, ch10, sc back along chain to form a slim stem; make 1–2 small leaves (ch6 sc back) at base.
B — Make a cluster
4. Make 3–5 tulips depending on desired fullness. Arrange tulips in a small bouquet by sewing stems together at the base and wrapping with a narrow band of yarn (like a small floral tie).
C — Attach to cord
5. Sew base of bouquet to the strap/cord. For an adjustable tieback, attach bouquet to a short elastic loop and a button on the other end so it can be buttoned around the curtain.
D — Alternative styling
- Make a string of spaced tulips (every 3–4″) along a cord to make a garland tieback — slide the tulips on via small loops or stitch them in fixed positions.
Variations & tips
- Make pastel tulips for nursery; make bold red/yellow for a statement.
- Use metallic thread for a subtle sheen in modern rooms.
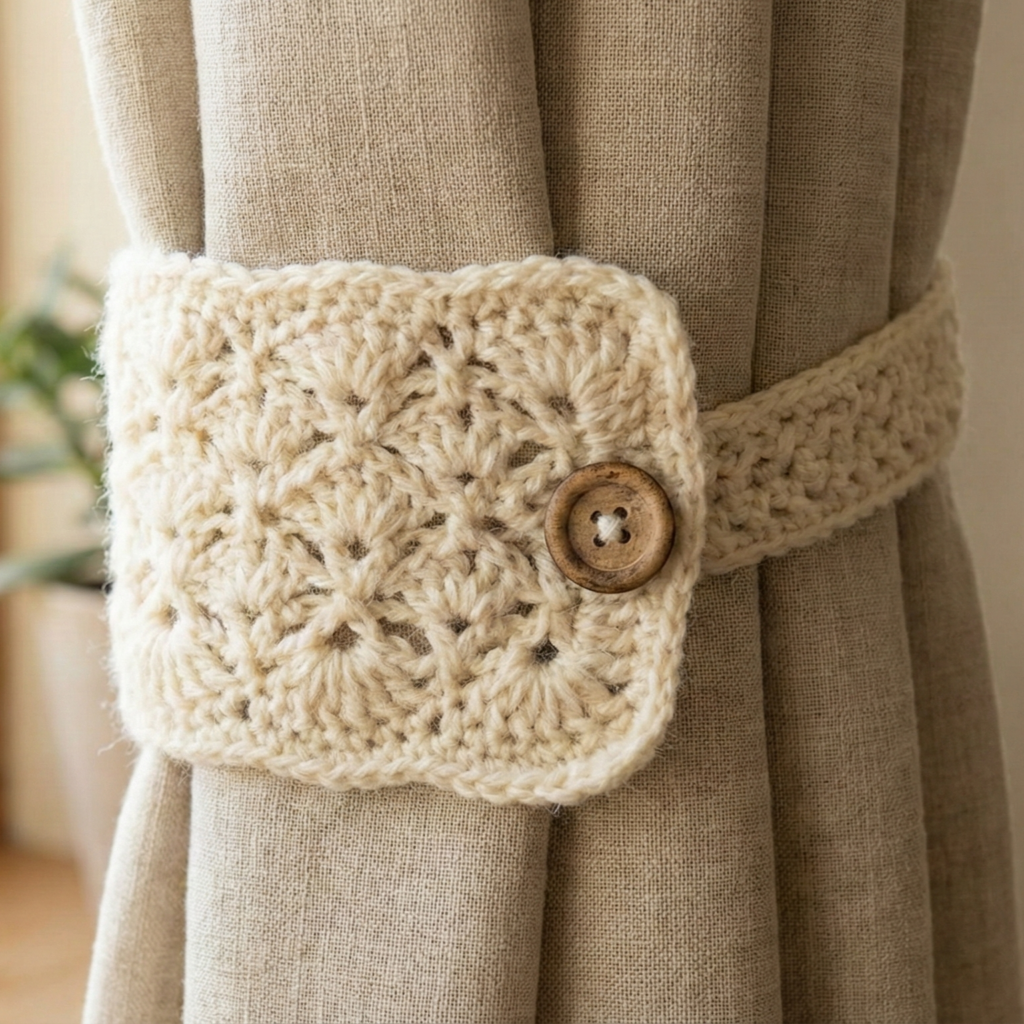
5. Crochet Flower Granny Square Curtain Tie Back Patter
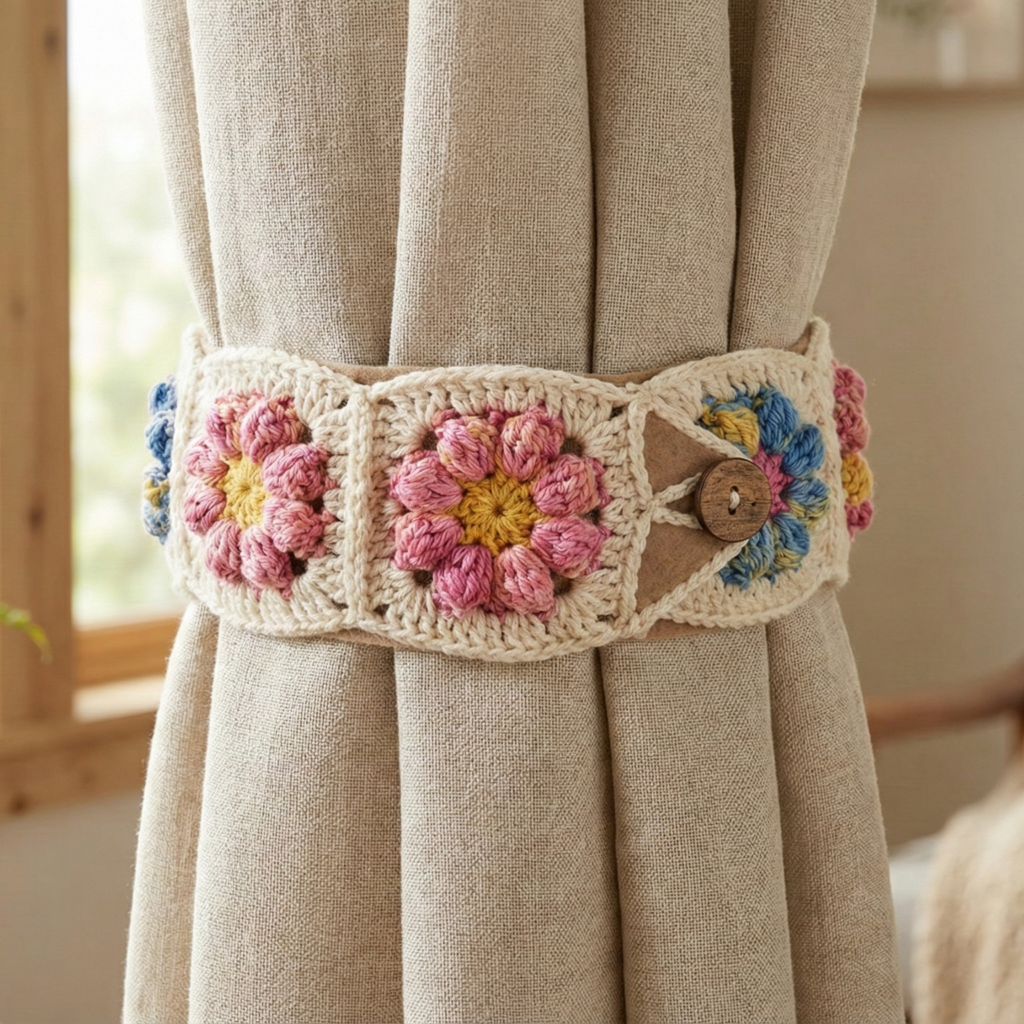
(Heading preserved exactly as you provided.) A charming granny-square approach — make small flower granny squares, join into a band, and form a decorative and sturdy tieback.
Vibe
Vintage, handmade, and customizable in color — great for eclectic and boho interiors.
Materials & finished size (example)
- DK or worsted cotton in multiple colors (flower centers + background) — amount depends on number of squares.
- Hook: 4.0–5.0 mm.
- Felt backing, strap, lining optional.
Stitches used
granny cluster (3 dc cluster), ch, sc, sl st.
Construction overview
Make many small flower granny squares (approx. 3–4″ each), join edge-to-edge into a long band, back with felt and add strap/loop closure.
Step-by-step
A — Flower granny square (small)
- Center: MR, ch2, 10 dc into ring, join (or 12 dc depending on size).
- Petal / round: ch3, 3 dc cluster in next space, ch1 repeat around to form petal clusters.
- Square rounds: in next round switch to background color and work standard granny rounds making the motif square: (3 dc cluster, ch2, 3 dc cluster) in corners as needed until square is desired size (3–4″). Block squares for consistency.
B — Make multiple squares
4. Compute how many squares you need: example tieback length 30″ and each square 3″ → need about 10 squares (include seam allowances). Make 10–12 squares for a band with a little overlap.
C — Join squares
5. Join squares using join-as-you-go to create a flat seam, or whip stitch them edge-to-edge for visible seam detail. You can also join with a narrow lace runner between squares for airiness.
D — Backing & strap
6. Back the long band with a felt strip to reinforce. Sew strap ends to felt backing and add a button, snap, or loop closure. For a neat look, edge the band with a round of sc or a picot border.
E — Mounting
7. This band works well wrapped and buttoned; for fixed installation stitch small loops on the wall and hang the band.
Variations & final touches
- Alternate colored squares for rainbow tiebacks.
- Add small tassels at square junctions for playful movement.
Care, blocking, and maintenance
- Blocking: block cotton and linen tiebacks lightly after finishing to shape petals and lace. Use wet blocking for cotton, steam for blends according to yarn label.
- Washing: cotton/acrylic tiebacks can be hand washed or machine washed on gentle in a mesh bag; wool tiebacks should be hand washed and laid flat. Remove hardware before washing when possible.
- Storage: hang tiebacks on a hook or roll flat to avoid crushing delicate motifs.
- Repairs: keep a few yards of the main yarn on hand so you can restitch loose joins if needed.
conclusion
These five tieback patterns give you a range of styles — from romantic Rose and delicate Lace Wool, to cute Bow, fresh Tulips, and the granny-square Flower band — each adaptable for different rooms and curtain weights. Every pattern includes clear instructions for a secure, reinforced finish and a choice of closures (button, snap, magnetic, loop + hook) so your tiebacks are both decorative and durable.