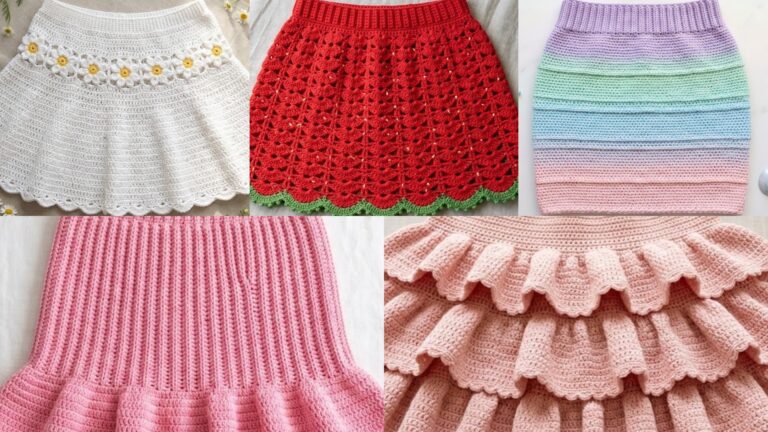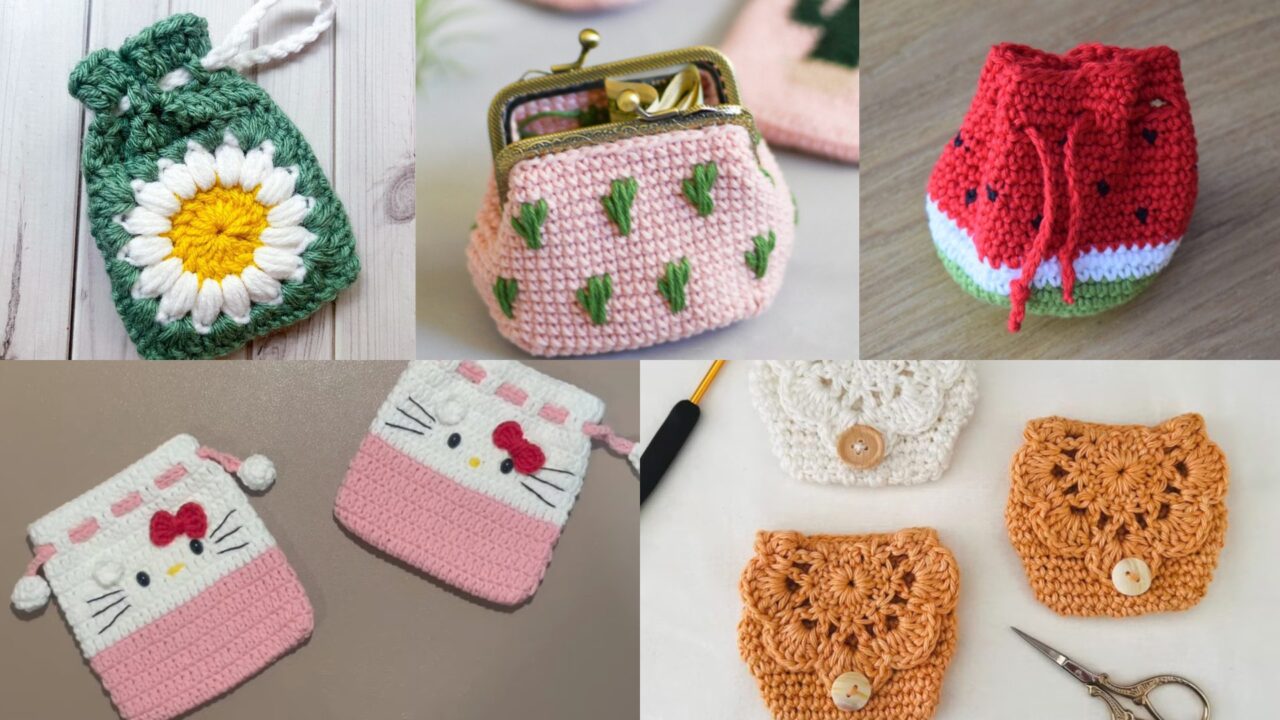
Small, practical, and utterly giftable — a crochet coin purse is the perfect quick project that lets you practice shaping, colorwork, and finishing techniques. Below you’ll find five distinct coin purse patterns: granny-square daisy, Hello Kitty drawstring bag, cactus print zipper purse, vintage frame purse, and a watermelon drawstring pouch. Each pattern includes skill level, materials, finished size, a step-by-step guide (US terms), finishing/closure options, and helpful tips so you can make each purse with confidence.
Quick stitch legend (US terms): ch = chain, sl st = slip stitch, sc = single crochet, hdc = half double crochet, dc = double crochet, tr = treble, st(s) = stitch(es), sk = skip, BLO = back loop only, FLO = front loop only, rep = repeat, inc = increase (2 sts in same st), dec = decrease (sc2tog unless otherwise noted). Use smooth cotton or cotton-blend yarn for structure and durability.
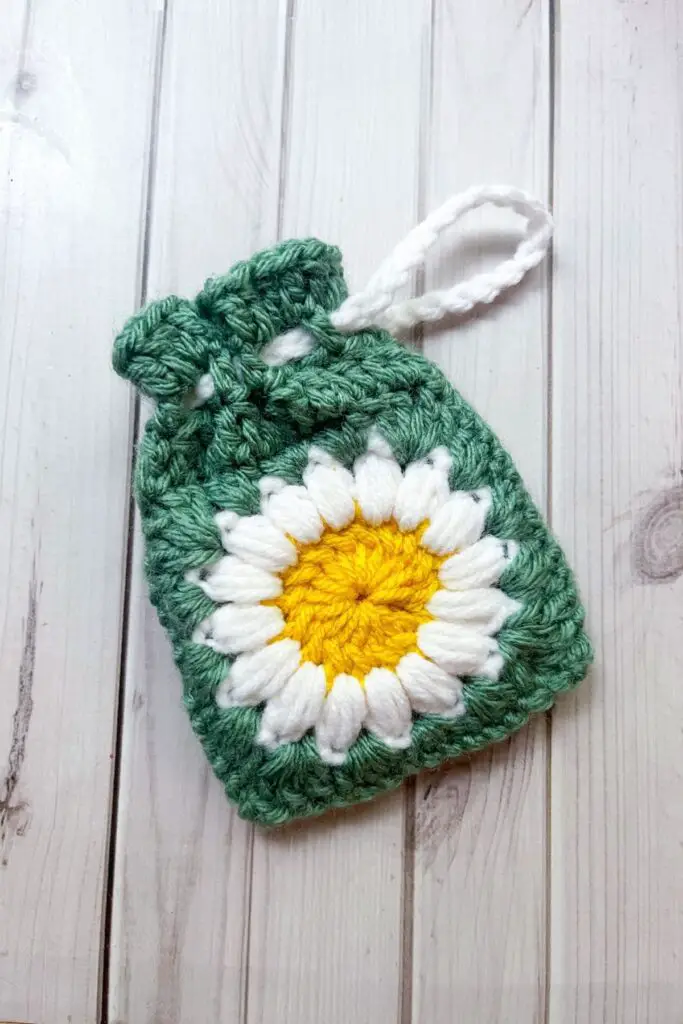
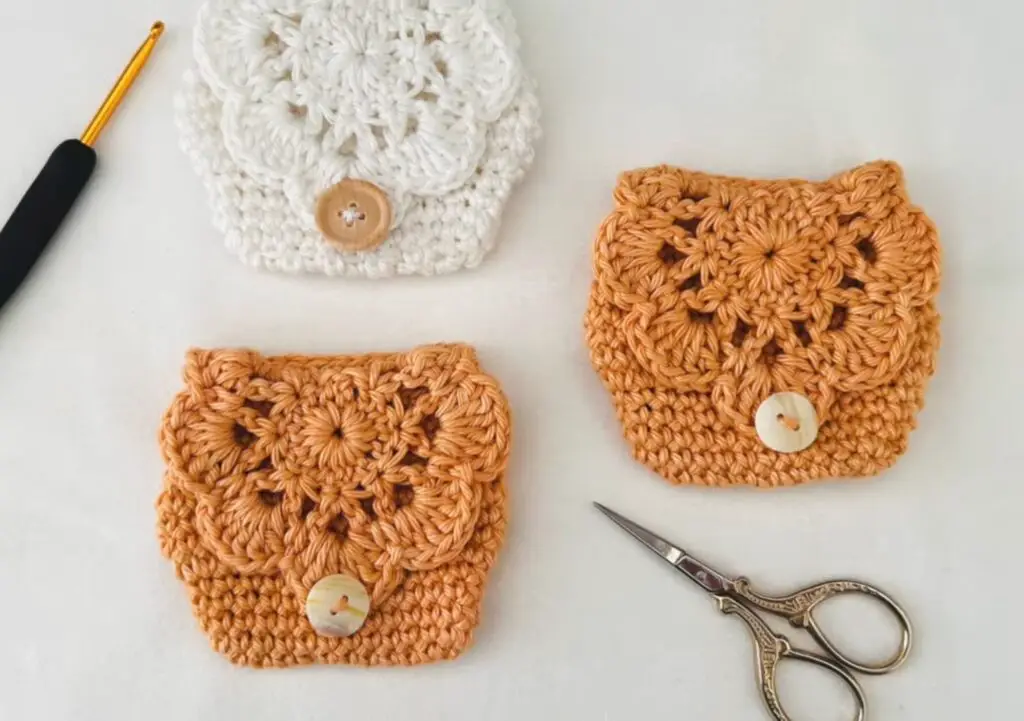
1. Crochet Granny Square Daisy Coin Purse Pattern
Skill level: Beginner–Intermediate (granny square basics + joining + optional lining)
Materials
- DK / light worsted cotton yarn in: Color A (background), Color B (daisy petals), Color C (center) — ~50 g each (or scraps)
- Crochet hook 3.5–4.0 mm (adjust to yarn)
- Small 6–8″ zipper, or magnetic snap/press stud if you prefer
- Tapestry needle, scissors, sewing needle & thread (for zipper/lining), optional small piece of cotton fabric for lining
Finished size: Approx. 4.5″–5″ wide × 3.5″–4″ tall (one granny square folded into a purse). Adjust by changing hook or yarn.
What you’ll make
A charming little coin purse built from one large granny square with a centered daisy motif, folded and seamed to create a pouch; add a zipper (recommended) or a button/flap closure.
Step-by-step
Make the Granny Daisy Square (one square)
- Center: With Color C (center), ch 4 and join to form a ring. Round 1: ch 3 (counts as dc), work 11 dc into ring, join with sl st to top of ch-3. (12 dc)
- Petals round: Join Color B in any dc. ch 3, sl st into next dc repeat around to make 12 small loops. Join.
- Into each ch-3 loop (petal): join Color B if not already, work (sc, hdc, 2 dc, hdc, sc) — a ruffled petal. Fasten off Color B.
- Granny rounds to form square: Join Color A into any space between petals. Round 1 (start square): ch 3, (2 dc, ch 2, 3 dc) into same space to form a corner. sk next petal base, (3 dc, ch 2, 3 dc) in next space repeat for 4 corners, join. (You now have a square-shaped round with corners.)
- Round 2+: Continue working classic granny clusters (3 dc groups) into side spaces and corners as (3 dc, ch 2, 3 dc) in corner spaces until the square measures approx. 4.5–5″ across (usually 3–4 granny rounds depending on yarn). Fasten off and weave ends.
Make two squares (optional)
- Option A: Make one large square and fold it so two opposite edges meet (creates front/back from one piece).
- Option B (cleanest): Make two equal granny squares and seam them together for a double-thickness purse.
Assemble purse
6. Fold the square in half so the daisy is centered on the front. If using two squares, place right sides together. Whipstitch or single-crochet seam along the two side edges and bottom edge, leaving the top open for zipper/closure. If working with one square, seam the folded short edges and bottom leaving top open.
7. Insert zipper: For a neat finish, sew a small zipper into the open top using a sewing needle and thread. Place zipper with teeth facing the inside, whipstitch through crochet and fabric teeth area. Alternatively, add a magnetic snap: sew both halves of snap into inner lining positions (requires lining).
Optional lining
8. Cut a small fabric rectangle slightly smaller than the inside of the purse. Sew side seams and bottom, then hand-stitch lining inside the crocheted shell before adding zipper — this gives structure and prevents coins from snagging.
Finishing & care
- Weave in ends; block lightly if needed to square the motif.
- Hand-wash and lay flat if using cotton; avoid machine agitation to preserve shape.
- Secure zipper stitching with a few extra passes for durability.
Tips & variations
- Use variegated yarn for the background for a fun effect; keep daisy in solid so it reads clearly.
- Add a small tassel or a keyring loop at one zipper end so the purse can be attached to a bag.
- For sturdier everyday use, stitch a thin interfacing to the fabric lining before inserting.
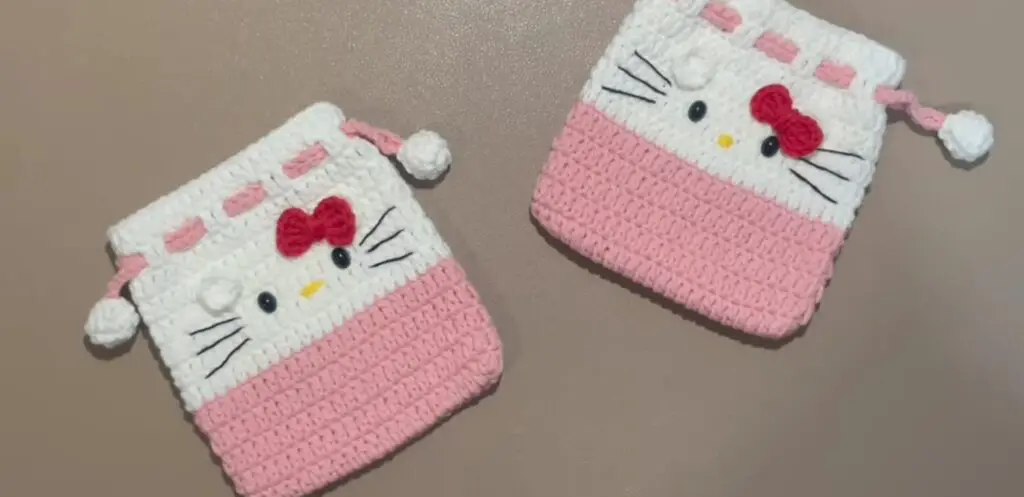
2. Hello Kitty Drawstring Crochet Coin Bag Tutorial
Skill level: Intermediate (shaping + simple amigurumi face + drawstring)
Materials
- Sport / DK acrylic or cotton yarn in white (main), pink (bow), black (eye whiskers), yellow (nose) — small amounts each (~30–50 g total)
- Crochet hook 2.5–3.5 mm for tight fabric (prevents coins from poking through)
- Tapestry needle, stitch markers, small safety eyes or black embroidery thread, ribbon or cord for drawstring (18–24″)
- Optional small bead or charm for drawstring ends
Finished size: Approx. 4″ wide × 4″ tall (bag body) — adjust by number of rounds.
What you’ll make
A cute drawstring coin bag shaped and decorated to look like Hello Kitty (or a generic cat face if you prefer), featuring an embroidered face and a tied bow accent.
Step-by-step
Bag body (worked in continuous rounds)
- Magic ring: With white, make magic ring. Rnd 1: 6 sc in ring. (6)
- Rnd 2: inc in each st around. (12)
- Rnd 3: [sc 1, inc] around. (18)
- Continue increasing evenly (sc rounds with evenly spaced incs) until base measures about 3–3.5″ diameter (approx. 30–36 sts depending on gauge). Keep count to maintain a flat circle.
- Work even sc rounds (no increases) to build the bag’s height until you reach ~3–3.5″ tall (or desired height), keeping stitch count constant. Use stitch marker at start of round.
- For the top, work one round of BLO sc to create a nice channel for drawstring threading (this creates a ridge). Then work 1–2 rounds sc in both loops again to form the lip. Fasten off, leaving tail for finishing.
Face & bow
7. Eyes & nose: Embroider two small ovals with black thread or sew on small safety eyes. For nose, sew small yellow oval or embroider satin stitch. Whiskers can be embroidered with three short straight stitches each side. Keep placement centered about 1/3 down from the top.
8. Bow: Crochet a tiny bow in pink: ch 6, sc across for 5 sc, work 4–6 rows to make small rectangle, fasten off, cinch center with small scrap to make bow shape and sew to top corner of face. Alternatively, crochet a small circle and attach as bow center.
Drawstring
9. Create a drawstring cord by crocheting a chain long enough to go around the bag mouth twice (recommended 18–24″), or make an i-cord. Thread through the BLO round or a row of ch-1 eyelets (you can create eyelet row by ch 1, sk 1 st round). Knot ends and add beads or charms if desired.
Finishing & care
- Weave in ends and firmly stitch the bow and face elements for safety (avoid small detachable parts for children’s use unless supervised).
- Spot-clean for embroidery; hand-wash bag body and reshape while damp.
Tips & variations
- For a more generic cat, skip Hello Kitty trademarked elements (keep simple features).
- Make smaller versions for coin keyfobs by reducing base rounds or use fingering yarn for daintier pouches.
- Line the bag if you want extra snag protection.
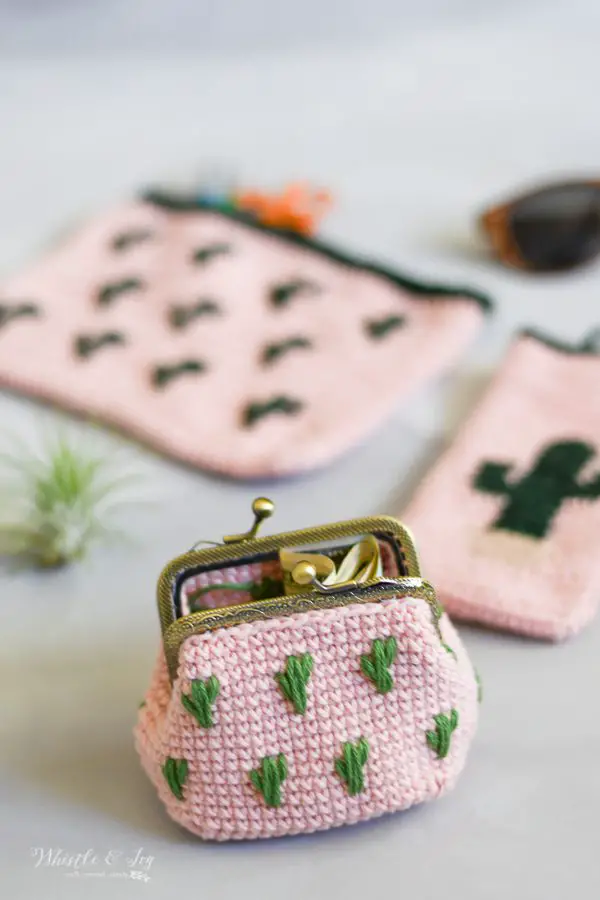
3. Crochet Cactus Print Coin Purse Pattern
Skill level: Intermediate (tapestry/intarsia colorwork or duplicate stitch)
Materials
- Cotton yarn in three colors: Background (A), cactus green (B), accent (C) for flowers — small amounts each
- Hook 3.5–4.0 mm
- Small zipper (6–8″) or snap; tapestry needle, scissors, optional lining fabric and sewing supplies
Finished size: Approx. 5″ wide × 3.5″ tall (flat zippered pouch).
What you’ll make
A flat zippered coin purse with a cactus motif worked into the front panel either by tapestry crochet (changing colors as you go) or by single-color background with cactus added later via duplicate stitch embroidery.
Step-by-step
Front panel with motif (tapestry crochet method)
- Foundation chain: With Color A, ch 31. Row 1: sc in 2nd ch from hook and across (30 sc). Turn. (This width yields about 5″ depending on tension.)
- Work rows: Continue sc rows in Color A for 1–2 rows to form base. To add cactus motif, follow a simple pixel chart (I’ll describe a small motif): count out cactus column positions — e.g., cactus centered spanning rows 4–14 and columns 12–16. When you reach a stitch where cactus color is needed, drop Color A (carry behind or carry under if no long floats), pick up Color B and sc with cactus color for that stitch, then switch back. Keep floats short or crochet with tapestry technique to trap floats on the inside.
- Continue sc rows following motif chart until you reach total height ~7–8 rows (approx. 3–3.5″). Fasten off.
Back panel
4. Make a second panel in solid Color A of the same size.
Assembly
5. Place panels wrong sides together. Sew sides and bottom with whipstitch or single crochet seam, leaving top open. Insert zipper: pin zipper teeth evenly to top edge and whipstitch zipper by hand, or machine-sew the zipper to a fabric lining and then hand sew the lining to the crochet shell for neatness.
Alternative (duplicate stitch)
- If you prefer not to manage colorwork while crocheting, make both panels in solid Color A and then embroider cactus motif with duplicate stitch using Color B after panels are done. This is easier for beginners and makes clean interior without carried floats.
Finishing & care
- Lining: cut a fabric rectangle matching panel size minus seam allowance, sew into a pouch, then sew zipper to lining for a polished interior.
- Hand-wash and reshape. Avoid vigorous machine washing to protect zipper attachment.
Tips & variations
- Make a set of cactus-in-different-pots motifs across the front as a repeat pattern.
- Use small metallic thread for cactus flowers to add sparkle.
- For a sturdier shell, sew interfacing to the fabric lining first.
4. Vintage Coin Purse Crochet Tutorial
Skill level: Intermediate (frame installation + textured stitches)
Materials
- Sport / DK cotton or cotton-blend yarn — ~50–80 g
- Small metal purse frame (kiss-lock frame) approx. 4–5″ wide (choose size to fit finished pouch)
- Crochet hook 3.0–4.0 mm, tapestry needle, sewing needle & strong thread to attach frame, small lining fabric piece
Finished size: Approx. 4.5″ wide × 3.5″ tall (fits small frame). Frame width dictates final size.
What you’ll make
A classic vintage-style coin purse built to fit into a metal kiss-lock frame, using textured stitches (bobble or popcorn) for a retro look and a sewn lining for a finished interior.
Step-by-step
Measure & base
- Determine frame size and measure its inner width. Work a gauge swatch: make a rectangle in sc until width equals frame inner width. This tells you how many stitches to chain for the base. Example: chain 30 for a 4.5″ frame if gauge matches.
- Body: Work in rows to create a rectangle the height needed to fit inside frame plus seam allowance (usually 3–4″ tall). Use textured stitch for vintage look: bobble stitch rows or waffle stitch (fpdc/bpdc). Example textured repeat: Row 1 sc across, Row 2 dc, bobble in next st, dc repeat, Row 3 sc across — adapt until desired height.
Shape to frame
3. If the frame requires a curved top, increase/decrease slightly at the top rows to create a gentle curve that sits well in frame (e.g., add 1–2 sc increases at center rows for arching). Keep both front and back panels identical.
Lining
4. Cut lining fabric matching panels, sew side seams and bottom. Turn inside out and insert into crochet shell. Press top edge neatly (use a fabric iron). Sew lining to crochet at the top edge with small whipstitches, leaving allowance for frame attachment.
Attach frame
5. Place lining inside metal frame opening. Using a strong upholstery or button thread, stitch from fabric/lining through tiny holes in the frame (if frame has holes) or stitch around top edge and use a strong glue combined with stitching if frame lacks holes. Some frames have small prongs you can bend over the lining/crochet—follow frame instructions. Go slowly and stitch evenly for durability.
Finishing & care
- Use a fabric stiffener or interfacing if your crochet fabric is too loose to hold the frame safely.
- Hand-wash gently, remove frame before washing if possible; wipe metal frame with a soft cloth.
Tips & variations
- Use metallic or pearlized yarn for an extra vintage sheen.
- Add a small charm to the frame loop for personalization.
- If you’re new to frames, practice on a cheaper frame first.
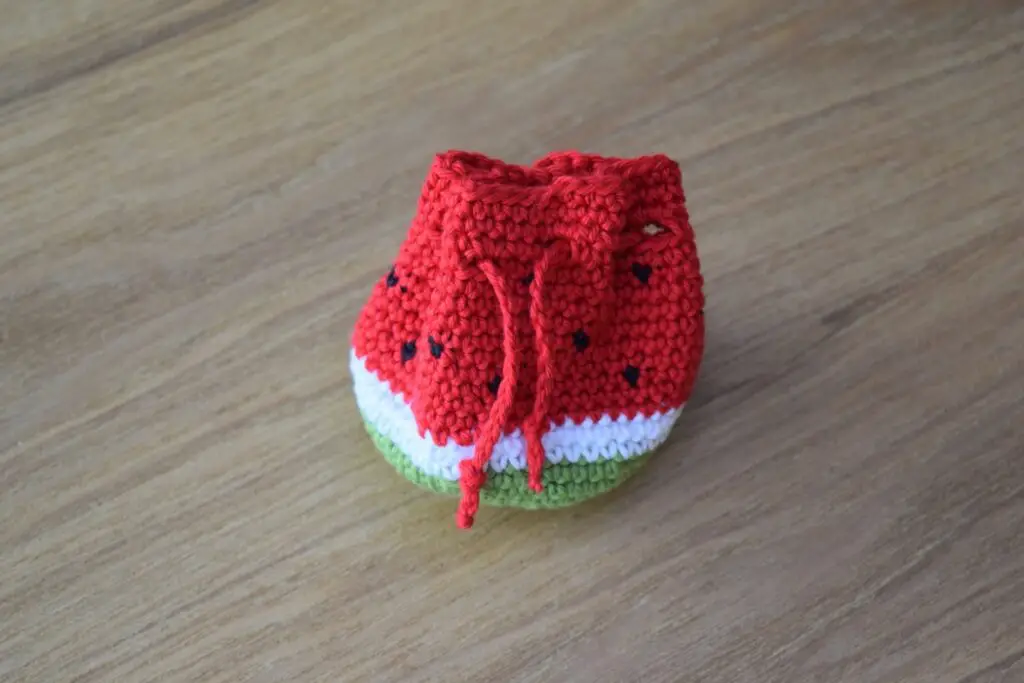
5. Crochet Watermelon Drawstring Coin Pouch Pattern
Skill level: Beginner–Intermediate (color changes + drawstring)
Materials
- Sport/fingering cotton in: Green (rind), light green (inner rind), pink/red (flesh), black (seeds) — small amounts each
- Hook 2.75–3.5 mm for tight fabric
- Ribbon or crocheted cord for drawstring (18–22″), tapestry needle, scissors
Finished size: Approx. 4.5″ wide × 4″ tall when closed (round pouch).
What you’ll make
A playful round drawstring pouch shaped and striped like a watermelon slice, with embroidered “seeds” and a green striped top for the rind.
Step-by-step
Base (work in rounds)
- Magic ring: With pink/red, make magic ring. Rnd 1: 6 sc in ring. (6)
- Rnd 2: inc in each st around. (12)
- Rnd 3: [sc 1, inc] around. (18)
- Continue increasing evenly (adding increases each round to keep flat) until base measures about 3.5–4″ across (approx. 30–36 sts depending on tension). Count increases so base stays flat.
Sides
5. Work even sc rounds (no increases) for several rounds (~4–6 rounds) to build the bag height in flesh color. Then change to light green and work 2 rounds, then green for 2 rounds for rind stripes. At the top, create a drawstring channel by working a round of sc, ch 1, skip 1 to form eyelets, or work one round BLO to create a gap. Fasten off leaving tail.
Seeds (embroidery)
6. With black yarn, embroider small seed shapes across the pink area using satin stitch or surface slip stitch. Keep spacing random but balanced.
Drawstring
7. Crochet a thin cord (chain stitched to desired length) or use ribbon. Thread through eyelet holes and knot ends. Pull to close. Add small beads or a wooden slice to ends for weight if you like.
Finishing & care
- Weave in ends and hide tail tips inside pouch.
- Hand-wash and reshape; avoid bleaching or harsh detergents to preserve colors.
Tips & variations
- Make mini versions as coin purses for kids by reducing base rounds.
- Add a flat fabric lining if you want smoother interior and to prevent seed embroidery from catching pages or small items.
General Finishing, Lining & Closure Notes (applies to all patterns)
- Lining: For durability and to protect coins/coins from catching on stitches, add a simple cotton fabric lining to zipped or framed purses. A lining also hides floats from colorwork and gives a professional finish.
- Closures: Zippers give the cleanest, most secure closure for coins. Drawstrings are quick and cute for novelty pouches. Metal frames require careful stitching and sometimes glue; practice before applying to a keeper purse. Magnetic snaps are easy to install but less secure for bulked coins.
- Seaming: Use whipstitch, mattress stitch, or single-crochet seam for neat joins. For best durability, stitch through both loops and use doubled yarn when seaming heavy-use purses.
- Reinforcement: For extra strength at zipper tops, sew a small strip of interfacing to the lining or stitch through crochet and lining several times.
- Care: Cotton and cotton blends — hand wash or gentle machine wash and reshape. Acrylic — gentle machine wash acceptable. Remove metal frames before washing when possible.
Conclusion
These five crochet coin purse patterns give you a range of styles — floral granny charm, adorable character drawstring, graphic cactus zipper pouch, elegant vintage frame purse, and a fun watermelon drawstring pouch. Each design is approachable and easy to make in an evening or two, and each offers room to personalize with color choices, linings, closures, and small embellishments. Pick one to practice a new technique (tapestry colorwork, frame setting, or zipper insertion), or make a set to give as a handmade gift bundle. Happy stitching — these little purses are as useful as they are delightful.