

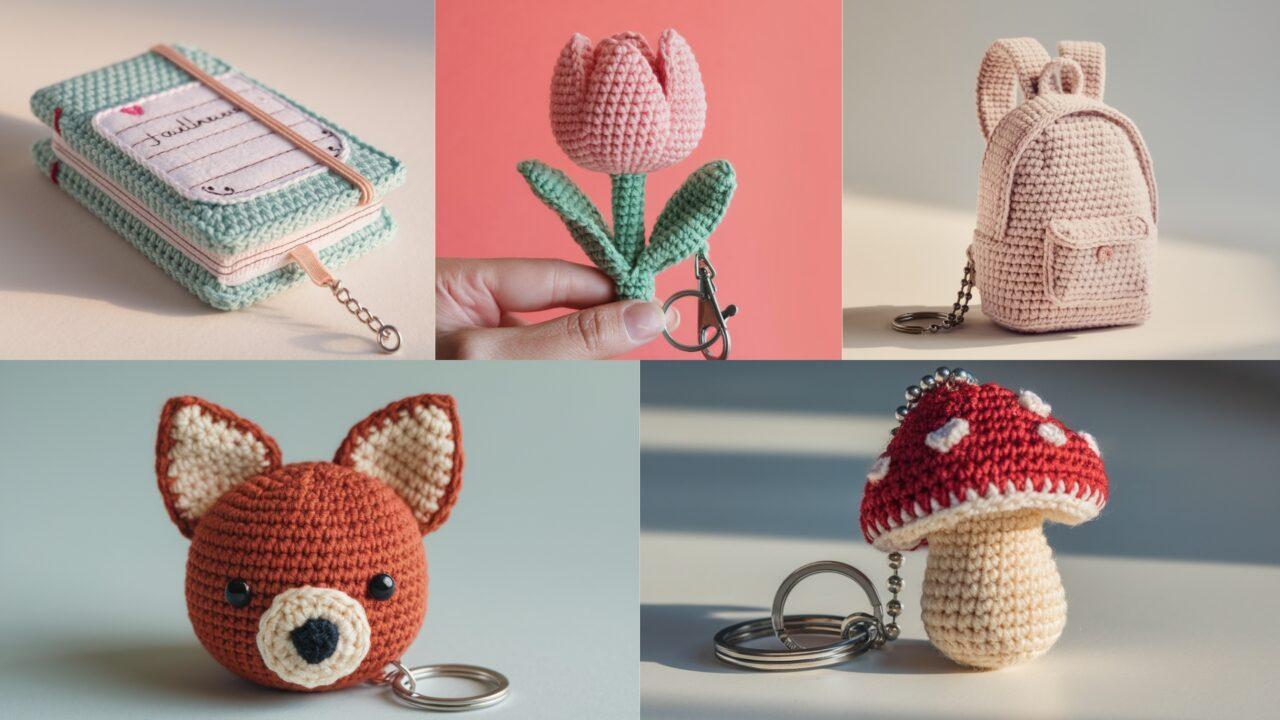
Tiny, squishy, and impossibly cute — amigurumi keychains are one of the most satisfying small projects you can make. They work up quickly, travel well, and are perfect for turning leftover yarn into thoughtful gifts: a little backpack for a student, a mushroom for a nature-lover, a tulip for spring, or a miniature notebook for your stationery-obsessed friend. Because these are small toys that will be handled a lot, each pattern below includes clear construction steps, finishing tips for durability, and safety notes.
I’ve written five complete patterns you can follow start-to-finish:
- Crochet Mini Backpack Amigurumi Keychain Pattern
- Crochet Mini Amigurumi Notebook Keychain Pattern
- Crochet Mushroom Amigurumi Keychain Pattern
- Crochet Tulip Amigurumi Keychain Pattern
- Crochet Mini Fox Amigurumi Keychain Pattern
Each pattern uses US crochet terms. If you prefer, you can make the same designs larger (use thicker yarn and a bigger hook) or smaller (thinner yarn and a smaller hook). Read the safety notes at the end of each pattern if you’ll give these to small children.
General notes (applies to all patterns)
- Yarn: DK / light worsted (Category 3) cotton or acrylic recommended for durability and tight stitches. Cotton gives crisp stitch definition; acrylic is soft and easy-care.
- Hooks: I use a 2.5–3.5 mm hook depending on yarn and how tight you crochet. Little amigurumi pieces benefit from a hook one-to-two sizes smaller than usual to avoid gaps.
- Stuffing: Polyester fiberfill (fully fill lightly — keychains need less stuffing than toys)
- Notions: yarn needle, stitch marker (or scrap loop), small scissors, metal keyring with short chain or swivel lobster clasp, optional small safety eyes (4–6 mm) or embroidery floss for eyes, small beads/buttons ONLY if giving to adults.
- Gauge: Not critical for keychains, but aim for tight single-crochet fabric so stuffing doesn’t show.
- Abbreviations (US):
- MR = magic ring
- ch = chain
- sc = single crochet
- inc = 2 sc in same st
- dec = sc2tog (single crochet two together)
- sl st = slip stitch
- st(s) = stitch(es)
- BLO = back loop only
1. Crochet Mini Backpack Amigurumi Keychain Pattern
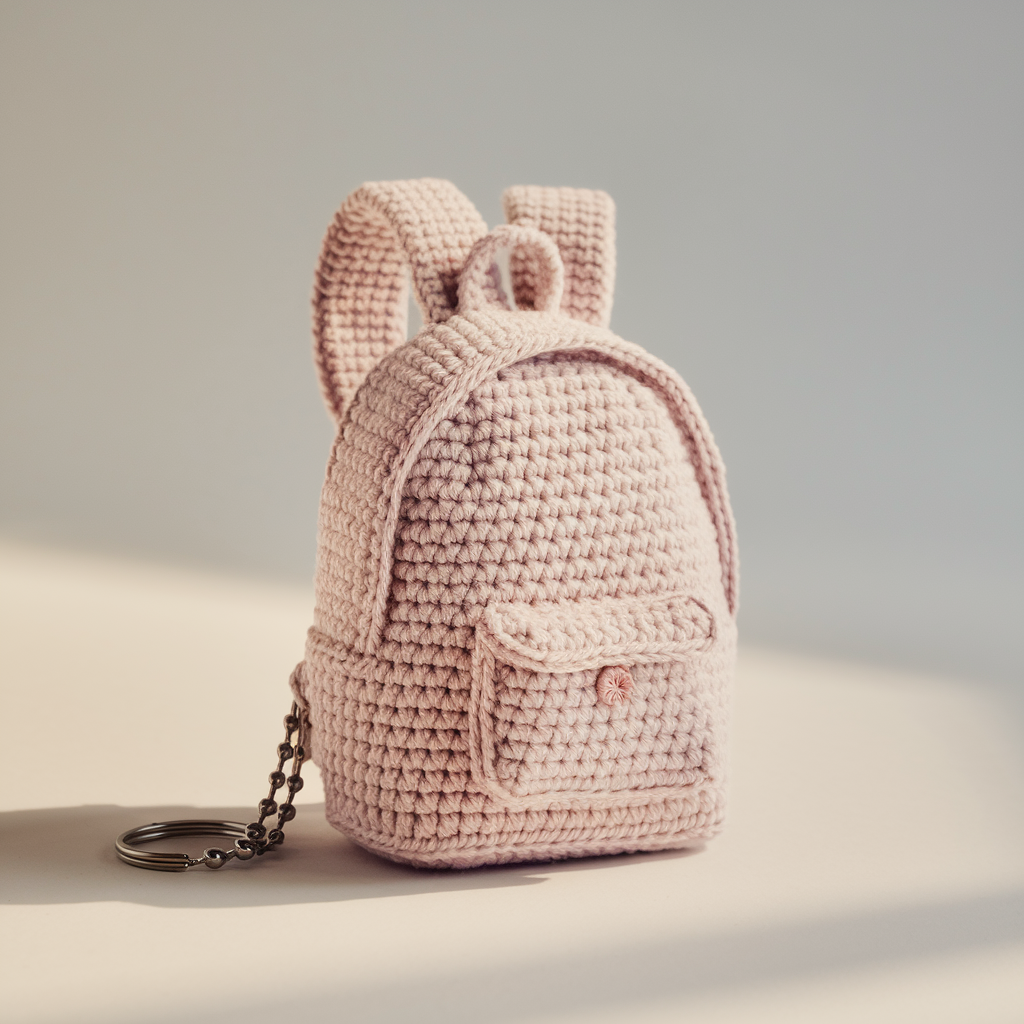
Skill level: Beginner–Intermediate
Finished size: ~1.5–2 in tall (without keyring) using DK yarn + 3 mm hook
Materials
- DK yarn: Main color (bag) ~10 g, Contrast (pocket/straps) ~5 g
- 3.0 mm crochet hook
- Polyester fiberfill (small amount)
- Tiny button or bead for pocket (optional) — avoid for child-safe versions; embroider instead
- Small lobster clasp or split keyring + 2–3 cm chain
- Yarn needle, stitch marker
Construction overview
Make a flat circular base, work the body up in continuous rounds, make a small front pocket, two straps (chain loops) and a flap. Attach a short chain loop at top for the keyring.
Abbreviations reminder
MR, ch, sc, inc, dec, sl st
Body — base + sides
- Base (magic ring): MR; R1: 6 sc in ring (6).
- R2: inc in each st around — 12.
- R3: sc, inc around — 18.
- R4: sc in next 2, inc around — 24.
- R5: sc in next 3, inc around — 30. (You have a small circular base ~30 sts.)
- R6–R13: sc around (30 sc each round) — work even to build height. For a slightly taller backpack, go to R14. Use continuous rounds (place stitch marker at first st and slide up each round). Stuff the bottom slightly as you go once body has height. Stop when body height ≈ 1.25–1.5 in.
Pocket (worked flat and sewn on)
- Pocket foundation: With contrast color, ch 9. R1: sc in 2nd ch from hook and across (8 sc). Turn.
- R2–R6: sc across (8 sc) — 5 rows total; fasten off leaving long tail for sewing. Block or flatten. Sew pocket to front lower third of backpack; top edge left open. Embroider tiny “button” or sew a small bead (only if adult gift).
Flap
- Flap: Attach MC to top front edge above pocket. CH 1; Row 1: 6 sc across top edge (or create a small triangular flap: ch 3, sc in 2nd ch and next; join to center). A simple rectangular flap of 6–8 sc by 2 rows looks fine. Optionally add one sl st buttonhole loop (ch2) and a small sewn button on pocket.
Straps
- Straps (make 2): With CC, ch 10 (or 6 for short straps); attach each end to the upper back of the backpack by sl stitch and sew securely. For realism weave straps through small loops at top and bottom or simply sew them flat.
Closure loop & keyring
- At the top center of the backpack, join yarn, ch 6–8 and sl st back to form a small loop. Insert metal 2–3 cm chain or lobster clasp through loop and secure with a few stitches. Fasten off and weave ends.
Finishing
- Weave in ends, reinforce strap attachment with extra stitches, and check keyring attachment for security.
Variations & tips
- Make tiny zipper detail with a running embroidered line and a small bead as pull.
- Use variegated yarn for a fun pattern.
- To make child-safe: embroider every embellishment; avoid beads or safety eyes.
2. Crochet Mini Amigurumi Notebook Keychain Pattern
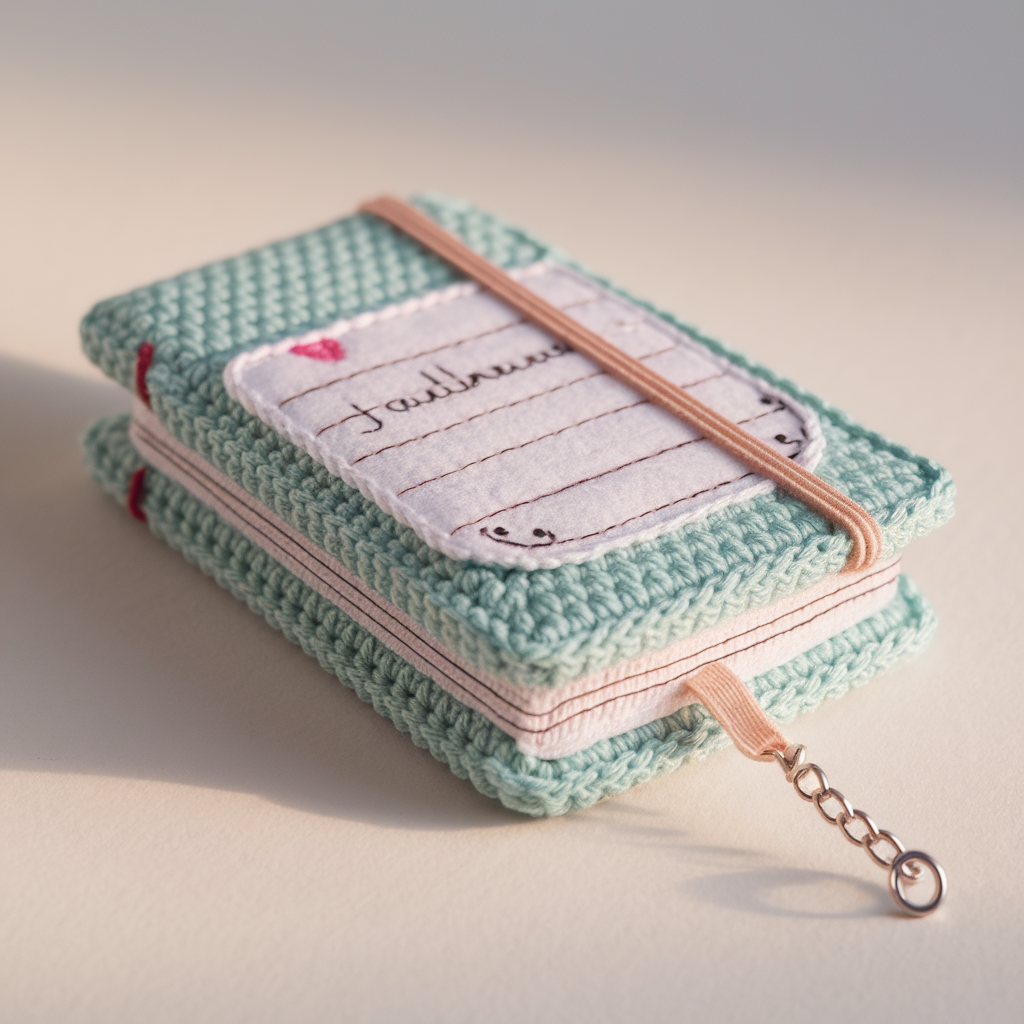
Skill level: Beginner
Finished size: ~1.5–2 in (closed notebook)
Materials
- DK yarn (cover color) ~10 g, thin contrasting yarn or embroidery floss for lines/closure
- 3.0 mm crochet hook
- Thin felt for inner pages (optional), or crochet pages from white yarn
- Small metal split ring or lobster clasp
- Yarn needle, scissors
Construction overview
Make two identical rectangular cover panels, create a thin “page” insert (crocheted or felt), sew three sides together leaving the top or one short side open (or add a tiny chain loop at the spine) and attach keyring.
Cover panels (make 2)
- Foundation chain: ch 12. R1: sc in 2nd ch from hook and across (11 sc). Turn.
- R2–R6: sc across (11 sc) — 5 rows total to make a small rectangle (~1.5 in tall). Adjust rows for desired thickness. Fasten off leaving long tails for sewing.
Pages
Option A — quick felt insert: cut a small rectangle of white felt slightly smaller than covers (e.g., 1/8 in smaller on all sides).
Option B — crochet pages: ch 10; sc rows 4–5 with white yarn and starch lightly to help stiffness.
Assembly
- Place the two cover panels wrong sides together with felt (or crocheted pages) centered between them. Sew three sides (left, bottom, right) with whipstitch leaving top open like a closed book edge. For a notebook with visible spine, leave the leftmost edge sewn and attach a small loop at the top of the spine for keyring.
Decorative details
- Lines and decoration: Use surface embroidery (contrasting floss) to add horizontal lines on the “page” edges so it looks like lined paper. Add a tiny embroidered title or small heart on the front cover.
- Spiral binding (optional): Chain 10 in contrasting yarn and sew down the left edge like a spiral. Or stitch small black French knots for “spiral holes.”
Keyring attachment
- Sew a short chain loop (ch 6) at the top center of the spine, pull a split ring through and secure with extra stitches. Alternatively sew on a small metal chain link.
Finishing & tips
- For a more durable cover, use slightly heavier yarn or double up yarn for the cover panels.
- Add a tiny stitched clasp (a small chain loop and a button) to close the notebook — safe for adult gifts only.
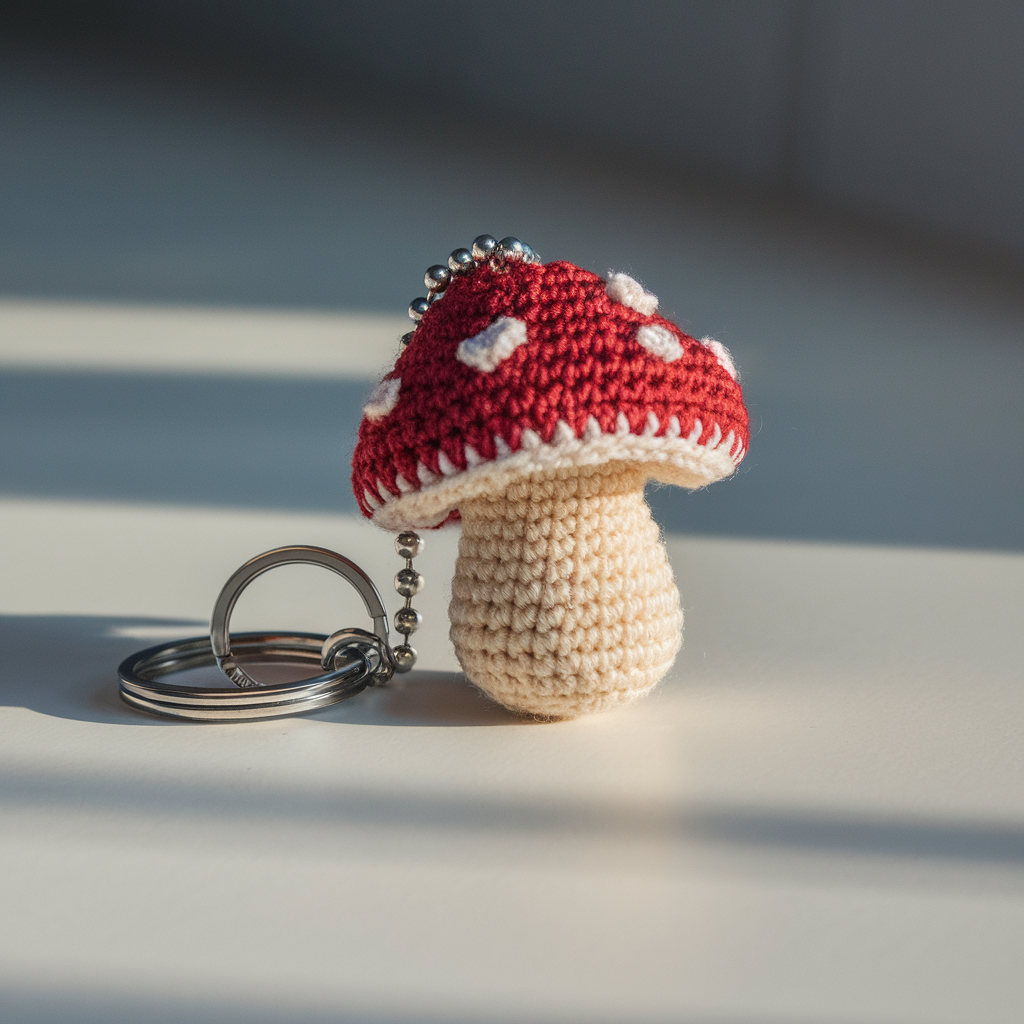
3. Crochet Mushroom Amigurumi Keychain Pattern

Skill level: Beginner
Finished size: ~1.75–2.5 in depending on rounds
Materials
- DK yarn: Cap color (red or other), spots (white), Stem (cream or white)
- 3.0 mm crochet hook
- Small amount of stuffing
- Keyring with short chain
- Yarn needle, stitch marker
Construction overview
Make a domed cap and a short stem and sew them together. Sew tiny white spots to cap. Attach keyring to top with a secure sewn loop.
Cap (top)
- R1: MR, 6 sc in ring (6).
- R2: inc in each st — 12.
- R3: sc, inc around — 18.
- R4: sc in next 2, inc around — 24.
- R5: sc in next 3, inc around — 30.
- R6: sc in next 4, inc — 36.
- R7: sc in next 5, inc — 42. (Cap approx 42 sts across; make fewer rounds for smaller cap.)
- R8–R10 (optional): sc around to build depth; for a round dome, work 2–3 rounds even. For a slightly flattened cap, work another 1–2 rounds and then stop increasing. Fasten off leaving long tail for sewing.
Stem (small cylinder)
- R1: MR, 6 sc in ring (6).
- R2: inc in each st — 12.
- R3–R6: sc around (12 sc) — work until stem height ≈ 0.75–1 in. Stuff lightly as you go.
- R7: dec around until you have 6 sts, fasten off leaving tail.
Assembly
- Place stem inside cap opening and sew firmly with yarn needle using whipstitch around opening. Make sure seams are tight. Add a little more stuffing if needed.
Spots (make 4–6)
- With white, MR, 6 sc in ring, sl st and fasten off leaving tail. Flatten and sew onto cap in a balanced layout.
Keyring loop
- At top of cap center, crochet a tiny loop: ch 6, sl st to base; weave tail through loop base multiple times to secure and sew around the loop to the cap underside. Attach split ring or short chain to loop; reinforce with extra stitching.
Finishing
- Weave ends and trim. Check keyring attachment for strength. If giving to a child, embroider eyes/facial details instead of buttons.
Variation
- Make a “toadstool” with white cap and red spots inverted colorways; or use pastel cap colors for a kawaii look.
4. Crochet Tulip Amigurumi Keychain Pattern
Skill level: Beginner–Intermediate
Finished size: Flower + stem ~2.5–3.5 in tall
Materials
- DK yarn: Tulip color (pink/red/yellow) ~5 g, green for stem/leaves ~5 g
- 3.0 mm crochet hook
- Small amount of stuffing for the base of the flower (optional)
- Thin floral wire (optional) if you want the stem to be posable — wrap with green floral tape and yarn to cover — note: wire makes it not suitable for small children’s toys.
- Keyring, yarn needle, stitch marker
Construction overview
Make a tulip blossom (closed bell shape), a short stem (tube), and 1–2 leaves. Sew together and attach a loop for the keyring.
Tulip blossom (closed bell)
- R1: MR, 6 sc in ring (6).
- R2: inc in each st — 12.
- R3: sc, inc around — 18.
- R4: sc in next 2, inc — 24.
- R5: sc around (24) — one round even; this produces a rounded top.
- R6 (petal shaping): [sl st, ch 3, 3 dc in next st, ch3, sl st into next st] repeat around to create 6 petal loops. (You will make 6 decorative petal arches.)
- R7 (close petals): Into each ch-3 arch work (sc, hdc, dc, hdc, sc) to form a petal. After completing all petals, fold petals upward to shape a closed tulip and sew petal bases together a bit to form a cup shape. Add a tiny bit of stuffing at base if you want a rounded bloom.
Stem
- Stem tube: With green, ch 2; R1: 6 sc in 2nd ch from hook (6). R2–R8: sc around (6) to reach desired length ~1.5–2 in. If you are using thin floral wire, thread wire through tube and secure ends by wrapping/top sewing. For a keychain, you can keep stem soft — simply stuff lightly and top with blossom. Fasten off leaving long tail.
Leaves (make 1–2)
- Leaf: CH 8; Row 1: sc in 2nd ch from hook, hdc, dc, hdc, sc — creates a tapered leaf. Fasten off and sew leaf to stem base.
Assembly & keyring
- Insert top of stem into the bottom of blossom and sew securely. At base of stem (top of keychain area) create a little loop by chaining 6 and sl st back to stem base or attach a small metal jump ring sewn into the top of the stem. Thread keyring through loop and reinforce.
Finishing & variations
- For a more stylized tulip, make the flower a little larger and make 3 petals only.
- Use metallic thread for subtle shimmer on petal edges for an evening look.
5. Crochet Mini Fox Amigurumi Keychain Pattern

Skill level: Intermediate (shaping + small parts)
Finished size: ~1.75–2.5 in head/body combined
Materials
- DK yarn: Rust/orange (main), cream (muzzle & inner ear) small amounts, black for nose/eye embroidery
- 2.75–3.25 mm crochet hook for tight fabric
- Small amount of stuffing
- Keyring + short chain
- Yarn needle, stitch marker
Construction overview
Make a small head/body (or only head) with ear appliqués and tiny embroidered face. Attach keyring with top loop.
Head / body (worked as slightly egg-shaped amigurumi)
- Head R1: MR, 6 sc in ring (6).
- R2: inc in each st — 12.
- R3: sc, inc around — 18.
- R4: sc 2, inc — 24.
- R5: sc 3, inc — 30.
- R6–R9: sc around (30) — 4 rounds even to build head height. Insert safety eyes here if using (6 mm) at round 7 spaced ~6 sts apart; otherwise leave and embroider eyes later.
- R10: sc 3, dec around — 24. (start shaping to neck)
- R11–R13: sc around (24) for a short body. Stuff firmly but not overfull.
- R14: sc 2, dec around — 18.
- R15: sc, dec around — 12.
- R16: dec around to close to a small nub (6). Fasten off leaving a tail and close using yarn needle weaving, secure tightly. This completes a small egg-shaped fox.
Muzzle (cream)
- Muzzle: MR, 6 sc in ring (6). R2: inc in each st — 12. R3: sc around 12. Flatten and sew onto lower front of head. Embroider a tiny black nose and mouth on muzzle.
Ears (make 2)
- Ears: With orange, ch 4. R1: sc in 2nd ch from hook and across (3 sc). Turn. R2: sc2tog, sc (2). Turn. R3: sc2tog (1). Fasten off leaving tail. Make small inner ear with cream: ch 3, sc 2 in 2nd ch from hook, sc next, fasten. Sew cream piece into orange ear. Attach ears symmetrically to top of head.
Tail (optional, tiny)
- Tiny tail: MR, 6 sc; R2–R4 sc around (6) — length 4 rounds; taper slightly by dec at end; sew to back.
Face details
- Embroider vertical small almond eyes with black embroidery thread or French knots; embroider small V-shape nose and mouth. Avoid small beads if giving to children.
Keyring loop
- Create a small sturdy cord: ch 12 with orange, sl st back to first ch to make a cord or braid a 6–8 cm length of yarn (3-strand). Attach cord to top center of head by weaving tail through several stitches and knotting securely; then attach metal keyring or swivel clasp. Reinforce stitching around loop.
Finishing
- Lock all knots with a drop of fabric glue on the inside (optional) and weave ends tidily. Double-check the keyring loop security.
Variations
- Make a fox in tabby colors or make an entire line of forest animals (bear, rabbit, fox) using the same basic head pattern.
Final finishing & safety tips
- Secure attachments: Because keychains are handled and sometimes pulled, reinforce any small parts (buttons, beads) with extra stitching and glue if appropriate. For gifts to young children, prefer embroidered features.
- Keyring anchoring: Use a chain link or sewn cord passed through multiple stitches and reinforced with several passes of yarn. Test by pulling before gifting.
- Stuffing: Don’t overstuff tiny pieces — small keychains look best with firm but not bulging stuffing. If the project is very small, you can omit most stuffing and rely on the crochet fabric to form shape.
- Washing: Most DK acrylic yarns wash fine on gentle cycle; cotton can be hand washed. Remove metal keyrings before washing or encase them in a small plastic bag.
- Labeling for safety: If you sell or gift keychains, consider attaching a small tag with fiber content and care instructions; if intended for children under 3, clearly label small detachable parts and recommend adult supervision.
Conclusion
These five amigurumi keychain patterns turn tiny shapes into memorable little gifts — perfect for party favors, add-ons to gift wrapping, or quick craft fair stock. Each design is intentionally compact and portable to crochet in an evening, and each is easy to personalize by switching yarn colors, adding tiny embroidered motifs, or mixing metallic loops for a grown-up look.

Your point of view caught my eye and was very interesting. Thanks. I have a question for you. https://www.binance.info/pt-BR/register?ref=GJY4VW8W
Your point of view caught my eye and was very interesting. Thanks. I have a question for you.
Your point of view caught my eye and was very interesting. Thanks. I have a question for you. https://accounts.binance.info/vi/register?ref=MFN0EVO1
I don’t think the title of your article matches the content lol. Just kidding, mainly because I had some doubts after reading the article. https://accounts.binance.info/hu/register-person?ref=IQY5TET4
I don’t think the title of your article matches the content lol. Just kidding, mainly because I had some doubts after reading the article.
Your point of view caught my eye and was very interesting. Thanks. I have a question for you.
Thanks for sharing. I read many of your blog posts, cool, your blog is very good. https://www.binance.com/register?ref=IHJUI7TF
Thank you for your sharing. I am worried that I lack creative ideas. It is your article that makes me full of hope. Thank you. But, I have a question, can you help me? https://accounts.binance.info/id/register-person?ref=UM6SMJM3
I don’t think the title of your article matches the content lol. Just kidding, mainly because I had some doubts after reading the article.
Thanks for sharing. I read many of your blog posts, cool, your blog is very good.
I don’t think the title of your article matches the content lol. Just kidding, mainly because I had some doubts after reading the article.
Can you be more specific about the content of your article? After reading it, I still have some doubts. Hope you can help me.
Your point of view caught my eye and was very interesting. Thanks. I have a question for you. https://accounts.binance.com/register-person?ref=IXBIAFVY
Your point of view caught my eye and was very interesting. Thanks. I have a question for you.
Your article helped me a lot, is there any more related content? Thanks!