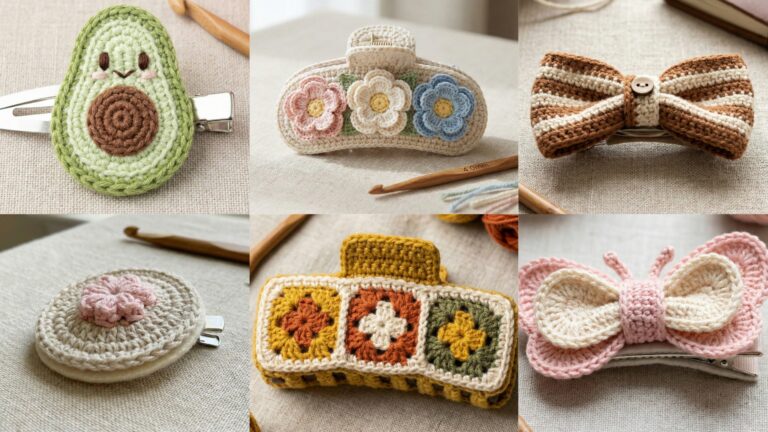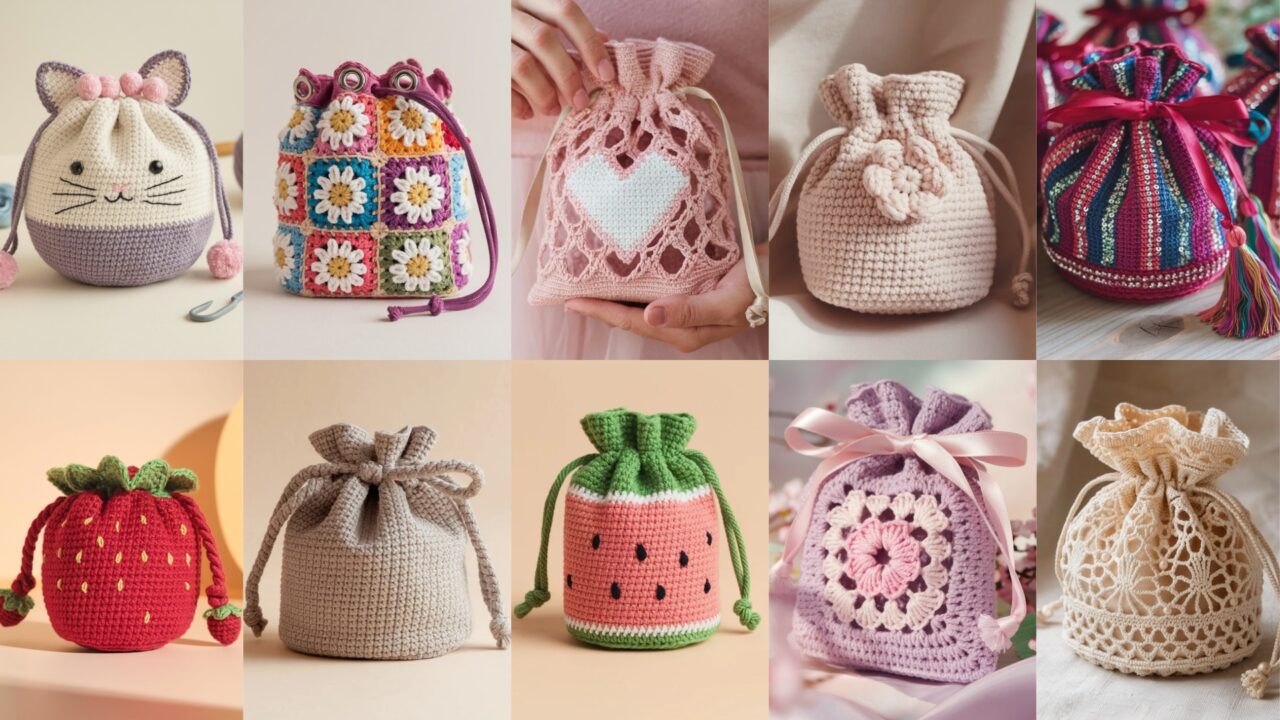
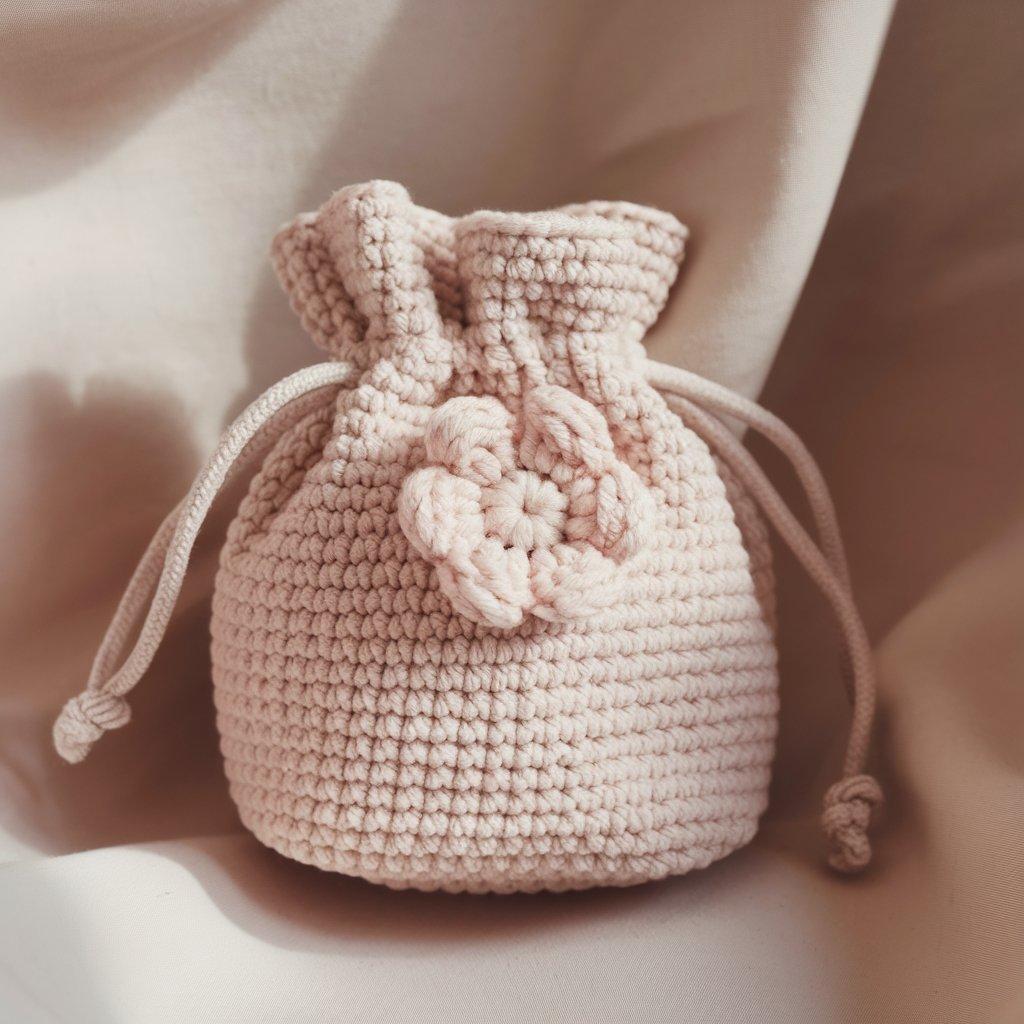
A crochet drawstring pouch is one of the best small projects: quick, satisfying, and useful. They’re perfect for gifting, storing jewelry, holding earbuds, housing dice, or acting as tiny emergency pockets for life essentials (chocolate, emergency optimism). The basic idea is simple: a flat or round base, walls worked up in the round or joined squares, eyelets or a casing for a cord, and a drawstring. But the way you build that basic structure — lace, filet, puff stitches, granny squares, or tiny amigurumi motifs — is what makes each pouch special.
Below I give three suggested finished sizes for each pattern and concrete stitch counts based on a sample gauge. Always swatch and adjust your stitch counts to match your yarn and tension.
General notes that matter (read this so the pouch actually fits stuff)
- Yarn & hook used in samples: worsted weight / aran (Category 4) with a 4.0–4.5 mm hook (US G/H), cotton or cotton-blend preferred for structure. Use softer acrylic if you want plush.
- Sample gauge: ~4 sts/inch in sc worked in rounds (measure your own).
- Sizes (finished, unstretched):
- Mini — base Ø ≈ 2.5–3″ (6–7.5 cm); height 3–3.5″ (7.5–9 cm) — good for rings/coins.
- Small — base Ø ≈ 3.5–4″ (9–10 cm); height 4–5″ (10–13 cm) — jewelry, earbuds.
- Medium — base Ø ≈ 4.5–5″ (11.5–13 cm); height 5.5–6.5″ (14–16.5 cm) — phone cables, small gifts.
- How to adapt sizes: Measure desired base circumference in inches and multiply by your stitches-per-inch from a swatch:
stitches = circumference × sts-per-inch. Make the base increases until you reach that stitch count, then stop increasing and work even rounds to desired height. - Drawstrings: Any yarn braided into an icord, a macramé cord, ribbon, or a leather thong works. For small eyelets use ch loops or sc-ch-sc gaps; for a casing crochet a row of dc in BLO or leave a folded hem.
- Finishing & lining: For fragile contents, line the pouch with fabric and slip-stitch inside, or use a small snapped liner. Lining prevents snagging from decorative stitches (puff, bobble, filet).
- Abbreviations: ch, sc, hdc, dc, tr, sl st, st(s), sk, BLO/FLO, inc (increase), dec (decrease), … rep.
1. Crochet Basic Drawstring Pouch Pattern
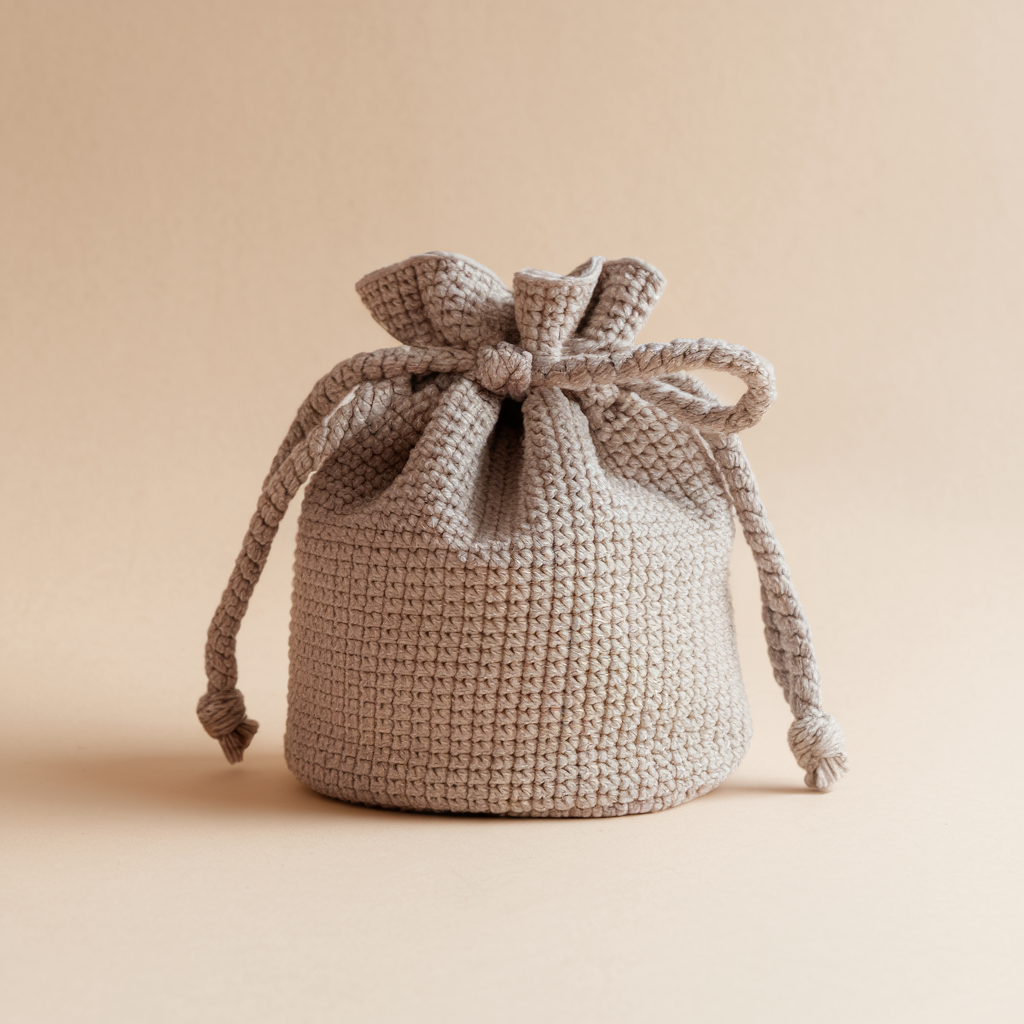
Simple, sturdy, and fast. Works for gifts, party favors, and quiet triumphs.
Skill level: Beginner
Materials: worsted weight cotton or acrylic, 50–120 yards depending on size; 4.0 mm hook; tapestry needle; stitch marker; cord (3–4 mm) or braided yarn for drawstring.
Sample gauge: 4 sts = 1″ in sc
Construction overview
Round base worked from a magic ring, increase in rounds to desired diameter, work even rounds for walls, create eyelets, finish with small cuff or fold and make casing, weave drawstring.
Step-by-step (exact counts for sample gauge)
Use the stitch counts below if your gauge matches (double-check!).
Base increases (mini / small / medium):
- Mini: start MR, R1: 6 sc; R2: inc around (12); R3: sc, inc around (18); R4: 2 sc, inc (24) — stop (base ≈ 3″ diameter).
- Small: continue one more increase round: R5: 3 sc, inc (30) — base ≈ 4″.
- Medium: R6: 4 sc, inc (36) — base ≈ 4.5–5″.
Walls
- Place marker at last stitch. Work sc in each st around, join in rounds (or work continuous spiral with marker).
- Work even sc rounds until pouch height reaches: mini 3″, small 4–5″, medium 5.5–6.5″. Approx rows = height × rows-per-inch (use 4–4.5 rows/inch as reference). Example small at 4.5″ → ~20 rounds.
Eyelets for drawstring (option A: ch-loops)
- Round for eyelets: sc 4, ch 2, sk 2 repeat around (spacing depends on circumference). If ch-2 leaves too large a gap, do ch-1. Make eyelet round 2–3 rows below the opening so cord can sit.
- Continue 1–2 rounds sc above eyelet row, then finish with 4 rounds sc for top cuff. Alternatively fold top over 1/2″ inward and sc through both layers to create casing for a thicker drawstring.
Finishing
- Fasten off leaving long tail, weave in ends. Insert drawstring and knot ends or add beads. Optionally line the pouch.
Tips
- For a structured pouch, use cotton and a tighter hook (–0.5 mm) so fabric is less stretchy.
- To make flat-bottomed pouch for standing, make an oval base (increase logic differs) — ask if you want that template.
2. Crochet Heart Filet Drawstring Pouch Pattern
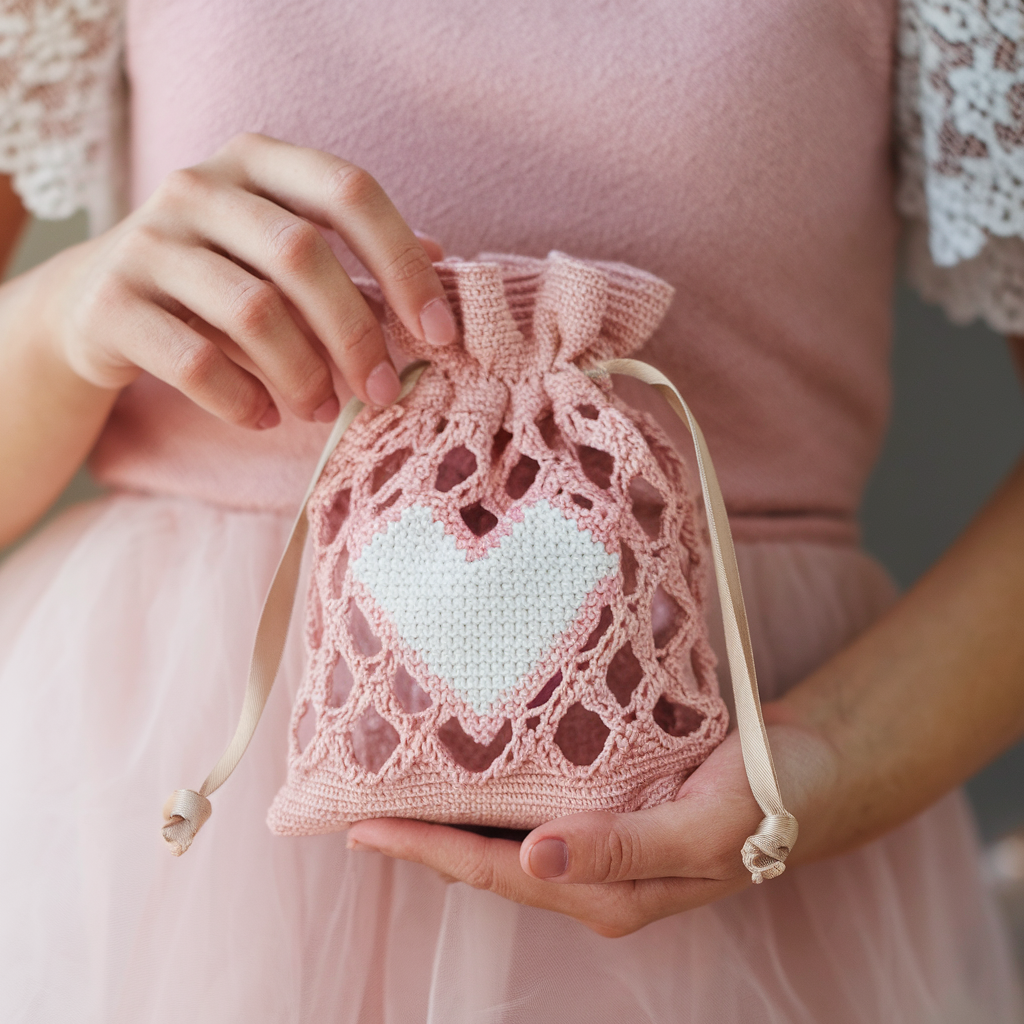
Filet crochet makes pixel-art hearts in lace. Great for valentines, jewelry, tiny confessions.
Skill level: Confident Beginner — basic filet chart reading or following written chart required
Materials: sport or DK cotton for crisper mesh (150–200 yds); 3.5–4.0 mm hook; tapestry needle.
Technique: filet mesh = blocks of dc (filled) and ch-2 spaces (open) worked in rows or rounds as modified filet tube.
Design concept
Work a flat filet panel (rectangle) with heart motif, seam the vertical edges to form a tube, then work base in rounds or crochet a separate circle and attach. This gives clean motif placement.
Pattern math & heart chart (written)
- Decide finished circumference (example small = 12″ circumference). With 3.5 mm + DK, assume 5 sts per inch in dc; for 12″ → 60 dc width. Fillet block uses 2 sts per mesh (dc+ch), common practice: each block translation: filled block = 3 dc? To avoid confusion, I provide an easier route: work filet with a mesh block = (dc, ch 2, dc) as one block width = 4 stitches. So choose multiples of 4. Use 56, 60, 64 as widths accordingly.
Simpler approach (written chart, heart centre)
I’ll describe a 10-row heart motif centered in a 56-st wide panel (small pouch). If your width differs, center the motif horizontally.
Filet panel (small 56 sts width, 24 rows height before base)
- Ch 58, row 1: dc in 4th ch from hook (counts as dc + ch-sp start?), ch 2, sk 2, dc in next ch across — this sets up mesh. (If you’re not comfortable, make a tiny 4″ test mesh first.)
- Row 2–n: Start each row with ch 3 (counts as dc), turn. Work pattern of filled and open blocks per the heart chart:
Heart motif (example, centre 10 rows — represent filled blocks with F and open with O):
- Row A (top of heart): O O F O O F O O (translate spacing to fit center)
- Continue down 10 rows to form heart shape — because a textual chart is clumsy, here’s a practical variant:
Practical filet heart method (easier)
- Make filet mesh panel of 56 sts wide × 30 rows tall (adjust to your desired height).
- On the RIGHT SIDE after finished panel, use duplicate stitch (embroidery with contrast yarn) to embroider a heart shape onto the mesh. This avoids complex block counting and gives a crisp heart. Duplicate stitch works beautifully on mesh because the dc columns provide anchorage.
Join & base
- Fold panel with right sides together, seam short edge with sl st or whip stitch leaving 1/2″ top seam for clean edge.
- For the base, either leave bottom open and work an attached bottom in rounds: join yarn at one bottom corner and work sc evenly around the opening forming a circular base (pulling to close). Or create a separate circular base (as in Basic pouch) and seam it on.
Eyelets & drawstring
- For delicate mesh, use a round of sc 4, ch 2, sk 2 as eyelet row. Thread a thin ribbon or narrow cord to match the delicate look.
Finishing & care
- Block gently to set mesh. Hand wash and reshape. Embroidered hearts will hold up but secure ends under the lining if you plan frequent washing.
3. Crochet Daisy Granny Square Drawstring Pouch Pattern
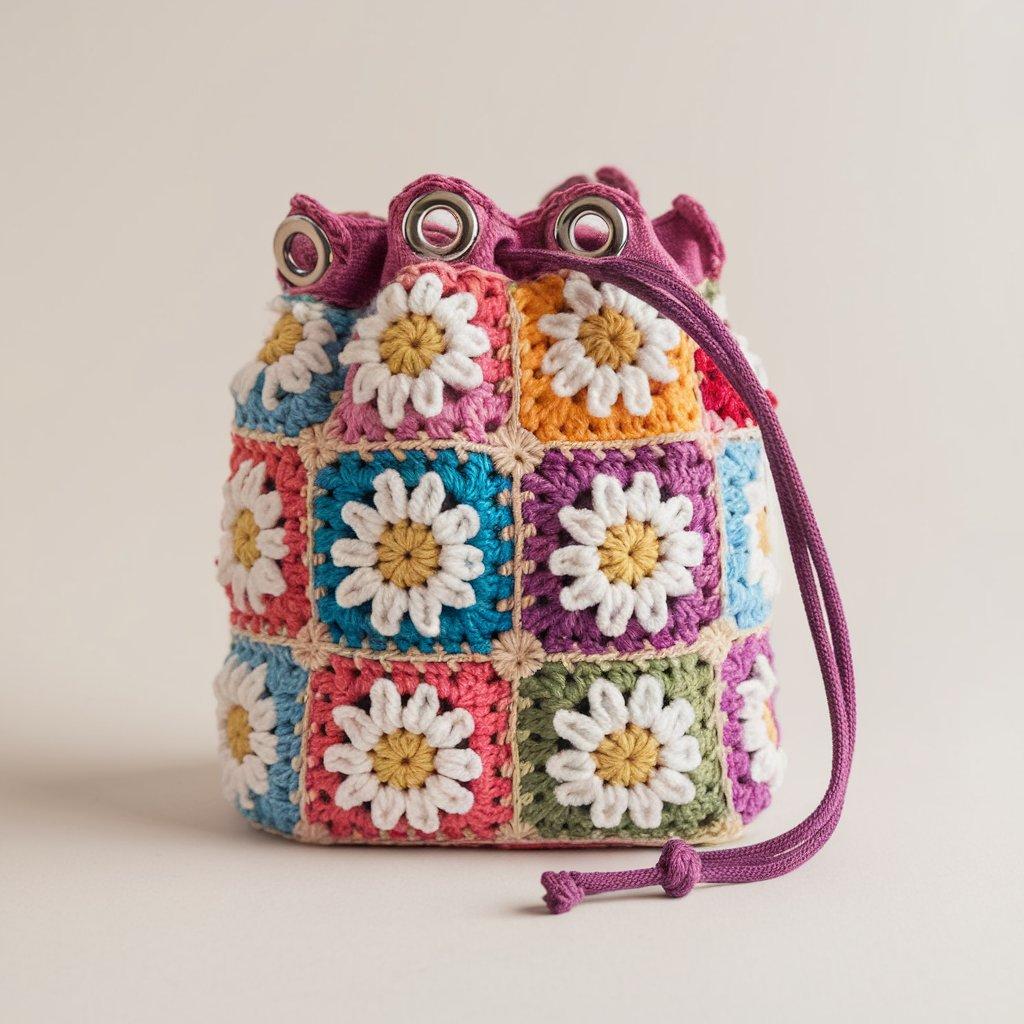
Make a pouch from granny squares with a daisy in the center of each square. Assemble into a tube, add base and drawstring.
Skill level: Intermediate (granny join + motif)
Materials: worsted cotton in main and petal colors; 4.0–4.5 mm hook; tapestry needle.
Square & layout
- Make squares ~2.5–3″ each and join in a vertical strip for height. Layout example for small pouch: 3 squares around (circumference) × 2 rows high → 6 squares total, plus a bottom made from 3–4 joined squares or a separate circle.
Daisy granny square (mini)
- Round 1 (center petal circle): with petal color, make a magic ring, ch 2, 2 dc, ch 2, sl st repeat 6 times (creates 6 petals). Pull ring closed. Fasten off petal color.
- Round 2 (surround): join main color in any ch-2 corner, ch 3 (counts as dc), 2 dc in same corner, ch 2, 3 dc in same corner; 3 dc, ch 2, 3 dc in each ch-2 corner — this creates a small granny square around the daisy. (Essentially a 3-dc corner granny expansion). Work Rounds 2–3 until square size ~2.5–3″. Fasten off.
Assembly
- Make required number of squares. Block squares flat and equalize size.
- Arrange squares: join them into vertical strip(s) using join-as-you-go or whip stitch. For a tidy interior, use mattress stitch for joins.
- Form a tube by joining the short ends of the strip.
- For base: you can attach a round circle to the bottom by crocheting a flat circle sized to the circumference (calculate the number of stitches equal to total squares across multiplied by square width; or simply join additional squares in a circle). Attach with sl st or mattress stitch.
Eyelets & cuff
- Work 1–2 rounds of sc across the top, then a round of sc 3, ch 2, sk 2 for eyelets, finish with sc rounds. Thread a cord woven from contrasting yarn through eyelets.
Finishing
- Weave ends. Add a lining if contents are delicate.
Variation
- Make a single square pouch (folded and seamed) for super-mini jewelry pouches.
4. Crochet Cat Drawstring Pouch Pattern
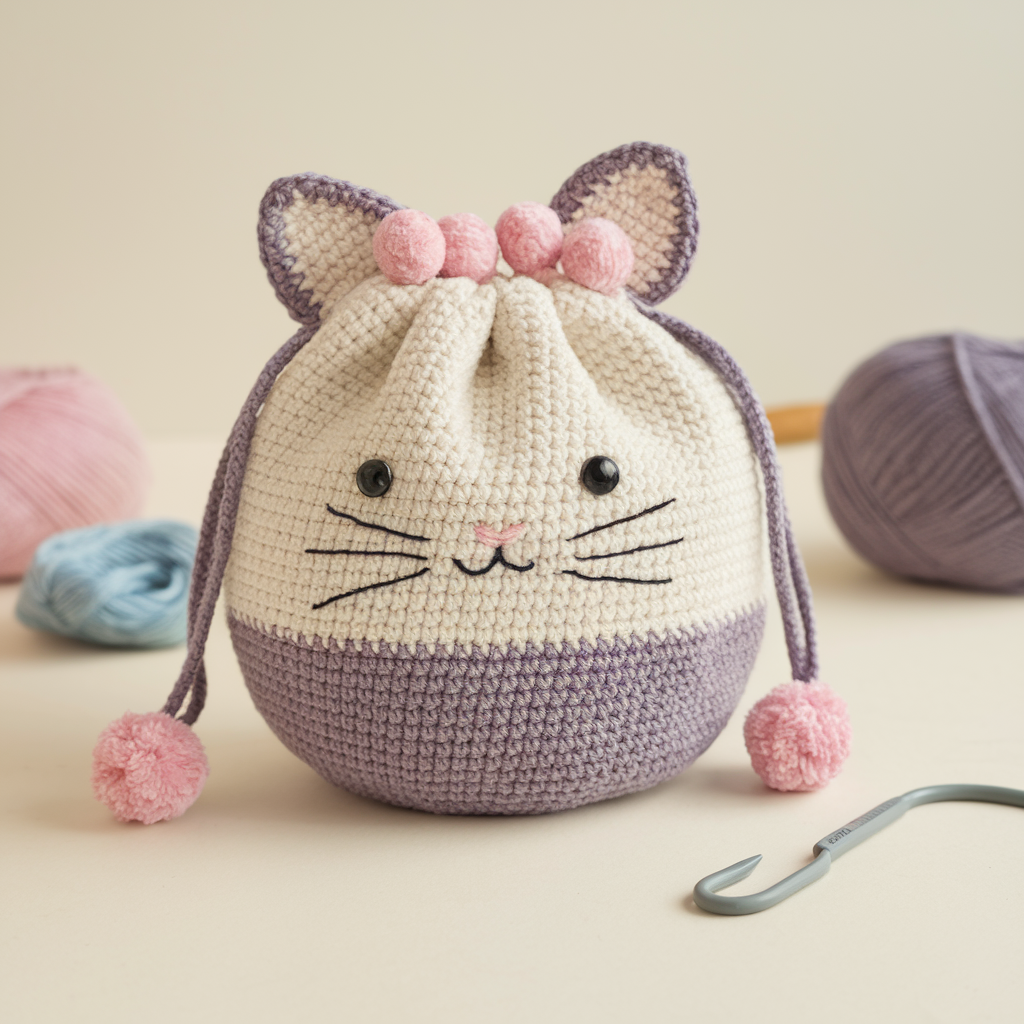
A pouch with a cat face on the front: simple shaping and embroidered details. Works as a small coin pouch or treat bag.
Skill level: Confident Beginner / Intermediate (amigurumi face elements)
Materials: worsted cotton, 4.0 mm hook, safety eyes (optional), stuffing for ears (optional), tapestry needle, contrast yarn for whiskers and nose.
Construction overview
Work a basic round pouch (Basic pattern) in a solid color. Create a small separate flat round for the face patch, embroider or attach eyes and nose, crochet small triangle ears, seam ears onto top edge, then add eyelet row and drawstring.
Step-by-step
Pouch body
- Follow Basic Drawstring Pouch base to medium size (see pattern 1) and work walls to desired height.
Face patch (flat circle)
- Magic ring, R1: 6 sc. R2: inc around (12). R3: sc, inc around (18). R4: 2 sc, inc around (24). Fasten off leaving long tail for sewing.
- Center the patch and stitch it onto the front of the pouch about 1–2 rounds below eyelet row position.
Eyes & nose
- Sew on small safety eyes or embroider two small oval shapes with black yarn. Embroider a small triangle nose with pink yarn and three whiskers on each side with white or black yarn.
Ears (make 2)
- Ch 2, Row 1: 2 sc into 2nd ch from hook (2). Row 2: inc both sts (4). Row 3: sc, inc across (6). Row 4: sc across (6). Option: shape into triangle by decreasing last row to 3 sts and fold to shape. Fasten off leaving tail. Sew ears to top inner rim of pouch.
Eyelet & drawstring
- Work one eyelet round as sc 3, ch 2, sk 2 around. Thread a skinny cord or braided i-cord, add little pompoms or tiny bells to ends for a playful finish.
Finishing
- Weave ends securely. Lining recommended if you use safety eyes instead of embroidered ones (so they don’t get snagged).
5. Crochet Vintage Drawstring Pouch Pattern
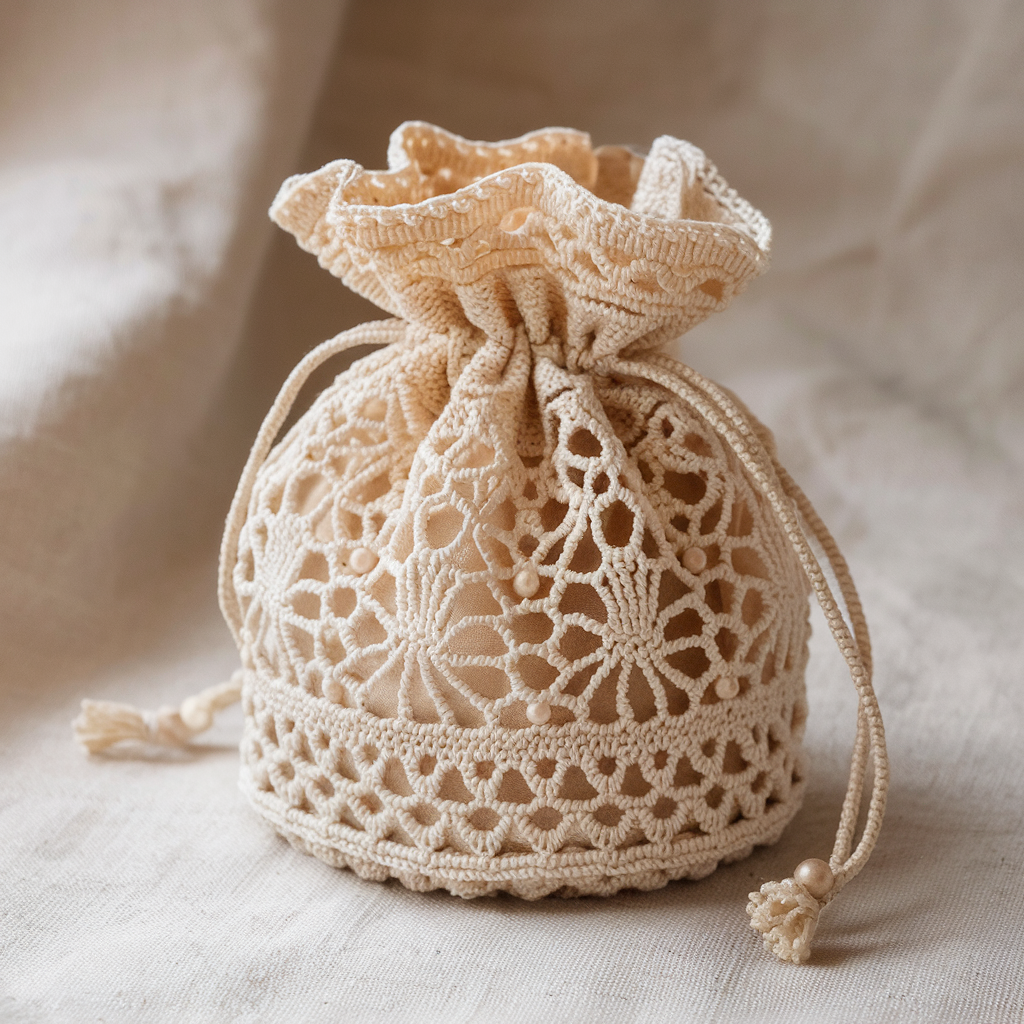
Lace, small picots, and optional beadwork. This is the one your grandmother would have approved of, grudgingly.
Skill level: Intermediate (lace + beads)
Materials: fingering or sport weight cotton (150–200 yds), 3.0–3.5 mm hook; small glass seed beads (size 6/0 or 8/0) optional; tapestry needle.
Construction concept
Work a round lace base and mesh tube in filet or shell lace, incorporate bead rows by threading beads onto yarn before crocheting.
Example stitch pattern (shell + picot)
- Shell = (2 dc, ch 2, 2 dc) in same st; Picot = ch 3, sl st into 3rd ch from hook.
Step-by-step
Base (small example)
- MR, R1: 6 sc. R2: inc around (12). R3: sc, inc (18). Continue until base ≈ 3–4″ (st counts 24–30) depending on desired pouch size.
Lace wall
- Round 1 (setup): ch 3, dc in same st and in each st around.
- Round 2 (shells): skip 2 sts, (2 dc, ch 2, 2 dc) in next st, skip 2 sts, sc in next st — repeat. This yields a shell pattern.
- After every 4th shell round, add a bead round: slide bead up into position before making the dc that will hold the bead, then continue. Beads sit nicely at shell centers.
- Work until height desired (~4–6″ depending on size).
Top picot edge & casing
- Work 1 round sc to stabilize.
- Work 1 round picot edging: (sc, ch 3, sl st to 3rd ch) repeating gives a dotty vintage edge.
- For the drawstring, fold top 3/4″ inward and slst through both layers to form a narrow casing; beaded cords look very fine through such casing.
Finishing & care
- Handle beads gently when washing; hand wash cold. Line with light fabric if storing delicate things.
6. Crochet Mini Strawberry Drawstring Pouch Pattern
A little strawberry-shaped pouch — small, adorable, and useful as a gift bag for jewelry.
Skill level: Intermediate (shaping & color changes)
Materials: sport to DK yarn in strawberry red, green for top, 3.5–4.0 mm hook, tapestry needle, small bead (optional) for seed texture.
Construction concept
Work a round, gradually taper shaped to a rounded cone (strawberry), then add leafy green crown, eyelets hidden under leaves, and short cord.
Step-by-step
Body (worked in continuous rounds, red)
- MR, R1: 6 sc (6)
- R2: inc around (12)
- R3: sc, inc around (18)
- R4: 2 sc, inc (24)
- R5: 3 sc, inc (30)
- R6–R9: sc around even (30) — height for small strawberry pouch.
- R10: 3 sc, dec (24)
- R11: 2 sc, dec (18)
- R12: sc, dec (12)
- R13: dec around until closed (6) — leave a longer tail, stuff lightly (optional) or leave empty if used as bag; if you want a roomy interior for a small item, stop decreases earlier and seam closed after joining to green crown instead.
Leaf crown
- Join green at top edge; ch 5, sl st in 2nd ch from hook, sc in next, hdc in next, sc in next (petal), ch 5, sl st in 2nd ch, sc, hdc, sc repeat around to make 5–6 leaves. Fasten off and weave ends.
- Add small French knots or beads as seeds in contrasting yellow/white across body using duplicate stitch or sew on beads at spaced intervals.
Eyelets
- Make 4 small ch-loops around top row under leaves for a subtle drawstring slot.
Drawstring
- Braid green and off-white yarn into a short cord and thread through loops, add tiny strawberry bead charms to ends.
Finishing
- Secure ends, weave in. Lining optional.
7. Crochet Sakura Granny Square Drawstring Pouch Pattern
Granny squares with blossom centers assembled into a pouch. Delicate, picturesque, perfect for spring or small gifts.
Skill level: Intermediate
Materials: DK or worsted in 2–3 colors (petal, center, background), 4.0 mm hook.
Square (sakura motif)
- Center (petals): Magic ring, ch 2, 3 dc, ch 2, sl st rep 6 times to form petal cluster; change to background color.
- Round 2 (square frame): Join background in any petal gap, ch 3, 2 dc, ch 2, 3 dc (corner) then (3 dc, ch 2, 3 dc) in each gap — classic granny frame. Work until square ~2.5–3″. Fasten off.
Assembly
- Make required squares (as with Daisy Granny) and join into tube of required circumference and height.
- Add a round base by crocheting rounds or attaching extra squares.
- Eyelet row & drawstring: work a round of sc, then ch 1, sk 1 eyelet spacing that doesn’t break the delicate look. Thread soft satin ribbon or matching yarn cord.
Finishing & care
- Block each square to identical size before joining. Lining recommended if store delicate items.
8. Crochet Festive Drawstring Pouch Pattern
Built for celebrations: interchangeable color palette, optional sequin or metallic yarn accents.
Skill level: Confident Beginner / Intermediate (optional beading)
Materials: worsted yarn in celebratory colors, optional metallic strand or sequin thread, 4.0–4.5 mm hook.
Simple striped tube (fast)
- Make a basic round base to desired diameter (see Basic pouch).
- Work sc rounds changing color every 4–6 rows for bold stripes. If using sequins, carry sequin strand along and pull a bead onto stitch before working that stitch to embed sequin in place.
Eyelet & finishing
- For a luxe look, fold top inward 3/4″ and sc through both layers to create casing; thread satin ribbon or metallic cord.
- Add tassels or pompom trim to drawstring ends.
Variation
- Make mini versions and attach small themed charms for party favors (e.g., mini Christmas ornaments, Halloween charm).
9. Crochet Mini Watermelon Drawstring Pouch Pattern
A small pouch shaped and colored like a slice of watermelon — whimsical and small.
Skill level: Intermediate (colorwork shaping)
Materials: DK yarn in pink, green, white, tiny black seed beads (optional), 3.5–4.0 mm hook.
Concept
Work a half-sphere in pink for the flesh, add thin white rind round, then green outer round as casing crown. Embroider seeds or sew on small black beads.
Steps (mini size)
- Magic ring R1: 6 sc (6)
- R2 inc → 12
- R3 sc, inc → 18
- R4 2 sc, inc → 24
- R5–R8 sc around (24) to build height. Switch to white for R9: sc around (rind). R10: switch to green for two rounds (outer rind and top).
- Decrease rounds if you want a closed bottom, or attach green crown with leaves for drawstring structure. Sew tiny beads as seeds across pink area.
Eyelets
- Make small ch-1 loops into green round for tiny thin cord. Thread thin satin cord or twisted yarn for the draw.
10. Crochet Puff Flower Drawstring Pouch Pattern
Puff stitches make gorgeous 3D florals that read like embroidery. Use larger hook and plump yarn for best effect.
Skill level: Intermediate (puff stitches + shaping)
Materials: worsted or bulky yarn for puffs, 4.5–5.5 mm hook, tapestry needle.
Puff stitch refresher
- Puff stitch (3-loop version): yo, insert hook, yo, pull up loop repeat 3 times into same st, yo and pull through all loops, ch 1 to close puff.
Construction approach
Option A: make a flat panel of puff-in-shell rows and seam into tube. Option B (recommended): work base in rounds and work alternating rounds with puff clusters placed into side surface to create flowers.
Step-by-step (panel → tube)
- Chain to width (multiple of 6 + 1). Row 1: sc foundation.
- Row 2 (flower row): sc, ch 1, puff in next st, ch 1, sc 2 repeat across placing puff stitches every 4th st to create rows of puffs.
- Row 3: sc across to stabilize. Alternate these rows so puffs offset visually. Continue until desired height.
- Seam short edge to form a tube and work a circular base (attach and sc around). Add eyelet row and top casing as usual.
Finishing
- Block lightly. Puffs can flatten slightly after washing; fluff with steam.
Universal finishing checklist
- Weave ends securely and tuck them into fabric where tension hides them.
- For delicate stitches (puff, filet), line the pouch before using it for small sharp objects.
- Add beads or charms after the drawstring is threaded and knotted; secure knots with a dab of fabric glue if you want permanence.
- To stiffen a delicate lace pouch for decorative use, lightly apply diluted PVA (craft glue) inside a liner when dry — test on scrap yarn first.
Care summary
- Cotton: machine or hand wash depending on colorfastness; reshape and dry flat.
- Acrylic: often machine-washable; avoid high heat to prevent distortion.
- Lace & beaded: hand-wash cold, dry flat.
- Embroidered or appliqué items: gentle hand wash to protect surface work.
conclusion
There you go: ten fully usable crochet drawstring pouch patterns, each with a distinct aesthetic and a practical construction plan. From the throw-together Basic Pouch to the ambitious Puff Flower and embroidered Filet Heart, these designs let you turn a tiny amount of yarn into something pretty and useful. Swatch first. Adjust counts to your gauge. Line anything you treasure. And yes, you’ll make more than one — because you know you will.